Showing posts with label or. Show all posts
Showing posts with label or. Show all posts
Thursday, April 13, 2017
How to add Facebook Likes widget to your blog or website
How to add Facebook Likes widget to your blog or website

How to add Facebook Likes widget to your blog or website
Facebook fan Page are a great way to promote your blog or website and facebook like box is widely used social plugin from Facebook developers. This facebook like box will help your visitor to become regular reader just by clicking like button. So that this box will increase number of your facebook fans. To get this widget follow below procedure,
Let me explain how to add simple facebook like box.
1. Login To Blogger Account.
2. Click Layout > Add A Gadget.
3. Select HTML / Javascript > Paste The Following Code In content Box.
1. Login To Blogger Account.
2. Click Layout > Add A Gadget.
3. Select HTML / Javascript > Paste The Following Code In content Box.
<iframe src="//www.facebook.com/plugins/likebox.php?href=http://www.facebook.com/bloggerszoom&width=292&height=258&colorscheme=light&show_faces=true&border_color&stream=false&header=false&" style="border:none; overflow:hidden; width:292px; height:258px;" >
Replace my facebook page URL with your page URL, Change Width And Height According To Your Template.
4. Now save and you are done.
Available link for download
Friday, April 7, 2017
How To Easily Create AppFolders In GNOME Shell Using GNOME AppFolders Manager Or GNOME Software
How To Easily Create AppFolders In GNOME Shell Using GNOME AppFolders Manager Or GNOME Software
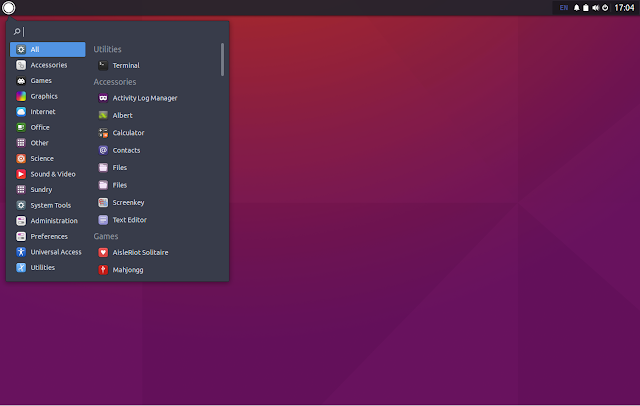
By default, the GNOME (Shell) overview displays applications in two views: "all", where all the applications are listed in alphabetic order, and "frequent", in which the frequently used applications are displayed.
GNOME Shell supports grouping applications in app folders, and there are two such predefined folders, "Utilities" and "Sundry". Some might not know how to create custom app folders, so here are two ways of achieving this.
Create and edit GNOME Shell app folders with GNOME AppFolders Manager

GNOME AppFolders Manager is a tool to create and edit app folders in GNOME Shell.
The application is fairly easy to use - in the left section, you can create, delete or edit app folders, while in the right section you can add (or remove) applications to app folders.
Once youve added the applications you want to an app folder, click the save button. Thats it! Heres a custom GNOME application folder I created using GNOME AppFolders Manager:

To install GNOME AppFolders Manager in Ubuntu GNOME 16.04, 15.10 or 15.04 (the app requires GNOME 3.12+, while Ubuntu 14.04 uses GNOME 3.10), you can use the main WebUpd8 PPA. Add the PPA and install the app using the following commands:
sudo add-apt-repository ppa:nilarimogard/webupd8
sudo apt update
sudo apt install gnome-appfolders-manager
Arch Linux users can install GNOME AppFolders Manager via AUR.
For other Linux distributions, see the application installation page.
Report any bugs you may find @ GitHub.
Add applications to app folders using GNOME Software
Note that in my test, the instructions below did not work in Ubuntu 16.04 with GNOME 3.18 and GNOME Software 3.20 (no error was displayed, the appfolder simply wasnt created). It didnt work in Fedora 24 with GNOME 3.20 either, but it did work in Fedora 22 with GNOME 3.16.
Also, GNOME Software is not available in the official repositories for Ubuntu versions older than 16.04. So for Ubuntu and for GNOME versions in which this functionality is broken, use GNOME AppFolders Manager.
Also, GNOME Software is not available in the official repositories for Ubuntu versions older than 16.04. So for Ubuntu and for GNOME versions in which this functionality is broken, use GNOME AppFolders Manager.
If youre using GNOME Software, you can easily add applications to app folders and create new app folders. To do this, launch GNOME Software, switch to the "Installed" tab and click the select button (top right):

Then, select the applications you want to add to a folder and click "Add to Folder":

And finally, simply select the app folder you want to add the applications to, or click "+" to add a new app folder, and click "Add":

In the same way, you can also remove or move applications from app folders.
Heres the result:


Available link for download
Wednesday, April 5, 2017
How To Install Budgie Desktop In Ubuntu 16 04 Or 15 10 Via PPA
How To Install Budgie Desktop In Ubuntu 16 04 Or 15 10 Via PPA
Budgie is a modern GTK-based desktop that was written from scratch, with simplicity and elegance in mind.

Used by default in Solus (not to be confused with SolusOS), a relatively new Linux distribution, Budgie Desktop integrates tightly with the GNOME stack and it features a libmutter-based window manager and a customizable panel which includes Raven, an applet, notification and customization center.
Since recent Budgie Desktop versions werent available in any Ubuntu PPA, fossfreedom decided to maintain such a PPA, which offers the latest Budgie Desktop version (10.2.4 at the time Im writing this article), for Ubuntu 15.10 and 16.04. The PPA doesnt support Ubuntu 14.04 because Budgie Desktop requires a newer GTK version.
Ive briefly tested Budgie Desktop in Ubuntu and it works great for the most part - the only issue I have with it so far is that the tray applet doesnt display the nm-applet or Dropbox icons (and probably others). Update: this bug was fixed and the nm-applet icon now shows up in the tray!
I should also mention that Budgie Desktop doesnt support AppIndicators, though this feature might be added in the future.
In other Budgie Desktop news:
- Solus 1.1 was released yesterday featuring the latest Budgie Desktop and various improvements. See THIS article for more information;
- Budgie Remix is a new Ubuntu (16.04) based Budgie Desktop Linux distributions which, from what I understand, might be the foundation for a new Ubuntu flavor. Right now, this is work in progress and should only be used for testing. More info HERE.
Budgie Desktop video
For a quick look at Budgie Desktop (version 10.2.4) in Ubuntu, check out the video below:
(direct video link)
Install Budgie Desktop in Ubuntu 15.10 or 16.04 via PPA
-----------------------------------------------
Important update for Ubuntu 16.04 users.
The PPA below now updates Nautilus to version 3.18 (while Ubuntu 16.04 has version 3.14.x), without any Unity patches and because of this, Nautilus doesnt come with any Unity integration, so it uses header bars, it doesnt uses a traditional menu and so on.
If youre using Unity and you know what youre doing, you can lock Nautilus so it never upgrades to the version from this PPA. The other option is to not use the PPA below!
If youve already added the PPA and upgraded Nautilus, you can use PPA Purge to purge the PPA (see below).
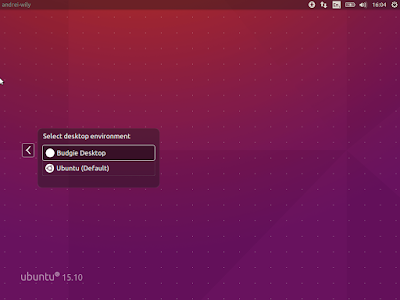
-----------------------------------------------To add the budgie-remix PPA and install the latest Budgie Desktop (version 10.2.4 at the time Im writing this article) in Ubuntu 15.10 or 16.04, use the following commands:
sudo add-apt-repository ppa:budgie-remix/ppa
sudo apt-get update
sudo apt-get install budgie-desktop
Once installed, log out and select "Budgie Desktop" from the login screen session list:
For best results, fossfreedom has included the Moka icon theme and Arc GTK theme in the PPA, and they should be installed automatically when installing budgie-desktop. After logging in, you can switch the GTK/icon themes by clicking on the Status Indicator applet (battery/sound/power), click the top-right settings icon and select "Arc-Dark" for the "Widget theme" and "Moka" for the "Icon theme".
Tip: if youve used THIS to fix large black borders around header bar apps with some themes in Ubuntu 15.10, remove it or else you wont have any shadow for header bar applications under Budgie Desktop.
Update: theres a bug that prevents the GNOME appmenu from being displayed in Budgie Desktop 10.2.4. Until this is fixed, you can use the command below to get it working:
Update: theres a bug that prevents the GNOME appmenu from being displayed in Budgie Desktop 10.2.4. Until this is fixed, you can use the command below to get it working:
gsettings set org.gnome.settings-daemon.plugins.xsettings overrides "{Gtk/ShellShowsAppMenu: ,Gtk/DecorationLayout: <menu:minimize,maximize,close>}"Purging the PPA
Since the PPA in this article provides a Nautilus version newer than the one available in the official Ubuntu 16.04 repositories, and without any Unity patches, you might need to purge the PPA at some point.
To purge the budgie-remix PPA (disable it and downgrade any packages installed from that PPA), you can use the following commands:
sudo apt-get install ppa-purge
sudo ppa-purge ppa:budgie-remix/ppa
via xpressubuntu
Available link for download
Monday, April 3, 2017
How To Get A Global Menu In Xubuntu 16 04 Or Lubuntu 16 04 Using TopMenu
How To Get A Global Menu In Xubuntu 16 04 Or Lubuntu 16 04 Using TopMenu
TopMenu (a global menu for MATE, Xfce and LXDE panels) is available in the official Ubuntu 16.04 repositories and it works great in Ubuntu MATE 16.04, but it doesnt work in Xubuntu 16.04 and Lubuntu 16.04 by simply installing the panel applet package.
Heres how to get TopMenu to work in Xubuntu 16.04 and Lubuntu 16.04, using the official packages, with a minor tweak.
Note that TopMenu only works with GTK2 and GTK3 applications. It doesnt work for Qt (4 or 5) applications as well as LibreOffice, Firefox andThunderbird.
How to install and get TopMenu to work in Xubuntu 16.04

1. Install all the required packages
The TopMenu Xfce panel applet package doesnt depend on all the packages required for it to work. To install all the required packages in Xubuntu 16.04, use the command below:
sudo apt install xfce4-topmenu-plugin libtopmenu-client-gtk2-0 libtopmenu-server-gtk2-0 libtopmenu-client-gtk3-0 libtopmenu-server-gtk3-0 topmenu-gtk2 topmenu-gtk32. Load TopMenu via /etc/profile.d/
The next step is to create a file, lets call it "topmenu-gtk.sh", in /etc/profile.d/ - Ill use Mousepad (the default Xubuntu 16.04 text editor) below to open an empty file at that location:
pkexec mousepad /etc/profile.d/topmenu-gtk.sh#!/bin/sh
export GTK_MODULES=$GTK_MODULES:topmenu-gtk-moduleThen save the file and restart the session (logout/login or restart the system).
To add TopMenu to the Xfce panel, right click the panel, select Panel > Panel Preferences and on the "Items" tab, click "+" and add TopMenu, then use the up and down arrows to move the applet to the desired location:

Its important to mention that TopMenu doesnt support panel transparency so if you want Topmenu to have the same backgound as the rest of the panel, set the Xfce panel opacity to 100 by right clicking on the panel and selecting Panel > Panel Preferences, on the Appearance tab (set "Alpha" to 100):

How to install and get TopMenu to work in Lubuntu 16.04

1. Install all the required packages
Just like the Xfce panel applet, installing the LXDE TopMenu panel applet doesnt install all the packages required for the applet to work, so lets install them:
sudo apt install lxpanel-plugin-topmenu libtopmenu-client-gtk2-0 libtopmenu-server-gtk2-0 libtopmenu-client-gtk3-0 libtopmenu-server-gtk3-0 topmenu-gtk2 topmenu-gtk32. Load TopMenu via /etc/profile.d/
The next step is to create a file, lets call it "topmenu-gtk.sh", in /etc/profile.d/ - Ill use Leafpad (the default Lubuntu 16.04 text editor) below to open an empty file at that location:
gksu leafpad /etc/profile.d/topmenu-gtk.sh#!/bin/sh
export GTK_MODULES=$GTK_MODULES:topmenu-gtk-moduleThen save the file and restart the session (logout/login or restart the system).
3. Add TopMenu to the Lubuntu 16.04 LXDE panel
Top add Topmenu to the LXDE panel, right click the panel, select "Add / Remove Panel Items", click "Add" and select TopMenu:

Available link for download
Thursday, March 30, 2017
How to Flash or Upgrade HTC Desire 620G dual sim with SP Flash tool tested
How to Flash or Upgrade HTC Desire 620G dual sim with SP Flash tool tested
You have to HTC Desire 620G dual sim phone device ? and in problem like auto turn on internet connection, auto turn on wifi connection, auto apk installing, auto gone balance, hang on logo, restarting, pattern lock, screen lock these problem you can solve using this method without any box just need to some impotent i think it is to be with you which one you can see in requirement tab there to be which need for above type problem solve this method you can use without any box its done from flash tool its also available here, and impotent of must be installed phones driver, you cant flash or upgrade if not installed in your computer or laptop it must be installed and also available in this post, here all are linked that tested and working fine just in one try this method and this is for everyone who new fresher technician or experience technician in android software related, before use remember of must be working well all are required which you can see in this method it below to be mention, different to be error when you try to flash or upgrade first of USB not recognized this error possible when micro USB not working, battery not charged, phone USB socket not working properly so if you fail with this method just write down your comment on below comment box i will soon possible to fix it, first take backup into device if live otherwise dead you cant take backup, this method use when device in dead condition also but must be in software problem in hardware device not be live.
Must read users:
This tutorial tested by me without any error but remember here some impotent question for successfully done with this tutorial, must be working device sub socket, must be working micro usb cable, must be working volume up or down keys for boot device, must be working computer or laptop usb socket, this tutorial you can use without any box its simple.
Required for HTC Desire 620G
- HTC Desire 620G dual Sim with good battery charged, it to be 80% up, and do not try with low battery
- HTC Desire 620G dual Sim tested Stock ROM Firmware | Download Mirror | Mirror
- HTC Desire 620G dual Sim USB (Flashing) Driver | Download here
- HTC Desire 620G dual Sim Flash tool | Download here
- Quality Micro USB Cable
- Computer or Laptop
Procedure for HTC Desire 620G
- First take files from above link which required for Flash or Upgrade, if link not working just leave your comment on below comment box
- Extract to Desktop or As you like path from the WinZip, Must be installed WinZip software in your computer or laptop
- Open SP Flash tool folder and choose flash_tool.exe file and open it
- Click on Scatter-loading button and choose MT6592_Android_scatter.txt file and click OK
- Now click on Download button and Just Insert Micro USB Cable into device after auto installing driver if installed in your computer or laptop
- If device not detect so just Press and hold Volume Up key and Insert USB cable into device
- If driver not take device after installed so just update Driver which above links from the device manager
- After updated flashing star automatically and wait until finished process, do not try to unplug device which in flashing
- You are done, Congratulation
HTC Desire 620G Flash done Screenshot:

Available link for download
How to Delete or Unistall Preloaded Google Apps on Samsung Phone
How to Delete or Unistall Preloaded Google Apps on Samsung Phone
Google Play Store is the most using an app for Android phones. It is the best way to install any likeable app on your phones. If you are using android phone and Google Play Store them you know many times we are installing many apps on the phone. But some apps dont use on your phone. If you want to install your preloaded Google apps, then follow below instruction.

Uninstall and Disable Apps
Using Task manager
Step #1
Hold Home Key for few seconds and then Task Manager
Step #2
After then Downloaded tab
Step #3
Scroll down for Uninstall, Press Uninstall Button
Step #4
Application details page appear
Step #5Using Task manager
Step #1
Hold Home Key for few seconds and then Task Manager
Step #2
After then Downloaded tab
Step #3
Scroll down for Uninstall, Press Uninstall Button
Step #4
Application details page appear
Click OK Button
Using Application Manager
Step #1
Menu >> Settings >> More >> Application Manager
Step #2
Touch the DOWNLOADED Tab
Step #3
Press Uninstall then OK
Step #4
After then Touch Uninstall Updates then OK Button
Available link for download
How To Install CWM TWRP or Any Other Recovery Without PC Faster and Safer Method
How To Install CWM TWRP or Any Other Recovery Without PC Faster and Safer Method
Whether it is CWM (Clockworkmod) or TWRP (Team Win Recovery Project) recovery, definitely you will flash any of the custom recovery if you wish to extend the Android experience. You can flash the custom recovery with or without using a PC. As a samsung user mostly I use Odin to flash a new recovery but, it is not possible keep a PC everywhere we travels. So sometimes we need an alternate solution.
There are many apps available in the Google Play Store which helps to install a custom recovery without PC but, I prefer Flashify. Flashify is a must have tool for every android root user which, comes with a clean hole UI and bunch of flash and backup options. I am not going to review the app...In this post I included simple steps flash CWM or TWRP custom recovery image using Flashify.

Requirement:
- Android 2.3 and up
- Root Permission
2. Download your favorite custom recovery .img file for your device
CWM ( Clockworkmod )
TWRP (Team Win Recovery Project)
**If you downloaded the recovery using PC...copy it to your internal or external storage.
3. Open Flashify app... Accept disclaimer and Grant permission on popup
4. In FLASH tab tap on Recovery Image and browse / select the downloaded recovery .img file using flashify explorer.


5. Now the app will popup a confirm Flash recovery? dialog.

6. Finally Tap on Yup! and wait.
Thats it....After successful installation it will popup a Flash Complete dialog.....Choose Reboot now if you wish to boot into recovery or Exit app.
There are many apps available in the Google Play Store which helps to install a custom recovery without PC but, I prefer Flashify. Flashify is a must have tool for every android root user which, comes with a clean hole UI and bunch of flash and backup options. I am not going to review the app...In this post I included simple steps flash CWM or TWRP custom recovery image using Flashify.
Requirement:
- Android 2.3 and up
- Root Permission
Install CMW / TWRP Custom Recovery Without PC
1. Download Flashify - Google Play [ Free ]2. Download your favorite custom recovery .img file for your device
CWM ( Clockworkmod )
TWRP (Team Win Recovery Project)
**If you downloaded the recovery using PC...copy it to your internal or external storage.
3. Open Flashify app... Accept disclaimer and Grant permission on popup
4. In FLASH tab tap on Recovery Image and browse / select the downloaded recovery .img file using flashify explorer.
5. Now the app will popup a confirm Flash recovery? dialog.
6. Finally Tap on Yup! and wait.
Thats it....After successful installation it will popup a Flash Complete dialog.....Choose Reboot now if you wish to boot into recovery or Exit app.
Available link for download
Sunday, March 19, 2017
How to Flash or Upgrade Intex Aqua A1 with SP Flash Tool Tested
How to Flash or Upgrade Intex Aqua A1 with SP Flash Tool Tested
This is simple way for flashing or upgrade in Intex Aqua A1 device because this is tested by me without any error, this method you can use without any box its done from flash tool its also available here, and impotent of must be installed phones driver, you cant flash or upgrade if not installed in your computer or laptop it must be installed and also available in this post, here all are linked that tested and working fine just in one try, you can use this guide when your device in hang on logo, restarting, auto turn on internet connection, auto turn on wifi connection, auto apk installing, auto gone balance, pattern lock, screen lock etc
This flash file tested by me without any error working well, this is free for all who know about software in mobile, impotent for flashing first must check your micro USB cable if not good then you cant flash it so check micro USB cable second check your device battery that is impotent for flashing if your device battery low so stop your device between flash so this is impotent for flash, before you flash save your data like contact, videos, notes, emails, photos, videos etc because this is factory flash file so you cant save after full flash so must remember all are impotent notes.
If you want to repair your device, you can try to repair it by you.You have to charge your battery with any charger and charged it by 70%. Your data is very important for you so it is good to do a backup of your data it may consist like your contact details,your important messages, your emails or any other important thing which you feel to be the backup in your device. This backup can be done on another device. we have to do the backup because after a format of your device, all your data will be gone and it will not be recovered. For backup in other devices you can use other external device like your hard drive, sd card or any other suitable devices. If you are doing by your own.do it at your own risk as we dont take any responsibility if your device is damaged
Required for Intex Aqua A1
- Intex Aqua A1 handset with good battery charged, do not try with low battery
- Intex Aqua A1 Stock ROM Firmware | Download here
- Intex Aqua A1 Flash tool | Download here
- Intex Aqua A1 USB Driver | Download here
- Micro USB Cable with Good Quality
- Computer or Laptop
Procedure for Intex Aqua A1
- Take files of required for this method from the above link, if link dead or broke just leave your comment on below comment box i will soon fix it if possible
- UnZip from WinZIP to anywhere you want from the ZIP, must be installed ZIP in your Computer or Laptop
- Open SP Flash tool folder and select and open flash_tool.exe file
- Click on Scatter-loading button and choose MT6572_Android_scatter.txt file from the Firmware folder
- Now click on Download button, and Just Insert USB Cable to device
- Wait until driver installing, if driver already installed in your Computer or Laptop then downloading start automatically
- If device dead for detection Press and hold Volume Up button and Insert USB Cable
- Wait until finished process, do not disconnect device while in flashing mode
- Congratulation you are done
Intex Aqua A1 Flash done Screenshot:
Available link for download
Friday, March 17, 2017
Gionee M2 8GB USB Flashing Driver or Flash tool Download here
Gionee M2 8GB USB Flashing Driver or Flash tool Download here

This driver for windows computer no need to install PC Suit if install this driver and this is most impotent and this is help to you for data transfer like contacts, videos, photos etc and also mobile updating if driver not installed in your computer or laptop then you cant flashing without driver so need must installed driver after you can do update if your device software related issue so then need flash to device then again need to driver here different driver for usb debugging that driver different here all are driver just you must know how to install that here all models driver available but if some models not include in this list just write down comment on below comment box i will soon updated it.
This driver you can use when your device in issue software and if software issue then need to update stock firmware or if you want to data transfer device to computer or laptop then also need to driver but here two type driver available firs for stock firmware update or second for just connect device to computer or laptop.
This driver you can use when your device in issue software and if software issue then need to update stock firmware or if you want to data transfer device to computer or laptop then also need to driver but here two type driver available firs for stock firmware update or second for just connect device to computer or laptop.
Gionee M2 8GB USB Driver
CDC Driver here
VCOM Driver here
ADB Driver here
Gionee M2 8GB Flash Tool
Download | Mirror
Available link for download
Wednesday, March 8, 2017
How to Check If ROM Is Odexed or Deodexed
How to Check If ROM Is Odexed or Deodexed
Sometimes the developers create separate mod or patch for the Odexed and Deodexed ROMs. In such cases we should know whether our ROM is Odexed or Deodexed. If you are using the Official stock ROM by the manufacturer then there is no more confusion your ROM is odexed. If you are using a custom ROM it may Odexed or Deodexed.
In this post I included the common and simple way to check if our ROM is Odexed or Deodexed.
2. Open the downloaded app and navigate to /system/app
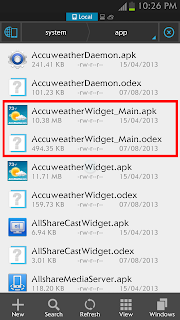
If your ROM is Odexed you can see the .apk and .odex file in the app directory. If your ROM is Deodexed you will not see any .odex file in the app directory.
Thats it.
In this post I included the common and simple way to check if our ROM is Odexed or Deodexed.
how to check if rom is odexed or deodexed ?
1. Download and install any Root explorer eg. ES File Explorer2. Open the downloaded app and navigate to /system/app
If your ROM is Odexed you can see the .apk and .odex file in the app directory. If your ROM is Deodexed you will not see any .odex file in the app directory.
Thats it.
Available link for download
Saturday, March 4, 2017
Gionee P3 USB Flashing Driver or Flash tool Download here
Gionee P3 USB Flashing Driver or Flash tool Download here

This driver for windows computer no need to install PC Suit if install this driver and this is most impotent and this is help to you for data transfer like contacts, videos, photos etc and also mobile updating if driver not installed in your computer or laptop then you cant flashing without driver so need must installed driver after you can do update if your device software related issue so then need flash to device then again need to driver here different driver for usb debugging that driver different here all are driver just you must know how to install that here all models driver available but if some models not include in this list just write down comment on below comment box i will soon updated it.
This driver you can use when your device in issue software and if software issue then need to update stock firmware or if you want to data transfer device to computer or laptop then also need to driver but here two type driver available firs for stock firmware update or second for just connect device to computer or laptop.
This driver you can use when your device in issue software and if software issue then need to update stock firmware or if you want to data transfer device to computer or laptop then also need to driver but here two type driver available firs for stock firmware update or second for just connect device to computer or laptop.
Gionee P3 USB Driver
CDC Driver here
VCOM Driver here
ADB Driver here
Gionee P3 Flash Tool
Download | Mirror
Available link for download
Tuesday, February 28, 2017
Guide How to Find IMEI or MEID Number on a Mobile Smartphone Device
Guide How to Find IMEI or MEID Number on a Mobile Smartphone Device
[Guide] How to Find IMEI or MEID Number on a Mobile Smartphone Device.
Find IMEI Number. This guide will show you how to Find IMEI or MEID Number on a Mobile Smartphone Device. IMEI literally stands for International Mobile Equipment Identity. Each and every Mobile Smartphone device should have a unique IMEI Number. A standard IMEI number is a Fourteen (14) digit decimal string accompanied by an additional check number. There are many may to find this IMEI number on your Mobile smartphone device. And now we will show it to you, just following the guide below.
Find IMEI Number.
- Using Android Smartphone Menu.
- Go to Android Setting Menu. Just go to App Drawer and find Setting menu, then Tap it.

IMEI number - setting menu - Then tap About Phone. To find it just Scroll menu to the bottom of screen.
- Then tap Status. Scroll down until you find the MEID or IMEI entry. this is difference between IMEI dan MEID.
- IMEI : GSM networks like AT&T and T-Mobile.
- MEID : CDMA networks such as Sprint, Verizon, and US Cellular.
- Dialing Code on Dial Pad.
- Open Dial Pad on your Android Mobile smartphone.

IMEI number - dialing code - Then Dial :
- *#06#
- You dont need to press or tap Call or Send button on your screen.
- Then, the IMEI/MEID number will appear as soon as you finish dialing the code.
- You can write the number down, or copy and paste it to the Email or Message.
- Find IMEI / MEID Under Battery.
- This is a simple way you can do. But, its possible on a phone with removable battery.
- Just remove the back phone cover.
- Then take out the battery tray.
- Once your battery removed, now see behind the battery.
- You will see printed IMEI or MEID number on mobile smartphone body.

IMEI number - under battery - Now, write down this number.


Available link for download
Wednesday, February 15, 2017
How To Install Cinnamon 3 0 In Ubuntu 16 04 Or 15 10 Via PPA
How To Install Cinnamon 3 0 In Ubuntu 16 04 Or 15 10 Via PPA
Cinnamon 3.0 was released yesterday and it includes improved GTK+ 3.20 support, new accessibility and sound settings and more.

Cinnamon is a GTK3 desktop environment, initially started as a fork of GNOME Shell, which is used by default in Linux Mint Cinnamon edition. Among its features are:
- panel with a menu, launchers, window list, system tray;
- support for panel applets and desktop widgets (Desklets);
- supports desktop animations and transition effects;
- highly configurable: users can customize the panel (besides applets, the panel supports autohide and the panel layout can be changed: you can use one panel or two panels like the old GNOME 2 layout), easily change themes, customize desktop animations, hot corners, etc.;
- much more.
Changes in Cinnamon 3.0 include:
- window management improvements on tiling, mapping and unmapping windows, compositor’s window groups and tracking of full screen windows
- improved out of the box touchpad support (edge-scrolling and two-finger-scrolling can now be configured independently and are both enabled by default)
- new accessibility and sound settings (both rewritten as native cinnamon-settings modules)
- battery powered devices can be renamed
- different favorite applications can now be set for plain-text, documents and source code files
- panel launchers now include application actions
- animation effects are now enabled by default on dialogs and menus
- favorites and system options can now be disabled in the menu applet
- the photo-frame desklet now also scans subdirectories
- improved support for GTK 3.20, Spotify 0.27, Viber
Here are the new Cinnamon accessibility and sound settings:


And the Preferred Applications dialog which now allows settings different applications for opening documents, plain text, and source code files:

Cinnamon 3.0 will be included with Linux Mint 18 Cinnamon edition. Its not yet clear if it will be available for Linux Mint 17.3, but I assume thats pretty difficult to achieve, considering that Linux Mint 17.3 is based on Ubuntu 14.04 which uses a pretty old GTK+ version (3.10).
Update: Clem mentioned in a comment that "versions 3.0, 3.2, 3.4 and 3.6 are targeting Mint 18.x.", so Linux Mint 17.x users wont be getting Cinnamon 3.x.
Update: Clem mentioned in a comment that "versions 3.0, 3.2, 3.4 and 3.6 are targeting Mint 18.x.", so Linux Mint 17.x users wont be getting Cinnamon 3.x.
Note that in the screenshots above, Im using the new Linux Mint Mint Y GTK and icon themes as well as the Linux Mint Cinnamon theme. Youll find download links for these below, under "Cinnamon 3.0 tweaks for Ubuntu".
Install Cinnamon 3.0 in Ubuntu 16.04 or 15.10 via PPA
Important: if you want to install Cinnamon in Ubuntu and youre using the WebUpd8 Nemo PPA, purge that PPA before proceeding. Also, dont add this PPA if you use Linux Mint.
The PPAs that uses to provide Cinnamon stable werent updated with the latest Cinnamon 3.0. I did find 2 PPAs with Cinnamon 3.0:
- Sunderland93s Cinnamon PPA (Ubuntu 16.04 only - its still in the process of being updated at the time Im writing this article)
- embrosyns Cinnamon PPA (for Ubuntu 16.04 and 15.10)
Theres also the Cinnamon Nightly Builds PPA, but its not recommended for regular users because it contains untested / unstable code from Git!
For the instructions below Im using embrosyns Cinnamon stable PPA.
To add the PPA and install Cinnamon 3.0 in Ubuntu 16.04 or 15.10, use the following commands:
sudo add-apt-repository ppa:embrosyn/cinnamon
sudo apt update
sudo apt install cinnamon blueberry
Once installed, log out and select Cinnamon from the login screen:

Tweaks
1. Themes
In Ubuntu 16.04, Ambiance and Radiance themes have some issues in Cinnamon, like missing shadows for CSD apps.
In Ubuntu 16.04, Ambiance and Radiance themes have some issues in Cinnamon, like missing shadows for CSD apps.
However, there are quite a few themes out there that should work properly in Cinnamon, like Numix GTK Theme (available in the official repositories). To install Numix GTK Theme, use the following command:
sudo apt install numix-gtk-themeYou can also download the official Linux Mint themes, including the new Mint Y Theme from Linux Mint 18, by using the links below:
- mint-themes (youll also need libreoffice-style-mint because mint-themes depends on it, as well as mint-x-icons and mint-themes-gtk3, both linked below)
- mint-themes-gtk3 (download the 3.18 version - its for GTK 3.18, available in Ubuntu 16.04)
- mint-y-theme
- mint-x-icons
- mint-y-icons
- cinnamon-themes
Note: to be able to install "libreoffice-style-mint", youll need to remove the "libreoffice-style-human" package, which is installed by default in Ubuntu 15.10.
To install them, download the deb files using the links above and place them in a folder - lets call it "deb" -, in your home directory (~/deb). Then use dpkg to install all the packages at once, using the following command:
To install them, download the deb files using the links above and place them in a folder - lets call it "deb" -, in your home directory (~/deb). Then use dpkg to install all the packages at once, using the following command:
sudo dpkg -i ~/deb/*.debIn my test in Ubuntu 15.10, selecting "Quit" from the Cinnamon menu (which allows you to shutdown the computer) doesnt work properly - the dialog doesnt display any buttons other than "Cancel".
gsettings set org.cinnamon.desktop.session settings-daemon-uses-logind true
gsettings set org.cinnamon.desktop.session session-manager-uses-logind true
gsettings set org.cinnamon.desktop.session screensaver-uses-logind falseI should also mention that I didnt encounter this issue in Ubuntu 16.04.
Thanks to Kevin @ AskUbuntu for the fix!
How to revert the changes
There are two ways you can revert the changes made by using the PPA above to install Cinnamon: either completely remove Cinnamon 3.0 or you can downgrade the packages installed from the PPA and use the Cinnamon version available in the official Ubuntu repositories.
A) Completely remove Cinnamon 3.0
Firstly remove the PPA:
sudo rm /etc/apt/sources.list.d/embrosyn-cinnamon*.listThen, to completely remove Cinnamon, you can use the following command:
sudo apt purge cinnamon* libcinnamon* nemo* libnemo-extension1 cjs libcjs0e blueberry gir1.2-cinnamondesktop-3.0 gir1.2-meta-muffin-0.0 libmuffin0 muffin-commonYou may then use "autoremove" to remove all the depedencies that were installed and are no longer required:
sudo apt autoremoveB) Purge the PPA
By purging the PPA, you can downgrade Cinnamon to the version available in the official Ubuntu repositories. You can do this with PPA Purge:
sudo apt install ppa-purge
sudo ppa-purge ppa:embrosyn/cinnamonAvailable link for download
Thursday, February 2, 2017
Gionee Elife S5 1 USB Flashing Driver or Flash tool Download here
Gionee Elife S5 1 USB Flashing Driver or Flash tool Download here

This driver for windows computer no need to install PC Suit if install this driver and this is most impotent and this is help to you for data transfer like contacts, videos, photos etc and also mobile updating if driver not installed in your computer or laptop then you cant flashing without driver so need must installed driver after you can do update if your device software related issue so then need flash to device then again need to driver here different driver for USB debugging that driver different here all are driver just you must know how to install that here all models driver available but if some models not include in this list just write down comment on below comment box i will soon updated it.
This driver you can use when your device in issue software and if software issue then needs to update stock firmware or if you want to data transfer device to computer or laptop then also need to the driver but here two type driver available first for stock firmware update or second for just connect device to computer or laptop.
This driver you can use when your device in issue software and if software issue then needs to update stock firmware or if you want to data transfer device to computer or laptop then also need to the driver but here two type driver available first for stock firmware update or second for just connect device to computer or laptop.
Gionee Elife S5.1 USB Driver
CDC Driver here
VCOM Driver here
ADB Driver here
Gionee Elife S5.1 Flash Tool
Download | Mirror
Available link for download
Sunday, January 29, 2017
How To Download YouTube Video As Mp3 in Windows Mac Linux IOS Android Symbian or Any Other Platform
How To Download YouTube Video As Mp3 in Windows Mac Linux IOS Android Symbian or Any Other Platform
 As all we know YouTube is the largest video sharing website where uploads many movies, songs, etc. in every instant. You may watch many songs on YouTube and may wish to save it for listening later. To download YouTube videos there are many third party softwares available for every platform and most of the apps are capable of saving to video formats only. If you download a song, it could be better if it gets as mp3 format which saves our Smartphone battery more than video playback.
In this post I included the instruction to download YouTube video as mp3 without installing any third party apps. There are many websites does it, but I prefer video2mp3.net because of many reasons.
video2mp3.net is one of the best rated YouTube to mp3 converting website, which allow us to convert unlimited number of YouTube videos to mp3 without losing any quality. The websites responsive interface makes the browsing faster and simpler in both PC and mobile devices.
How To convert Youtube Video to Mp3 File ?
1. Copy the prefered video URL2. Go to www.video2mp3.net
3. Paste the youtube video URL in the convert box and click convert
( Wait till it finish conversion...after conversion it will generate a download link of mp3 file)
5. Finally Click on Download your MP3 file

Thats it...
Available link for download
Sunday, January 8, 2017
Gionee M2 4GB USB Flashing Driver or Flash tool Download here
Gionee M2 4GB USB Flashing Driver or Flash tool Download here
This driver for windows computer no need to install PC Suit if install this driver and this is most impotent and this is help to you for data transfer like contacts, videos, photos etc and also mobile updating if driver not installed in your computer or laptop then you cant flashing without driver so need must installed driver after you can do update if your device software related issue so then need flash to device then again need to driver here different driver for usb debugging that driver different here all are driver just you must know how to install that here all models driver available but if some models not include in this list just write down comment on below comment box i will soon updated it.
This driver you can use when your device in issue software and if software issue then need to update stock firmware or if you want to data transfer device to computer or laptop then also need to driver but here two type driver available firs for stock firmware update or second for just connect device to computer or laptop.
This driver you can use when your device in issue software and if software issue then need to update stock firmware or if you want to data transfer device to computer or laptop then also need to driver but here two type driver available firs for stock firmware update or second for just connect device to computer or laptop.
Gionee M2 4GB USB Driver
CDC Driver here
VCOM Driver here
ADB Driver here
Gionee M2 4GB Flash Tool
Download | Mirror
Available link for download
Saturday, December 31, 2016
How to boot repair or Flash Redmi Note 2 Prime Dual Sim 4G Model 2014912 with Flash tool Tested
How to boot repair or Flash Redmi Note 2 Prime Dual Sim 4G Model 2014912 with Flash tool Tested
This tutorial tested by me without any error some time we are flashing this device so many time take in flashing so we are search other tool for flashing and easy to flash this device from the many time i search but after many time i found other flash tool and i try this device in this tool so easy procedure easy or not was give many time for flashing so this tool with i have experience so here post new with different tool but here some different procedure from the before flashing tool this tool you can use if before post not success then you can use this tool if you want to first try use so dont worry because this is tested by me its very easy to flash and just remember of required for flashing if any issue in required from yours so first prepare to required after try in flash and we are mention which need to flashing in below and also must remember before use this tutorial which one first read all carefully this tutorial after try in flash because if you read tutorial then you can easy flashing this device this my own experience and must be working well micro USB cable if any issue in this then you cant connect device with computer or laptop also must be working device charging socket if any issue so also you cant connect with computer or laptop must be installed driver in your computer or laptop if not install in your computer or laptop then device not connect so you cant flash see below description about firmware.
If you want to repair your device, you can try to repair it by you.
You have to charge your battery with any charger and charged it by 70%, Your data is very important for you so it is good to do a backup of your data it may consist like your contact details, your important messages, your emails or any other important thing which you feel to be the backup in your device, this backup can be done on another device. we have to do the backup because after a format of your device, all your data will be gone and it will not be recovered. For backup in other devices you can use other external device like your hard drive, sd card or any other suitable devices. If you are doing by your own.do it at your own risk as we dont take any responsibility if your device is damaged.Required for flash:
- Redmi Note 2 Prime (Dual Sim 4G) Model : 2014912 device with well battery charged, and do not try with low battery
- Redmi Note 2 Prime (Dual Sim 4G) Model : 2014912 Stock ROM Firmware (tested) | Download Mirror-1, Mirror-2
- Redmi Note 2 Prime (Dual Sim 4G) Model : 2014912 USB (Flashing) OR Dead Boot Repair driver | Download here
- Redmi Note 2 Prime (Dual Sim 4G) Model : 2014912 Flash Tool | Download here
- Good Quality Micro usb cable
- Computer or Laptop
Procedure:
- First download tested Firmware, Flash tool or driver from above link (if link not working just leave your comment on below comment box i will soon fix it)
- Extract to all are zip files to desktop or as you like path (must be installed winrar software to Extract)
- Open Driver folder and choose Qualcomm_USB_Driver_Setup.exe file and wait until finish installation
- Open QPST.WIN.2.7_Installer-00430.1 folder and chose setup.exe file and open and install it
- Now open QFIL from the "C:Program FilesQualcommQPST in" path
- Tick on Flat Build option
- Go to Programmer Path and click on Browse.. button and choose prog_emmc_firehose_8916.mbn file
- Click on Load XML.. button and choose rawprogram_unsparse.xml file and second choose patch0.xml file from the Firmware folder
- Insert USB cable and wait until driver install
- After drier installed just Click on Download button and wait until finish procedure
- Congratulation you are done
Redmi Note 2 Prime Dead Boot Repair done Screenshot:

Available link for download
Sunday, December 25, 2016
How To Fix Asus Zenfone 5 From Not Installed or Not Available For SIM Card 1 or 2
How To Fix Asus Zenfone 5 From Not Installed or Not Available For SIM Card 1 or 2
Localtechno greeting, this time localtechno will share with you all about "how to resolve the error SIM card on Asus Zenfone 5"
There are several causes, why the SIM card is not detected :
- 1. Because its too hard when inserting the SIM card
- 2. The IMEI is lost, because the flash or change the ROM
- 3. Socket SIM card is already loose or ill-fitting
Equipment needed :
- 1. Needle
- 2. Miser nail cutter
- 1. Turn off your HH
- 2. Insert the needle gets under the SIM card and push forward to restore the flexibility of a SIM card
- 3. Align the side of the SIM Card, to be a little smaller parts and smooth
- 4. Replace your SIM card and turn on your HH
You can also see videos and screenshots by localtechno result, the following :


Available link for download
Thursday, December 22, 2016
How to Download or Verify Gameloft Games without Wifi
How to Download or Verify Gameloft Games without Wifi

You love gameloft but sometimes u dont like them ,Reason? due to all new HD gameloft games requires WIFI Verification to start/play those gameloft games,but most of the users dose not have a wifi conection on their locations,so now? what to do? Dont be worry i have a simple trick to change WIFI mode to your Carrier Network Gprs/GPRS ,now u can verifygameloft games through ur mobile internet,and also u dont need to use Titanium backup again,
U have installed apk of the game and also placed data files in ur sdcards gameloft/games folder,but whenever u try to play that game it says download must be perform through wifi,this line dose not mean that u need to download data files again but this line means that u need wifi to verify data files,after verify data files u will be able to play those games again,so now u got it?do u think u need titanium backup again? so let us see how to do this trick
Required rooted phone?
Answer: No
Instruction:
Download This TXT file and place it into SDCard,it will be like this SDCard/qaWifiOnlyMode
Download TXT file from here:
Download Now
Available link for download
Subscribe to:
Posts (Atom)