Showing posts with label menu. Show all posts
Showing posts with label menu. Show all posts
Monday, April 10, 2017
How To Backup APK Using ES File Manager Latest Version Now You Cant See The Old App Manager Menu Item
How To Backup APK Using ES File Manager Latest Version Now You Cant See The Old App Manager Menu Item
 Along with bug fixes,performance improvements and other feature enhancements the ES team brought a modified Fast Access menu on the recent version of ES File Explorer File Manager. In the previous version of ES File Manager there was an App Manager menu item in the Fast Access menu, Which is used to mange User and System apps. The App Managers apk backup feature is very useful as we can backup and reinstall the app later without downloading from Google Play. One of my old post titled "How To Backup Android Apps As APK using ES File Explorer ?" mentioned the steps do the same.
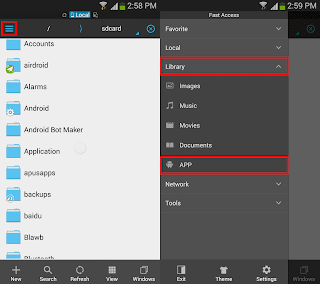
As the recent version modified the Fast access menu, now you cant find the App Manger there. Its renamed to APP and placed in Library menu. The New APP is same as the old App Manager and which can do all the old stuffs like Uninstall, backup, etc. The process of backup apk is same and I included the complete steps in this post.
Backup Android App Using ES File Explorer File Manager
1. Open ES File Explorer - Download2. Tap on Fast Access icon or option soft key or swipe from left to right.
3. In Fast Access menu tap on Library then APP.
4. In the APP grid long press on the desired app you wish to back up and finally tap on Backup.
(If you wish to backup multiple apps, just tap on other apps too)

Thats it.. You can grab the backed up app apk from /sdcard/backups/apps/.
Available link for download
Monday, April 3, 2017
How To Get A Global Menu In Xubuntu 16 04 Or Lubuntu 16 04 Using TopMenu
How To Get A Global Menu In Xubuntu 16 04 Or Lubuntu 16 04 Using TopMenu
TopMenu (a global menu for MATE, Xfce and LXDE panels) is available in the official Ubuntu 16.04 repositories and it works great in Ubuntu MATE 16.04, but it doesnt work in Xubuntu 16.04 and Lubuntu 16.04 by simply installing the panel applet package.
Heres how to get TopMenu to work in Xubuntu 16.04 and Lubuntu 16.04, using the official packages, with a minor tweak.
Note that TopMenu only works with GTK2 and GTK3 applications. It doesnt work for Qt (4 or 5) applications as well as LibreOffice, Firefox andThunderbird.
How to install and get TopMenu to work in Xubuntu 16.04

1. Install all the required packages
The TopMenu Xfce panel applet package doesnt depend on all the packages required for it to work. To install all the required packages in Xubuntu 16.04, use the command below:
sudo apt install xfce4-topmenu-plugin libtopmenu-client-gtk2-0 libtopmenu-server-gtk2-0 libtopmenu-client-gtk3-0 libtopmenu-server-gtk3-0 topmenu-gtk2 topmenu-gtk32. Load TopMenu via /etc/profile.d/
The next step is to create a file, lets call it "topmenu-gtk.sh", in /etc/profile.d/ - Ill use Mousepad (the default Xubuntu 16.04 text editor) below to open an empty file at that location:
pkexec mousepad /etc/profile.d/topmenu-gtk.sh#!/bin/sh
export GTK_MODULES=$GTK_MODULES:topmenu-gtk-moduleThen save the file and restart the session (logout/login or restart the system).
To add TopMenu to the Xfce panel, right click the panel, select Panel > Panel Preferences and on the "Items" tab, click "+" and add TopMenu, then use the up and down arrows to move the applet to the desired location:

Its important to mention that TopMenu doesnt support panel transparency so if you want Topmenu to have the same backgound as the rest of the panel, set the Xfce panel opacity to 100 by right clicking on the panel and selecting Panel > Panel Preferences, on the Appearance tab (set "Alpha" to 100):

How to install and get TopMenu to work in Lubuntu 16.04

1. Install all the required packages
Just like the Xfce panel applet, installing the LXDE TopMenu panel applet doesnt install all the packages required for the applet to work, so lets install them:
sudo apt install lxpanel-plugin-topmenu libtopmenu-client-gtk2-0 libtopmenu-server-gtk2-0 libtopmenu-client-gtk3-0 libtopmenu-server-gtk3-0 topmenu-gtk2 topmenu-gtk32. Load TopMenu via /etc/profile.d/
The next step is to create a file, lets call it "topmenu-gtk.sh", in /etc/profile.d/ - Ill use Leafpad (the default Lubuntu 16.04 text editor) below to open an empty file at that location:
gksu leafpad /etc/profile.d/topmenu-gtk.sh#!/bin/sh
export GTK_MODULES=$GTK_MODULES:topmenu-gtk-moduleThen save the file and restart the session (logout/login or restart the system).
3. Add TopMenu to the Lubuntu 16.04 LXDE panel
Top add Topmenu to the LXDE panel, right click the panel, select "Add / Remove Panel Items", click "Add" and select TopMenu:


Available link for download
Friday, March 31, 2017
How To Install Extended Power Menu Mod in Samsung Galaxy S3
How To Install Extended Power Menu Mod in Samsung Galaxy S3

In this post I included the steps to install extended power menu mod (Recovery, Download, etc.) in Samsung Galaxy S3. We should thank XDA Recognized Developer AndiP for making this mod. Currently, extended power menu mod is only available for selected ICS and Jelly bean versions.
Note:
- Make sure to download the correct odex or deodex firmware versions file. Check if Odexed or Deodexed ?
- This mod is only for Galaxy S3 with Stock Rom.
Disclaimer:
Installing Mods may brick your phone. I am not responsible for any damage. Do at your risk.
How To Install Extended Power Menu Mod in Samsung Galaxy S3 ?
1. Download the correct version of Extended PowerMenu zip for your firmware build number - Download2. Copy XX...-ExtPowMenu.zip to SD card.
3. Boot into CWM recovery. ( Power Off .... Press and Hold Volume up , Home and Power button )
4. In CWM Recovery select - install zip from sd card
5. Now click choose zip from sd card.
6. Finally select the XX...-ExtPowMenu.zip
After installation .... reboot...done...After reboot long press power button and click reboot. if the installation was success it will show options like Recovery, Download etc..
If the above method not worked or if you want to rollback the power menu to its default state just follow the steps below.
How to Restore the default power menu in Samsung Galaxy S3 ?
1. Download the correct version of Extended PowerMenu Rollback zip for your firmware build number - Download2. Copy XX...-ExtPowMenu-Rollback.zip to SD card.
3. Boot into CWM recovery. ( Power Off .... Press and Hold Volume up , Home and Power button )
4. In CWM Recovery select - install zip from sd card
5. Now click choose zip from sd card.
6. Finally select the XX...-ExtPowMenu-Rollback.zip
After complete install...reboot...
source
Available link for download
Sunday, February 5, 2017
How to add reboot recovery and bootloader options in Power menu
How to add reboot recovery and bootloader options in Power menu
So lets Start
Required
1-apktool
2-notepad++
3-some brains
STEP-1
Decompile Framework-res.apk
goto to res/vlaues/arrays.xml
and add these lines at the end
now goto res/values/strings
and add these lines at the end
goto add the ic_lock_reboot.png which i have i provided in the resources attached below this post to drawablw-hdpi folder
so before compiling the framework-res.apk follow erorcuns guide to properly recompile framework-res.apk
once recompile is done ....decompile again to get the HEX IDs
STEP-2
decompile android.policy.jar
goto classoutcomandroidinternalpolicyimpl
and add the 3 smalis files which i provided in the resources attached below
Now option classoutcomandroidinternalpolicyimplGlobalAc tions.smali
and find these lines and add the red marked lines between them
now we need to assign the Hex ids as per ur Public.xml
NOTE: the hex ids might be different from mine and yours so be careful while comparing
new as per the above changes in GlobalActions.xml
assign the ids as below
<public type="drawable" name="ic_lock_reboot" id="0x01080827" />
<public type="string" name="reboot" id="0x0104060b" />
Now option up classoutcomandroidinternalpolicyimplGlobalAc tions$11.smali
find and replace the following
@line 70
<public type="string" name="reboot" id="0x0104060b" />
@line 90
<public type="array" name="reboot_options" id="0x0107003b" />
@line 105
<public type="string" name="ok" id="0x0104000a" />
@line 147
<public type="bool" name="config_sf_slowBlur" id="0x0111000b" />
now open up classoutcomandroidinternalpolicyimplGlobalAc tions$11$2.smali
@line 59
<public type="array" name="reboot_actions" id="0x0107003c" />
save it and recompile android.policy.jar
now push all the files into ut phone...will have the new Advanced reboot options
Required
1-apktool
2-notepad++
3-some brains
STEP-1
Decompile Framework-res.apk
goto to res/vlaues/arrays.xml
and add these lines at the end
Code:
 <string-array name="reboot_options">
 <item>@string/reboot_normal</item>
 <item>@string/reboot_recovery</item>
 <item>@string/reboot_bootloader</item>
 </string-array>
 <string-array name="reboot_actions">
 <item>now</item>
 <item>recovery</item>
 <item>bootloader</item>
 </string-array>
now goto res/values/strings
and add these lines at the end
Code:
 <string name="reboot">Reboot</string>
 <string name="reboot_normal">Reboot</string>
 <string name="reboot_recovery">Recovery</string>
 <string name="reboot_bootloader">Bootloader</string>
goto add the ic_lock_reboot.png which i have i provided in the resources attached below this post to drawablw-hdpi folder
so before compiling the framework-res.apk follow erorcuns guide to properly recompile framework-res.apk
once recompile is done ....decompile again to get the HEX IDs
STEP-2
decompile android.policy.jar
goto classoutcomandroidinternalpolicyimpl
and add the 3 smalis files which i provided in the resources attached below
Now option classoutcomandroidinternalpolicyimplGlobalAc tions.smali
and find these lines and add the red marked lines between them
Code:
 .line 235
 iget-object v0, p0, Lcom/android/internal/policy/impl/GlobalActions;->mItems:Ljava/util/ArrayList;

 new-instance v1, Lcom/android/internal/policy/impl/GlobalActions$2;

 const v2, 0x1080030

 const v3, 0x10400fa

 invoke-direct {v1, p0, v2, v3}, Lcom/android/internal/policy/impl/GlobalActions$2;-><init>(Lcom/android/internal/policy/impl/GlobalActions;II)V

 invoke-virtual {v0, v1}, Ljava/util/ArrayList;->add(Ljava/lang/Object;)Z

 .line 213
 move-object/from16 v0, p0

 iget-object v1, v0, Lcom/android/internal/policy/impl/GlobalActions;->mItems:Ljava/util/ArrayList;

 new-instance v2, Lcom/android/internal/policy/impl/GlobalActions$11;

 const v3, 0x1080827

 const v4, 0x104060b

 move-object/from16 v0, p0

 invoke-direct {v2, v0, v3, v4}, Lcom/android/internal/policy/impl/GlobalActions$11;-><init>(Lcom/android/internal/policy/impl/GlobalActions;II)V

 invoke-virtual {v1, v2}, Ljava/util/ArrayList;->add(Ljava/lang/Object;)Z

 .line 260
 iget-object v0, p0, Lcom/android/internal/policy/impl/GlobalActions;->mItems:Ljava/util/ArrayList;

 iget-object v1, p0, Lcom/android/internal/policy/impl/GlobalActions;->mAirplaneModeOn:Lcom/android/internal/policy/impl/GlobalActions$ToggleAction;

 invoke-virtual {v0, v1}, Ljava/util/ArrayList;->add(Ljava/lang/Object;)Z
now we need to assign the Hex ids as per ur Public.xml
NOTE: the hex ids might be different from mine and yours so be careful while comparing
new as per the above changes in GlobalActions.xml
assign the ids as below
<public type="drawable" name="ic_lock_reboot" id="0x01080827" />
Code:
 new-instance v2, Lcom/android/internal/policy/impl/GlobalActions$11;

 const v3, 0x1080827
<public type="string" name="reboot" id="0x0104060b" />
Code:
new-instance v2, Lcom/android/internal/policy/impl/GlobalActions$11;

 const v3, 0x1080827

 const v4, 0x104060b
Now option up classoutcomandroidinternalpolicyimplGlobalAc tions$11.smali
find and replace the following
@line 70
<public type="string" name="reboot" id="0x0104060b" />
Code:
const v3, 0x104060b@line 90
<public type="array" name="reboot_options" id="0x0107003b" />
Code:
const v3, 0x107003b@line 105
<public type="string" name="ok" id="0x0104000a" />
Code:
const v2, 0x104000a@line 147
<public type="bool" name="config_sf_slowBlur" id="0x0111000b" />
Code:
const v3, 0x111000bnow open up classoutcomandroidinternalpolicyimplGlobalAc tions$11$2.smali
@line 59
<public type="array" name="reboot_actions" id="0x0107003c" />
Code:
const v2, 0x107003csave it and recompile android.policy.jar
now push all the files into ut phone...will have the new Advanced reboot options
Available link for download
Thursday, January 26, 2017
How To Get A Unity Like HUD Searchable Menu In Xubuntu Ubuntu MATE Linux Mint More
How To Get A Unity Like HUD Searchable Menu In Xubuntu Ubuntu MATE Linux Mint More
Youre probably familiar with the Unity HUD, or Head-Up Display, which lets you search through and applications menu. Thanks to Rafael Bocquets i3-hud-menu (and J.A. McNaughtons fork), you can use this menu search feature in pretty much any desktop environment (and in any Linux distribution in which you can install unity-gtk-module).
i3-hud-menu allows searching and navigating through an applications menu using the keyboard, with the use of dmenu (dmenu doesnt have mouse support by default). Heres how it looks like in Xubuntu 16.04:

And in Linux Mint 17.3 Cinnamon:

i3-hud-menu works with GTK2, GTK3 (but not client-side decorated apps) and Qt4 applications.
i3-hud-menu works with GTK2, GTK3 (but not client-side decorated apps) and Qt4 applications.
The tool is buggy with Qt5 applications as well as LibreOffice - see the limitations / issues section below for more information.
Important: issues and limitations
i3-hud-menu has quite a few issues / limitations but I decided to post an article about it anyway since some of you might still find it useful.
Also, Im hoping someone reading this article might be able to fix or at least come up with some workarounds for some of the issues below. If you do, please let us know in the comments!
i3-hud-menu limitations / issues:
- it doesnt work with client-side decorated applications;
- it doesnt work with Firefox or Thunderbird;
- it doesnt work with Qt5 apps (make sure appmenu-qt5 and libdbusmenu-qt5 are not installed or else you wont have a menu for Qt5 apps, such as VLC in Ubuntu 16.04 - if you do install those packages, you can use the menu via i3-hud-menu, but the actual menu wont be visible in the application);
- using it, LibreOffice no longer has a menu if the "libreoffice-gtk" package is installed - this package is used for GTK+ integration (though using i3-hud-menu, you can search the menu, but actually using the menu items doesnt work for some reason);
- to get i3-hud-menu to work with Java swing applications, youll need JAyatana;
- probably more.
It appears that the LibreOffice and the Qt5 applications issue occur because "APPMENU_DISPLAY_BOTH=1" is not respected. Furthermore, using "UBUNTU_MENUPROXY=" (for example, using "UBUNTU_MENUPROXY= libreoffice --writer") or blacklisting it via Dconf Editor (com > canonical > unity-gtk-module > blacklist) doesnt get the LibreOffice menu to show up.
On Arch Linux (possibly in other Linux distributions as well), which requires the unity-gtk-module-standalone-bzr package, you need to run the following command (or change this via Dconf Editor: com > canonical > unity-gtk-module, set gtk2-shell-shows-menubar to "false") and reboot to ensure that menus are displayed in GTK applications:
gsettings set com.canonical.unity-gtk-module gtk2-shell-shows-menubar falseInstall and configure i3-hud-menu
Important note: I included exact instructions for Xubuntu, Ubuntu MATE and Linux Mint Cinnamon edition, but this should work with any Ubuntu or Linux Mint flavor (14.04 and newer only). It may also work in other Linux distributions, as long as you can install unity-gtk-module and appmenu-qt.
1. Install the required dependencies: python3, python-dbus, dmenu, appmenu-qt and unity-gtk-module.
In Ubuntu (14.04 and newer), use the following command (will also install "wget", required under step 2):
sudo apt install python3 python-dbus dmenu appmenu-qt unity-gtk2-module unity-gtk3-module wget2. Download and install i3-hud-menu
To download and install J.A. McNaughtons i3-hud-menu fork from the command line, use the following commands:
cd /tmp
wget https://github.com/jamcnaughton/i3-hud-menu/archive/master.tar.gz
tar -xvf master.tar.gz
sudo mkdir -p /opt/i3-hud-menu
sudo cp -r i3-hud-menu-master/* /opt/i3-hud-menu/
If you want to install it yourself, grab the code from GitHub (but note that the instructions below assume that youve installed i3-hud-menu in /opt/i3-hud-menu/)
3. Load the Unity gtk module
Open ~/.profile with a text editor (".profile" is a hidden file in your home folder so use Ctrl + H to see hidden files in your gile manager), paste the following at the end of the file:
export APPMENU_DISPLAY_BOTH=1
if [ -n "$GTK_MODULES" ]
then
 GTK_MODULES="$GTK_MODULES:unity-gtk-module"
else
 GTK_MODULES="unity-gtk-module"
fi

if [ -z "$UBUNTU_MENUPROXY" ]
then
 UBUNTU_MENUPROXY=1
fi

export GTK_MODULES
export UBUNTU_MENUPROXYIf after completing all the steps below, i3-hud-menu doesnt work, you can try to paste the lines above in ~/.bashrc instead of ~/.profile.
4. Add i3-appmenu-service.py to startup
The next step is to add i3-appmenu-service.py to the system startup. If youve installed i3-hud-menu using the commands above, this file should be located in /opt/i3-hud-menu/
Xubuntu: To add i3-appmenu-service.py to startup, launch Session and Startup from the menu / System Settings, and on the "Application Autostart" tab click "Add", enter "i3 menu service" under "Name", and "/opt/i3-hud-menu/i3-appmenu-service.py" (without the quotes) under "Command":

Ubuntu MATE: launch Control Center and open Startup Applications, click "Add", use "i3 menu service" under "Name", and "/opt/i3-hud-menu/i3-appmenu-service.py" (without the quotes) under "Command", and click "Add":

Linux Mint (Cinnamon): launch Startup Applications from the menu, click Add > Custom Command, use "i3 menu service" under "Name", and "/opt/i3-hud-menu/i3-appmenu-service.py" (without the quotes) under "Command", and click "Add":

5. Assign a keyboard shortcut to i3-hud-menu.py
The keyboard shortcut you assign to i3-hud-menu.py will be used to open i3-hud-menu and search through an applications menu. Heres how to configure it in some Ubuntu flavors and Linux Mint (Cinnamon).
Xubuntu: open "Keyboard" from the menu / System Settings, and on the "Application Shortcuts" tab, click "Add". Use "/opt/i3-hud-menu/i3-hud-menu.py" (without the quotes; if youve installed i3-hud-menu to a different location, make sure you use the correct path) for the command, click "OK:

... and assign it a keyboard shortcut:

You can even use "Alt", like in Ubuntu (with Unity), but I dont recommend it as you wont be able to use other shortcuts that use Alt. You can use something like Alt + 1 or any other keyboard shortcut thats not already in use.
Ubuntu MATE: from Control Center open Keyboard Shortcuts, click "Add", under "Name" enter "i3-hud-menu" (without the quotes), and use "/opt/i3-hud-menu/i3-hud-menu.py" (without the quotes; if youve installed i3-hud-menu to a different location, make sure you use the correct path) for "Command":

... and assign it a keyboard shortcut. Note that unlike Xubuntu, Ubuntu MATE doesnt allow assigning Alt as a shortcut. You can use something like Alt + 1 or whatever other keyboard shortcut you want, but make sure its not already in use.
Linux Mint (Cinnamon): launch Keyboard from the menu, click "Add custom shortcut", enter "i3-hud-menu" (without the quotes) under "Name", "/opt/i3-hud-menu/i3-hud-menu.py" (without the quotes; if youve installed i3-hud-menu to a different location, make sure you use the correct path) under "Command" and click "Add":

... and assign it a keyboard shortcut.
6. And finally, restart the session (logout/login), focus an application and use the keyboard shortcut you set in step 5 to open i3-hud-menu.
via / further reference:
- Reddit (thanks to JaZoray)
- jamcnaughton.com
Available link for download
Sunday, January 15, 2017
How to create jTable right click popup menu Java Swing GUI
How to create jTable right click popup menu Java Swing GUI
jTable right-click popup menu Java Swing GUI - Mouse click
Java 2016
table_6.addMouseListener(new MouseAdapter() {
 @Override
 public void mouseReleased(MouseEvent e)
 {
 int r = table_6.rowAtPoint(e.getPoint());
 if (r >= 0 && r < table_6.getRowCount()) {
 table_6.setRowSelectionInterval(r, r);
 } else {
 table_6.clearSelection();
 }

 //row index is found...
 int rowindex = table_6.getSelectedRow();
 if (rowindex < 0)
 return;
 if (e.isPopupTrigger() && e.getComponent() instanceof JTable ) {
 JPopupMenu popup = createYourPopUp(rowindex,table_6);
 popup.show(e.getComponent(), e.getX(), e.getY());
 }
 }

 });
jTable right-click popup menu Java Swing GUI - Method
Java 2016
public static JPopupMenu createYourPopUp(int rowindex, JTable table_6)
{
 JPopupMenu popup=new JPopupMenu();
 JMenuItem edit=new JMenuItem("Edit Details");
 JMenuItem delete=new JMenuItem("Delete Details");
 edit.addActionListener(new ActionListener() {
 @Override
 public void actionPerformed(ActionEvent e) {
 // TODO Auto-generated method stub
 JOptionPane.showMessageDialog(null, "Edit scucessfuly");
 }
 });
 delete.addActionListener(new ActionListener() {
 @Override
 public void actionPerformed(ActionEvent e) {
 // TODO Auto-generated method stub
 JOptionPane.showMessageDialog(null, "Delete scucessfuly");
 }
 });
 popup.add(edit);
 popup.add(delete);
 return popup;
}


Available link for download
Wednesday, January 11, 2017
How To Add Application Shortcut To Desktop Context Right Click Menu in Windows
How To Add Application Shortcut To Desktop Context Right Click Menu in Windows
 Do you want to add your favorite application to desktop context menu ? If your answer is yes, then this post is for you. There are many third party software available to do the same, but I am not writing about them.
 You can add any application to your desktop context menu by simply editing your registry. Just follow the simple steps to get it worked !
Steps
1. Press Windrows + R to open the Run box
2. Enter regedit in the open textfield and click OK
- It will open Registry Editor window
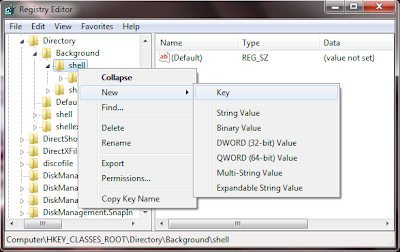
3. In Registry Editor expand HKEY_CLASSES_ROOTDirectoryBackgroundshell
4. Right click on the shell node click New > Key
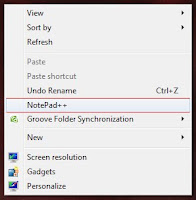
5. Now name the newly created Key to your apps name or anything you wish, because this name will show on the context menu of desktop. I am named it Notepad++.
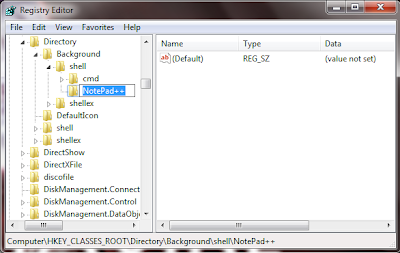
6. Now right click on the newly created key ( in my case NotePad++ ) and click New > Key
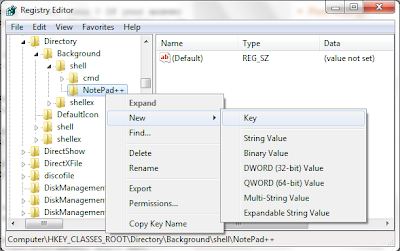
7. Name it to command

8. Now Right click on (Default) of command key and select Modify
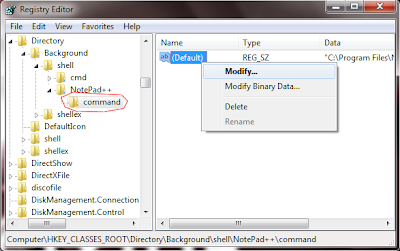
9. Now Copy the full path of your favorite application to the Value data textfield.... Click OK
Note : To copy the full path of application. Go to application folder find the apps .exe file. Shift + Right Click on the exe and click Copy as path.

Thats it done ! Now Go and check by right clicking desktop you will see the added menu item in Context menu !
Available link for download
Monday, October 10, 2016
Global Menu Applet For Cinnamon Desktop Global Application Menu
Global Menu Applet For Cinnamon Desktop Global Application Menu
A much requested applet was released to the Cinnamon Applets website recently: Global Application Menu.
Global Application Menu is a Cinnamon (the desktop environment used by default in Linux Mint Cinnamon edition) applet which allows displaying the application menu on the Cinnamon panel, either as a horizontal menu or as a menu button:


The applet, developed by Lester Carballo Pérez (lestcape) is based on the GNOME Shell AppIndicator extension and it makes use of unity-gtk-module (so it requires unity-gtk2-module and unity-gtk3-module to be installed). Thanks to this, the new Cinnamon global menu works with GTK2, GTK3 and Qt applications (requires appmenu-qt) as well as LibreOffice.
From the Global Application Menu settings, you can change the way the menu looks an behaves: you can show or hide the application icon on the panel, desaturate the app icon, show or hide the app name, display the menu as an horizontal menu or as a menu button and more:

Important. Please read.
According to its description, the applet is currently in beta and there are some potential/known issues. For instance, the applet can completely freeze Cinnamon in some cases and the Firefox menu disappears after some time. Also, in my test, the GNOME Terminal menu didnt work, even though I enabled "Show menubar" from its context menu.
I tested Global Application Menu with Linux Mint 17.1 and Ubuntu 15.04 with Cinnamon installed from the official Ubuntu repositories and while everything worked great under Linux Mint 17.1, Cinnamon failed to load under Ubuntu 15.04 after installing the Unity GTK modules and adding Global Application Menu applet to the panel (this might be caused by something I had installed or it might be related to the incomplete Cinnamon available in the official Ubuntu 15.04 repositories).
To recover from this issue, I removed the applet from ~/.local/share/cinnamon/applets/ and followed the uninstall instructions from HERE. So use this at your own risk and only if you know how to fix everything in case things go wrong!
The global menu did work in my test under Ubuntu 14.04 using the latest stable Cinnamon version from the lestcape PPA. So to use it in Ubuntu, I recommend using that PPA (the PPA only supports Ubuntu 14.04).
The global menu did work in my test under Ubuntu 14.04 using the latest stable Cinnamon version from the lestcape PPA. So to use it in Ubuntu, I recommend using that PPA (the PPA only supports Ubuntu 14.04).
Install Global Application Menu Cinnamon Applet in Linux Mint or Ubuntu (14.04)
The Global Application Menu might not work with the Cinnamon versions available in the official repositories so to use this in Ubuntu, I recommend using letscape PPA (Ubuntu 14.04 only). Also, please read the notes above before installing Global Application Menu applet!
1. Install Unity/Qt appmenu modules.
To be able to use the Cinnamon Global Application Menu applet, youll firstly need to install the Unity (AppMenu) GTK and Qt modules:
sudo apt-get install unity-gtk2-module unity-gtk3-module appmenu-qt appmenu-qt52. Restart your computer.
The Unity GTK/Qt modules load at system boot so to load them, a system restart is required.
3. Install Global Menu applet via Cinnamon Settings.
To do this, open Cinnamons System Settings and go to Applets > Available applets (online), then search for "Global Application Menu", select it and click "Install or update selected items":

4. Add the Global Application Menu to the panel.
To do this, right click on the panel on which you want to add the applet (preferably set up either a single top panel or two panels, one at the top and one at the bottom, so you can add the global menu to the top panel), select "Add applets to the panel" and from the "Installed applets" tab, select "Global Application Menu" and click "Add to panel".
5. Log out, log back in and you should now see a Global Application Menu on the Cinnamon panel, like in the screenshots above.
To configure it, right click the applet on the panel and select "Configure".
For how to completely uninstall Global Application Menu Cinnamon applet, see the instructions from HERE.
Report any bugs you may find @ GitHub.
Report any bugs you may find @ GitHub.
Thanks to Iain Closs for the tip!
Available link for download
Subscribe to:
Posts (Atom)