Showing posts with label 2. Show all posts

Tuesday, April 11, 2017

How To Manually Update Galaxy S3 GT I9300 to Official Android Jelly Bean 4 1 2 XXEMH4 Using Odin

How To Manually Update Galaxy S3 GT I9300 to Official Android Jelly Bean 4 1 2 XXEMH4 Using Odin


galaxy s3 jelly bean 4.1.2 update XXEMH4
Recently Samsung released Android 4.1.2 XXEMH4 for Galaxy S3 International version (GT-I9300). The update is available through OTA and Kies for the users of India, Sri Lanka, Bangladesh and Nepal. May be this is the final version of Android 4.1.2 for the following countries before the upcoming Android 4.3 update .The update include some battery and performance tweaks.

In this I included the steps to manually flash Android 4.1.2 Jelly bean XXEMH4 to Galaxy S3 I9300 International version using Odin.

Firmware Details
PDA: I9300XXEMH4
CSC: I9300ODDEMI2
MODEM: I9300DDEMG2

Note :
1. Backup your important data.
2. Enable USB debugging in your phone.
3. Battery must have 60% or more charge.
4. Disable or Exit Antivirus and Kies if you are installed.
5. Your PC must install Kies or Galaxy S3 driver.
6. This Firmware is only for Galaxy S3 I9300 International Version.

How To Flash Official Android 4.1.2 I9300XXEMH4 in Galaxy S3 I9300 using Odin ?

1. Download Official Android Jelly Bean 4.1.2 I9300XXEMH4 for your country from below links.
  India | Sri Lanka | Bangladesh | Nepal
2. Extract the downloaded firmware zip.
3. Download Odin v1.85 - Download
4. Now, Extract and Open odin3 v1.85.exe.
5. Power off your phone.
6. Now boot in to download mode. ( Press and hold : Volume down key and Home button ( Center button ) ,now press and hold the power button to boot in to download mode and Press Volume up on Warning)
7. In download mode connect your phone to PC.
8. Now look in to Odin... ID:COM box, it will be yellow with a port name and Added! message will be displayed.
( If not it will the problem of driver or USB ... check both )

galaxy s3 i9300 odin update com port yellow

9. In Odin..Click PDA and browse the extracted firmware folder and select I9300XXEMH4_I9300ODDEMI2_I9300DDEMG2_HOME.tar.md5 finally Click Start button.

galaxy s3 i9300 odin pda file

10. After complete update Odin will show PASS on top left and phone will reboot. now unplug phone from USB.

galaxy s3 i9300 odin pass

Thats it .... Done .

Note :
If the phone stuck at the boot screen...
1. Remove and reinsert your battery.
2. Now boot into recovery mode. (Volume up + Home + Power )
3. Apply wipe data/factory reset.
4. Apply wipe cache partition.
5. Finally reboot system...

Done !

Go to the below post to root the firmware

How To Root Samsung Galaxy S3 Jelly Bean 4.1.2 XXEMH4 ?


Available link for download

Read more »

Monday, April 3, 2017

GT N7000 running LOLLIPOP 5 0 2

GT N7000 running LOLLIPOP 5 0 2


Testing Lillipop 5.0.2 on my Galaxy Note GT-N7000

Let see the result. Coming soon...

What you need?
1. cm-Resurrection_Remix_LP_v5.3.8-20150309-n7000.zip.
2. gapps-lp-20141109-signed.zip.
3. philz_touch_6.48.4-n7000.zip.

If you are coming from 4.1.2, make sure you had installed philz above and reboot recovery before flashing lolli

How to install?

  1. Reboot recovery using Philz Touch
  2. Full wipe and factory reset
  3. Flash ROM 
  4. Flash Gapps
  5. Reboot.
  6. Enjoy!

Its that easy? YES!

Source: Click here


Available link for download

Read more »

Saturday, April 1, 2017

How To Root Unroot Xiaomi Redmi 2 Without PC

How To Root Unroot Xiaomi Redmi 2 Without PC


redmi 2 root without pc
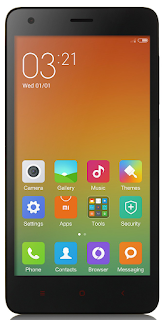
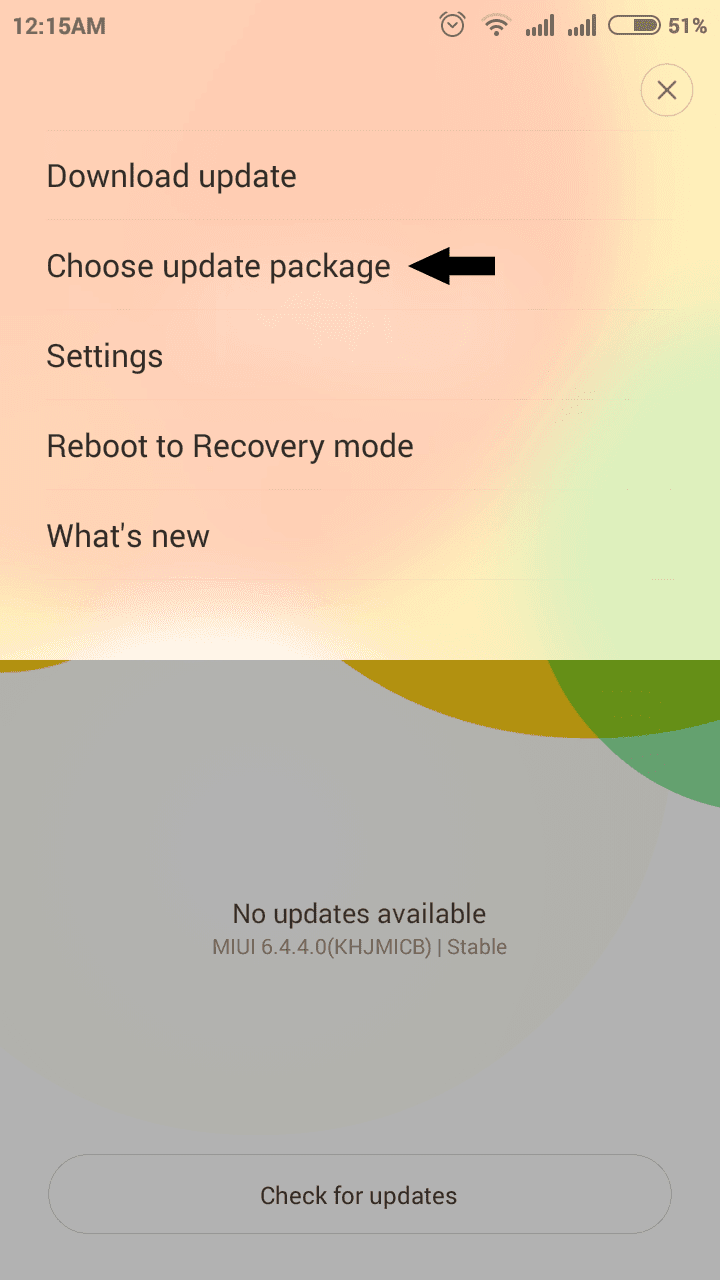
Redmi 2 is my first Xiaomi device and I am really satisfied with the spec and performance of the Redmi 2 for the price tag 6,999/- INR. Here I am posting the safest root method available in Xiaomi official forum for Redmi 2. This root method doesnt need any PC or Custom Recovery, just do it in your phone it self.

I have tested this root on the Redmi 2 Global version with MIUI version 6.4.4.0 (KHJMICB) and it worked without issue. In the Xiaomi forums Redmi 2 rooting thread you can find other variants of Redmi 2 root too.

Update
- Post updated with unrooting method.

Update (23/05/2015)
- Redmi 2 OTA update installation will fail on rooted device. So Unroot your Redmi 2 before OTA update.

Update (29-5-2015)
- Root available for V6.5.2.0.KHJMICD

Update (21-7-2015)
- Root available for V6.6.6.0.KHJMICF

Notes:
- In this post I am using the root for Redmi 2 Indian (Global) version with MIUI 6.4.4.0 (KHJMICB). If you have different phone or different MIUI version use appropriate root file.
- This root process will not delete any data. (Still recommend to backup important data)
- Battery percentage should be 40 or above.
- Rooting Will Void Warranty I am not responsible for any damage.

Redmi 2 Root Without PC

1. Download Specific Root File for Your Redmi 2 Version - Download
2. Copy The Root File to Internal Memory.
3. Open Updater app (Probably in Tools Folder)
4. In Updated app tap on the 3 dots on the right top and select Choose update package.

redmi 2 updater softwareredmi 2 updater choose update package

5. Now browse for the copied root file and select it.
(When You select the root package phone will reboot. Wait till it finish the process.)

6. After Reboot, Open Security app and tap on Permissions. You will see Root access menu there.

xiaomi redmi 2 root access

7. For Better root Management download Supersu and open it, then enable root access for Supersu in Security app finally Reboot device ...

Thats it you are successfully rooted your Xiaomi Redmi 2.

Redmi 2 Unroot Without PC

If any case you wish to unroot your Redmi 2 follow the below steps.

1. Download Specific UnrootRoot (Disable) File for Your Redmi 2 Version - Download

2. Copy the Unroot file to Internal Memory.

3. follow the rooting procedure from step 3.

Thats it.


Available link for download

Read more »

Monday, March 20, 2017

How To Root Galaxy S2 Jelly Bean 4 1 2 XXLSJ

How To Root Galaxy S2 Jelly Bean 4 1 2 XXLSJ


root galaxy s2 jelly bean 4.1.2 xxlsj
As a continuation of the post How To Manually Update Samsung Galaxy S2 to Stock Jelly Bean 4.1.2 I9100XXLSJ ?, in this post i am writing about the method to root Samsung Galaxy S2 Jelly Bean 4.1.2 XXLSJ. This method of rooting is more secure and simple. You dont need to install any insecure kernel and you dont need to use any third party tools, Just install the provided zip package from stock recovery.

We should thank to XDA senior member PhilZ for the zip package with a short time. The package contains root files , CWM6 and SuperSu.

Warning : Rooting will void phones Warrenty ! Rooting / Flashing may brick your phone ! We are not responsible for any damage do at your risk !

Note:
1. Backup Importent Data
2. Battery charge must be 60% or more

Root Galaxy S2 Jelly Bean 4.1.2 XXLSJ using zip package

1. Download 4.1.2 XXLSJ Root zip package from here (v3.75)
2. Copy the downloaded zip package XXLSJ-ROOT-CWM6.zip to external SD card.
3. Switch off your phone and wait till vibrate.
4. Boot in to stock recovery ( Volume up + Home + Power )
5. In recovery select apply update from external storage.

root galaxy s2 xxlsj recovery external storage

6. Select copied zip file XXLSJ-ROOT-CWM6.zip


7. After installation ....select reboot system now...

Thats it...Now you are successfully rooted Galaxy S2 4.1.2 XXLSJ.


Available link for download

Read more »

Saturday, March 18, 2017

How to root samsung galaxy ace 2

How to root samsung galaxy ace 2


FOR GINGERBREAD
Whats you need:
  • Samsung Galaxy Ace 2 GT-I8160 with Gingerbread
  • Custom Kernel with CWM or TWRP 
  • SuperSU Flashable Zip Download HERE.
  • A Sharp Eyes.
  • Smart Brain.
Steps:
  • First, Put the SuperSU Flashable Zip to your SD Card.
  • Boot into Recovery Mode (Volume Up + Home + Power)
  • Flash the SuperSU Flashable Zip from recovery.
  • Wait
  • Choose "Reboot System Now"
  • Tadaa, now you have a rooted phone.
FOR JELLY BEAN
Whats you need:
  • Samsung Galaxy Ace 2 GT-I8160 with Jelly Bean
  • Custom Kernel with CWM or TWRP 
  • SuperSU Flashable Zip Download HERE
Steps (Jelly Bean with Custom Kernel):
  • First, Put the SuperSU Flashable Zip to your SD Card.
  • Boot into Recovery Mode (Volume Up + Home + Power)
  • Flash the SuperSU Flashable Zip from recovery.
  • Wait
  • Choose "Reboot System Now"
  • Tadaa, now you have a rooted phone.
Steps (Jelly Bean with Stock Kernel):
  • First, Put the SuperSU Flashable Zip to your SD Card.
  • Boot into Recovery Mode (Volume Up + Home + Power)
  • Flash the CWM from stock recovery.
  • Flash the SuperSU Flashable Zip from CWM recovery.
  • Wait.
  • Choose "Reboot System Now"
  • Tadaa, now you have a rooted phone.
*****************************************************************


Available link for download

Read more »

Thursday, February 23, 2017

How To Flash Official Android Jelly Bean 4 1 2 XWLS8 on Galaxy S2 I9100

How To Flash Official Android Jelly Bean 4 1 2 XWLS8 on Galaxy S2 I9100


update galaxy s2 i9100 to jelly bean 4.1.2 xwls8
Samsung started rolling out Android 4.1.2 to Galaxy S2 International variant (I9100). So far this is the major update to Galaxy S2 by Samsung. Through Kies or OTA this Official update is available only for some selected countries.

If your phone not showing any update dont worry , Samsung will provide the update very soon to Your country or you can manually install the update by following the simple steps here.

Some great features in the new Jelly Bean Update:
- Buttery Smooth Performance & Great Stability
- Full User Interface Revamp (Same UI as of the Galaxy S III and Galaxy Note II)
- TouchWiz Nature UX
- S Cloud services by Samsung
- Improved Camera features
- New Lockscreen With Many Customization Options
- New Features like Direct Call, Smart Stay and Pop-up Play
- New Widgets (From Galaxy S III)
- 2 Home screen modes
- New Notification bar With More Notification Toggles
- Google Now

Firmware Details:
Android Version: 4.1.2 – Build JZO54K
PDA: I9100XWLS8
CSC: I9100FOPLS3
MODEM: I9100XXLS8
Changelist: 816988
Build Date: 14 January 2013

Must Note :
1. This update only for Samsung Galaxy S2 International variant I9100
2. Make sure that your phone is factory unlocked not locked for specific carrier
3. Backup All the Data in your Phone
4. Your Phone Charge Must Be 80% or above
5. Enable USB Debugging
6. Make sure you have installed Kies or S2 driver
7. Exit Antivirus, Kies etc .. before start flashing.

How To manually update Galaxy S2 I9100 to Official Android Jelly Bean 4.1.2 XWLS8?

1. Search Samfirm to download the Specific 4.1.2 to your country Or Download Galaxy S2 4.1.2 XWLS8 (Spain) firmware and Extract it to PC
2. Download Odin3 v1.85 and Extract it
3. Power off and boot Galaxy S2 in to download mode. ( Volume down + Home + Power )
4. In download mode connect your phone to PC.
5. Now Open Odin 1.85 and look in to ID:COM box it will be yellow with a port name and a "Added!" message will be displayed in Message box.
6. In Odin..Click PDA and select I9100XWLS8_I9100XXLS8_I9100FOPLS3_HOME.tar.md5 from Extracted firmwares folder.

7. Click Start button. Odin will show PASS on top left and phone will reboot.

Thats it done ....You are succefully flashed your Galaxy S2 to Official Android Jellybean 4.1.2.
If you face boot loop after flashing ...go to recovery mode and do a factory reset and wipe cache....done...

ROOT FOR GALAXY S2 4.1.2 XWLS8 IS AVAILABLE HERE


Available link for download

Read more »

Monday, February 13, 2017

How To Root Samsung Galaxy S3 Jelly Bean 4 1 2 XXEMH4

How To Root Samsung Galaxy S3 Jelly Bean 4 1 2 XXEMH4


Galaxy S3 Jelly Bean 4.1.2 XXEMH4 root
As a continuation of the previous post, here I am including the method to root Galaxy S3 I9300 Jelly Bean 4.1.2 XXEMH4. The method is based on the Galaxy S3 CF Auto Root method which was posted before.

So far this is the fastest and simplest method of rooting Galaxy S3 I9300 Jelly Bean 4.1.2 XXEMH4. The Root is developed by XDA Elite Recognized Developer Chainfire. This post is specific for Galaxy S3 I9300. If you have other Galaxy S3 variants follow the post here

Requires:
- A windows computer with Galaxy s3 driver installed ( Use Kies ).
- Odin
- Any of the Galaxy S3 model listed in the Supporting Models with more than 50% battery.
- USB Cable

Note:
- Backup all your important data.
- Kill all the Kies processes using Windows Task Manager.
- Disable Antivirus.
- This Root is Only for Galaxy S3 I9300 International version

Disclaimer:
Rooting or installing recovery may brick your phone or void warranty. I am not responsible for anything. Do at your risk.

How To Root Galaxy S3 Jelly Bean 4.1.2 XXEMH4 ?


1. Download and extract CF-Auto-Root-m0-m0xx-gti9300.zip from here ( Odin Included )

2. In the extracted folder open Odin3-v1.85.exe.

3. Click PDA button and select CF-Auto-Root-m0-m0xx-gti9300.tar.md5.

4. Boot your phone to download mode ( Turn off phone, after all the lights gone press volume Down + Home + Power .If it asks to press a button to continue, press the listed button ).

5. Now, Connect the phone to PC using USB cable.

6. If everything correct Odins ID:COM box it will be in yellow or blue color with a port name.

7. Make sure Re-partition is NOT checked.

galaxy s3 Jelly Bean 4.1.2 XXEMH4 root odin

8. Finally Click Start button and wait till the phone reboot.

After complete update Odin will show PASS on top left and phone will reboot.

galaxy s3 Jelly Bean 4.1.2 XXEMH4 root odin pass

Thats it....You are successfully Rooted your phone....

How To Install TWRP Custom Recovery in Galaxy S3


Available link for download

Read more »

Monday, January 30, 2017

GENNXT FIRST PORT ROM FOR GRAND 2

GENNXT FIRST PORT ROM FOR GRAND 2


Instructions:-
Do Take your current Rom Backup first from CWM Recovery
Quote:
1 - Download the Rom zip file and place it in your phone memory
2 - Boot ur phone in CWM Recovery and choose install zip option 
3 - Aroma installer guides u to Install the rom 
4 - After installation Reboot your phone and its done


CLICK HERE FOR S5 PORT ROM


Available link for download

Read more »

Saturday, January 28, 2017

How to Delete Locked Games in Corby 2

How to Delete Locked Games in Corby 2


Corby 2 has its own unique feature which includes Games for entertainment. There are times that we feel to play new games especially when we become bored on the current game that we play. But these locked games may be annoying to some of us because they are large in size. Since Corby 2 has a limited Phone memory, you need to delete one of those games so that you can download a new one. But how can you completely
eliminate this locked games? Follow these easy steps.

1. Gather the required things.

   Deleting locked games cannot be done on your phone manually. You need to do it by plugging your phone ( Corby 2 ) on your computer. Prepare your Samsung USB Cord and configure your Corby 2. Remove your Sim card and Memory card for safety reasons. 

   If you havent installed Samsung USB Driver yet, download and install one so that your device will run smoothly. To make sure that you have successfully installed Samsung USB Driver, check it manually. Plug your phone on your Computer. 

   For Windows XP Users: 

  • Go to "Control Panel"
  • Click "Performance and Maintenance"
  • Click "System"
  • Click "Hardware" then "Device Manager"
  • Under "Modems", You should see "Samsung USB Modem"
   For Windows 7 Users:
  • Click "Start" then search "Device Manager"
  • Under "Modems", You should see "Samsung USB Modem"
   Now download TK File Explorer 2.4, this is the software that we are going to use to delete the locked games. Extract the file. File password is corbysociety.

2. Follow the steps carefully.

At this moment, your phone must be already plugged on your computer.
  • Launch TK File Explorer 2.4
  • Click "Connect" and set your "Port" ( Example COM5 ) then click "Ok". Click "Connect" once again.
  Method # How to Know Your Port
  1. Using your keyboard, press the Windows logo+R (not CTRL+R) then type devmgmt.mschit enter and the Device Manager window should appear. Click "Modems" and right click SAMSUNG Mobile USB Modem. Select Properties. Click the Modem tab and you will see your Port number. Take note of that.
  2. Using Multiloader v5.65, you can also know what your port number is using. Download Multiloader v5.65 here. Launch Multiloader and then connect your phone in "Download Mode" in your computer. Now click "Port Search" you should see what your port number is.
  • Click "AppEx" then click "User"


  • Click "Java" then click "Games"

  • You should see a list of your games. Finally, delete the locked games.
  • Click "Disconnect" and unplug your phone ( Corby 2 ).
Watch Video tutorial by Hariz Zizi


If you have any questions/clarifications, just leave a comment.


Available link for download

Read more »

Monday, January 23, 2017

Hotspot Shield apk 4 2 5 Elite VPN Full Version

Hotspot Shield apk 4 2 5 Elite VPN Full Version


Hotspot Shield apk 4.2.5 Elite VPN Full Version ( mod cracked pro ) - merupakan salah satu aplikasi yang wajib di miliki Untuk para pengguna android, terutama untuk Anda yang suka menghubungkan wi-fi Anda dengan Hotspot gratis orang lain.


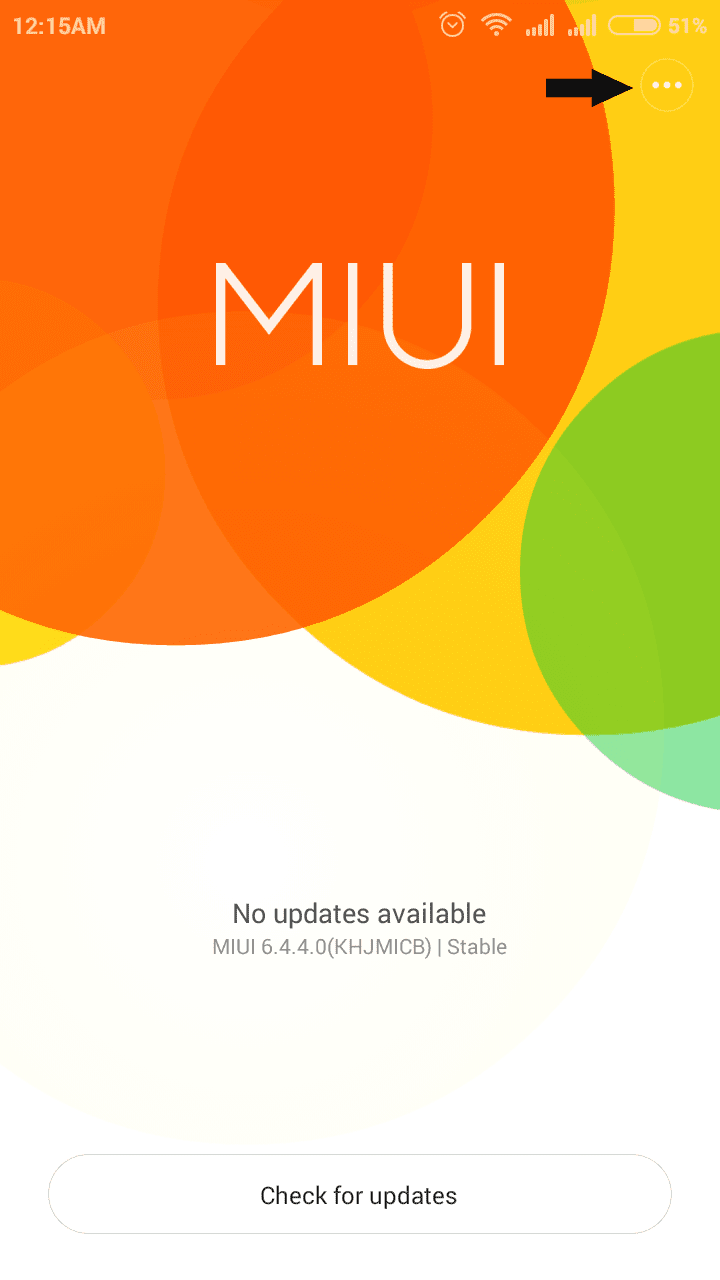
"Menggunakan/menyambungkan Wi-Fi secara publikasi itu sebenarnya kurang baik. Kenapa? : Karena tanpa kita sadari sang pemilik hotspot akan mudah mengetahui semua data yang ada pada perangkat kita dan mudah disusupi oleh hacker!"

Namun Anda tidak usah khawatir karena aplikasi Hotspot Shield ini dapat menjaga keamanan data penting ponsel Anda, pada saat menggunakan hotspot orang lain. Uniknya aplikasi yang satu ini juga dapat mengamankan koneksi internet kita dengan cara mengubah IP asli kita dengan IP lainnya. Dengan menginstal ini anda juga dapat mengakses situs-situs yang diblokir oleh provider anda. Apalagi disini kami membagikan HotSpot Shield Full VPN Elite Edition yang sudah di crack. Sehingga anda dapat menggunakan aplikasi ini selama apapun anda mau tanpa adanya popup yang mengganggu.

Memang di luar sana banyak bertebaran HotSpot Shield Full apk yang dibagikan, namun kebanyakan sudah tidak dapat digunakan lagi. Terkadang kita malah hanya mendapatkan notifikasi untuk segera mengupgrade versi HotSpot Shield yang kita instal tersebut. Namun disini kami membagikan HotSpot Shield VPN Elite Edition terbaru Full Apk yang masih work hingga postingan ini kami buat. Jadi tunggu apalagi, segera anda download dan instal HotSpot Shield Full ini sekarang juga.

Disini kami membagikan versi apk yang sudah di crack dari HotSpot Shield VPN Elite Edition ini. Jadi anda hanya perlu menginstalnya ke Android anda dan anda sudah mendapatkan HotSpot Shield VPN Elite Edition Premium ini dengan gratis.

Dtails

Hotspot Shield apk 4.2.5 Elite VPN Full Version mod cracked pro Free Download Material Design Dark Light Themes Latest v4.2.5 android app file mediafire zippyshare torrent

Play Store Link :

What’s New :

? NEW! App Lock -Menyembunyikan aplikasi pribadi Anda dari pengintai dengan kode sandi
? Automatically turn on Hotspot Shield -ketika Anda membuka aplikasi favorit Anda
? Connects More Faster : Fixed connecting issues some user were having

Features of this app :

WDengan Hotspot Shield Virtual Private Network, Anda dapat melewati firewall dan melihat secara anonim untuk menghindari dilacak.
– Mengamankan semua aktivitas online dengan enkripsi perbankan-tingkat pada setiap jaringan publik atau IP lokal.
– Menyembunyikan alamat IP Anda, identitas, dan lokasi dari situs web dan pelacak secara online.
– Menikmati privasi dan keamanan maksimum untuk mencegah pencurian informasi pribadi.
– Membuka website yang di blokir dan layanan mobile VoIP.
– mengubah secara otomatis Hotspot Shield pada saat aplikasi tertentu diluncurkan pada ponsel Anda atau ketika Anda terhubung ke jaringan WiFi.
– Pilihan lokasi di Australia, Canada, China, Germany, Hong Kong, India, Japan, UK,US and more!
– Aplikasi disertakan dengan pola dan fasilitas pincode untuk mengamankan perangkat Anda yang lebih.

Features of this mod :

* Tersedia dengan 2 tampilan tema yaitu cerah Dan gelap. (Official app have LIGHT theme)
* Semua jenis iklan sepenuhnya telah Dihapus.
* “Elite” atau “Premium” (pro) diaktifkan secara default tanpa sign in. (Akses hanya di Lokasi AS)
* Material Design, dan ditambahkan dengan ikon cantik.
* In-App updater of added for future CRACK updates.

App Info :

Version Name & Version Code (Build) : 4.2.5g (425)
Updated on : 28 January 2016
Developed by : AnchorFree GmbH
Required Android Version : 4.0.3 ICE CREAM SANDWICH and up (API 15)
Official APK size : 10.1 MB
Dark Variant MD5 | Size : 0A3A16059263FAD1B2004E3E8E47AE1A | 9.13 MB (9,580,351 bytes)
Light Variant MD5 | Size : DBE14C776FABC87FA55D3E246230E5A8 | 9.13 MB (9,583,775 bytes)
Minimal Variant MD5 | Size : 37EF012C7D30E25BEF1454B70B22DD7D | 9.37 MB (9,831,954 bytes)

Download Link (Dark Apk):

Link 1 (Mediafire)
Link 2 (Zippyshare)

Download Link (Light Apk):

Link 1 (Mediafire)
Link 2 (Zippyshare)

Download Link (Minimal Apk):

Link 1 (Mediafire)
Link 2 (Zippyshare)


Instructions :

* Cukup Install apk v4.2.5-g / dengan 2 varian tema gelap dan cerah tergantung pada pilihan Anda
* First try Dark/Light variant, if it doesnt work for you properly then and only then use MINIMAL variant. It will work for sure.
* Enjoy


Available link for download

Read more »

Sunday, January 22, 2017

Harga Hardisk Laptop 2 5 3 5 dan SSD 2016

Harga Hardisk Laptop 2 5 3 5 dan SSD 2016


Harga Hardisk Laptop, 2.5, 3.5 dan SSD
Anda yang tertarik dengan harga Hardisk Laptop jenis ini sendiri terlebih dahulu perlu mengetahui bahwa penyimpan data ini terdiri dari dua macam ukuran yang biasanya digunakan sesuai dengan jenis perangkat yang dimiliki. Bagi pemilik PC Desktop maka Anda perlu mencari harga Hardisk berukuran 3.5 inci karena harga hardisk berukuran 2.5 inci ditujukan untuk laptop terbaik atau sebagai HD eksternal. Perkembangan teknologi yang makin pesat juga memunculkan pesaing Hard Disk Drive (HDD) yaitu apa yang dikenal masyarakat sebagai SSD (Solid State Drive). Perangkat berteknologi SSD mulai dikenal penggunaannya secara luas ketika Anda mengenal flashdisk atau flashdrive yang saat ini sudah memiliki kapasitas besar meski dibalut dalam tubuh cukup mungil.
Tentunya ada perbedaan cukup signifikan dari kedua jenis komponen ini selain dari segi harga harddisk laptop. Perbedaannya jelas terlihat dari prinsip kerja dimana HDD memiliki plat yang terus berputar ketika menerima dan mengolah data, sementara sang generasi terbaru SSD tidak memiliki komponen bergerak didalamnya ketika digunakan. Hal ini jugalah yang menyebabkan teknologi SSD dikenal lebih fleksibel karena tahan terhadap guncangan sekaligus mudah dibawah kemanapun Anda membutuhkan.

Harga Hardisk Laptop 2.5

Seagate
Seagate 2.5 320GB SATA 8MB 5400RPM
Rp 430,000
Seagate 2.5 500GB SATA 8MB 5400RPM
Rp 539,000
Seagate 2.5 500GB SATA 8MB 7200RPM
Rp 865,000
Seagate 2.5 1TB SATA 8MB
Rp 1,344,000
Seagate 2.5" 147GB SAS 10000 RPM
Rp 3,075,000
Seagate 2.5" 300GB SAS 10000 RPM
Rp 3,833,000
Seagate 2.5" 147GB SAS 15000 RPM
Rp 3,926,000
Seagate 2.5" 300GB SAS 15000 RPM
Rp 6,349,000
Seagate 2.5" SSHD 500GB, SSD 8GB
Rp 1,111,000
Seagate 2.5" SSHD 1TB, SSD 8GB
Rp 1,150,000


Toshiba
Toshiba 2.5 320GB SATA 8MB
Rp 410,000
Toshiba 2.5 500GB SATA 8MB 5400RPM
Rp 529,000
Toshiba 2.5 750GB SATA 8MB 5400RPM
Rp 570,000
Toshiba 2.5 1TB SATA 8MB
Rp 752,000
Toshiba 2.5" 147GB SAS 15000RPM - MK1401GRRB
Rp 2,902,000
Toshiba 2.5" 300GB SAS 15000RPM - MK3001GRRB
Rp 4,845,000
Toshiba 2.5" 300GB SAS 10000RPM - MBF2300RC
Rp 2,422,000
Toshiba 2.5" 450GB SAS 10000RPM - MBF2450RC
Rp 3,314,000
Toshiba 2.5" 600GB SAS 10000RPM - MBF2600RC
Rp 3,993,000


WDC
WDC 2.5 320GB SATA 16MB
Rp 430,000
WDC 2.5 500GB SATA 8MB
Rp 586,000
WDC 2.5 1TB SATA 8MB
Rp 812,000
WDC 2.5" 320GB SATA 7200RPM - Scorpio Black
Rp 705,000
WDC 2.5" 500GB SATA 7200RPM SATA3 - Scorpio Black
Rp 779,000
WDC 2.5" 750GB SATA 7200RPM - Scorpio Black
Rp 1,344,000
WDC 2.5" Black 2 Dual Drive (1TB HDD + 120GB SSD)
Rp 4,485,000
WDC 2.5" 1TB 7MM
Rp 1,078,000


Samsung
Samsung 2.5" 320GB SATA - ST320LM001
Rp 390,000
Samsung 2.5" 500GB SATA
Rp 579,000


Hitachi
Hitachi 2.5 320GB SATA2 8MB - 5400RPM
Rp 420,000
Hitachi 2.5 500GB SATA3 8MB 5400RPM - 7mm
Rp 520,000
Hitachi 2.5 500GB SATA3 16MB 7200RPM - 7mm
Rp 570,000
Hitachi 2.5 1TB SATA3 8MB 5400RPM
Rp 752,000
Hitachi 2.5 1TB SATA3 16MB 7200RPM
Rp 845,000
Hitachi 2.5" 73GB SAS 15000RPM
Rp 3,314,000
Hitachi 2.5" 147GB SAS 15000RPM
Rp 4,099,000
Hitachi 2.5" 300GB SAS 10000RPM
Rp 3,713,000
Hitachi 2.5" 450GB SAS 10000RPM
Rp 5,790,000
Hitachi 2.5" 600GB SAS 10000RPM
Rp 6,189,000
Hitachi 2.5" 900GB SAS 10000RPM
Rp 10,408,000

Harga Hardisk Laptop 3.5

WDC
WDC 80GB IDE 8MB
Rp 170,000
WDC 120GB IDE 8MB
Rp 180,000
WDC 160GB SATA2
Rp 180,000
WDC 320GB SATA2 8MB
Rp 300,000
WDC 320GB IDE 8MB
Rp 280,000
WDC 500GB SATA3 16MB - Caviar Blue
Rp 599,000
WDC 500GB SATA3 32MB - Caviar Black Ver.2
Rp 852,000
WDC 1TB SATA3 64MB - Caviar Blue
Rp 679,000
WDC 1TB SATA 32MB - Caviar Black RE
Rp 580,000
WDC 1TB SATA3 64MB - Caviar Black
Rp 998,000
WDC 2TB SATA3 64MB - Green Power
Rp 1,018,000
WDC 2TB SATA3 64MB - Caviar Red
Rp 1,251,000
WDC 2TB SATA3 64MB - Caviar Black
Rp 1,843,000
WDC 3TB SATA3 64MB - Green Power
Rp 1,391,000
WDC 3TB SATA3 64MB - Caviar Red
Rp 1,664,000
WDC 3TB SATA3 64MB - Caviar Black Ver.2
Rp 2,436,000
WDC 4TB SATA3 64MB - Green Power
Rp 1,917,000
WDC 4TB SATA3 64MB - Caviar Red
Rp 2,269,000
WDC 4TB SATA3 64MB - Caviar Black Ver.2
Rp 3,274,000
WDC 5TB SATA3 64MB - Green Power
Rp 2,689,000
WDC 5TB SATA3 64MB - Caviar Red
Rp 3,141,000
WDC 6TB SATA3 64MB - Green Power
Rp 3,254,000
WDC 6TB SATA3 64MB - Caviar Red
Rp 3,727,000
Samsung
Samsung 120GB IDE [Search]
Rp 160,000
Samsung 160GB SATA 7200RPM
Rp 210,000
Samsung 320GB SATA 7200RPM 16MB
Rp 320,000
Samsung 500GB SATA
Rp 659,000
Samsung 1TB SATA2
Rp 510,000
Seagate
Seagate 80GB IDE 8MB
Rp 180,000
Seagate 80GB SATA2
Rp 135,000
Seagate 120GB IDE
Rp 170,000
Seagate 160GB IDE
Rp 230,000
Seagate 160GB SATA2
Rp 190,000
Seagate 320GB SATA2
Rp 290,000
Seagate 500GB SATA3
Rp 596,000
Seagate 1TB SATA3
Rp 679,000
Seagate 1TB SSHD
Rp 785,000
Seagate 2TB SSHD
Rp 735,000
Seagate 4TB SSHD
Rp 1,078,000
Seagate 2TB SATA3 - 7200 RPM
Rp 1,431,000
Seagate Surveillance 2TB
Rp 2,349,000
Seagate 2TB For NAS
Rp 1,038,000
Seagate 3TB SATA3 64MB - 7200 RPM
Rp 1,185,000
Seagate Surveillance 3TB
Rp 1,110,000
Seagate 3TB For NAS
Rp 1,271,000
Seagate 4TB SATA3
Rp 1,418,000
Seagate Surveillance 4TB
Rp 1,597,000
Seagate 4TB For NAS
Rp 1,544,000
Seagate 6TB For NAS
Rp 1,670,000
Hitachi
Hitachi 160GB SATA 7200RPM
Rp 220,000
Hitachi 320GB SATA 7200RPM
Rp 325,000
Hitachi 500GB SATA 7200RPM
Rp 479,000
Hitachi 3TB NAS
Rp 1,863,000
Hitachi 4TB NAS
Rp 2,609,000
Toshiba
Toshiba 500GB SATA3 7200RPM
Rp 542,000
Toshiba 1TB SATA3 7200RPM
Rp 679,000
Toshiba 2TB SATA3 7200RPM
Rp 992,000
Toshiba 3TB SATA3 7200RPM
Rp 1,384,000
Toshiba 4TB SATA3 7200RPM
Rp 2,090,000

Harga Hardisk Laptop SSD

Samsung
Samsung SSD 850 EVO 120GB
Rp 1,050,000
Samsung SSD 850 EVO 250GB
Rp 1,560,000
Samsung SSD 850 EVO 500GB
Rp 2,790,000
Samsung SSD 850 EVO 1TB
Rp 5,050,000
Samsung SSD 850 PRO 256GB
Rp 2,130,000
Samsung SSD 850 PRO 512GB
Rp 4,120,000
Samsung SSD 850 PRO 1TB
Rp 7,140,000
Sandisk
Sandisk SSD Ultra Plus 128GB
Rp 800,000
Sandisk SSD Ultra Plus 256GB
Rp 1,490,000
Sandisk SSD Ultra-II 120GB
Rp 980,000
Sandisk SSD Ultra-II 240GB
Rp 1,380,000
Sandisk SSD Ultra-II 480GB
Rp 2,730,000
Sandisk SSD Ultra-II 960GB
Rp 4,950,000
Sandisk SSD Extreme Pro 240GB - SDSSDXPS-240G
Rp 1,870,000
Sandisk SSD Extreme Pro 480GB - SDSSDXPS-480G
Rp 3,510,000
Sandisk SSD Extreme Pro 960GB - SDSSDXPS-960G
Rp 6,260,000
Kingston
Kingston HyperX 3K SH103S3 120GB SATA3
Rp 1,080,000
Kingston HyperX 3K SH103S3 240GB SATA3
Rp 1,825,000
Kingston HyperX Fury SHFS37A/120G 120GB SATA3
Rp 902,000
Kingston HyperX Fury SHFS37A/240G 240GB SATA3
Rp 1,544,000
Kingston SDD Now V300 SV300S37A/60G 60GB SATA3
Rp 570,000
Kingston SDD Now V300 SV300S37A/120G 120GB SATA3
Rp 690,000
Kingston SDD Now V300 SV300S37A/240G 240GB SATA3
Rp 1,250,000
Team
Team T253L3240GMC101 (L3) - 240GB
Rp 1,291,000
Crucial 
Crucial BX100 120GB
Rp 930,000
Crucial BX100 250GB
Rp 1,330,000
Crucial BX100 500GB
Rp 2,430,000
Crucial BX100 1TB
Rp 4,890,000
Crucial MX200 250GB
Rp 1,887,000
Crucial MX200 500GB
Rp 3,438,000
Crucial MX100 128GB
Rp 940,000
Crucial MX100 256GB
Rp 1,440,000
Crucial MX100 512GB
Rp 2,560,000
Crucial M550 128GB tail]
Rp 1,029,000
Crucial M550 512GB
Rp 3,270,000
Kingfast 
Kingfast SSD F6 60GB
Rp 399,000
Kingfast SSD F6 120GB
Rp 630,000
Kingfast SSD F9 256GB
Rp 1,120,000
Kingfast SSD F9 512GB
Rp 2,199,000
Kingfast SSD F9 1TB
Rp 4,990,000

* Harga Hardisk Laptop Dapat Berubah Sewaktu-waktu
Harga hardisk laptop sendiri bervariasi tergantung dari merek yang diinginkan. Anda harus memastikan untuk memilih komponen yang paling sesuai dengan kebutuhan, seperi hardisk 2.5 inci, 3,5 inci, maupun hardisk SSD. Perhatikan pula kecepatan komponen dalam menerima dan mengolah data agar segala pekerjaan Anda berjalan dengan lancar. Selamat memilih dan membeli harga hardisk laptop penawaran terbaik ya


Available link for download

Read more »

Thursday, January 12, 2017

How to flash Galaxy S2 i9100 4 2 2 Custom ROM Super Nexus 2 0 Updated

How to flash Galaxy S2 i9100 4 2 2 Custom ROM Super Nexus 2 0 Updated


galaxy s2 best jelly bean 4.2.2 rom
Do you have Samsung Galaxy S2 ? Do you want to experience the pure android in it ? the here it is. This post describe the steps to flash Jellybean 4.2.2 based custom ROM Super Nexus 2.0 on Samsung Galaxy S2.

There are many custom ROMs in XDA but i like Super Nexus ROM. I started using this ROM since its 4.0.4 build and i am really satisfied with it. In my Galaxy S2 ,now i am using Super Nexus 2.0 build 3. Its really smooth. Thanks to Faryaab for making this amazing ROM.

Super Nexus 2.0 gives vanilla android experience like Googles nexus devices. The ROM is entirely built from Googles AOSP Source with lot of improvements and optimizations and removed all the third party apps(ZERO Bloatware).

Update:
I was using XWLS8 4.1.2 now again switched back to Super Nexus 2.0. Now its on Android 4.2.2 the latest one recently started giving to Nexus device only.

System Details:
- Android 4.2.2 Jelly Bean (JOP40D - Android-4.2.2_r1)
- Latest CM Kernel
- All Jelly Bean Features and Apps (Nothing excluded from AOSP)
- No Visual Changes!
- Stock Jelly Bean Look and Feel

ROM Features:
Show / Hide Content

- Fully Deodexed
- Zipaligned APKs
- Rooted (Super SU)
- BusyBox Installed
- No 3rd Party App
- ZERO Bloatware
- Android Source Code vastly improved and optimized (i.e. Bionic, Dalvik, Webkit, Framework, libcore, SQlite etc)
- Official Jelly Bean Bootanimation (From Official Galaxy Nexus Android 4.2.1 Factory Image)
- Init.d Support
- UserInit Support
- Bash & Nano Support
- Native SIP/VOIP Support
- HSPA+ Support
- OpenVPN Support
- EXT4 File System Optimizations
- Galaxy S II Device Settings As An App
- Large APN & SPN List

Framework Features:
-Extended Power Menu (Reboot, Recovery, Download & Screenshot Options)
-Improved Scrolling Cache
-Tweaked Animation Values Of Progress Spinners (Silky Smooth Loading Spinners)
-Enabled Rotation Lock Tile in Quick Settings for Phones (Previously was only enabled on Tablets)

Camera Features:
-Burst Shot (Up to 20 Images at once)
-ISO Mode
-Touch Focus Duration
-Power Shutter (Click Power Button To Capture Image/Video)
-Color Effects
-Shutter Timer
-Zero-Shutter Lag (On Specific devices)
-sphere camera not included

Browser Features:
-Increased Maximum Tab limit from 16 to 64
-Incognito Tab Option (When long pressed on an URL)
-Option To Close All Tabs With One-Click
-Allowed Any Type Of File To Be Downloaded

Phone Features:
-T9 Dialer Support
-Landscape Dialer Support
-Transparency To Incall Screen
-Noise Suppression

Miscellaneous Features:
-Allowed Installation Of Apps From Unknown Sources By Default
-Allowed Any Type Of File To Be Sent/Received Via Bluetooth
-Disabled Data Roaming By Default
-Removed Googles Software Updates Option from Settings
-Enabled Gesture Input By default
-Hardware Information of the device (Settings>About Device>Hardware Information)
Note:
- Phone must be rooted and Clockworkmod Recovery (CWM) installed.
- Backup your data
- battery must be 70% or above.
- download links provided on this post is only for Galaxy S2 i9100 .. if you have a different device visit forum thread to get download link.

Note from developer
Philz kernel and recovery causes some kind of issues with AOSP ROM installations, please use CF-Root, Siyah, CM or Dorimanx kernel before flashing SuperNexus.

Disclaimer : Rooting / Flashing may brick your phone we are not responsible for any damage. Do at your risk.

How to flash Super Nexus 2.0 on Galaxy S2 i9100

1. Download Super Nexus 2.0 BUILD 3 From XDA threadfrom here
2. Download Gapps for Jelly Bean from here
3. Copy both downloaded files to internal SD card.
4. Switch off your phone and wait till vibrate.
5. Boot in to Clockworkmod recovery ( Volume up + Home + Power )
6. Do a Wipe data/factory reset.
7. select install zip from sdcard.
8. select choose zip from internal sdcard.
9. select SuperNexus-2.0-i9100-BUILD3.zip and install..after installation.
10. select gapps-jb-20121212-signed.zip and install...after installation.
11. select reboot system now.

Thats it wait till the phone reboots...!


Available link for download

Read more »

Saturday, January 7, 2017

GNOME Twitch 0 2 0 Adds Chat Feature Ubuntu PPA

GNOME Twitch 0 2 0 Adds Chat Feature Ubuntu PPA


GNOME Twitch

GNOME Twitch was updated to version 0.2.0 recently, adding a much needed chat feature, along with various user interface improvements and bug fixes.

In case youre not familiar with Twitch.tv, this is a popular live streaming video platform that primarily focuses on video gaming. GNOME Twitch lets you play Twitch streams without Flash, browse games and channel lists, add favorite channels and change the video quality.

The latest GNOME Twitch 0.2.0 brings support for chat. To be able to see and/or join the conversation, youll need to log in to Twitch from the GNOME Twitch preferences.

GNOME Twitch

For now, logging in to Twitch only allows using the chat feature (and its not possible to view the chat without logging in, but this should be fixed in a future release), while other features, like receiving notifications when a stream goes live, subscribing or following streams, and so on, are not yet supported.

An alternative to get notifications when the channels you follow go live is Twitch.tv Indicator.

You can add streams to your favorites in the app, even without logging in to Twitch though.

GNOME Twitch

The chat implementation in GNOME Twitch supports displaying Twitch emotes, including subscriber, turbo, etc. badges, allows using a dark or light background and to set its opacity, width and height as well as to hide the chat. 

Right now, the chat doesnt display the user list and links in chat are not clickable, but thats on the todo list.

I should also add that after logging in to Twitch, you need to restart GNOME Twitch to be able to use the chat feature.

Note that GNOME Twitch uses header bars (client-side decorations), so it will look out of place in Ubuntu (with Unity), at least with the default Ambiance theme (it looks ok with other themes, such as Numix or Greybird). Header bars were fixed in Ubuntu 16.04, but not for all applications and GNOME Twitch is of them (heres a screenshot in Ubuntu 16.04 with Ambiance theme).

According to the release notes, GNOME Twitch is still very much a work in progress and there are quite a few planned features, including support for followed streams, recording and taking stream screenshots, as well as using different player backends, such as mpv (this is partially implemented) and VLC.

For more information about GNOME Twitch, see its GitHub page as well as our initial GNOME Twitch article.


Install GNOME Twitch in Ubuntu


The official GNOME Twitch PPA was discontinued because the application is now available in the official Ubuntu (and Debian) 16.04 repositories, though its an older version (0.1.0). Getdeb provides GNOME Twitch too, but it wasnt updated to version 0.2.0 at the time Im writing this article.

Because of this, I decided to upload the latest GNOME Twitch 0.2.0 to the main WebUpd8 PPA (using its official Debian packaging, with modifications for the latest release), for Ubuntu 15.10 and 16.04. 

The application doesnt work in Ubuntu versions older than 15.10 because it requires GTK 3.16 or newer, which is not available by default in Ubuntu 15.04 or 14.04.

To add the main WebUpd8 PPA and install GNOME Twitch in Ubuntu 16.04 or 15.10 (and derivatives), use the following commands:
sudo add-apt-repository ppa:nilarimogard/webupd8
sudo apt-get update
sudo apt-get install gnome-twitch

If you dont want to add the PPA, you can grab the deb from HERE.

Note that in my test in Ubuntu 16.04, installing gstreamer1.0-vaapi (which provides hardware accelerated video decoding, encoding and processing via VA-API) caused frequent GNOME Twitch crashes. This might not be the case for you, but if the app crashes frequently, try removing the "gstreamer1.0-vaapi" package.

For installing GNOME Twitch in other Linux distributions, see THIS page.


Available link for download

Read more »

Saturday, December 31, 2016

How to boot repair or Flash Redmi Note 2 Prime Dual Sim 4G Model 2014912 with Flash tool Tested

How to boot repair or Flash Redmi Note 2 Prime Dual Sim 4G Model 2014912 with Flash tool Tested


This tutorial tested by me without any error some time we are flashing this device so many time take in flashing so we are search other tool for flashing and easy to flash this device from the many time i search but after many time i found other flash tool and i try this device in this tool so easy procedure easy or not was give many time for flashing so this tool with i have experience so here post new with different tool but here some different procedure from the before flashing tool this tool you can use if before post not success then you can use this tool if you want to first try use so dont worry because this is tested by me its very easy to flash and just remember of required for flashing if any issue in required from yours so first prepare to required after try in flash and we are mention which need to flashing in below and also must remember before use this tutorial which one first read all carefully this tutorial after try in flash because if you read tutorial then you can easy flashing this device this my own experience and must be working well micro USB cable if any issue in this then you cant connect device with computer or laptop also must be working device charging socket if any issue so also you cant connect with computer or laptop must be installed driver in your computer or laptop if not install in your computer or laptop then device not connect so you cant flash see below description about firmware.

If you want to repair your device, you can try to repair it by you.
You have to charge your battery with any charger and charged it by 70%, Your data is very important for you so it is good to do a backup of your data it may consist like your contact details, your important messages, your emails or any other important thing which you feel to be the backup in your device, this backup can be done on another device. we have to do the backup because after a format of your device, all your data will be gone and it will not be recovered. For backup in other devices you can use other external device like your hard drive, sd card or any other suitable devices. If you are doing by your own.do it at your own risk as we dont take any responsibility if your device is damaged.

    Required for flash:

    • Redmi Note 2 Prime (Dual Sim 4G) Model : 2014912 device with well battery charged, and do not try with low battery
    • Redmi Note 2 Prime (Dual Sim 4G) Model : 2014912 Stock ROM Firmware (tested) | Download Mirror-1, Mirror-2
    • Redmi Note 2 Prime (Dual Sim 4G) Model : 2014912 USB (Flashing) OR Dead Boot Repair driver | Download here
    • Redmi Note 2 Prime (Dual Sim 4G) Model : 2014912 Flash Tool | Download here
    • Good Quality Micro usb cable
    • Computer or Laptop

    Procedure:

    • First download tested Firmware, Flash tool or driver from above link (if link not working just leave your comment on below comment box i will soon fix it)
    • Extract to all are zip files to desktop or as you like path (must be installed winrar software to Extract)
    • Open Driver folder and choose Qualcomm_USB_Driver_Setup.exe file and wait until finish installation
    • Open QPST.WIN.2.7_Installer-00430.1 folder and chose setup.exe file and open and install it
    • Now open QFIL from the "C:Program FilesQualcommQPST in" path
    • Tick on Flat Build option
    • Go to Programmer Path and click on Browse.. button and choose prog_emmc_firehose_8916.mbn file
    • Click on Load XML.. button and choose rawprogram_unsparse.xml file and second choose patch0.xml file from the Firmware folder
    • Insert USB cable and wait until driver install
    • After drier installed just Click on Download button and wait until finish procedure
    • Congratulation you are done
    Redmi Note 2 Prime Dead Boot Repair done Screenshot:


    Available link for download

    Read more »