Showing posts with label desktop. Show all posts
Showing posts with label desktop. Show all posts
Wednesday, April 5, 2017
How To Install Budgie Desktop In Ubuntu 16 04 Or 15 10 Via PPA
How To Install Budgie Desktop In Ubuntu 16 04 Or 15 10 Via PPA
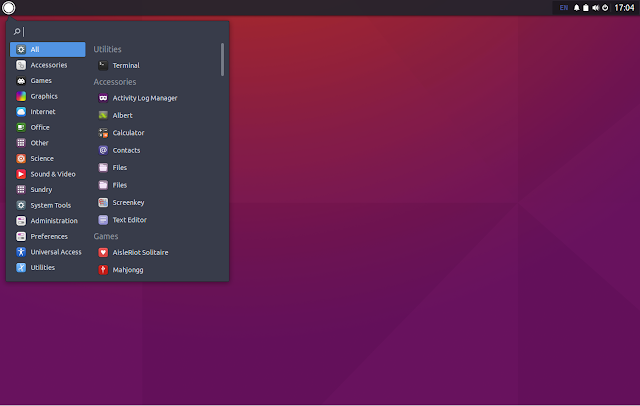
Budgie is a modern GTK-based desktop that was written from scratch, with simplicity and elegance in mind.

Used by default in Solus (not to be confused with SolusOS), a relatively new Linux distribution, Budgie Desktop integrates tightly with the GNOME stack and it features a libmutter-based window manager and a customizable panel which includes Raven, an applet, notification and customization center.
Since recent Budgie Desktop versions werent available in any Ubuntu PPA, fossfreedom decided to maintain such a PPA, which offers the latest Budgie Desktop version (10.2.4 at the time Im writing this article), for Ubuntu 15.10 and 16.04. The PPA doesnt support Ubuntu 14.04 because Budgie Desktop requires a newer GTK version.
Ive briefly tested Budgie Desktop in Ubuntu and it works great for the most part - the only issue I have with it so far is that the tray applet doesnt display the nm-applet or Dropbox icons (and probably others). Update: this bug was fixed and the nm-applet icon now shows up in the tray!
I should also mention that Budgie Desktop doesnt support AppIndicators, though this feature might be added in the future.
In other Budgie Desktop news:
- Solus 1.1 was released yesterday featuring the latest Budgie Desktop and various improvements. See THIS article for more information;
- Budgie Remix is a new Ubuntu (16.04) based Budgie Desktop Linux distributions which, from what I understand, might be the foundation for a new Ubuntu flavor. Right now, this is work in progress and should only be used for testing. More info HERE.
Budgie Desktop video
For a quick look at Budgie Desktop (version 10.2.4) in Ubuntu, check out the video below:
(direct video link)
Install Budgie Desktop in Ubuntu 15.10 or 16.04 via PPA
-----------------------------------------------
Important update for Ubuntu 16.04 users.
The PPA below now updates Nautilus to version 3.18 (while Ubuntu 16.04 has version 3.14.x), without any Unity patches and because of this, Nautilus doesnt come with any Unity integration, so it uses header bars, it doesnt uses a traditional menu and so on.
If youre using Unity and you know what youre doing, you can lock Nautilus so it never upgrades to the version from this PPA. The other option is to not use the PPA below!
If youve already added the PPA and upgraded Nautilus, you can use PPA Purge to purge the PPA (see below).
-----------------------------------------------To add the budgie-remix PPA and install the latest Budgie Desktop (version 10.2.4 at the time Im writing this article) in Ubuntu 15.10 or 16.04, use the following commands:
sudo add-apt-repository ppa:budgie-remix/ppa
sudo apt-get update
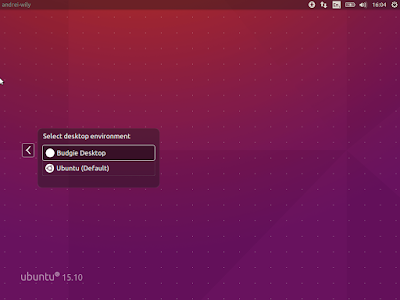
sudo apt-get install budgie-desktopOnce installed, log out and select "Budgie Desktop" from the login screen session list:
For best results, fossfreedom has included the Moka icon theme and Arc GTK theme in the PPA, and they should be installed automatically when installing budgie-desktop. After logging in, you can switch the GTK/icon themes by clicking on the Status Indicator applet (battery/sound/power), click the top-right settings icon and select "Arc-Dark" for the "Widget theme" and "Moka" for the "Icon theme".
Tip: if youve used THIS to fix large black borders around header bar apps with some themes in Ubuntu 15.10, remove it or else you wont have any shadow for header bar applications under Budgie Desktop.
Update: theres a bug that prevents the GNOME appmenu from being displayed in Budgie Desktop 10.2.4. Until this is fixed, you can use the command below to get it working:
Update: theres a bug that prevents the GNOME appmenu from being displayed in Budgie Desktop 10.2.4. Until this is fixed, you can use the command below to get it working:
gsettings set org.gnome.settings-daemon.plugins.xsettings overrides "{Gtk/ShellShowsAppMenu: ,Gtk/DecorationLayout: <menu:minimize,maximize,close>}"Purging the PPA
Since the PPA in this article provides a Nautilus version newer than the one available in the official Ubuntu 16.04 repositories, and without any Unity patches, you might need to purge the PPA at some point.
To purge the budgie-remix PPA (disable it and downgrade any packages installed from that PPA), you can use the following commands:
sudo apt-get install ppa-purge
sudo ppa-purge ppa:budgie-remix/ppa
via xpressubuntu

Available link for download
Wednesday, January 11, 2017
How To Add Application Shortcut To Desktop Context Right Click Menu in Windows
How To Add Application Shortcut To Desktop Context Right Click Menu in Windows
 Do you want to add your favorite application to desktop context menu ? If your answer is yes, then this post is for you. There are many third party software available to do the same, but I am not writing about them.
 You can add any application to your desktop context menu by simply editing your registry. Just follow the simple steps to get it worked !
Steps
1. Press Windrows + R to open the Run box
2. Enter regedit in the open textfield and click OK
- It will open Registry Editor window
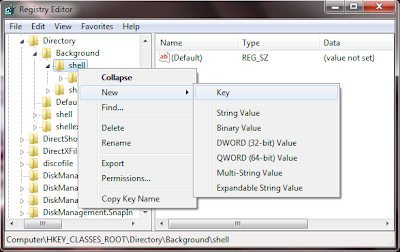
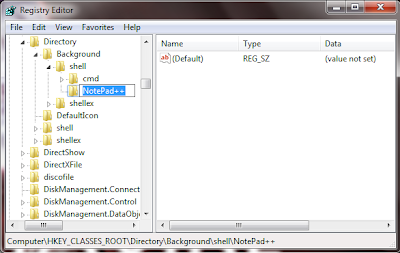
3. In Registry Editor expand HKEY_CLASSES_ROOTDirectoryBackgroundshell
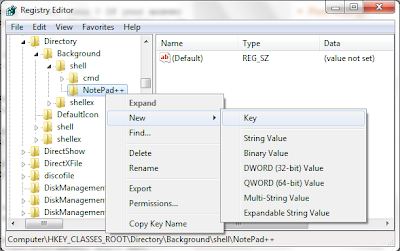
4. Right click on the shell node click New > Key
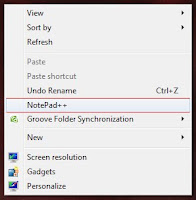
5. Now name the newly created Key to your apps name or anything you wish, because this name will show on the context menu of desktop. I am named it Notepad++.
6. Now right click on the newly created key ( in my case NotePad++ ) and click New > Key
7. Name it to command

8. Now Right click on (Default) of command key and select Modify
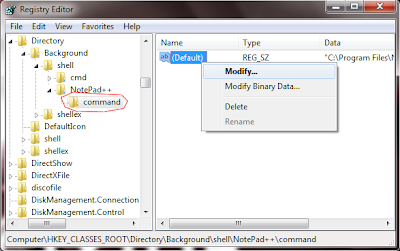
9. Now Copy the full path of your favorite application to the Value data textfield.... Click OK
Note : To copy the full path of application. Go to application folder find the apps .exe file. Shift + Right Click on the exe and click Copy as path.

Thats it done ! Now Go and check by right clicking desktop you will see the added menu item in Context menu !
Available link for download
Friday, December 30, 2016
How To Load the Desktop Version Of Websites On Your Google Android Honeycomb Tablet
How To Load the Desktop Version Of Websites On Your Google Android Honeycomb Tablet
 Tablets are great devices for reading and browsing websites. Using the touchpad is intuitive and convenient, and tablet screens don’t present the size limitations of mobile phones. However, with tablet web browsing, you will notice that many websites automatically load their mobile version. This is because the browser you are using identifies itself as a mobile based application to the websites you are visiting.
Being restricted to the mobile version of a website can be annoying since they often lack features offered by their desktop version. If you would prefer to view the desktop version of websites on your Google Android Honeycomb tablet, you will be delighted to hear that there are two simple ways to achieve this. Read on to find out how you can toggle between the desktop and mobile versions on your Honeycomb tablet.
Change The Honeycomb Browser User Agent Setting
The Honeycomb browser’s user agent is set to ‘Android’, which most websites interpret as ‘smartphone’, thus displaying the compact version of their website. To change this, you need to change the respective user agent string.
- Open the native browser on your Android Honeycomb tablet.
- Type about:debug in the address / URL bar and press Enter.
- Don’t expect anything to happen; it will probably look like nothing happened.
- Next, open the browser’s settings via the icon in the top right corner.

- Select Settings from the drop-down menu.
- Switch to the Debug tab via the left-hand menu.
- On the right side now select UAString.
- Select Desktop.

- Click the Back button in the bottom left corner of the browser to exit settings.
- Repeat step 2 to exit debugging mode.
Note that the setting may be reset every time you reboot your device.
Interestingly, the browser on Android-based smartphones has a different user agent setting, which reads ‘Android Mobile’. This actually allows websites to differentiate between tablets and smartphones. Unfortunately, not all websites support the two different settings and surprisingly, this includes Google Mail.
Use A Different Browser
You may find that some mobile websites are actually more convenient than their desktop counterparts. In this case you probably don’t want to change the user agent setting since switching back and forth between different settings is quite a hassle. The alternative solution is to use a different browser which allows you to toggle easily between the desktop and mobile version of a website.
A browser I highly recommend is Dolphin Browser HD. To rapidly switch between the mobile and desktop versions of a website, you also need to install the Dolphin Desktop Toggle add-on. Once installed, you will find a toggle button in the right-hand menu of the browser. The right-hand menu opens when you attempt to slide the browser window to the left. Pressing the toggle button will load the respective other version of the website, if available.

Are you still undecided which tablet to get? There are at least 5 Things To Consider Before Buying A Tablet PC. Maybe you would like to Try Google’s Android Mobile OS on Your Computer with Live CD? And if you have made up your mind about getting an Android Tablet, be sure to review The 3 Best Android Tablets Available Today That A Buyer Should Check Out.
Available link for download
Monday, October 10, 2016
Global Menu Applet For Cinnamon Desktop Global Application Menu
Global Menu Applet For Cinnamon Desktop Global Application Menu
A much requested applet was released to the Cinnamon Applets website recently: Global Application Menu.
Global Application Menu is a Cinnamon (the desktop environment used by default in Linux Mint Cinnamon edition) applet which allows displaying the application menu on the Cinnamon panel, either as a horizontal menu or as a menu button:


The applet, developed by Lester Carballo Pérez (lestcape) is based on the GNOME Shell AppIndicator extension and it makes use of unity-gtk-module (so it requires unity-gtk2-module and unity-gtk3-module to be installed). Thanks to this, the new Cinnamon global menu works with GTK2, GTK3 and Qt applications (requires appmenu-qt) as well as LibreOffice.
From the Global Application Menu settings, you can change the way the menu looks an behaves: you can show or hide the application icon on the panel, desaturate the app icon, show or hide the app name, display the menu as an horizontal menu or as a menu button and more:

Important. Please read.
According to its description, the applet is currently in beta and there are some potential/known issues. For instance, the applet can completely freeze Cinnamon in some cases and the Firefox menu disappears after some time. Also, in my test, the GNOME Terminal menu didnt work, even though I enabled "Show menubar" from its context menu.
I tested Global Application Menu with Linux Mint 17.1 and Ubuntu 15.04 with Cinnamon installed from the official Ubuntu repositories and while everything worked great under Linux Mint 17.1, Cinnamon failed to load under Ubuntu 15.04 after installing the Unity GTK modules and adding Global Application Menu applet to the panel (this might be caused by something I had installed or it might be related to the incomplete Cinnamon available in the official Ubuntu 15.04 repositories).
To recover from this issue, I removed the applet from ~/.local/share/cinnamon/applets/ and followed the uninstall instructions from HERE. So use this at your own risk and only if you know how to fix everything in case things go wrong!
The global menu did work in my test under Ubuntu 14.04 using the latest stable Cinnamon version from the lestcape PPA. So to use it in Ubuntu, I recommend using that PPA (the PPA only supports Ubuntu 14.04).
The global menu did work in my test under Ubuntu 14.04 using the latest stable Cinnamon version from the lestcape PPA. So to use it in Ubuntu, I recommend using that PPA (the PPA only supports Ubuntu 14.04).
Install Global Application Menu Cinnamon Applet in Linux Mint or Ubuntu (14.04)
The Global Application Menu might not work with the Cinnamon versions available in the official repositories so to use this in Ubuntu, I recommend using letscape PPA (Ubuntu 14.04 only). Also, please read the notes above before installing Global Application Menu applet!
1. Install Unity/Qt appmenu modules.
To be able to use the Cinnamon Global Application Menu applet, youll firstly need to install the Unity (AppMenu) GTK and Qt modules:
sudo apt-get install unity-gtk2-module unity-gtk3-module appmenu-qt appmenu-qt52. Restart your computer.
The Unity GTK/Qt modules load at system boot so to load them, a system restart is required.
3. Install Global Menu applet via Cinnamon Settings.
To do this, open Cinnamons System Settings and go to Applets > Available applets (online), then search for "Global Application Menu", select it and click "Install or update selected items":

4. Add the Global Application Menu to the panel.
To do this, right click on the panel on which you want to add the applet (preferably set up either a single top panel or two panels, one at the top and one at the bottom, so you can add the global menu to the top panel), select "Add applets to the panel" and from the "Installed applets" tab, select "Global Application Menu" and click "Add to panel".
5. Log out, log back in and you should now see a Global Application Menu on the Cinnamon panel, like in the screenshots above.
To configure it, right click the applet on the panel and select "Configure".
For how to completely uninstall Global Application Menu Cinnamon applet, see the instructions from HERE.
Report any bugs you may find @ GitHub.
Report any bugs you may find @ GitHub.
Thanks to Iain Closs for the tip!
Available link for download
Subscribe to:
Posts (Atom)