Showing posts with label manager. Show all posts
Showing posts with label manager. Show all posts
Monday, April 10, 2017
How To Backup APK Using ES File Manager Latest Version Now You Cant See The Old App Manager Menu Item
How To Backup APK Using ES File Manager Latest Version Now You Cant See The Old App Manager Menu Item
 Along with bug fixes,performance improvements and other feature enhancements the ES team brought a modified Fast Access menu on the recent version of ES File Explorer File Manager. In the previous version of ES File Manager there was an App Manager menu item in the Fast Access menu, Which is used to mange User and System apps. The App Managers apk backup feature is very useful as we can backup and reinstall the app later without downloading from Google Play. One of my old post titled "How To Backup Android Apps As APK using ES File Explorer ?" mentioned the steps do the same.
As the recent version modified the Fast access menu, now you cant find the App Manger there. Its renamed to APP and placed in Library menu. The New APP is same as the old App Manager and which can do all the old stuffs like Uninstall, backup, etc. The process of backup apk is same and I included the complete steps in this post.
Backup Android App Using ES File Explorer File Manager
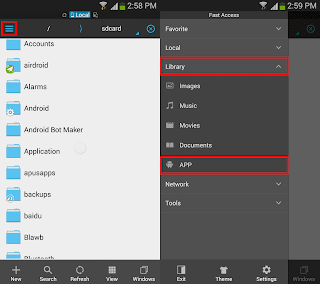
1. Open ES File Explorer - Download2. Tap on Fast Access icon or option soft key or swipe from left to right.
3. In Fast Access menu tap on Library then APP.
4. In the APP grid long press on the desired app you wish to back up and finally tap on Backup.
(If you wish to backup multiple apps, just tap on other apps too)

Thats it.. You can grab the backed up app apk from /sdcard/backups/apps/.
Available link for download
Friday, April 7, 2017
How To Easily Create AppFolders In GNOME Shell Using GNOME AppFolders Manager Or GNOME Software
How To Easily Create AppFolders In GNOME Shell Using GNOME AppFolders Manager Or GNOME Software
By default, the GNOME (Shell) overview displays applications in two views: "all", where all the applications are listed in alphabetic order, and "frequent", in which the frequently used applications are displayed.
GNOME Shell supports grouping applications in app folders, and there are two such predefined folders, "Utilities" and "Sundry". Some might not know how to create custom app folders, so here are two ways of achieving this.
Create and edit GNOME Shell app folders with GNOME AppFolders Manager

GNOME AppFolders Manager is a tool to create and edit app folders in GNOME Shell.
The application is fairly easy to use - in the left section, you can create, delete or edit app folders, while in the right section you can add (or remove) applications to app folders.
Once youve added the applications you want to an app folder, click the save button. Thats it! Heres a custom GNOME application folder I created using GNOME AppFolders Manager:

To install GNOME AppFolders Manager in Ubuntu GNOME 16.04, 15.10 or 15.04 (the app requires GNOME 3.12+, while Ubuntu 14.04 uses GNOME 3.10), you can use the main WebUpd8 PPA. Add the PPA and install the app using the following commands:
sudo add-apt-repository ppa:nilarimogard/webupd8
sudo apt update
sudo apt install gnome-appfolders-manager
Arch Linux users can install GNOME AppFolders Manager via AUR.
For other Linux distributions, see the application installation page.
Report any bugs you may find @ GitHub.
Add applications to app folders using GNOME Software
Note that in my test, the instructions below did not work in Ubuntu 16.04 with GNOME 3.18 and GNOME Software 3.20 (no error was displayed, the appfolder simply wasnt created). It didnt work in Fedora 24 with GNOME 3.20 either, but it did work in Fedora 22 with GNOME 3.16.
Also, GNOME Software is not available in the official repositories for Ubuntu versions older than 16.04. So for Ubuntu and for GNOME versions in which this functionality is broken, use GNOME AppFolders Manager.
Also, GNOME Software is not available in the official repositories for Ubuntu versions older than 16.04. So for Ubuntu and for GNOME versions in which this functionality is broken, use GNOME AppFolders Manager.
If youre using GNOME Software, you can easily add applications to app folders and create new app folders. To do this, launch GNOME Software, switch to the "Installed" tab and click the select button (top right):

Then, select the applications you want to add to a folder and click "Add to Folder":

And finally, simply select the app folder you want to add the applications to, or click "+" to add a new app folder, and click "Add":

In the same way, you can also remove or move applications from app folders.
Heres the result:


Available link for download
Wednesday, March 15, 2017
How To Copy Paste and Enable Root Access in CyanogenMod CM File Manager
How To Copy Paste and Enable Root Access in CyanogenMod CM File Manager
CM File Manager comes as the default file manager in CyanogenMod ROM. The file manager has an attractive holo UI with dark and light theme. It also has the features like root access, swipe to delete,create archive etc. Even there are many advanced file managers are available in Google Play, still many CyanogenMod users prefer CM file manager for daily use.
In this post I include the steps to enable root access, enable swipe to delete and copy/paste in cyanogenmod cm file manager.

2. Go to Settings -> General settings
3. Then tap on Access mode and select Root Access mode in the prompt dialog.
4. On Superuser or SuperSu prompt select Remember choice forever and tap on Allow

2. Select the desired files you want to copy
3. Go to the destination folder you want to paste the selected files
4. tap on the Actions button

5. Finally in the Actions dialog tap on Copy selection here

Thats it....
In this post I include the steps to enable root access, enable swipe to delete and copy/paste in cyanogenmod cm file manager.
Enable Root Access in CyanogenMod CM File Manager
1. Open CM File Manager2. Go to Settings -> General settings
3. Then tap on Access mode and select Root Access mode in the prompt dialog.
4. On Superuser or SuperSu prompt select Remember choice forever and tap on Allow
Copy / Paste Files in CyanogenMod CM File Manager
1. Open CM File Manager2. Select the desired files you want to copy
3. Go to the destination folder you want to paste the selected files
4. tap on the Actions button
5. Finally in the Actions dialog tap on Copy selection here
Thats it....
Available link for download
Saturday, February 11, 2017
Go For It! A Simple Todo txt Based To Do List Manager And Timer Productivity App
Go For It! A Simple Todo txt Based To Do List Manager And Timer Productivity App
Go For It! is a simple, yet very useful 2 in 1 productivity app which includes to-do list management as well as a timer, available for Linux and Windows.
The to-do list and timer are used together: simply select a task and switch to the timer tab to activate it. From the Timer tab, you can choose to mark a task as done, skip or pause it at any time:


When the timer runs out (and 60 seconds before), a notification is displayed so you dont need to have the app focused the whole time.
To see the app in action, check out the video below created by the Go For It! developer:
(direct video link)
Go For it! stores to-do lists in the Todo.txt format, which weve covered a few times here, on WebUpd8 (like Todo Indicator - by the way, you can use in combination with Go For It! or any other Todo.txt app) and what makes this special is that its easy to edit, migrate and synchronize across devices. Since there are numerous Todo.txt-based applications (GUIs for any OS, including mobile, command line tools, etc.), you can simply store the lists in Dropbox (or whatever cloud storage youre using) and access them on any device or even use a text editor to edit or add new tasks.
The application is written in Vala and GTK and its user interface is inspired by the elementary OS and GNOME design philosophy (and simplicity), which means it uses header bars however, it uses a traditional titlebar under desktop environments that dont fully support header bars, such as Unity.
Install / Download Go For It!
Go For It! is available in a PPA, for Ubuntu 15.04, 14.04 and 12.04 (and Linux Mint 17.x and 13). To add the PPA and install it in Ubuntu, Linux Mint and derivatives, use the following commands:
sudo add-apt-repository ppa:mank319/go-for-it
sudo apt-get update
sudo apt-get install go-for-it
There are no packages for Ubuntu 15.10 yet, but you can install the Ubuntu 15.04 package in Ubuntu 15.10 and it should work.
Arch Linux users can install Go For It! via AUR (git).
For other Linux distributions, grab the source from GitHub.
Windows binaries can be downloaded from HERE.
Thanks to Mehdi for the tip!
Available link for download
Sunday, January 1, 2017
How To Download Files From Mega With Internet Download Manager
How To Download Files From Mega With Internet Download Manager

Langsung Saja Ke Pokok Permasalahan nya , Gimana Caranya Supaya Download Dari Files Host Mega Ke IDM/Internet Download Manager ?
Langkah-Langkah nya :
- Siapkan Link Download Dari Host Mega Drive nya , Lalu Anda Copy Link nya .
- Setelah Anda Copy Link Mega nya Anda Masuk Ke Sini!
- Setelah Anda Masuk Ke Link No 2 Terus Paste Link Yang Anda Copy Dari Mega Ke Kotak Dan Klik Generate Tunggu Hingga Link Hasil Generate Muncul, Jika Sudah Muncul Copy Link Hasil Generate Tersebut Dan Setelah itu Anda Buka IDM Dan Paste Kan Link Hasil Generate Tadi Ke Url IDM Selesai IDM Akan Secara otomatis Men-Download Files Tersebut.
Jika Anda Kurang Pahan Dengan Totorial Text Di Atas Anda Bisa Lihat Totorial Video Nya Di Bawah ini.
Trimakasih sudah menyaksikan video ini Salam Rantau021.
Englis Version
How To Download Files From Mega With Internet Download Manager .Just Jump Into Her Main Problem , How How In order Download From the Files Into Host Mega IDM / Internet Download Manager ?
Steps it:
- Prepare Link Download From Host Mega Drive it , then you Copy Link her .
- Once you Copy Link Mega Her Into Your Sign Here!
- Once you Log Into Link No. 2 Keep Paste Link That You Copy Of ??Mega To Box And Click Generate Wait Until Sponsored Results Generate Appear , If It Appears Copy Link Results Generate Such And Then You Open IDM And Paste Kan Sponsored Results Generate Tadi To Url Done IDM IDM Will automatically Download Download Files Such .
If you are less Pahan With Totorial Text Above You Can See His Video Totorial Under this .
Thank you to watch this video Salam Rantau021 .
Firmware Sony Xperia
- Firmare Sony Xperia E4g E2003 - New!
- Firmware Sony Ericsson Xperia X10 Mini Pro - New!
- Firmware Sony Xperi M C1905
- Firmware Sony Xperia C3 D2502 - New!
- Firmware Sony Xperia C3 D2533 - New!
- Firmware Sony Xperia C3 D2533 Part 2 - New!
- Firmware Sony Xperia C5 Ultra Dual E5563 - New!
- Firmware Sony Xperia E C1505
- Firmware Sony Xperia E4g Dual E2033 - New!
- Firmware Sony Xperia L C2105
- Firmware Sony Xperia M2 Aqua D2403
- Firmware Sony Xperia M2 Dual D2302
- Firmware Sony Xperia X Dual (F5122)
- Firmware Sony Xperia X F5121
- Firmware Sony Xperia X Ferformance F8131
- Firmware Sony Xperia XA F3111
- Firmware Sony Xperia XA Ultra F3211
- Firmware Sony Xperia Z C6602
- Firmware Sony Xperia Z1 C6902
- Firmware Sony Xperia Z1 Conpact D5503
- Firmware Sony Xperia Z2 D6502/L50W
- Firmware Sony Xperia Z2a D6563
- Firmware Sony Xperia Z3 Compact D5803
- Firmware Sony Xperia Z3+ Dual E6533
- Firmware Sony Xperia Z3/Z3V D6603
- Firmware Sony Xperia Z5 Compact E5803
- Firmware Sony Xperia Z5 E6603
- Firmware Sony Xperia ZL/ZQ C6502/C6503 - New!
- Firmware Sony Xperia ZR/A C5502/C5503/M36H - New!
- Firmware Xperia Z5 Premium Dual E6833
Available link for download
Sunday, December 11, 2016
How To Hide Files And Folders In Your File Manager Without Renaming Them Quick Tip
How To Hide Files And Folders In Your File Manager Without Renaming Them Quick Tip
Usually if you want to hide a file or folder so it doesnt show up in your file manager, you can rename it by adding a dot (".") at the beginning of the filename.
However, there are situations in which you may want to hide a file or folder without renaming it. For instance, some applications insist on creating a folder in the users home directory or in the Documents folder (and they cant be renamed) and so on. But I dont want these folders cluttered - I want to easily find what Im looking for.

For such situations or whatever other reasons, theres another way of hiding files and folders (prevent them from showing up in the file manager only): you can create a file called ".hidden" (theres a dot in front of "hidden" so this is a hidden file!) and in this file, enter the name of the files and folders you want to hide, each on a separate line. Then, refresh the folder (press F5 or Ctrl + R) and those files or folders should no longer be visible in your file manager.
This should work (at least, it worked in my test) with the following file managers: Nautilus, Nemo, Caja, Thunar (Im not sure when this was introduced but I can tell you that it doesnt work with version 1.2.2 available in Xubuntu 12.04; it does work with versions 1.6.3 and newer) and Pantheon Files (from Freya only), but there might be others to support it.
Note: for Thunar youll need to navigate to a separate folder for the changes to be applied, refreshing isnt enough.
Heres an example: lets assume you have a folder called "FOLDER1" and a file call "FILE1" in your home directory and you want to hide both without renaming them. To do this, create a file called ".hidden" in your home directory and in this file, add the following two lines:
FOLDER1
FILE1
Then save the file and press F5 to refresh the home folder - "FOLDER1" and "FILE1" shouldnt be displayed any more.
Extra tip: HEREs a Nautilus extension which allows hiding files and folders using this method via the context menu.
Available link for download
Wednesday, October 19, 2016
How to Fix Task Manager hes been disabled by Your Administrator
How to Fix Task Manager hes been disabled by Your Administrator
Its very important problem i have ever known, but it first time i can post to this blog. Some other sites explain it more than once, but i will write to remind me whenever i be. I hope it will remind you too.
 |
| How it can be appeared? |
Then, How to Fix Task Manager hes been disabled by Your Administrator? Its simple, just follow the instruction below
It applicable to Windows XP, WIn Vista, Win7 and Win8.
#1. Go to star menu - Search, then type "gpedit.msc" (without quote) then Press Enter
 |
| Task Manager hes been disabled by Your Administrator |
#2. Choose Administrative Templates - System (double click)
#3. Choose Remove Task Manager (double click) then set value to Disable. After finish, restart your computer. When computer star, check your system.
Available link for download
Subscribe to:
Posts (Atom)