Showing posts with label sp. Show all posts
Showing posts with label sp. Show all posts
Thursday, March 30, 2017
How to Flash or Upgrade HTC Desire 620G dual sim with SP Flash tool tested
How to Flash or Upgrade HTC Desire 620G dual sim with SP Flash tool tested
You have to HTC Desire 620G dual sim phone device ? and in problem like auto turn on internet connection, auto turn on wifi connection, auto apk installing, auto gone balance, hang on logo, restarting, pattern lock, screen lock these problem you can solve using this method without any box just need to some impotent i think it is to be with you which one you can see in requirement tab there to be which need for above type problem solve this method you can use without any box its done from flash tool its also available here, and impotent of must be installed phones driver, you cant flash or upgrade if not installed in your computer or laptop it must be installed and also available in this post, here all are linked that tested and working fine just in one try this method and this is for everyone who new fresher technician or experience technician in android software related, before use remember of must be working well all are required which you can see in this method it below to be mention, different to be error when you try to flash or upgrade first of USB not recognized this error possible when micro USB not working, battery not charged, phone USB socket not working properly so if you fail with this method just write down your comment on below comment box i will soon possible to fix it, first take backup into device if live otherwise dead you cant take backup, this method use when device in dead condition also but must be in software problem in hardware device not be live.
Must read users:
This tutorial tested by me without any error but remember here some impotent question for successfully done with this tutorial, must be working device sub socket, must be working micro usb cable, must be working volume up or down keys for boot device, must be working computer or laptop usb socket, this tutorial you can use without any box its simple.
Must read users:
This tutorial tested by me without any error but remember here some impotent question for successfully done with this tutorial, must be working device sub socket, must be working micro usb cable, must be working volume up or down keys for boot device, must be working computer or laptop usb socket, this tutorial you can use without any box its simple.
Required for HTC Desire 620G
- HTC Desire 620G dual Sim with good battery charged, it to be 80% up, and do not try with low battery
- HTC Desire 620G dual Sim tested Stock ROM Firmware | Download Mirror | Mirror
- HTC Desire 620G dual Sim USB (Flashing) Driver | Download here
- HTC Desire 620G dual Sim Flash tool | Download here
- Quality Micro USB Cable
- Computer or Laptop
Procedure for HTC Desire 620G
- First take files from above link which required for Flash or Upgrade, if link not working just leave your comment on below comment box
- Extract to Desktop or As you like path from the WinZip, Must be installed WinZip software in your computer or laptop
- Open SP Flash tool folder and choose flash_tool.exe file and open it
- Click on Scatter-loading button and choose MT6592_Android_scatter.txt file and click OK
- Now click on Download button and Just Insert Micro USB Cable into device after auto installing driver if installed in your computer or laptop
- If device not detect so just Press and hold Volume Up key and Insert USB cable into device
- If driver not take device after installed so just update Driver which above links from the device manager
- After updated flashing star automatically and wait until finished process, do not try to unplug device which in flashing
- You are done, Congratulation
HTC Desire 620G Flash done Screenshot:

Available link for download

Thursday, March 23, 2017
How to Flash Gionee Elife S5 1 with SP flash tool Tested
How to Flash Gionee Elife S5 1 with SP flash tool Tested
This flashing method for Gionee Elife S5.1 its very easy to use, you can done without any box just download tested Stock ROM or Flash tool from below link and follow this way, you can use this method when you device in hang on logo, restarting, auto turn on internet connection, auto turn on wifi connection, auto apk installing, auto gone balance, pattern lock, screen lock, This method you can use without any box its done from flash tool its also available here, and impotent of must be installed phones driver, you cant flash or upgrade if not installed in your computer or laptop it must be installed and also available in this post, here all are linked that tested.
Must Read before Following
You have to charge your battery with any charger and charged it by 70%, your data is very important for you so it is good to do a backup of your data it may consist like your contact details,your important messages, your emails or any other important thing which you feel to be the backup in your device. This backup can be done on another device. we have to do the backup because after a format of your device, all your data will be gone and it will not be recovered. For backup in other devices you can use other external device like your hard drive, sd card or any other suitable devices. If you are doing by your own.do it at your own risk as we dont take any responsibility if your device is damaged
About Method
This method without any box and this is free for all who know about software in mobile, impotent for flashing first must check your micro USB cable if not good then you cant flash it so check micro USB cable second check your device battery that is impotent for flashing if your device battery low so stop your device between flash so this is impotent for flash, before you flash save your data like contact, photos, videos etc because this is factory flash file so you cant save after full flash so must remember all are impotent notes.
Must Read before Following
You have to charge your battery with any charger and charged it by 70%, your data is very important for you so it is good to do a backup of your data it may consist like your contact details,your important messages, your emails or any other important thing which you feel to be the backup in your device. This backup can be done on another device. we have to do the backup because after a format of your device, all your data will be gone and it will not be recovered. For backup in other devices you can use other external device like your hard drive, sd card or any other suitable devices. If you are doing by your own.do it at your own risk as we dont take any responsibility if your device is damaged
About Method
This method without any box and this is free for all who know about software in mobile, impotent for flashing first must check your micro USB cable if not good then you cant flash it so check micro USB cable second check your device battery that is impotent for flashing if your device battery low so stop your device between flash so this is impotent for flash, before you flash save your data like contact, photos, videos etc because this is factory flash file so you cant save after full flash so must remember all are impotent notes.
Requirement for Gionee Elife S5.1
- Gionee Elife S5.1 device with good battery charged, do not try with low battery otherwise many problem be in device
- Gionee Elife S5.1 tested Stock ROM Firmware | Download here
- Gionee Elife S5.1 tested Flash tool | Download here
- Gionee Elife S5.1 USB Driver | Download here
- Good Quality Micro USB Cable
- Computer or Laptop
Procedure for Gionee Elife S5.1
- First Download tested Stock ROM Firmware, Flash tool or USB Driver from above link, if link not working just leave your comment on below comment box
- Unzip all WinZip file to Root Folder or As you like path, Must be installed WinZip software in your Computer or Laptop
- Open Sp Flash tool folder and choose flash_tool.exe file and open it
- Click on Scatter-loading button and choose MT6592_Android_scatter.txt file and click OK button
- Now Click on Download button, Insert Micro USB Cable to device and wait until driver installed, if driver not installing automatically just update from the above links driver
- If device not detect with Sp flash tool then Press and hold Volume Up button and Insert USB Cable
- Wait until finished process, do not try to unplug while device in flashing mode
- Congratulation i hope you are done
Gionee Elife S5.1 Flash done Screenshot:

Available link for download
Sunday, March 19, 2017
How to Flash or Upgrade Intex Aqua A1 with SP Flash Tool Tested
How to Flash or Upgrade Intex Aqua A1 with SP Flash Tool Tested
This is simple way for flashing or upgrade in Intex Aqua A1 device because this is tested by me without any error, this method you can use without any box its done from flash tool its also available here, and impotent of must be installed phones driver, you cant flash or upgrade if not installed in your computer or laptop it must be installed and also available in this post, here all are linked that tested and working fine just in one try, you can use this guide when your device in hang on logo, restarting, auto turn on internet connection, auto turn on wifi connection, auto apk installing, auto gone balance, pattern lock, screen lock etc
This flash file tested by me without any error working well, this is free for all who know about software in mobile, impotent for flashing first must check your micro USB cable if not good then you cant flash it so check micro USB cable second check your device battery that is impotent for flashing if your device battery low so stop your device between flash so this is impotent for flash, before you flash save your data like contact, videos, notes, emails, photos, videos etc because this is factory flash file so you cant save after full flash so must remember all are impotent notes.
If you want to repair your device, you can try to repair it by you.You have to charge your battery with any charger and charged it by 70%. Your data is very important for you so it is good to do a backup of your data it may consist like your contact details,your important messages, your emails or any other important thing which you feel to be the backup in your device. This backup can be done on another device. we have to do the backup because after a format of your device, all your data will be gone and it will not be recovered. For backup in other devices you can use other external device like your hard drive, sd card or any other suitable devices. If you are doing by your own.do it at your own risk as we dont take any responsibility if your device is damaged

This flash file tested by me without any error working well, this is free for all who know about software in mobile, impotent for flashing first must check your micro USB cable if not good then you cant flash it so check micro USB cable second check your device battery that is impotent for flashing if your device battery low so stop your device between flash so this is impotent for flash, before you flash save your data like contact, videos, notes, emails, photos, videos etc because this is factory flash file so you cant save after full flash so must remember all are impotent notes.
If you want to repair your device, you can try to repair it by you.You have to charge your battery with any charger and charged it by 70%. Your data is very important for you so it is good to do a backup of your data it may consist like your contact details,your important messages, your emails or any other important thing which you feel to be the backup in your device. This backup can be done on another device. we have to do the backup because after a format of your device, all your data will be gone and it will not be recovered. For backup in other devices you can use other external device like your hard drive, sd card or any other suitable devices. If you are doing by your own.do it at your own risk as we dont take any responsibility if your device is damaged
Required for Intex Aqua A1
- Intex Aqua A1 handset with good battery charged, do not try with low battery
- Intex Aqua A1 Stock ROM Firmware | Download here
- Intex Aqua A1 Flash tool | Download here
- Intex Aqua A1 USB Driver | Download here
- Micro USB Cable with Good Quality
- Computer or Laptop
Procedure for Intex Aqua A1
- Take files of required for this method from the above link, if link dead or broke just leave your comment on below comment box i will soon fix it if possible
- UnZip from WinZIP to anywhere you want from the ZIP, must be installed ZIP in your Computer or Laptop
- Open SP Flash tool folder and select and open flash_tool.exe file
- Click on Scatter-loading button and choose MT6572_Android_scatter.txt file from the Firmware folder
- Now click on Download button, and Just Insert USB Cable to device
- Wait until driver installing, if driver already installed in your Computer or Laptop then downloading start automatically
- If device dead for detection Press and hold Volume Up button and Insert USB Cable
- Wait until finished process, do not disconnect device while in flashing mode
- Congratulation you are done
Intex Aqua A1 Flash done Screenshot:
Available link for download
Friday, January 13, 2017
How To Flash karbonn a100 MTK Smartphone With SP Flash Tool
How To Flash karbonn a100 MTK Smartphone With SP Flash Tool
How To Flash karbonn a100 MTK Smartphone With SP Flash Tools
Unofficial support site for this Phone By Welcome Zone Haldwani
The Instructions Given Below To Flash Stock Rom Or Any Custom Rom Flash File Firmware using Smart Phone Flash Tool (SP Flash Tool) on Your Android MTK SmartPhone .
Requirements:
1=> Your Android Smartphone should have at-least 40-50 percent of battery to perform the Flashing Process.
2=> SP Flash Tool And Usb Drivers .
You Can Download It From Last In The Post
3=> USB Cable.
Step 1: Download and install Android USB Drivers on your computer From The Link Given Up. In case You Already Installed Android USB Drivers on your Computer then skip this step.

Step 2: Then Next Step Is Power Off your Android Smartphone and remove the Battery (if it is removable).
Step 3: Download And Extract the Stock Rom or Custom Rom that you want to Flash on your Smartphone .
Step 4: Download and Extract Smart Phone Flash Tool on Your Computer. After Extracting you will be able to see the following files.
Step 5: Now Open Flash_tool.exe .

Step 6: When Smart Phone Flash Tool is launched , Click on the Scatter-Loading Button That Is On Right Side .

Step 7: Now , Locate the Scatter File (Give The Path Of That File You Extracted In Your Computer).
Step 8: Then Next Is Click on the Download Button to begin the Flashing Process.

After Clicking On The Download Button You Can See This Type Of Screen .

Step 9: Now, Connect your Android Smartphone to the Computer Via USB Cable (without battery- if it is removable).

Now One Red Line Is Run ThenThen One Voilet Line Then One Yellow Line Is Run And Then It finished .


Step 10: When Flashing is completed, a Green Download Ok Logo will appear.

Step 11: Now You Can Close the Smart Phone Flash Tool In your computer and disconnect your Android Smartphone from the computer .
Note => If You want To Flash Only User Data Or Recovery File So Tick Mark Only User Data Or Recovery File .
Deselect all parts except those one you want to flash and then press F9 Or Hit Download Button .


When You Click On The Download Button , The tool will immediately show a warning Message because not all parts are selected, but you should continue anyway, Safely press Yes.

Now Process To Flash Only One File Is Started And Compleated In Just A Minute .


Congratulations, Now your Smartphone is successfully Flashed With the Stock Rom you have Downloaded Or Only User Data Or Recovery File .
| karbonn a100 | Flash File | Download |
| karbonn a100 | Flash Tool | Download |
| karbonn a100 | Usb Driver | Download |
| Page | Like This |
Available link for download
Tuesday, January 10, 2017
How to Flash Oppo Neo 3 R831K with SP Flash tool Tested
How to Flash Oppo Neo 3 R831K with SP Flash tool Tested
When in Oppo Neo 3 R831K to be software related issues then you can use this guide because it is very simple to use and in this no need any box just download flash tool or stock ROM from the below link and you can do, if device in hardware related problem then cant use this guide because dead will be dead, first check in device which shorting or not first remove shorting, you can use this guide when your device in hang on logo, restarting, auto turn on internet connection, auto turn on wifi connection, auto apk installing, auto gone balance, pattern lock, screen lock etc these type and this is for everyone who new fresher technician or experience technician in android software related, before use remember of must be working well all are required which you can see in this method it below to be mention, different to be error when you try to flash or upgrade first of USB not recognized this error possible when micro USB not working, battery not charged, phone USB socket not working properly so if you fail with this method just write down your comment on below comment box i will soon possible to fix it, first take backup into device if live otherwise dead you cant take backup, this method use when device in dead condition also but must be in software problem in hardware device not be live.
If you want to repair your device, you can try to repair it. You have to charge your battery with any charger and charged it by 70%. Your data is very important for you so it is good to do a backup of your data it may consist like your contact details,your important messages, your emails or any other important thing which you feel to be the backup in your device. This backup can be done on another device. we have to do the backup because after a format of your device, all your data will be gone and it will not be recovered. For backup in other devices you can use other external device like your hard drive, sd card or any other suitable devices.
If you are doing by your own.do it at your own risk as we dont take any responsibility if your device is damaged
If you want to repair your device, you can try to repair it. You have to charge your battery with any charger and charged it by 70%. Your data is very important for you so it is good to do a backup of your data it may consist like your contact details,your important messages, your emails or any other important thing which you feel to be the backup in your device. This backup can be done on another device. we have to do the backup because after a format of your device, all your data will be gone and it will not be recovered. For backup in other devices you can use other external device like your hard drive, sd card or any other suitable devices.
If you are doing by your own.do it at your own risk as we dont take any responsibility if your device is damaged
Required for Flash to Oppo Neo 3 R831K
- Oppo Neo 3 R831K Handset with good battery charged , may be charged up to 90% and do not try with low battery
- Oppo Neo 3 R831K Stock ROM it must be tested means working well | Download here
- Oppo Neo 3 R831K Flash tool | Download here
- Oppo Neo 3 R831K USB (Flashing) Driver | Download here
- Good Quality Micro USB Cable
- Computer or Laptop
Procedure for Oppo Neo 3 R831K
- Download tested all are files from the above download link, if link not working just leave your comment on below comment box i will soon fix if possible
- Installing WinZip in your Computer or Laptop if not installed and Extract all are file to Desktop or as you like path from the WinZip
- Open Flash tool folder and choose flash_tool.exe file open it
- Click on Scatter-loading button and choose MT6572_Android_scatter_emmc.txt file and click OK
- Click on Download button and Just Insert USB Cable into device wait until Driver Installing if auto Driver not installed then update from the above links driver
- If Device Dead or not detect then try to Press and hold Volume Up button and Insert USB Cable
- Wait until Finished Process, do not try to unplug device while in flashing mode
- Congratulation you are done
Oppo Neo 3 R831K Flash done Screenshot:
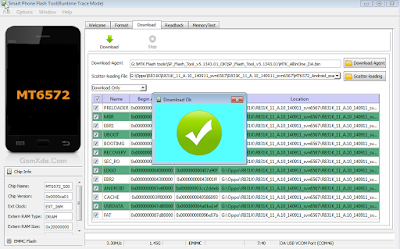
Available link for download
Subscribe to:
Posts (Atom)