Showing posts with label twrp. Show all posts
Showing posts with label twrp. Show all posts
Thursday, March 30, 2017
How To Install CWM TWRP or Any Other Recovery Without PC Faster and Safer Method
How To Install CWM TWRP or Any Other Recovery Without PC Faster and Safer Method
Whether it is CWM (Clockworkmod) or TWRP (Team Win Recovery Project) recovery, definitely you will flash any of the custom recovery if you wish to extend the Android experience. You can flash the custom recovery with or without using a PC. As a samsung user mostly I use Odin to flash a new recovery but, it is not possible keep a PC everywhere we travels. So sometimes we need an alternate solution.
There are many apps available in the Google Play Store which helps to install a custom recovery without PC but, I prefer Flashify. Flashify is a must have tool for every android root user which, comes with a clean hole UI and bunch of flash and backup options. I am not going to review the app...In this post I included simple steps flash CWM or TWRP custom recovery image using Flashify.

Requirement:
- Android 2.3 and up
- Root Permission
2. Download your favorite custom recovery .img file for your device
CWM ( Clockworkmod )
TWRP (Team Win Recovery Project)
**If you downloaded the recovery using PC...copy it to your internal or external storage.
3. Open Flashify app... Accept disclaimer and Grant permission on popup
4. In FLASH tab tap on Recovery Image and browse / select the downloaded recovery .img file using flashify explorer.


5. Now the app will popup a confirm Flash recovery? dialog.

6. Finally Tap on Yup! and wait.
Thats it....After successful installation it will popup a Flash Complete dialog.....Choose Reboot now if you wish to boot into recovery or Exit app.
There are many apps available in the Google Play Store which helps to install a custom recovery without PC but, I prefer Flashify. Flashify is a must have tool for every android root user which, comes with a clean hole UI and bunch of flash and backup options. I am not going to review the app...In this post I included simple steps flash CWM or TWRP custom recovery image using Flashify.
Requirement:
- Android 2.3 and up
- Root Permission
Install CMW / TWRP Custom Recovery Without PC
1. Download Flashify - Google Play [ Free ]2. Download your favorite custom recovery .img file for your device
CWM ( Clockworkmod )
TWRP (Team Win Recovery Project)
**If you downloaded the recovery using PC...copy it to your internal or external storage.
3. Open Flashify app... Accept disclaimer and Grant permission on popup
4. In FLASH tab tap on Recovery Image and browse / select the downloaded recovery .img file using flashify explorer.
5. Now the app will popup a confirm Flash recovery? dialog.
6. Finally Tap on Yup! and wait.
Thats it....After successful installation it will popup a Flash Complete dialog.....Choose Reboot now if you wish to boot into recovery or Exit app.
Available link for download

Wednesday, February 8, 2017
How to Install Latest TWRP Recovery on Android Devices
How to Install Latest TWRP Recovery on Android Devices

How to Install Latest TWRP Recovery on Android Devices
TWRP is the most popular custom recovery available for Android devices and it just got a newer version. So if you own an Android device that has already TWRP installed or any another recovery, it’s time for your to update to the latest TWRP 3.0.
For those who are unaware of TWRP or custom recoveries, let me clear things for you. TWRP is a custom recovery which lets you perform actions like:
- Installing ROMs, Mods or any other zip or .img files to your system.
- Making Nandroid backups, i.e. backup of your entire ROM including data and other partitions.
- Restore ROM backups
- Wipe any partition of your device,
These tasks cannot be performed by stock recovery, just like custom ROMs custom recoveries gives you more features and easy to use interface specially TWRP. Well the TWRP custom recovery gives you immense control of your device, but you should take things easy and do not play around with every option until you are sure what you are doing.
The newer version brings many changes, the most noticeable being the introduction of Material design. Other changes introduced in the latest version are:
- Completely new theme – Much more modern and much nicer looking (by z31s1g)
- True Terminal Emulator – Includes arrow keys, tab, and tab completion, etc. (by _that)
- Language translation – It won’t be perfect and especially some languages that require large font files like Chinese & Japanese won’t be available on most devices. Also, some languages may only be partially translated at this time. Feel free to submit more translations to OmniROM’s Gerrit. (mostly by Dees_Troy)
- Flashing of sparse images – On select devices you will be able to flash some parts of factory images via the TWRP GUI (by HashBang173)
- Adopted storage support for select devices – TWRP can now decrypt adopted storage partitions from Marshmallow
- Reworked graphics to bring us more up to date with AOSP – includes support for ADF and DRM graphics (by Dees_Troy)
- SuperSU prompt will no longer display if a Marshmallow ROM is installed
- Update exFAT, exFAT fuse, dosfstools (by mdmower)
- Update AOSP base to 6.0
- A huge laundry list of other minor fixes and tweaks


Install TWRP 3.0 on Your Android Device
Things You Will Need
- An Android device and a PC
- Download the latest TWRP.img for your device: Link
- Minimal ADB and Fastboot: Follow this guide and install Minimal Fastboot and ADB on your PC. (How to Get ADB and Fastboot within Seconds)
- Usb drivers: Link
Steps to Follow
Follow any one of the following methods that suit you:
For Those Who Already have an earlier version of TWRP
- Download the .img file for your device from the links given above.
- Boot your device into TWRP custom recovery.
- Select Install, then browse for the download image file. Keep in mind you will have to tap on Images button in the bottom right corner first in order to display .img files in the list. (as shown below).
- Now select the TWRP 3.0 .img file, then select Recovery partition on the next screen.(as shown in the screenshot below)
- Now swipe right to confirm the installation.
- Reboot to recovery, it should have been updated.


For Those Who Do Not Have a Custom Recovery Installed but have Root Privilege
- Download the TWRP manager app from Google Play Store.
- Select TWRP Install and select device name and version to install and then select Install Recovery.


Fastboot Install Method ( Who are Installing Custom Recovery for the First Time)
This method will most of the Android devices. If you are unable to install it or you get stuck somewhere feel free to leave a comment down below, we will be happy to help you.
- Download the .img file for your device from the links given above.
- Download and Install Minimal Fastboot and ADB following this guide.
- Copy the .img file to the Minimal ADB and Fastboot folder (usually C:Program Files (x86)Minimal ADB and Fastboot) and rename it to ‘twrp.img’.
- On your device, go to Settings -> About and find the Build Number and tap on it 7 times to enable developer settings. Press back and go into Developer Options and enable USB debugging.
- Connect your device to your PC via USB cable.
- Open Minimal ADB and Fastboot, it will open a command prompt
- Type the following command and hit Enter:
adb reboot bootloader - Above step will boot your device into fastboot mode. Now type the following command to install TWRP3.0:
fastboot flash recovery twrp.img - Now type the following command to reboot your device:
fastboot reboot - Now press the default key combo for your device for booting into Recovery mode.
Note many devices will replace your custom recovery automatically during first boot. To prevent this, use Google to find the proper key combo to enter recovery. After typing fastboot reboot, hold the key combo and boot to TWRP. Once TWRP is booted, TWRP will patch the stock ROM to prevent the stock ROM from replacing TWRP. If you don’t follow this step, you will have to repeat the installation process.
Once you have installed TWRP 3.0 custom recovery on your Android device, you could use to install any Mods or custom zip files on your device. But before installing any custom files on your device’s system make sure to backup your current ROM, using Backup option available in the TWRP recovery. Taking backup ensures that your data is safe and you could restore using this backup if something messes up your device. Also, make sure to flash files meant for your device/model only otherwise, your device could get bricked.
Flashing Zip Files Using TWRP Recovery
- Download the zip file and copy it to your device’s storage.
- Boot your device into TWRP recovery.
- Select Install button in the recovery and then browse for the zip file you want to install on your device.
- Now swipe to confirm the installation.
- Now tap the Reboot option and select System to see the effect of the ROM/mod you have installed.
Enjoy latest TWRP on your Android version and have the freedom of flashing anything on your device. But be careful! while using it. Let us know if you have any queries in the comment section below.
Available link for download
Tuesday, November 29, 2016
How To Install TWRP Recovery in Any Samsung Galaxy S3
How To Install TWRP Recovery in Any Samsung Galaxy S3
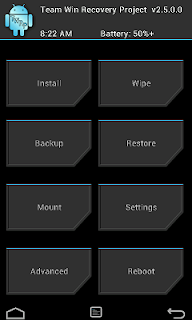
In this post I include steps to Install TWRP recovery in Galaxy S3 using Recovery Tools - Flasher. Recovery Tools - Flasher is great android app which let install CWM Recovery,TWRP Recovery, etc. in many rooted android devices along with all variants of Galaxy S3.
Requirement:
- Rooted device - Root Galaxy S3 here
- WiFi / 3G
- 50% or more battery
Note:
Backup important data
Disclaimer
Flashing Custom recovery may brick your phone and void warranty. I am not responsible for any damage. Do at your risk.
Install TWRP Recovery in Galaxy S3
1. Install Recovery Tools - Flasher from Play Store2. Open the app Recovery Tools - Flasher and grand root permission on popup.
3. Tap on Flash TWRP Recovery and Tap Yes,please for the Download warning.
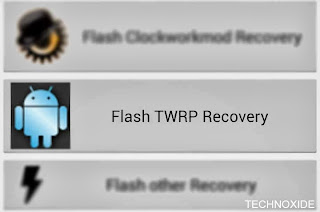
( Now Yo will see a downloading progress dialog, wait... )
4. After Complete it will popup Task completed dialog.
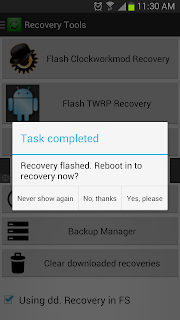
Thats it..
Note:
If you does not have Wifi or 3G download TWRP recovery.img for your variant and copy to /sdcard/Recovery-Tools/recoveries/twrp/ then follow the steps.
Keywords:
TWRP for Samsung Galaxy S3 (AT&T)
TWRP for Samsung Galaxy S3 (Canada)
TWRP for Samsung Galaxy S3 (Canada)
TWRP for Samsung Galaxy S3 (Cricket)
TWRP for Samsung Galaxy S3 (International i9300)
TWRP for Samsung Galaxy S3 (Metro PCS)
TWRP for Samsung Galaxy S3 (Sprint)
TWRP for Samsung Galaxy S3 (T-Mobile USA)
TWRP for Samsung Galaxy S3 (US Cellular)
TWRP for Samsung Galaxy S3 (Verizon)
Available link for download
Friday, November 18, 2016
Guide How to Install TWRP Recovery and Root Android Lenovo Vibe K5 K5 Plus
Guide How to Install TWRP Recovery and Root Android Lenovo Vibe K5 K5 Plus
[Guide] How to Install TWRP Recovery and Root Android Lenovo Vibe K5 | K5 Plus.
Install TWRP Recovery and Root Vibe Lenovo K5. This guide will show you how to Install TWRP Recovery and Root Android Lenovo Vibe K5 | K5 Plus. If you want root the Lenovo Vibe K5 or K5 plus you must install TWRP Recovery first on this device. We know that TWRP is custom recovery image for Android-based devices, and this recovery provided GUI interface or with touchscreen enabled, by using TWRP we allows users to install third-party firmware and backup the current system. therefore, TWRP often installed when rooting Android smartphone devices.
Lenovo Vibe K5 is the smartphone released on February, 2016. with 5,0 Inchi IPS capacitive touchscreen, 16M colors, work on Android OS, v5.1 (Lollipop), and supported with Quad-core 1.5 GHz Cortex-A53 & quad-core 1.2 GHz Cortex-A53 CPU, Qualcomm MSM8929 Snapdragon 415 chipset, Adreno 405 GPU, combined with 2 GB of RAM, 13 MP on primary camera and 5 MP on secondary camera.
Lenovo Vibe K5 is the smartphone released on February, 2016. with 5,0 Inchi IPS capacitive touchscreen, 16M colors, work on Android OS, v5.1 (Lollipop), and supported with Quad-core 1.5 GHz Cortex-A53 & quad-core 1.2 GHz Cortex-A53 CPU, Qualcomm MSM8929 Snapdragon 415 chipset, Adreno 405 GPU, combined with 2 GB of RAM, 13 MP on primary camera and 5 MP on secondary camera.
Install TWRP on Lenovo Vibe K5.
Here is the guide started. Now follow all step carefully.
- Make sure Minimal ADB and fastboot installed on your compuer. you can see this guide.
- Make sure your battery is not empty or at least has 70% of battery capacity.
- Now, switch on your Lenovo Vibe K5.
- Then enable the Developer Options.
- Go to Setting -> About Phone -> Phone Information -> tap 7 times at Build Number,
- Then, Enable USB Debugging
- Go to Settings -> Developer -> USB Debugging
- Now, Enable OEM unlock.
- Go to Settings -> Developer -> Unlock OEM
- Make sure driver for Lenovo Vibe K5 installed correctly on your computer, you can find the driver that come on the CD cell partition
- Now, connect your Lenovo Vibe K5 to the computer using original USB cable.
- Then, Download the TWRP recovery, and copy it to the folder where adb is installed on your computer.
- Download link
- Cretaed by Shreps
- TWRP version : 3.0.2.0
- File name : twrp-k5-3.0.2-r1_shreps.img
- Open a command prompt from within your fastboot folder.
- To start this command prompt just hold shift + right click, select open command prompt here.

Run ADB on computer - Now type,
- adb devices
- This command used to confirm the connection between Lenovo Vibe K5 and the computer.
- Once the connection confirmed. Now type.
- adb reboot bootloader
- If you want to temporarily boot this recovery type ,
- fastboot boot TWRP-k5-3.0.2-r1_shreps.img
- If you want to permanently flash it, type ;
- fastboot flash recovery TWRP-k5-3.0.2-r1_shreps.img
- Finish.
Root on Lenovo Vibe K5.
- This step will show you how to root Lenovo Vibe K5
- To start it, you must Download the ZIP file SuperSU v2.46
- Then save it in the micro SD card.
- Now turn off your Lenovo Vibe K5.
- Then enter to recovery mode.
- Press and hold Power Button and Volume Up button
- Then follow instruction appear on screen.
- Select recovery to install SuperSu from SD Card.
Available link for download
Subscribe to:
Posts (Atom)