Monday, April 3, 2017
How to Flash Intex ECO 205 with SPD Upgrade Tool vR2 9 9015 Flash tool Tested
How to Flash Intex ECO 205 with SPD Upgrade Tool vR2 9 9015 Flash tool Tested
Intex ECO 205 in any type issue software related you can easy solve using this method and this is for everyone who new fresher technician or experience technician in software related, before use remember of must be working well all are required which you can see in this method it below to be mention, different to be error when you try to flash or upgrade first of USB not recognized this error possible when micro USB not working, battery not charged, phone USB socket not working properly so if you fail with this method just write down your comment on below comment box i will soon possible to fix it, first take backup into device if live otherwise dead you cant take backup, this method use when device in dead condition also but must be in software problem in hardware device not be live
Required for Intex ECO 205
- Intex ECO 205 Feature phone with well battery charged, do not try with low battery
- Intex ECO 205 Flash file you can download from here | Mirror
- Intex ECO 205 Flash tool you can download from here
- Intex ECO 205 USB Driver you can download from here
- Micro USB Cable with Good Quality
- Computer or Laptop
Procedure for Intex ECO 205
- Download tested flash file, flash tool or USB driver from the above link, if link not working just leave your comment on below comment box
- Extract to anywhere as you like from WinRAR, Must be installed WinRAR in your Computer or Laptop
- Open SPD Upgrade Tool vR2.9.9015 folder and choose UpgradeDownload.exe file and open it
- Click on Flash file button and choose Intex_ ECO 205_V01_NOWTP_India _SER.pac file from the HLG_X600_011_V01 20150407 flash folder
- Now click on Download button
- Press and hold Center key and Insert USB Cable then wait until driver installing if already installed then downloading stat automatically
- Wait until finished the process, do not unplug while phone in flashing mode
- I hope you are done, Congratulation

Available link for download

Thursday, March 30, 2017
How to Flash or Upgrade HTC Desire 620G dual sim with SP Flash tool tested
How to Flash or Upgrade HTC Desire 620G dual sim with SP Flash tool tested
Must read users:
This tutorial tested by me without any error but remember here some impotent question for successfully done with this tutorial, must be working device sub socket, must be working micro usb cable, must be working volume up or down keys for boot device, must be working computer or laptop usb socket, this tutorial you can use without any box its simple.
Required for HTC Desire 620G
- HTC Desire 620G dual Sim with good battery charged, it to be 80% up, and do not try with low battery
- HTC Desire 620G dual Sim tested Stock ROM Firmware | Download Mirror | Mirror
- HTC Desire 620G dual Sim USB (Flashing) Driver | Download here
- HTC Desire 620G dual Sim Flash tool | Download here
- Quality Micro USB Cable
- Computer or Laptop
Procedure for HTC Desire 620G
- First take files from above link which required for Flash or Upgrade, if link not working just leave your comment on below comment box
- Extract to Desktop or As you like path from the WinZip, Must be installed WinZip software in your computer or laptop
- Open SP Flash tool folder and choose flash_tool.exe file and open it
- Click on Scatter-loading button and choose MT6592_Android_scatter.txt file and click OK
- Now click on Download button and Just Insert Micro USB Cable into device after auto installing driver if installed in your computer or laptop
- If device not detect so just Press and hold Volume Up key and Insert USB cable into device
- If driver not take device after installed so just update Driver which above links from the device manager
- After updated flashing star automatically and wait until finished process, do not try to unplug device which in flashing
- You are done, Congratulation

Available link for download
Sunday, March 19, 2017
How to Flash or Upgrade Intex Aqua A1 with SP Flash Tool Tested
How to Flash or Upgrade Intex Aqua A1 with SP Flash Tool Tested
This flash file tested by me without any error working well, this is free for all who know about software in mobile, impotent for flashing first must check your micro USB cable if not good then you cant flash it so check micro USB cable second check your device battery that is impotent for flashing if your device battery low so stop your device between flash so this is impotent for flash, before you flash save your data like contact, videos, notes, emails, photos, videos etc because this is factory flash file so you cant save after full flash so must remember all are impotent notes.
If you want to repair your device, you can try to repair it by you.You have to charge your battery with any charger and charged it by 70%. Your data is very important for you so it is good to do a backup of your data it may consist like your contact details,your important messages, your emails or any other important thing which you feel to be the backup in your device. This backup can be done on another device. we have to do the backup because after a format of your device, all your data will be gone and it will not be recovered. For backup in other devices you can use other external device like your hard drive, sd card or any other suitable devices. If you are doing by your own.do it at your own risk as we dont take any responsibility if your device is damaged
Required for Intex Aqua A1
- Intex Aqua A1 handset with good battery charged, do not try with low battery
- Intex Aqua A1 Stock ROM Firmware | Download here
- Intex Aqua A1 Flash tool | Download here
- Intex Aqua A1 USB Driver | Download here
- Micro USB Cable with Good Quality
- Computer or Laptop
Procedure for Intex Aqua A1
- Take files of required for this method from the above link, if link dead or broke just leave your comment on below comment box i will soon fix it if possible
- UnZip from WinZIP to anywhere you want from the ZIP, must be installed ZIP in your Computer or Laptop
- Open SP Flash tool folder and select and open flash_tool.exe file
- Click on Scatter-loading button and choose MT6572_Android_scatter.txt file from the Firmware folder
- Now click on Download button, and Just Insert USB Cable to device
- Wait until driver installing, if driver already installed in your Computer or Laptop then downloading start automatically
- If device dead for detection Press and hold Volume Up button and Insert USB Cable
- Wait until finished process, do not disconnect device while in flashing mode
- Congratulation you are done

Available link for download
Sunday, December 18, 2016
Guide How to Flash Microsoft Lumia Devices To Upgrade or Fix Bootloop
Guide How to Flash Microsoft Lumia Devices To Upgrade or Fix Bootloop
[Guide] How to Flash Microsoft Lumia Devices To Upgrade or Fix Bootloop.
What you need to start this guide ?
- A computer or laptop run on Microsoft Windows Operating System. You can run Windows 7 / Windows 8 / Windows 8.1 / Windows 10.
- Original USB cable to connect your Microsoft Lumia device to the computer or laptop.
- Always backup all data and file stored on your Microsoft Lumia device (recommended).
- A Microsoft Lumia device incorporating Microsoft Windows Phone 8, Microsoft Windows Phone 8.1 or Microsoft Windows 10 Mobile as operating system.
- At least 10 GB free space on computer disk.
- Download Windows device recovery tool software, this tool is called WindowsDeviceRecoveryTool3.3.31.exe.
How to install Windows Device Recovery Tool.
- Once WindowsDeviceRecoveryTool3.3.31.exe successfully downloaded, now you can excecute this file,
- Then you will see a new window appear on your screen.
- Now, From this window, click on the Install button.

installing device recovery tool - flash lumia - Then you will see User Account Control windows appears on computer screen. you can click Yes, and this window will closed

installing device recovery tool - flash lumia - Then the process will return to the installation of Windows Device Recovery Tool.
- Just wait for second for this installation process until finish. This process will download all necessery program for your

installing device recovery tool - flash lumia - Then click Next.
- Thick on I accept the terms in Liccense Agreement and click Next.
- Then click Install
- If youve finished the installation process, you should see this windows appear.

installing device recovery tool - flash lumia - Once this step being finished, now you can go to the next step.


Download 64 Bit Checker & Determine the OS Architecture.
- You can download 64Bit Checker Here.
- This tool used to check which OS architecture used by your computer or laptop
- Now, Execute the 64bitChecker1.5.0.exe file.
- Now, you will see the 64bit checker window appear on screen.
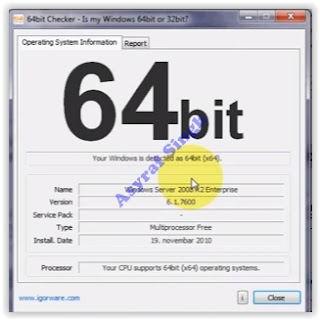
64 bit checker - From this window, we know what is the OS architecture we use. and this information will be useful later for the Installation package part.

Download Lumia Firmware.
- To download Microsoft Lumia Firmware you can go to this website.
- For further instruction how to download Lumia Firmware, you can visit this link.
How To Install Package ?.
- To install the package on Microsoft Lumia, you must connect your Microsoft Lumia device to the computer.
- Then open command prompt in administrator mode.
- Now, copy and paste this command below.
- For 32Bit Windows OS Architecture.
- cd "%ProgramFiles%Microsoft Care SuiteWindows Device Recovery Tool"
- For 64Bit Windows OS Architecture.
- cd "%ProgramFiles(x86)%Microsoft Care SuiteWindows Device Recovery Tool"
- Then, Copy and modify the
- thor2 -mode vpl -vplfile "%HomePath%DesktopPackagex.vpl" command, where x is the name of the VPL file previously downloaded.
- Once the modify is done, now copy and paste your modify command to the command prompt.
- Then press Enter button on computer keyboard.
- Now, the installation package is started, just wait until finished.
- Then, Copy and paste the thor2 -mode rnd -bootnormalmode command to the command prompt to reboot your Microsoft Lumia device normaly.
- Done,
Available link for download
Monday, November 7, 2016
How to Flash Karbonn Titanium S205 2GB with SPD Upgrade Tool tested
How to Flash Karbonn Titanium S205 2GB with SPD Upgrade Tool tested
This method you can use without any box its done from flash tool its also available here, and impotent of must be installed phones driver, you cant flash or upgrade if not installed in your computer or laptop it must be installed and also available in this post, here all are linked that tested and working fine just in one try, you can use this guide when your device in hang on logo, restarting, auto turn on internet connection, auto turn on wifi connection, auto apk installing, auto gone balance, pattern lock, screen lock etc these type issues you can use this way now lets see how to above mention software related issues solve using this method ?
Whats a Need for that ?
- Karbonn Titanium S205 2GB handset with well battery charged it up to 80%, do not try with low battery
- Karbonn Titanium S205 2GB tested Stock ROM Firmware | Download here
- Karbonn Titanium S205 2GB tested Flash tool | Download here
- Karbonn Titanium S205 2GB USB (Flashing) Driver | Download here
- Good Quality micro USB Cable
- Computer or Laptop
How to Flash or Upgrade ?
- Download tested all are required from above link, if link not working just leave your comment
- Extract to Desktop or as you like path from the WinZip, must be installed WinZip in your Computer or Laptop
- Open SPD Upgrade Tool and choose UpgradeDownload.exe file and open it from the double click
- Click on Firmware button it be first number and choose UTLTitanium_S205_2GBv1004.pac file
- Now Click on Download button it be Third number, Turn off device if it ON
- Press and hold Volume Down key and inset USB cable wait until driver installed, already that then start flashing automatically
- Wait until finished process, do not try to unplug while device in flashing mode
- Congratulation you are done

Available link for download
Friday, November 4, 2016
Heres Why Its Time to Upgrade Your Gaming System
Heres Why Its Time to Upgrade Your Gaming System
The average PC refresh cycle is getting longer and longer. While at one time a person was likely to refresh their PCs every two-to-three years, this cycle has stretched on to now be between five to seven years. While hardcore gamers might update their hardware on a 12 month cycle, the average person that doesnt have a budget to do yearly upgrades might still be using hardware form 2010.
And for the average person this might work -- but it wont work well. While hardware from 2010 might be able to play 2015s latest games, it will only do so with choppy frame rates at the lowest resolutions and graphics settings. This is far from an enjoyable gaming experience, and is not how the developers intended the games to be played.
Just to show you the performance advantage a modern system featuring an Intel® 6th. Gen™ CPU, DDR4 RAM, an Intel 750-series SSD, a GIGABYTE WindForce GeForce 980 Ti graphics card on a GIGABYTE Z170X-Gaming G1 motherboard has over a system with a 2010-era high-end hardware weve prepared a video demonstrating the vast difference in performance. As you will see, our benchmarking of the resource demanding Grand Theft Auto V and the benchmark suite Catzilla shows that the 2010-era system struggles while the GIGABYTE G1 Gaming motherboard based system has no problem.
Check out the video below from the GIGABYTE Motherboard and Brix YouTube channel:
Building a 2015 gaming machine
For the benchmarking tests we chose to put together a system that would represent what an average user would be after if they wanted to build a high-end system. Of course, there are those that have the budget for an extreme system with multiple graphics cards and extensive watercooling systems but many gamers simply dont have the budget for that and want high-end gaming at an affordable price.
Lets go through the parts used in building the PC and why we chose them.
GIGABYTE 100 Series Motherboard: For this video we used the GIGABYTE Z170X-Gaming G1 motherboard, the flagship Gaming motherboard of GIGABYTEs 100 Series lineup. The Gaming G1 motherboard has many high-end features that set it miles apart from the competition.

For audiophiles looking to game with crystal-clear sound the Gaming G1 motherboard has a Creative® Sound Core3D™ Quad-Core audio processor with a Burr-Brown high end 127 dB DAC which is Creative® certified ZxRi 120+dB SNR . For those with an interest in overclocking, the GIGABYTE Z170X-Gaming G1 board features enhanced BCLK frequency tuning, allowing overclockers to make adjustments outside of the traditional 5% straps. In addition, for gamers that play online, lag is a thing of the past: this board features the lag-killing Killer DoubleShot-X3™ Pro which intelligently routes traffic over the boards available connections ensuring that online games run silky smooth even as downloads continue in the background.
While this motherboard might be right for someone with a bigger budget for a system build, theres also the GIGABYTE Z170X-Gaming 7 or the Z170X-Gaming 3 for those that need to stay within a smaller budget. All of these GIGABYTEs 100 Series motherboards support the latest Intel 6th.® Gen™ CPU, DDR4 RAM, feature onboard USB Type-C™ and have other innovative and award-winning GIGABYTE features.
Intel 6th. Gen CPU: For those wanting the best in price-performance, theres no better choice than an Intel 6th. Gen CPU. As you can see in the video it offers double-digit performance gains over a CPU from the last generation. Under the lid Intel has made improvements to the micro architecture to make it more efficient.

One of the things Intel has improved is the processors ability to fetch and dispatch up to six instructions at once and store up to 224 instructions in its out-of-order buffer at once (up from 192 in Haswell).
In addition, it has enhanced support for DDR4, support for USB 3.1 over USB Type C, and better baseclock tuning for enhanced overclocking support.
If youre after some more in-depth benchmarking and analysis check out these reviews from around the web.
DDR4 RAM: First supported on Intel fifth-generation CPUs, DDR4 is the latest generation of RAM offering a range of improvements over over DDR2 and DDR3.

The primary advantages of DDR4 is that is offers higher speeds -- between 800 to 1600 MHz -- than DDR3 which had a maximum frequency of 1067 MHz, as well as it runs at a lower voltage.
The big speed increases that DDR4 offers makes it a must have for any gamer looking to get the most out of his system.
Intel 750 Series SSD: Over the past five years SSDs have gone down in price dramatically while increasing in speed and storage. Now, the cost per gigabyte of an SSD is getting to be very competitive to an HDD for the average user (with the cost/GB approaching $1). SSDs are faster than HDDs because they use something called non-volatile NAND memory instead of a magnetic platter and actuator arm. On average, a PCIe-based SSD will offer a 4X speed improvement over an HDD. For a more detailed explainer of the differences between an HDD and SSD, you can check out this post from PC Mag.

For our system we used the Intel 750 Series SSD. This SSD fits right into the motherboards PCI-e slot, and uses a controller protocol developed by Intel called Non-Volatile Memory Express (commonly shortened as NVMe). Benchmarks published online show that the SSD can push 2.4GB/sec of read and 1.2GB/sec of write bandwidth. For gamers this means that demanding games (such as Grand Theft Auto V which we tested) can run at a better FPS as the system has faster access to the games data and high-resolution textures.
Its time to upgrade
Available link for download