Showing posts with label ppa. Show all posts
Showing posts with label ppa. Show all posts
Wednesday, April 5, 2017
How To Install Budgie Desktop In Ubuntu 16 04 Or 15 10 Via PPA
How To Install Budgie Desktop In Ubuntu 16 04 Or 15 10 Via PPA
Budgie is a modern GTK-based desktop that was written from scratch, with simplicity and elegance in mind.
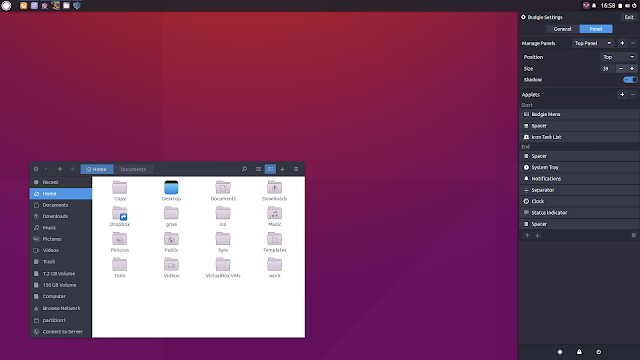
Used by default in Solus (not to be confused with SolusOS), a relatively new Linux distribution, Budgie Desktop integrates tightly with the GNOME stack and it features a libmutter-based window manager and a customizable panel which includes Raven, an applet, notification and customization center.
Since recent Budgie Desktop versions werent available in any Ubuntu PPA, fossfreedom decided to maintain such a PPA, which offers the latest Budgie Desktop version (10.2.4 at the time Im writing this article), for Ubuntu 15.10 and 16.04. The PPA doesnt support Ubuntu 14.04 because Budgie Desktop requires a newer GTK version.
Ive briefly tested Budgie Desktop in Ubuntu and it works great for the most part - the only issue I have with it so far is that the tray applet doesnt display the nm-applet or Dropbox icons (and probably others). Update: this bug was fixed and the nm-applet icon now shows up in the tray!
I should also mention that Budgie Desktop doesnt support AppIndicators, though this feature might be added in the future.
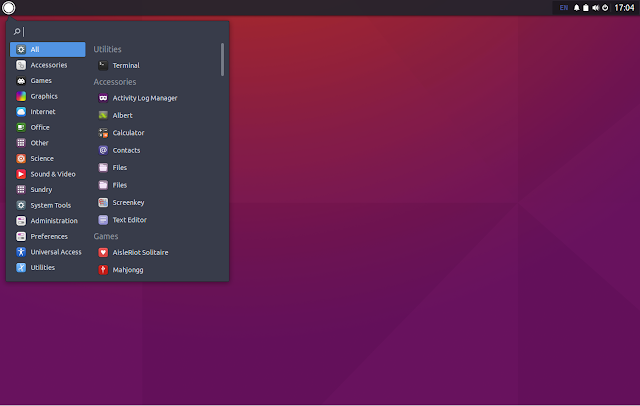
In other Budgie Desktop news:
- Solus 1.1 was released yesterday featuring the latest Budgie Desktop and various improvements. See THIS article for more information;
- Budgie Remix is a new Ubuntu (16.04) based Budgie Desktop Linux distributions which, from what I understand, might be the foundation for a new Ubuntu flavor. Right now, this is work in progress and should only be used for testing. More info HERE.
Budgie Desktop video
For a quick look at Budgie Desktop (version 10.2.4) in Ubuntu, check out the video below:
(direct video link)
Install Budgie Desktop in Ubuntu 15.10 or 16.04 via PPA
-----------------------------------------------
Important update for Ubuntu 16.04 users.
The PPA below now updates Nautilus to version 3.18 (while Ubuntu 16.04 has version 3.14.x), without any Unity patches and because of this, Nautilus doesnt come with any Unity integration, so it uses header bars, it doesnt uses a traditional menu and so on.
If youre using Unity and you know what youre doing, you can lock Nautilus so it never upgrades to the version from this PPA. The other option is to not use the PPA below!
If youve already added the PPA and upgraded Nautilus, you can use PPA Purge to purge the PPA (see below).
-----------------------------------------------To add the budgie-remix PPA and install the latest Budgie Desktop (version 10.2.4 at the time Im writing this article) in Ubuntu 15.10 or 16.04, use the following commands:
sudo add-apt-repository ppa:budgie-remix/ppa
sudo apt-get update
sudo apt-get install budgie-desktop
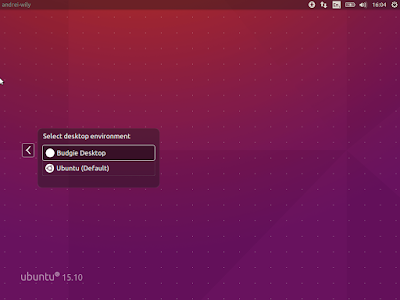
Once installed, log out and select "Budgie Desktop" from the login screen session list:
For best results, fossfreedom has included the Moka icon theme and Arc GTK theme in the PPA, and they should be installed automatically when installing budgie-desktop. After logging in, you can switch the GTK/icon themes by clicking on the Status Indicator applet (battery/sound/power), click the top-right settings icon and select "Arc-Dark" for the "Widget theme" and "Moka" for the "Icon theme".
Tip: if youve used THIS to fix large black borders around header bar apps with some themes in Ubuntu 15.10, remove it or else you wont have any shadow for header bar applications under Budgie Desktop.
Update: theres a bug that prevents the GNOME appmenu from being displayed in Budgie Desktop 10.2.4. Until this is fixed, you can use the command below to get it working:
Update: theres a bug that prevents the GNOME appmenu from being displayed in Budgie Desktop 10.2.4. Until this is fixed, you can use the command below to get it working:
gsettings set org.gnome.settings-daemon.plugins.xsettings overrides "{Gtk/ShellShowsAppMenu: ,Gtk/DecorationLayout: <menu:minimize,maximize,close>}"Purging the PPA
Since the PPA in this article provides a Nautilus version newer than the one available in the official Ubuntu 16.04 repositories, and without any Unity patches, you might need to purge the PPA at some point.
To purge the budgie-remix PPA (disable it and downgrade any packages installed from that PPA), you can use the following commands:
sudo apt-get install ppa-purge
sudo ppa-purge ppa:budgie-remix/ppa
via xpressubuntu

Available link for download

Sunday, March 12, 2017
Grive2 Grive Fork With Google Drive REST API And Partial Sync Support PPA
Grive2 Grive Fork With Google Drive REST API And Partial Sync Support PPA
Grive was an unofficial, open source command line Linux client for Google Drive. I say "was" because the tool no longer works due to Google changing its API recently and Grive not being maintained any more (there are no commits on its GitHub page since May, 2013).
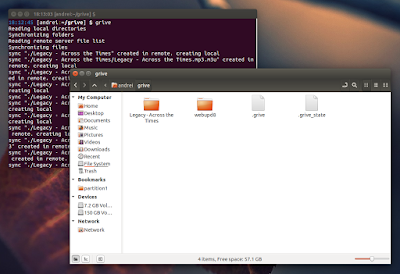
To get Grive up and running again, Vitaliy Filippov forked it and named his fork "Grive2". The fork supports the new Google Drive REST API and it also includes a new feature: partial (directory) sync, along with bug fixes.
Compared to the original "Grive", Grive2 comes with the following changes:
- supports the new Drive REST API
- added partial sync
- major code refractoring: a lot of dead code removed, JSON-C is not used any more, API-specific code is split from non-API-specific
- some stability fixes
- slightly reduce number of syscalls when reading local files
- bug fixes
Also, just like the old app, Grive2 does NOT support:
- continuously waiting for changes in file system or in Google Drive to occur and upload. A sync is only performed when you run Grive, and it calculates checksums for all files every time;
- symbolic links;
- Google documents.
Install Grive2 in Ubuntu or Linux Mint via PPA
Since there are quite a tools that rely on Grive, the Grive2 binary and package continue to be called "grive", so installing Grive2 from the main WebUpd8 PPA will overwrite any old Grive versions it may find on the system (just as if it was a newer Grive1 version).
To install Grive2 in Ubuntu, Linux Mint and derivatives by using the main WebUpd8 PPA, use the following commands:
sudo add-apt-repository ppa:nilarimogard/webupd8
sudo apt-get update
sudo apt-get install griveArch Linux users can install Grive2 via AUR (its actually the old "grive" package, updated with the new Grive2 fork).
For other Linux distributions, see the Grive2 GitHub page.
Using Grive2
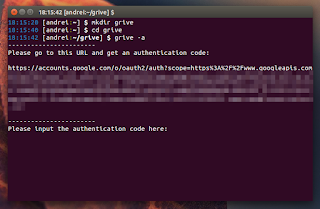
1. Grive2 will download / upload new or changed files from the directory you run it. So firstly, lets create a new folder - well call it "grive" -, in your home directory:
mkdir -p ~/grive2. Next, navigate using the terminal into the newly created "grive" folder:
cd ~/grive3. The first time you run Grive2, you must use the "-a" argument to grant it permission to access your Google Drive:
grive -aAfter running the command above, an URL should be displayed in the terminal - copy this URL and paste it in a web browser. In the newly loaded page, youll be asked to give Grive permission to access your Google Drive and after clicking "Allow access", an authentication code will be displayed - copy this code and paste it in the terminal where you ran Grive2.
Thats it. Now each time you want to sync Google Drive with your local "grive" folder, navigate to the "grive" folder (step 2) and run "grive" (this time without "-a" since youve already authenticated Grive with Google Drive).
Grive2 comes with some advanced features as well. For instance, compared to the original Grive, the new Grive2 fork supports partial sync. To only synchronize one subfolder (a folder from your ~/grive directory) with Google Drive, use:
grive -s SUBFOLDERTo see all the available options, type:
grive --helpAvailable link for download
Wednesday, February 15, 2017
How To Install Cinnamon 3 0 In Ubuntu 16 04 Or 15 10 Via PPA
How To Install Cinnamon 3 0 In Ubuntu 16 04 Or 15 10 Via PPA
Cinnamon 3.0 was released yesterday and it includes improved GTK+ 3.20 support, new accessibility and sound settings and more.
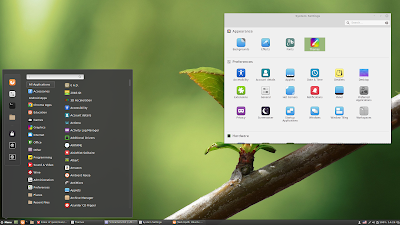
Cinnamon is a GTK3 desktop environment, initially started as a fork of GNOME Shell, which is used by default in Linux Mint Cinnamon edition. Among its features are:
- panel with a menu, launchers, window list, system tray;
- support for panel applets and desktop widgets (Desklets);
- supports desktop animations and transition effects;
- highly configurable: users can customize the panel (besides applets, the panel supports autohide and the panel layout can be changed: you can use one panel or two panels like the old GNOME 2 layout), easily change themes, customize desktop animations, hot corners, etc.;
- much more.
Changes in Cinnamon 3.0 include:
- window management improvements on tiling, mapping and unmapping windows, compositor’s window groups and tracking of full screen windows
- improved out of the box touchpad support (edge-scrolling and two-finger-scrolling can now be configured independently and are both enabled by default)
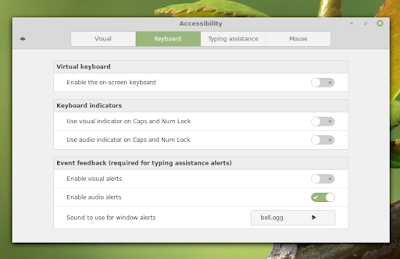
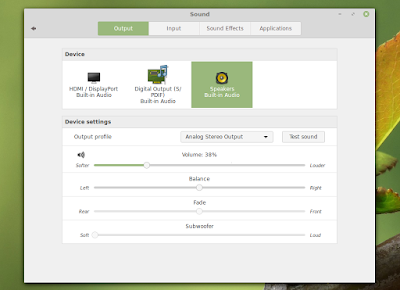
- new accessibility and sound settings (both rewritten as native cinnamon-settings modules)
- battery powered devices can be renamed
- different favorite applications can now be set for plain-text, documents and source code files
- panel launchers now include application actions
- animation effects are now enabled by default on dialogs and menus
- favorites and system options can now be disabled in the menu applet
- the photo-frame desklet now also scans subdirectories
- improved support for GTK 3.20, Spotify 0.27, Viber
Here are the new Cinnamon accessibility and sound settings:
And the Preferred Applications dialog which now allows settings different applications for opening documents, plain text, and source code files:
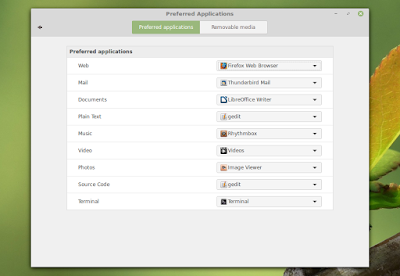
Cinnamon 3.0 will be included with Linux Mint 18 Cinnamon edition. Its not yet clear if it will be available for Linux Mint 17.3, but I assume thats pretty difficult to achieve, considering that Linux Mint 17.3 is based on Ubuntu 14.04 which uses a pretty old GTK+ version (3.10).
Update: Clem mentioned in a comment that "versions 3.0, 3.2, 3.4 and 3.6 are targeting Mint 18.x.", so Linux Mint 17.x users wont be getting Cinnamon 3.x.
Update: Clem mentioned in a comment that "versions 3.0, 3.2, 3.4 and 3.6 are targeting Mint 18.x.", so Linux Mint 17.x users wont be getting Cinnamon 3.x.
Note that in the screenshots above, Im using the new Linux Mint Mint Y GTK and icon themes as well as the Linux Mint Cinnamon theme. Youll find download links for these below, under "Cinnamon 3.0 tweaks for Ubuntu".
Install Cinnamon 3.0 in Ubuntu 16.04 or 15.10 via PPA
Important: if you want to install Cinnamon in Ubuntu and youre using the WebUpd8 Nemo PPA, purge that PPA before proceeding. Also, dont add this PPA if you use Linux Mint.
The PPAs that uses to provide Cinnamon stable werent updated with the latest Cinnamon 3.0. I did find 2 PPAs with Cinnamon 3.0:
- Sunderland93s Cinnamon PPA (Ubuntu 16.04 only - its still in the process of being updated at the time Im writing this article)
- embrosyns Cinnamon PPA (for Ubuntu 16.04 and 15.10)
Theres also the Cinnamon Nightly Builds PPA, but its not recommended for regular users because it contains untested / unstable code from Git!
For the instructions below Im using embrosyns Cinnamon stable PPA.
To add the PPA and install Cinnamon 3.0 in Ubuntu 16.04 or 15.10, use the following commands:
sudo add-apt-repository ppa:embrosyn/cinnamon
sudo apt update
sudo apt install cinnamon blueberry
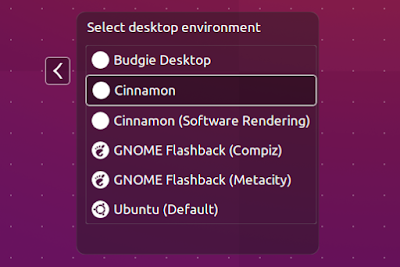
Once installed, log out and select Cinnamon from the login screen:
Tweaks
1. Themes
In Ubuntu 16.04, Ambiance and Radiance themes have some issues in Cinnamon, like missing shadows for CSD apps.
In Ubuntu 16.04, Ambiance and Radiance themes have some issues in Cinnamon, like missing shadows for CSD apps.
However, there are quite a few themes out there that should work properly in Cinnamon, like Numix GTK Theme (available in the official repositories). To install Numix GTK Theme, use the following command:
sudo apt install numix-gtk-themeYou can also download the official Linux Mint themes, including the new Mint Y Theme from Linux Mint 18, by using the links below:
- mint-themes (youll also need libreoffice-style-mint because mint-themes depends on it, as well as mint-x-icons and mint-themes-gtk3, both linked below)
- mint-themes-gtk3 (download the 3.18 version - its for GTK 3.18, available in Ubuntu 16.04)
- mint-y-theme
- mint-x-icons
- mint-y-icons
- cinnamon-themes
Note: to be able to install "libreoffice-style-mint", youll need to remove the "libreoffice-style-human" package, which is installed by default in Ubuntu 15.10.
To install them, download the deb files using the links above and place them in a folder - lets call it "deb" -, in your home directory (~/deb). Then use dpkg to install all the packages at once, using the following command:
To install them, download the deb files using the links above and place them in a folder - lets call it "deb" -, in your home directory (~/deb). Then use dpkg to install all the packages at once, using the following command:
sudo dpkg -i ~/deb/*.debIn my test in Ubuntu 15.10, selecting "Quit" from the Cinnamon menu (which allows you to shutdown the computer) doesnt work properly - the dialog doesnt display any buttons other than "Cancel".
gsettings set org.cinnamon.desktop.session settings-daemon-uses-logind true
gsettings set org.cinnamon.desktop.session session-manager-uses-logind true
gsettings set org.cinnamon.desktop.session screensaver-uses-logind falseI should also mention that I didnt encounter this issue in Ubuntu 16.04.
Thanks to Kevin @ AskUbuntu for the fix!
How to revert the changes
There are two ways you can revert the changes made by using the PPA above to install Cinnamon: either completely remove Cinnamon 3.0 or you can downgrade the packages installed from the PPA and use the Cinnamon version available in the official Ubuntu repositories.
A) Completely remove Cinnamon 3.0
Firstly remove the PPA:
sudo rm /etc/apt/sources.list.d/embrosyn-cinnamon*.listThen, to completely remove Cinnamon, you can use the following command:
sudo apt purge cinnamon* libcinnamon* nemo* libnemo-extension1 cjs libcjs0e blueberry gir1.2-cinnamondesktop-3.0 gir1.2-meta-muffin-0.0 libmuffin0 muffin-commonYou may then use "autoremove" to remove all the depedencies that were installed and are no longer required:
sudo apt autoremoveB) Purge the PPA
By purging the PPA, you can downgrade Cinnamon to the version available in the official Ubuntu repositories. You can do this with PPA Purge:
sudo apt install ppa-purge
sudo ppa-purge ppa:embrosyn/cinnamonAvailable link for download
Saturday, January 7, 2017
GNOME Twitch 0 2 0 Adds Chat Feature Ubuntu PPA
GNOME Twitch 0 2 0 Adds Chat Feature Ubuntu PPA

GNOME Twitch was updated to version 0.2.0 recently, adding a much needed chat feature, along with various user interface improvements and bug fixes.
In case youre not familiar with Twitch.tv, this is a popular live streaming video platform that primarily focuses on video gaming. GNOME Twitch lets you play Twitch streams without Flash, browse games and channel lists, add favorite channels and change the video quality.
The latest GNOME Twitch 0.2.0 brings support for chat. To be able to see and/or join the conversation, youll need to log in to Twitch from the GNOME Twitch preferences.

For now, logging in to Twitch only allows using the chat feature (and its not possible to view the chat without logging in, but this should be fixed in a future release), while other features, like receiving notifications when a stream goes live, subscribing or following streams, and so on, are not yet supported.
An alternative to get notifications when the channels you follow go live is Twitch.tv Indicator.
An alternative to get notifications when the channels you follow go live is Twitch.tv Indicator.
You can add streams to your favorites in the app, even without logging in to Twitch though.

The chat implementation in GNOME Twitch supports displaying Twitch emotes, including subscriber, turbo, etc. badges, allows using a dark or light background and to set its opacity, width and height as well as to hide the chat.
Right now, the chat doesnt display the user list and links in chat are not clickable, but thats on the todo list.
I should also add that after logging in to Twitch, you need to restart GNOME Twitch to be able to use the chat feature.
Note that GNOME Twitch uses header bars (client-side decorations), so it will look out of place in Ubuntu (with Unity), at least with the default Ambiance theme (it looks ok with other themes, such as Numix or Greybird). Header bars were fixed in Ubuntu 16.04, but not for all applications and GNOME Twitch is of them (heres a screenshot in Ubuntu 16.04 with Ambiance theme).
According to the release notes, GNOME Twitch is still very much a work in progress and there are quite a few planned features, including support for followed streams, recording and taking stream screenshots, as well as using different player backends, such as mpv (this is partially implemented) and VLC.
For more information about GNOME Twitch, see its GitHub page as well as our initial GNOME Twitch article.
Install GNOME Twitch in Ubuntu
The official GNOME Twitch PPA was discontinued because the application is now available in the official Ubuntu (and Debian) 16.04 repositories, though its an older version (0.1.0). Getdeb provides GNOME Twitch too, but it wasnt updated to version 0.2.0 at the time Im writing this article.
Because of this, I decided to upload the latest GNOME Twitch 0.2.0 to the main WebUpd8 PPA (using its official Debian packaging, with modifications for the latest release), for Ubuntu 15.10 and 16.04.
The application doesnt work in Ubuntu versions older than 15.10 because it requires GTK 3.16 or newer, which is not available by default in Ubuntu 15.04 or 14.04.
To add the main WebUpd8 PPA and install GNOME Twitch in Ubuntu 16.04 or 15.10 (and derivatives), use the following commands:
sudo add-apt-repository ppa:nilarimogard/webupd8
sudo apt-get update
sudo apt-get install gnome-twitch
If you dont want to add the PPA, you can grab the deb from HERE.
Note that in my test in Ubuntu 16.04, installing gstreamer1.0-vaapi (which provides hardware accelerated video decoding, encoding and processing via VA-API) caused frequent GNOME Twitch crashes. This might not be the case for you, but if the app crashes frequently, try removing the "gstreamer1.0-vaapi" package.
For installing GNOME Twitch in other Linux distributions, see THIS page.
Available link for download
Wednesday, December 21, 2016
Get New Wine Features Faster With Wine Staging PPA
Get New Wine Features Faster With Wine Staging PPA
Wine Staging is a Wine version which provides bug fixes and features that arent yet available in regular Wine versions.
Wine Staging (formerly known as Wine Compholio) was initially created for Pipelight, a project that brings Silverlight and other Windows-only plugins to Linux web browsers. The project has evolved and some Linux distributions, like Fedora, provide it in the official repositories instead of the regular Wine version.
The latest Wine Staging provides the following extra features and bug fixes:
- CSMT (Commandstream multithreading) for better graphic performance
- CUDA / PhysX / NVENC Support for NVIDIA graphic cards
- DXVA2 GPU video decoding (experimental)
- EAX 1 support
- Fixes for various upstream regressions
- Job Object support
- Loading of .NET CLI images without entry point
- Named Pipe message mode support (Linux kernel >= 3.4 only)
- Performance improvements for IO-heavy programs and memory allocation functions
- S3 texture compression (DXTn) support
- Threadpool API support
- Various improvements to d3dx9
- Various speed improvements (shared memory, RT priority)
- Windows ACL support
- Wine PulseAudio driver
Some of these features are optional and they can enabled or disabled via Wine Configuration, on the Staging tab:

Install Wine Staging in Ubuntu or Linux Mint
Wine Staging is available in the Pipelight PPA for Ubuntu, Linux Mint and derivatives. To add the PPA and install Wine Staging, use the following commands:
sudo add-apt-repository ppa:pipelight/stable
sudo apt-get update
sudo apt-get install --install-recommends wine-staging
If youre on 64bit and want to use the 64bit Wine version, also install wine-staging-amd64:
sudo apt-get install wine-staging-amd64/opt/wine-staging/bin/wine
/opt/wine-staging/bin/winecfgHowever, if you dont want to type the full path each time you want to use Wine Staging, you can install a package which provides compatibility symlinks (but you wont be able to use the regular Wine version any more):
sudo apt-get install wine-staging-compatFor more information, see the Wine Staging Usage page.
The Wine Staging developers provide binaries for Arch Linux, Debian, Gentoo, Mageia and OpenSUSE - for installation instructions, see THIS page.
Available link for download
Saturday, November 12, 2016
How To Install The Latest Nvidia Drivers In Ubuntu Via PPA
How To Install The Latest Nvidia Drivers In Ubuntu Via PPA
Upgrading to the latest version of the proprietary Nvidia drivers in Ubuntu was pretty complicated a while back. You would either have to use the official Linux installer, which was not always reliable, at least for me, or use a bleeding edge PPA, like the Xorg Edgers PPA, which would upgrade multiple packages, most of which were unstable.
Thats no longer the case thanks to the Proprietary GPU Drivers PPA, which offers stable proprietary Nvidia graphics driver updates, without updating other libraries to unstable versions (some libraries may still be updated using this PPA, if they are needed by the drivers, but theres nothing unstable in the PPA).
Despite its name, the PPA only provides proprietary Nvidia graphics drivers updates, with no support for AMD or Intel.
Even though the PPA is probably the most stable way of upgrading to the latest proprietary Nvidia drivers version in Ubuntu, its still considered in testing. That means issues may still occur (though I didnt encounter any and Ive been using it for some time), so you should only use this PPA if you have experience with recovering your system from a failed graphics driver upgrade.
Even though the PPA is probably the most stable way of upgrading to the latest proprietary Nvidia drivers version in Ubuntu, its still considered in testing. That means issues may still occur (though I didnt encounter any and Ive been using it for some time), so you should only use this PPA if you have experience with recovering your system from a failed graphics driver upgrade.
I should also mention that the PPA provides packages for all supported Ubuntu versions (16.10, 16.04, 15.10, 14.04 and 12.04). At the time Im writing this article, the PPA provides the latest long lived branch version (367.27) of the Nvidia graphics drivers for Ubuntu 16.10 and 16.04 and the latest short lived branch version (364.19) for Ubuntu 15.10, 14.04 and 12.04.
You can check the latest Nvidia Linux graphics drivers version by visiting THIS page.
Install the latest Nvidia graphics drivers in Ubuntu via PPA
1. Add the PPA.
Before proceeding, please read the PPA description!
To add the Proprietary GPU Drivers PPA in Ubuntu and update the software sources, use the following commands:
sudo add-apt-repository ppa:graphics-drivers/ppa
sudo apt update
2. Install (and activate) the latest Nvidia graphics drivers
From System Settings or directly from the menu / Dash, open Software & Updates, click on the "Additional Drivers" tab, select the driver you want to use, and click "Apply changes":
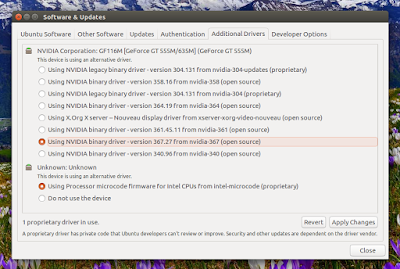
After the driver is downloaded and installed, restart your system. Thats it!
You can also install the latest drivers using Synaptic or from the command line. To see the available versions, you can use:
apt-cache search nvidiaapt search nvidiaAnd look for the packages called "nvidia-VERSION", for instance "nvidia-367" for the latest 367.27 graphics drivers, and install it ("sudo apt install nvidia-VERSION").
Available link for download
Subscribe to:
Posts (Atom)