Showing posts with label enable. Show all posts

Friday, April 7, 2017

How to Enable and Disable USB Debugging in Samsung GALAXY Tab2

How to Enable and Disable USB Debugging in Samsung GALAXY Tab2


In this article, the method to enable and disable USB debugging in Samsung GALAXY Tab2 (with Android 4.0) is illustrated in detail.


 Step 1: Open all apps.

Click the Apps icon on the top right corner of the tablet screen.


Step 2: Access Settings in Apps interface.

Find and click Settings to enter it.


Step 3: Enable or disable USB debugging.


1.    Locate Developer options, open it and select USB debugging to enable it.


 2.     To disable USB debugging, open Developer optionsand uncheck USB dubugging.


Related articles:
How to Open USB Debugging in Samsung Galaxy S5
How to Set Password on Galaxy S4 GT-I9500/GT-I9508
How to Get Your Contacts Back on Samsung Galaxy Note 3 Android


Available link for download

Read more »

Wednesday, March 15, 2017

How To Copy Paste and Enable Root Access in CyanogenMod CM File Manager

How To Copy Paste and Enable Root Access in CyanogenMod CM File Manager


CM File Manager comes as the default file manager in CyanogenMod ROM. The file manager has an attractive holo UI with dark and light theme. It also has the features like root access, swipe to delete,create archive etc. Even there are many advanced file managers are available in Google Play, still many CyanogenMod users prefer CM file manager for daily use.

In this post I include the steps to enable root access, enable swipe to delete and copy/paste in cyanogenmod cm file manager.


Enable Root Access in CyanogenMod CM File Manager

1. Open CM File Manager
2. Go to Settings -> General settings
3. Then tap on Access mode and select Root Access mode in the prompt dialog.
4. On Superuser or SuperSu prompt select Remember choice forever and tap on Allow


Copy / Paste Files in CyanogenMod CM File Manager

1. Open CM File Manager
2. Select the desired files you want to copy
3. Go to the destination folder you want to paste the selected files
4. tap on the Actions button


5. Finally in the Actions dialog tap on Copy selection here


Thats it....


Available link for download

Read more »

Friday, March 10, 2017

How to Enable USB Debugging in ZTE Grand S II LTE

How to Enable USB Debugging in ZTE Grand S II LTE


Owing to its improved hardware components, diversified applications and metal-like appearance design, ZTE Grand S II LTE, with Android 4.3, is getting more and more popular in the mobile phone market. Meanwhile, a significant number of users are inquiring how to enable USB debugging in it. As a result, this article will introduce the concrete operation step by step.


Step 1: Open Settings.


Step 2: Click More and tap About phone.


Step 3: Find Build number, and keep clicking it until the developer mode is enabled.


Step 4: Go back to Settings and tap Developer options in it.


Step 5: Check USB debugging and click OK in the pop-up window to allow USB debugging.


Now, you can enable USB debugging in your ZTE Grand S II LTE by following the steps above.


Related Articles:
Android USB Drivers for ZTE
Recover All Deleted Text Messages on ZTE Blade V-series Android


Available link for download

Read more »

Sunday, February 12, 2017

How to enable registry on windows

How to enable registry on windows


Mostly those laptops which are given by the companies to their employs have their USB ports blocked or other things too for security purpose. Recently my friend tried copying some data on his laptop but the USB ports were blocked so we finally decided to unblock them, but when we tried to unblock them from Registry or "Regedit" it was also blocked too. So we finally came up with this method to unblock Registry for enabling USB ports.


NOTE- THIS METHOD IS FOR EDUCATIONAL PURPOSE ONLY WE ARE NOT RESPONSIBLE FOR ANY UNAUTHORIZED USE OF THIS METHOD.


=> ENABLING REGISTRY BY GROUP POLICY EDITOR


STEP 1- Press window key+R and type gpedit.msc 


STEP 2- Browse to
User Configuration -> Administrative Templates -> System.

STEP 3- Double Click on "Prevent Access to registry editing tools" a popup will appear click on Disable and press Ok.


Now you can access Registry or "Regedit" after restarting your laptop/pc.


=> ENABLE REGISTRY USING VISUAL BASIC SCRIPT


STEP 1- Open notepad and copy the following lines

Option Explicit
Dim WSHShell, n, MyBox, p, t, mustboot, errnum, vers
Dim enab, disab, jobfunc, itemtype
Set WSHShell = WScript.CreateObject("WScript.Shell")
p = "HKCUSoftwareMicrosoftWindowsCurrentVersionPoliciesSystem"
p = p & "DisableRegistryTools"
itemtype = "REG_DWORD"
mustboot = "Log off and back on, or restart your pc to" & vbCR & "effect the changes"
enab = "ENABLED"
disab = "DISABLED"
jobfunc = "Registry Editing Tools are now "
t = "Confirmation"
Err.Clear
On Error Resume Next
n = WSHShell.RegRead (p)
On Error Goto 0
errnum = Err.Number
if errnum <> 0 then
WSHShell.RegWrite p, 0, itemtype
End If
If n = 0 Then
n = 1
WSHShell.RegWrite p, n, itemtype
Mybox = MsgBox(jobfunc & disab & vbCR & mustboot, 4096, t)
ElseIf n = 1 then
n = 0
WSHShell.RegWrite p, n, itemtype
Mybox = MsgBox(jobfunc & enab & vbCR & mustboot, 4096, t)
End If

Save the file by name "*.vbs".

STEP 2- Open the file this will enable the Registry or "Regedit".

After rebooting you will be able to access Registry.


=> ENABLING REGISTRY BY CMD COMMAND


STEP 1- Open notepad and paste the following code.

Available link for download

Read more »

Tuesday, January 24, 2017

How To Enable Disable Paranoid Android Halo Notification

How To Enable Disable Paranoid Android Halo Notification


Paranoid Android custom ROM always comes with stunning features. Currently, my S3 running on the recent Paranoid android 4.3 build. In this ROM my favorite one is HALO notification multitasking feature, it is really superb.

In this post I include the steps to enable and disable HALO notification in Paranoid Android ROM.

How To Enable HALO Notification in Paranoid Android ROM ?

1. Swipe the Notification Panel and touch the HALO icon.

paranoid android enable halo

How To Disable HALO Notification in Paranoid Android ROM ?


Method 1 ( Reverse HALO Checked ):
1. Double-Tap on the HALO floating widget and drag it to the red circle.

Method 2 ( Reverse HALO Unchecked ):
1. Tap on the HALO floating widget and drag it to the red circle.

paranoid android disable halo


source


Available link for download

Read more »

Monday, January 2, 2017

How To Enable USB Debugging Option In All Android Smartphones

How To Enable USB Debugging Option In All Android Smartphones


Enabling the USB Debugging option in android devices especially in smartphones is very important because without that you cannot root or update your Android device. If you are new to the android world probably you don’t know how to do that. So, in this article I have decided to explain about how to Enable USB Debugging option in android cell phones. Generally, the USB debugging option allows you to connect your android phones to the computer and use the android SDK along with it.

Enabling and disabling the USB Debugging option is available in every android phones. But some devices, it will be disabled due to some safety measures. To be very frank, Google developed the USB debugging option only for the developers. They can use this option if they want to test their newly created android app on their phone. So, it is generally disabled. The disabling option prevent the non-developers from the risk of enabling it accidentally. That’s why in the latest Android versions, you can find this option under the “Developer Options“.

How To Enable USB Debugging Mode?

As I have already said, by default this option is generally disabled and hidden. Therefore, if you want to enable the USB Debugging option you need to follow the instructions given below. I have given separate instructions for Android 2.3, 4.0 and 4.2 versions.

Enable USB Debugging In Android 2.3 Or Earlier Version:


1.First go to “Settings“.
2.Their tap on the “Applications” option.
3.From there go to “Development“.
4.Now, you need to check the (tick) “USB Debugging” to enable it.

Enable USB Debugging In Android 4.0 Or Higher Version:

1.Google has slightly changed this option on Android 4.0 version compared to the previous versions.
2.From the main menu, first go to the “Settings” in your android phone.
3.Scrolling down, you will be able to find the “Developer options“.
4.Tap that option now and you can see the “USB Debugging” option. Just enable it by taping on it.

Enable USB Debugging Mode In Android 4.2 Or Latest Versions (4.4, 5.0, etc):


1.In this version, Google has hidden the whole “Developer options” section for the users who are not much familiar to use developing tools.
2.So, to enable it go to “Settings” option.
3.From Settings go to “About” option.
4.From there go the “Build number“. You can find this at the end of the scroll.
5.Just tap that Build Number option repeatedly for 7 times. On the third tap, you will be presented with a message saying you have only 4 more taps to be a developer.
6.Continue to tap until you the message “Hooray, you are now a Developer“. At this phase, go back to the “Settings” page.
7.Now, you will be able to see the “Developer options“.


 8.Launch the developer options, then check the “USB Debugging” option. Tap “OK“.
Once this option is enabled, even as a non-developer you can access this option over your device and you will get full freedom to control your android phone. There after you can easily root or update your android smartphone by following the appropriate procedure. Enjoy!


Available link for download

Read more »

Thursday, December 29, 2016

How To Enable Voice Calling On Samsung Galaxy Tab 10 1

How To Enable Voice Calling On Samsung Galaxy Tab 10 1


samsung galaxy tab 10.1 voice call
Make voice calls on your Samsung Galaxy Tab 10.1 3G variant. Yes now its possible, we must thank to XDA senior member almaqdad for this working mod that already enjoying by many SG tab 10.1 users. The only reported bug is that sometimes you have to switch to 2G mode to get calls working properly. Now this mod work great with Stock Android ICS ROM and 3 custom ROMs.

Requirements:
- Samsung Galaxy Tab 10.1 3G [GT-P7500].
- You Must have Unlocked Recovery Mode. For Flashing .zip
- Any ROM based on Stock ICS 4.0.4 OR JB CyanogenMod10 Or ICS CyanogenMod9 OR AOKP.

Go to XDA forum thread to download latest builds and get the tutorial on flashing.


Available link for download

Read more »

Wednesday, December 14, 2016

How To Enable USB Debugging in Android 4 2 Jelly Bean

How To Enable USB Debugging in Android 4 2 Jelly Bean


Enable USB Debugging in Android 4.2 Jelly Bean
If you are on Android 4.2 and you cant find Developer options or USB debugging , dont worry it is not your firmware issue. In Android 4.2 Jelly bean update Google has hided Developer options menu , by default it is not visible in the Settings menu.

Yo can simply enable this Developer options by following the below method.

How To Enable USB Debugging in Android 4.2 Jelly Bean ?

1. Go to Settings-> About phone.
2. Now tap on the Build number option repeatedly about 7 times.
Now you will get a Toast message you are now a developer.

Thats it ... Now go back to Settings you will see the Developer options placed in the menu and you can enable USB debugging.


Available link for download

Read more »

Monday, December 5, 2016

How to Enable Developer Options and USB Debugging Mode on All Android Devices

How to Enable Developer Options and USB Debugging Mode on All Android Devices


                            Hi guys this is rajtechieguy in this tutorial i will show you how to enable developer option in almost all the android device.Most of the time whenever you would like to flash or upgrade your Android device via flash tool or whenever you want to Root your android device you need to enable USB debugging mode in order to connect and communicate with your Android device. This mode not only useful for connectivity but helps in sending command code to your Android device via Odin. By default the USB debugging mode is disabled for any brand new device to avoid unintentional modifications on your device. But you need to enable debugging option manually for your Android development process. For different Android versions there will be different configurations to turn the USB debugging mode.


Features of Developer Options

                              The “Developer Options” feature is indispensable to Android developers, hackers and enthusiasts as a means to quickly access and control their device from the PC. Even if you are an average user and wish to root, install a ROM or mod on your Android device, you must turn on USB Debugging mode on your phone or tablet. And you’ll not be able to do it unless you enable Developer Options on your device first.

Among the most useful features that are  found under Developer Options are as follows:
  • Enable debugging over USB.
  • Quickly capture bug reports onto the device.
  • Show CPU usage on screen.
  • Draw debugging information on screen such as layout bounds, updates on GPU views and hardware layers, and other information.
  • Many other options to simulate app stresses or enable debugging options.
The “Developer Options” has always been visible by default in all previous versions of Android. On

Developer Options on Gingerbread (Android 2.3):
    Settings> Applications> Development> USB Debugging


Developer Options on ICS (Android 4.0):
     Settings> Developer Options> USB Debugging


Developer Options on Jelly bean, Kitkat, lollipop  (Android > 4.1):
Settings> Developer Options> USB Debugging

If you have recently upgraded your device to Android 4.2 Jelly Bean or have bought a new device with 4.2 or higher pre-installed, do not be surprised if you find the  ”Developer Options” missing.

How to Enable Developers Options on Android > 4.2

In fact, the developer options lie at the core of Android development and so they cannot be removed as long as Android is an open source environment. The only change Android 4.2 brings in connection to these useful options is that now they are hidden by default  and you will have to make it available by doing some finger exercise.

  • Open Settings> About on your Android phone or tablet.

  • Now scroll to Build number and tap it 7  times.

  • After tapping the Build Number 7 times, you will see a message “You are now a developer!”
  • Return to the main Settings menu and now you’ll be able to see Developer Options.  
  • Tap on Developer options and mark the box in front of  USB Debugging  to enable it.


  • To disable USB Debugging mode later, you can uncheck the box before the option
  • To enable Developer Options, go to Settings> Developer options and tap on the ON/OFF slider on the top of the page.

        It is not obvious why Google decided to hide the “Developer options” on the latest version of Android. I guess they might have done it as a warning for noobs but whatever the reason might be, you can easily turn on the Developer Options and enable USB Debugging mode in a fun way using the above method.

Hiding Developer Options on Android:
                  Once activated, the Developer Options on devices with Android 4.2/4.3 or above remain visible. You will not find a single option that lets you revert back to the state when it was hidden. However, there is still a way to hide Developer Options on Android device. To do this, you will have to boot your device into Recovery Mode and perform a “data/factory reset”.


Available link for download

Read more »

Thursday, November 24, 2016

How to Enable USB Debugging in Asus ZenFone 5 6

How to Enable USB Debugging in Asus ZenFone 5 6


Is there no USB debugging in Asus ZenFone 5/6 phone? Actually, it does exist, but it is hidden. And this article, for your convenience, will summarize the steps to enable USB debugging in ZenFone 5/6(Android 4.3).


Step 1: Go to Settings.


Step 2: Click About.


Step 3: Open Software information.


Step 4: Tap Build number continuously until a pop-up hint informs you that you’ve entered the developer mode.


Step 5: Return to Settings.


Step 6: Find and open Developer options.


Step 7: Select USB debugging and click OK.


After these seven steps, the USB debugging is enabled successfully.


Related Articles:
Asus Android USB Drivers
How to Set Password on Asus ZenFone 5/6


How to Set Password on Asus PadFone


Available link for download

Read more »

Tuesday, November 15, 2016

How to enable developer options and debugging on Android 4 2 or upper

How to enable developer options and debugging on Android 4 2 or upper


                Hi, This is guide for enable developer options and  debugging mode in Android 4.2 or upper. Developer options not enable by default on Android 4.2 or upper. you need to enable these options for the enable debugging and protect your SD card lots of developer options. So here we go to know How to Enable developer options in Android 4.2 or upper version.

Follow these sets for Enable developer options and debugging mode: -


Step 1: Go to setting >>> About phone >>> Tap 5-10 times on Build number  >>> Now you get a popup massage "you are now a developer" (its done)

Enable-developer-options


Step 2: Go to setting >>> About phone >>> Developer options >>> check the USB debugging  >>> you will get popup massage >>> OK (its done).

Enable-debugging-mode


Note: - After your work un-check USB debugging

What is USB Debugging Mode?

USB Debugging Mode is one thing that you cannot skip to know if you are an Android user. The primary function of this mode is to facilitate a connection between an Android device and a computer with Android SDK (Software Development Kit). So it can be enabled in Android after connecting the device directly to a computer via USB.

USB Debugging Mode, in some versions of Android, is also called Developer Mode. Then it is relatively easy for you to understand that this USB Debugging Mode establishes a direct connection between an Android Device and a computer and readies it for deeper-level actions. You may come across a pop-out notification as it shows below:
 

What is USB Debugging for?

USB Debugging Mode is definitely important, as you can see. But why? What capabilities that it carries make this mode so important? What is USB Debugging for?

You’ve probably got the idea that USB Debugging Mode grants you a level of access to your device. What kind of access, you may ask. This level of access that USB Debugging Mode grants is important when you need system-level clearance, such as when coding a new app. This mode, also called Developer Mode, allows newly programmed apps to be copied via USB to the device for testing. Depending on the OS version and installed utilities, the mode must be turned on to let developers read internal logs.

But it does more than that. There are a few non-development-related benefits from this new level of access that can give you much more freedom of control over you device. For example, with Android SDK, you gain direct access to your phone through your computer and that allows you to do things or run terminal commands with ADB. These terminal commands can help you restore a bricked phone. So this mode is a useful tool for any adventurous Android owner.

Of course, the background knowledge is always complicated for those non-experts. This is exactly what Android Update exists for. Android Update incorporated all these complicated features and tools to make it easy for you
.

**************************************************


Available link for download

Read more »

Saturday, October 22, 2016

How to enable facebook fan page in blogger

How to enable facebook fan page in blogger


                           Hi guys this is rajtechieguy in this tutorial i will show you how to enable facebook fanpage in your blogger or wordpress . facebook fan page is a easy way to reach your latest updates. A Facebook Fan Box or Like Box is a great plugin that allows blog visitors to subscribe to your blog updates via their Facebook accounts, without leaving your blog. Once subscribing (by pressing the like button), visitors will receive your most recent blog updates on their Facebook page. This box also displays faces of the "likers" on your blog. Before creating a fan box, you should already have a Facebook fan page.

 STEPS TO ADD FB FAN PAGE

STEP 1 : First you should have a facebook fan page and copy your fb fan page link (e.g http://www.facebook.com/techarmesofficial ) 

STEP 2  : And enter into the link https://developers.facebook.com/docs/plugins

STEP 3 : Click on the Social plugin and select page plugin show in pic below


STEP 4 : Enter your fb page link in the Facebook page url and select your width and height for your choice and if you want cover photo in your blog dont click on the hide cover photo or if you want to show your page post in your blog click on the show page post otherwise unchecked . last box was show friends faces if you checked the friend face will show on the page in your blogger otherwise unchecked


STEP 5 : And click on the Get Code and your code was displayed like below pic


STEP 6 : Two code was displayed . copy the first code and paste the code below the <body> tag

STEP 7 : copy the second code and paste in your widget gadget 


STEP 8 : finally save the widget and fb  fan page was in your blogger 


Available link for download

Read more »

Sunday, October 16, 2016

How to Enable TwoFingerTap as a Right Click in lenovo laptops Synaptic Touchpad Systems

How to Enable TwoFingerTap as a Right Click in lenovo laptops Synaptic Touchpad Systems


In some of the laptops which use synaptics  touchpad drivers, the TwoFingerTap doesnt work as a right click.Even after enabling this option in the Synaptics Control panel doesnt fix this problem.In this tutorial you will learn how to fix this problem & enable TwoFingerTap as a RightClick on Lenovo laptops.Im Performing this in Lenovoz510 which is loaded with Windows 10 operating system.But this method will work for every laptop which uses synaptics touchpad Driver.This will also work in Windows 8.1 platforms.


Steps-

1.Press Win+R keys to open run, type regedit and hit enter to open Registry Editor.

2.Go to "HKEY_CURRENT_USERSoftwareSynapticsSynTPTouchPadPS2". If you dont find "TouchPadPS2" and another entry named "TouchPadSMB2c" exists under SynTP then click on "TouchPadSMB2c". If you dont find "SynTP" key then read note at end of the post.

3.On the right double click on "MultiFingerTapFlags" entry and update its value to 3.

4.On the right double click on "2FingerTapAction" entry and update its value to 2.

5.  Press OK and Exit.

6. Restart your Laptop.

Note - If you dont find any of the above keys then you have to manually create it. Right Click on Synaptics click on New Key and Give it name ""SynTP". Now similarly create a key named "TouchPadPS2" under "SynTP". Now under "TouchPadPS2" create new "DWORD (32 bit) Value" with name "2FingerTapAction". Double Click it and Change its Value to 2. Logoff and Start Windows.

--------------------------------------------

REGARDS

Shankha Jana

.


Available link for download

Read more »

Wednesday, October 12, 2016

How to Enable USB Mass Storage Mode in Sony Xperia S P and U

How to Enable USB Mass Storage Mode in Sony Xperia S P and U


sony xperia s,p and u usb mass storage mode
In some latest android smartphones and updates some of the manufactures not includes the USB Mass Storage mode. They prefer to include MTP ( Media Transfer Protocol ) over UMS. Even MTP have its own advantages, many users still prefer UMS.

In Xperia S, P and U Sony not included the option to enable USB Mass Storage. But still we can enable the UMS using the third party app SD Mounter. The app requires Rooted Stock Ice Cream Sandwich or Jelly Bean with Busybox installed. Now this app tested with Xperia S , P and U and works well. Check with other Xperia devices and share your feedback.

Note [ By Developer ]:
- Before switching to Media Transfer Mode , Eject Mass Storage Drive on PC

Usage
1. Download and install the latest version of SD Mounter - Download
2. Connect the device to computer using USB cable.
3. Open SD Mounter and click Mass Storage.

sd mounter sony xperia s,p and u

Thats it done..!


Available link for download

Read more »

Sunday, October 9, 2016

How To Enable Gmail Tabbed Inbox in Web Browser

How To Enable Gmail Tabbed Inbox in Web Browser


Gmail Tabbed inbox in web browser
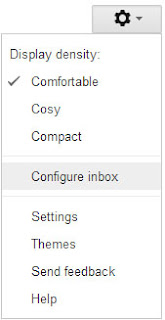
Recently Google introduced Gmail tabbed inbox, which is really reduced the clutter in inbox and became more simple. It brings a tabbed inbox and divides the mail we receive in to Categories. In this Gmail update we can add up to 5 tabs(categories) which are..

1. Primary
Person-to-person conversations ie. from friends and family.

2. Social
Messages from social networks, media-sharing sites,online dating service etc.

3. Promotions
Deals, offers and other marketing emails.

4.Updates
Personal, auto-generated updates including confirmations, receipts, bills and statements.

5. Forums
Messages from online groups, discussion boards and mailing lists.

We can customize the above tabs as which category we wish to see. To enable this Tab feature in your Gmail inbox just follow the simple steps below.

1. Sign in to Gmail, Click the Settings icon on the right side and select Configure inbox.
gmail tabbed inbox settings configure inbox

2. Now it will prompt a dialog to choose the tabs you see in the inbox. Select your desired tabs and click Save.
gmail tabbed inbox select tabs

Thats it...you are successfully enabled Gmail Tabbed inbox.


Available link for download

Read more »