Showing posts with label options. Show all posts
Showing posts with label options. Show all posts
Sunday, February 5, 2017
How to add reboot recovery and bootloader options in Power menu
How to add reboot recovery and bootloader options in Power menu
So lets Start
Required
1-apktool
2-notepad++
3-some brains
STEP-1
Decompile Framework-res.apk
goto to res/vlaues/arrays.xml
and add these lines at the end
now goto res/values/strings
and add these lines at the end
goto add the ic_lock_reboot.png which i have i provided in the resources attached below this post to drawablw-hdpi folder
so before compiling the framework-res.apk follow erorcuns guide to properly recompile framework-res.apk
once recompile is done ....decompile again to get the HEX IDs
STEP-2
decompile android.policy.jar
goto classoutcomandroidinternalpolicyimpl
and add the 3 smalis files which i provided in the resources attached below
Now option classoutcomandroidinternalpolicyimplGlobalAc tions.smali
and find these lines and add the red marked lines between them
now we need to assign the Hex ids as per ur Public.xml
NOTE: the hex ids might be different from mine and yours so be careful while comparing
new as per the above changes in GlobalActions.xml
assign the ids as below
<public type="drawable" name="ic_lock_reboot" id="0x01080827" />
<public type="string" name="reboot" id="0x0104060b" />
Now option up classoutcomandroidinternalpolicyimplGlobalAc tions$11.smali
find and replace the following
@line 70
<public type="string" name="reboot" id="0x0104060b" />
@line 90
<public type="array" name="reboot_options" id="0x0107003b" />
@line 105
<public type="string" name="ok" id="0x0104000a" />
@line 147
<public type="bool" name="config_sf_slowBlur" id="0x0111000b" />
now open up classoutcomandroidinternalpolicyimplGlobalAc tions$11$2.smali
@line 59
<public type="array" name="reboot_actions" id="0x0107003c" />
save it and recompile android.policy.jar
now push all the files into ut phone...will have the new Advanced reboot options
Required
1-apktool
2-notepad++
3-some brains
STEP-1
Decompile Framework-res.apk
goto to res/vlaues/arrays.xml
and add these lines at the end
Code:
 <string-array name="reboot_options">
 <item>@string/reboot_normal</item>
 <item>@string/reboot_recovery</item>
 <item>@string/reboot_bootloader</item>
 </string-array>
 <string-array name="reboot_actions">
 <item>now</item>
 <item>recovery</item>
 <item>bootloader</item>
 </string-array>
now goto res/values/strings
and add these lines at the end
Code:
 <string name="reboot">Reboot</string>
 <string name="reboot_normal">Reboot</string>
 <string name="reboot_recovery">Recovery</string>
 <string name="reboot_bootloader">Bootloader</string>
goto add the ic_lock_reboot.png which i have i provided in the resources attached below this post to drawablw-hdpi folder
so before compiling the framework-res.apk follow erorcuns guide to properly recompile framework-res.apk
once recompile is done ....decompile again to get the HEX IDs
STEP-2
decompile android.policy.jar
goto classoutcomandroidinternalpolicyimpl
and add the 3 smalis files which i provided in the resources attached below
Now option classoutcomandroidinternalpolicyimplGlobalAc tions.smali
and find these lines and add the red marked lines between them
Code:
 .line 235
 iget-object v0, p0, Lcom/android/internal/policy/impl/GlobalActions;->mItems:Ljava/util/ArrayList;

 new-instance v1, Lcom/android/internal/policy/impl/GlobalActions$2;

 const v2, 0x1080030

 const v3, 0x10400fa

 invoke-direct {v1, p0, v2, v3}, Lcom/android/internal/policy/impl/GlobalActions$2;-><init>(Lcom/android/internal/policy/impl/GlobalActions;II)V

 invoke-virtual {v0, v1}, Ljava/util/ArrayList;->add(Ljava/lang/Object;)Z

 .line 213
 move-object/from16 v0, p0

 iget-object v1, v0, Lcom/android/internal/policy/impl/GlobalActions;->mItems:Ljava/util/ArrayList;

 new-instance v2, Lcom/android/internal/policy/impl/GlobalActions$11;

 const v3, 0x1080827

 const v4, 0x104060b

 move-object/from16 v0, p0

 invoke-direct {v2, v0, v3, v4}, Lcom/android/internal/policy/impl/GlobalActions$11;-><init>(Lcom/android/internal/policy/impl/GlobalActions;II)V

 invoke-virtual {v1, v2}, Ljava/util/ArrayList;->add(Ljava/lang/Object;)Z

 .line 260
 iget-object v0, p0, Lcom/android/internal/policy/impl/GlobalActions;->mItems:Ljava/util/ArrayList;

 iget-object v1, p0, Lcom/android/internal/policy/impl/GlobalActions;->mAirplaneModeOn:Lcom/android/internal/policy/impl/GlobalActions$ToggleAction;

 invoke-virtual {v0, v1}, Ljava/util/ArrayList;->add(Ljava/lang/Object;)Z
now we need to assign the Hex ids as per ur Public.xml
NOTE: the hex ids might be different from mine and yours so be careful while comparing
new as per the above changes in GlobalActions.xml
assign the ids as below
<public type="drawable" name="ic_lock_reboot" id="0x01080827" />
Code:
 new-instance v2, Lcom/android/internal/policy/impl/GlobalActions$11;

 const v3, 0x1080827
<public type="string" name="reboot" id="0x0104060b" />
Code:
new-instance v2, Lcom/android/internal/policy/impl/GlobalActions$11;

 const v3, 0x1080827

 const v4, 0x104060b
Now option up classoutcomandroidinternalpolicyimplGlobalAc tions$11.smali
find and replace the following
@line 70
<public type="string" name="reboot" id="0x0104060b" />
Code:
const v3, 0x104060b@line 90
<public type="array" name="reboot_options" id="0x0107003b" />
Code:
const v3, 0x107003b@line 105
<public type="string" name="ok" id="0x0104000a" />
Code:
const v2, 0x104000a@line 147
<public type="bool" name="config_sf_slowBlur" id="0x0111000b" />
Code:
const v3, 0x111000bnow open up classoutcomandroidinternalpolicyimplGlobalAc tions$11$2.smali
@line 59
<public type="array" name="reboot_actions" id="0x0107003c" />
Code:
const v2, 0x107003csave it and recompile android.policy.jar
now push all the files into ut phone...will have the new Advanced reboot options
Available link for download

Monday, December 5, 2016
How to Enable Developer Options and USB Debugging Mode on All Android Devices
How to Enable Developer Options and USB Debugging Mode on All Android Devices
Hi guys this is rajtechieguy in this tutorial i will show you how to enable developer option in almost all the android device.Most of the time whenever you would like to flash or upgrade your Android device via flash tool or whenever you want to Root your android device you need to enable USB debugging mode in order to connect and communicate with your Android device. This mode not only useful for connectivity but helps in sending command code to your Android device via Odin. By default the USB debugging mode is disabled for any brand new device to avoid unintentional modifications on your device. But you need to enable debugging option manually for your Android development process. For different Android versions there will be different configurations to turn the USB debugging mode.

Features of Developer Options
The “Developer Options” feature is indispensable to Android developers, hackers and enthusiasts as a means to quickly access and control their device from the PC. Even if you are an average user and wish to root, install a ROM or mod on your Android device, you must turn on USB Debugging mode on your phone or tablet. And you’ll not be able to do it unless you enable Developer Options on your device first.
Among the most useful features that are found under Developer Options are as follows:
- Enable debugging over USB.
- Quickly capture bug reports onto the device.
- Show CPU usage on screen.
- Draw debugging information on screen such as layout bounds, updates on GPU views and hardware layers, and other information.
- Many other options to simulate app stresses or enable debugging options.
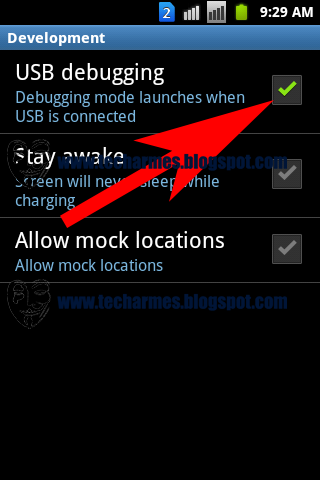
Developer Options on Gingerbread (Android 2.3):
Settings> Applications> Development> USB Debugging
.png)

.png)
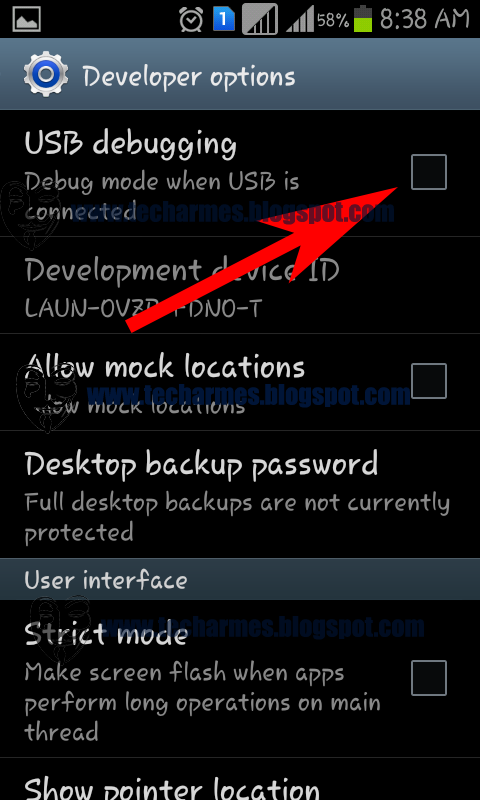
Developer Options on ICS (Android 4.0):
Settings> Developer Options> USB Debugging
Settings> Developer Options> USB Debugging
.png)
.png)
Settings> Developer Options> USB Debugging
If you have recently upgraded your device to Android 4.2 Jelly Bean or have bought a new device with 4.2 or higher pre-installed, do not be surprised if you find the ”Developer Options” missing.
How to Enable Developers Options on Android > 4.2
In fact, the developer options lie at the core of Android development and so they cannot be removed as long as Android is an open source environment. The only change Android 4.2 brings in connection to these useful options is that now they are hidden by default and you will have to make it available by doing some finger exercise.
- Open Settings> About on your Android phone or tablet.
.jpg)
- Now scroll to Build number and tap it 7 times.
.png)
- After tapping the Build Number 7 times, you will see a message “You are now a developer!”
.png)
- Return to the main Settings menu and now you’ll be able to see Developer Options.
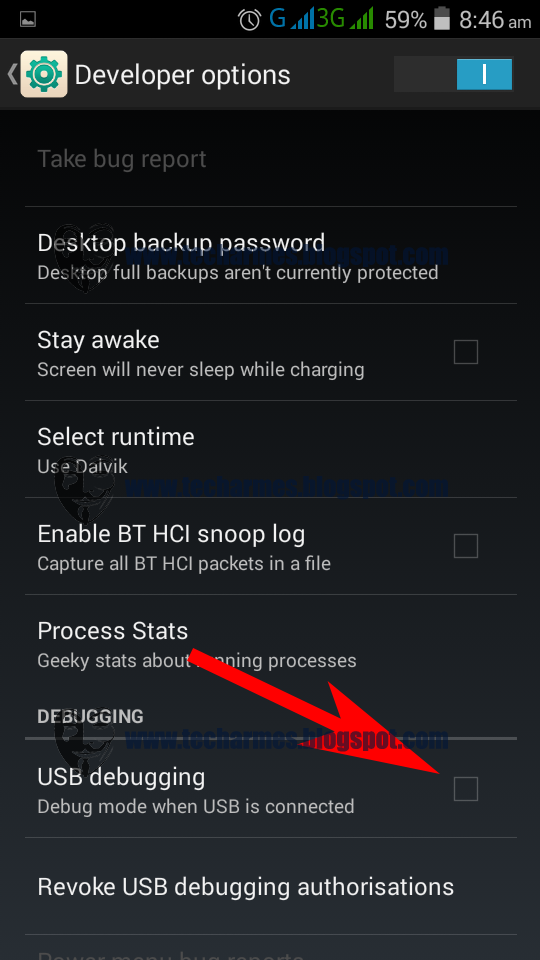
- Tap on Developer options and mark the box in front of USB Debugging to enable it.
.png)
- To disable USB Debugging mode later, you can uncheck the box before the option
- To enable Developer Options, go to Settings> Developer options and tap on the ON/OFF slider on the top of the page.
It is not obvious why Google decided to hide the “Developer options” on the latest version of Android. I guess they might have done it as a warning for noobs but whatever the reason might be, you can easily turn on the Developer Options and enable USB Debugging mode in a fun way using the above method.
Hiding Developer Options on Android:
Once activated, the Developer Options on devices with Android 4.2/4.3 or above remain visible. You will not find a single option that lets you revert back to the state when it was hidden. However, there is still a way to hide Developer Options on Android device. To do this, you will have to boot your device into Recovery Mode and perform a “data/factory reset”.
Available link for download
Tuesday, November 15, 2016
How to enable developer options and debugging on Android 4 2 or upper
How to enable developer options and debugging on Android 4 2 or upper
Hi, This is guide for enable developer options and debugging mode in Android 4.2 or upper. Developer options not enable by default on Android 4.2 or upper. you need to enable these options for the enable debugging and protect your SD card lots of developer options. So here we go to know How to Enable developer options in Android 4.2 or upper version.
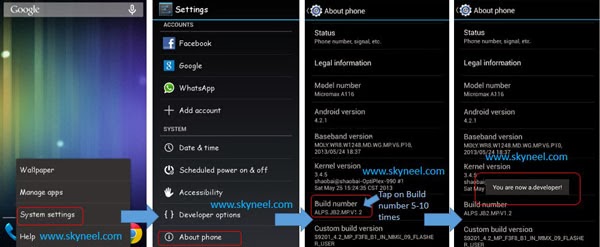
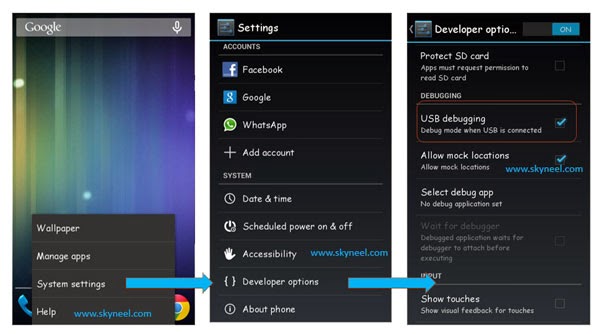
Follow these sets for Enable developer options and debugging mode: -
Step 1: Go to setting >>> About phone >>> Tap 5-10 times on Build number >>> Now you get a popup massage "you are now a developer" (its done)
Step 2: Go to setting >>> About phone >>> Developer options >>> check the USB debugging >>> you will get popup massage >>> OK (its done).
Note: - After your work un-check USB debugging
What is USB Debugging Mode?
USB Debugging Mode is one thing that you cannot skip to know if you are an Android user. The primary function of this mode is to facilitate a connection between an Android device and a computer with Android SDK (Software Development Kit). So it can be enabled in Android after connecting the device directly to a computer via USB.
USB Debugging Mode, in some versions of Android, is also called Developer Mode. Then it is relatively easy for you to understand that this USB Debugging Mode establishes a direct connection between an Android Device and a computer and readies it for deeper-level actions. You may come across a pop-out notification as it shows below:
USB Debugging Mode, in some versions of Android, is also called Developer Mode. Then it is relatively easy for you to understand that this USB Debugging Mode establishes a direct connection between an Android Device and a computer and readies it for deeper-level actions. You may come across a pop-out notification as it shows below:
What is USB Debugging for?
USB Debugging Mode is definitely important, as you can see. But why? What capabilities that it carries make this mode so important? What is USB Debugging for?
You’ve probably got the idea that USB Debugging Mode grants you a level of access to your device. What kind of access, you may ask. This level of access that USB Debugging Mode grants is important when you need system-level clearance, such as when coding a new app. This mode, also called Developer Mode, allows newly programmed apps to be copied via USB to the device for testing. Depending on the OS version and installed utilities, the mode must be turned on to let developers read internal logs.
But it does more than that. There are a few non-development-related benefits from this new level of access that can give you much more freedom of control over you device. For example, with Android SDK, you gain direct access to your phone through your computer and that allows you to do things or run terminal commands with ADB. These terminal commands can help you restore a bricked phone. So this mode is a useful tool for any adventurous Android owner.
Of course, the background knowledge is always complicated for those non-experts. This is exactly what Android Update exists for. Android Update incorporated all these complicated features and tools to make it easy for you.
You’ve probably got the idea that USB Debugging Mode grants you a level of access to your device. What kind of access, you may ask. This level of access that USB Debugging Mode grants is important when you need system-level clearance, such as when coding a new app. This mode, also called Developer Mode, allows newly programmed apps to be copied via USB to the device for testing. Depending on the OS version and installed utilities, the mode must be turned on to let developers read internal logs.
But it does more than that. There are a few non-development-related benefits from this new level of access that can give you much more freedom of control over you device. For example, with Android SDK, you gain direct access to your phone through your computer and that allows you to do things or run terminal commands with ADB. These terminal commands can help you restore a bricked phone. So this mode is a useful tool for any adventurous Android owner.
Of course, the background knowledge is always complicated for those non-experts. This is exactly what Android Update exists for. Android Update incorporated all these complicated features and tools to make it easy for you.
**************************************************
Available link for download
Subscribe to:
Posts (Atom)