Showing posts with label mode. Show all posts
Showing posts with label mode. Show all posts
Friday, March 17, 2017
GIGABYTE X99 Case mode Made By Kier
GIGABYTE X99 Case mode Made By Kier
GIGABYTE VIP suite at the Taipei 101s 36 floor was filled with exciting live demos, new motherboards and also a few amazing case modes. One of them was a gaming themed case mod built by the famous casemodder Richard Keirsgieter especially for Computex 2015.
Featuring a GIGABYTE X99 Gaming 5P motherboard, Intel Core i7 processor (5960X) and 16GB of HyperX Predator DDR4, the build is all open to show the great water cooling works that is done on the graphics cards and CPU. This build also includes two GTX 970 and a 400GB Intel SSD 750 Series (connected of the M.2 to U.2 converter).
Powerful, well cooled, really good looking... what else can a gamer ask for?
Available link for download

Monday, December 5, 2016
How to Enable Developer Options and USB Debugging Mode on All Android Devices
How to Enable Developer Options and USB Debugging Mode on All Android Devices
Hi guys this is rajtechieguy in this tutorial i will show you how to enable developer option in almost all the android device.Most of the time whenever you would like to flash or upgrade your Android device via flash tool or whenever you want to Root your android device you need to enable USB debugging mode in order to connect and communicate with your Android device. This mode not only useful for connectivity but helps in sending command code to your Android device via Odin. By default the USB debugging mode is disabled for any brand new device to avoid unintentional modifications on your device. But you need to enable debugging option manually for your Android development process. For different Android versions there will be different configurations to turn the USB debugging mode.

Features of Developer Options
The “Developer Options” feature is indispensable to Android developers, hackers and enthusiasts as a means to quickly access and control their device from the PC. Even if you are an average user and wish to root, install a ROM or mod on your Android device, you must turn on USB Debugging mode on your phone or tablet. And you’ll not be able to do it unless you enable Developer Options on your device first.
Among the most useful features that are found under Developer Options are as follows:
- Enable debugging over USB.
- Quickly capture bug reports onto the device.
- Show CPU usage on screen.
- Draw debugging information on screen such as layout bounds, updates on GPU views and hardware layers, and other information.
- Many other options to simulate app stresses or enable debugging options.
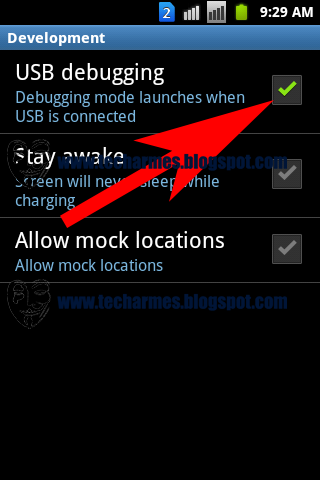
Developer Options on Gingerbread (Android 2.3):
Settings> Applications> Development> USB Debugging
.png)

.png)
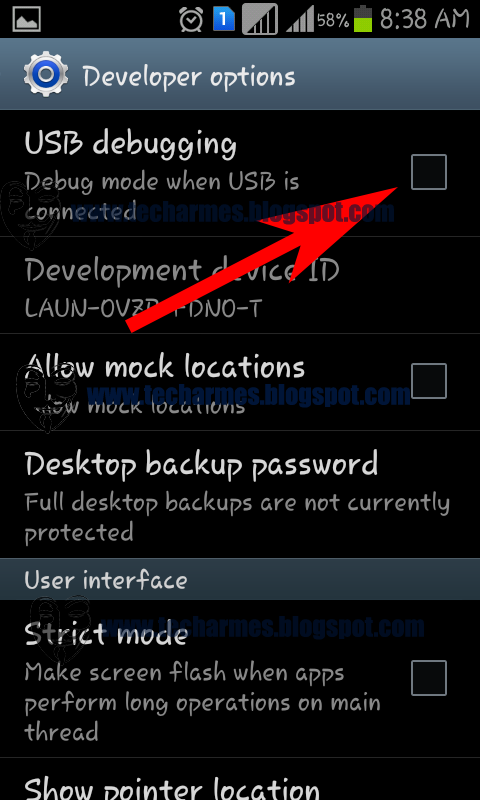
Developer Options on ICS (Android 4.0):
Settings> Developer Options> USB Debugging
Settings> Developer Options> USB Debugging
.png)
.png)
Settings> Developer Options> USB Debugging
If you have recently upgraded your device to Android 4.2 Jelly Bean or have bought a new device with 4.2 or higher pre-installed, do not be surprised if you find the ”Developer Options” missing.
How to Enable Developers Options on Android > 4.2
In fact, the developer options lie at the core of Android development and so they cannot be removed as long as Android is an open source environment. The only change Android 4.2 brings in connection to these useful options is that now they are hidden by default and you will have to make it available by doing some finger exercise.
- Open Settings> About on your Android phone or tablet.
.jpg)
- Now scroll to Build number and tap it 7 times.
.png)
- After tapping the Build Number 7 times, you will see a message “You are now a developer!”
.png)
- Return to the main Settings menu and now you’ll be able to see Developer Options.
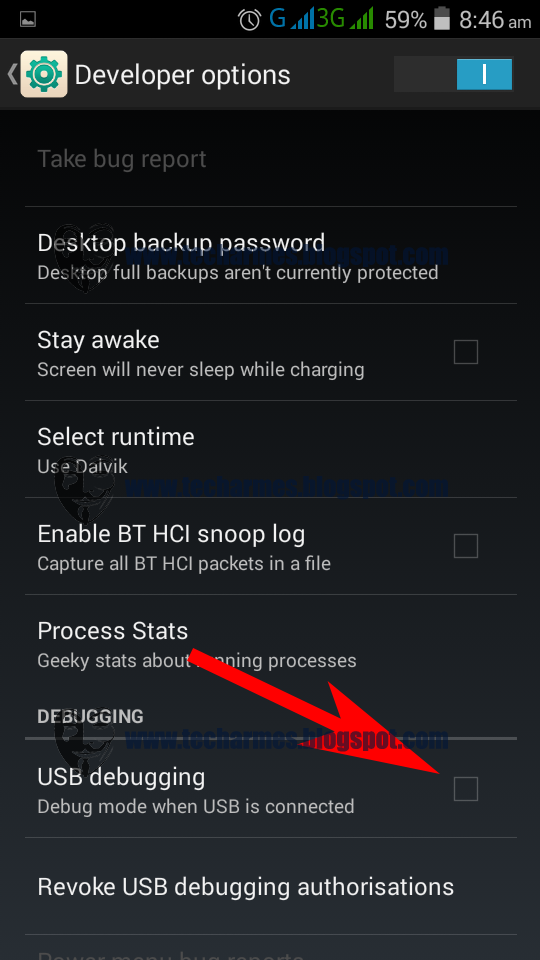
- Tap on Developer options and mark the box in front of USB Debugging to enable it.
.png)
- To disable USB Debugging mode later, you can uncheck the box before the option
- To enable Developer Options, go to Settings> Developer options and tap on the ON/OFF slider on the top of the page.
It is not obvious why Google decided to hide the “Developer options” on the latest version of Android. I guess they might have done it as a warning for noobs but whatever the reason might be, you can easily turn on the Developer Options and enable USB Debugging mode in a fun way using the above method.
Hiding Developer Options on Android:
Once activated, the Developer Options on devices with Android 4.2/4.3 or above remain visible. You will not find a single option that lets you revert back to the state when it was hidden. However, there is still a way to hide Developer Options on Android device. To do this, you will have to boot your device into Recovery Mode and perform a “data/factory reset”.
Available link for download
Friday, November 25, 2016
How to enter recovery mode in Samsung Galaxy S Plus
How to enter recovery mode in Samsung Galaxy S Plus
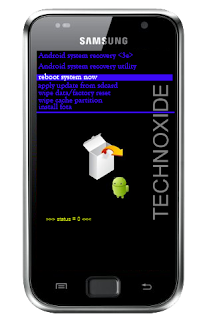
Methode:
1. Switch off your SGS Plus (wait until you get the vibration )
2. Now, press and hold the volume up key and the power button. Leave both buttons when you see the SAMSUNG logo.
3. After "Galaxy S Plus" splash screen you will get a white box and android logo image like below,then press menu soft key and wait some second.
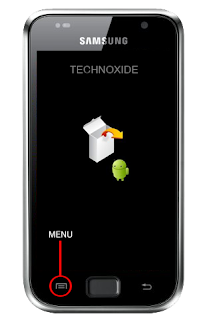
Thats it ! You will be in recovery mode !
Available link for download
Wednesday, October 12, 2016
How to Enable USB Mass Storage Mode in Sony Xperia S P and U
How to Enable USB Mass Storage Mode in Sony Xperia S P and U

In Xperia S, P and U Sony not included the option to enable USB Mass Storage. But still we can enable the UMS using the third party app SD Mounter. The app requires Rooted Stock Ice Cream Sandwich or Jelly Bean with Busybox installed. Now this app tested with Xperia S , P and U and works well. Check with other Xperia devices and share your feedback.
Note [ By Developer ]:
- Before switching to Media Transfer Mode , Eject Mass Storage Drive on PC
Usage
1. Download and install the latest version of SD Mounter - Download
2. Connect the device to computer using USB cable.
3. Open SD Mounter and click Mass Storage.

Thats it done..!
Available link for download
Subscribe to:
Posts (Atom)