Tuesday, April 11, 2017
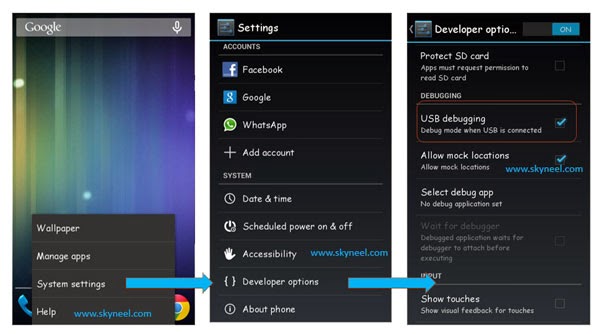
How to Open USB Debugging in Samsung Galaxy S5
How to Open USB Debugging in Samsung Galaxy S5


Related articles:
How to Enable and Disable USB Debugging in Samsung GALAXY Tab2
How to Set Password on Galaxy S4 GT-I9500/GT-I9508
How to Set Password on Samsung Galaxy S3 I9300/I9308
Available link for download
Friday, April 7, 2017
How to Enable and Disable USB Debugging in Samsung GALAXY Tab2
How to Enable and Disable USB Debugging in Samsung GALAXY Tab2

Available link for download
Friday, March 10, 2017
How to Enable USB Debugging in ZTE Grand S II LTE
How to Enable USB Debugging in ZTE Grand S II LTE

Owing to its improved hardware components, diversified applications and metal-like appearance design, ZTE Grand S II LTE, with Android 4.3, is getting more and more popular in the mobile phone market. Meanwhile, a significant number of users are inquiring how to enable USB debugging in it. As a result, this article will introduce the concrete operation step by step.
Related Articles:
Android USB Drivers for ZTE
Recover All Deleted Text Messages on ZTE Blade V-series Android
Available link for download
Monday, January 2, 2017
How To Enable USB Debugging Option In All Android Smartphones
How To Enable USB Debugging Option In All Android Smartphones
Enabling the USB Debugging option in android devices especially in smartphones is very important because without that you cannot root or update your Android device. If you are new to the android world probably you don’t know how to do that. So, in this article I have decided to explain about how to Enable USB Debugging option in android cell phones. Generally, the USB debugging option allows you to connect your android phones to the computer and use the android SDK along with it.
Enabling and disabling the USB Debugging option is available in every android phones. But some devices, it will be disabled due to some safety measures. To be very frank, Google developed the USB debugging option only for the developers. They can use this option if they want to test their newly created android app on their phone. So, it is generally disabled. The disabling option prevent the non-developers from the risk of enabling it accidentally. That’s why in the latest Android versions, you can find this option under the “Developer Options“.
How To Enable USB Debugging Mode?
As I have already said, by default this option is generally disabled and hidden. Therefore, if you want to enable the USB Debugging option you need to follow the instructions given below. I have given separate instructions for Android 2.3, 4.0 and 4.2 versions.Enable USB Debugging In Android 2.3 Or Earlier Version:

1.First go to “Settings“.
2.Their tap on the “Applications” option.
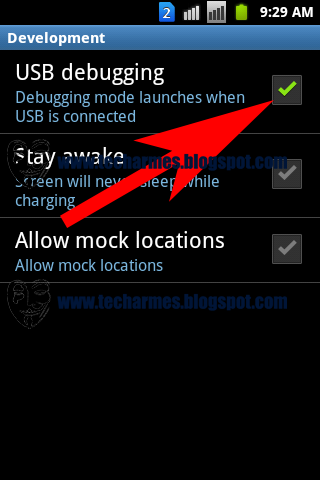
3.From there go to “Development“.
4.Now, you need to check the (tick) “USB Debugging” to enable it.
Enable USB Debugging In Android 4.0 Or Higher Version:
1.Google has slightly changed this option on Android 4.0 version compared to the previous versions.2.From the main menu, first go to the “Settings” in your android phone.
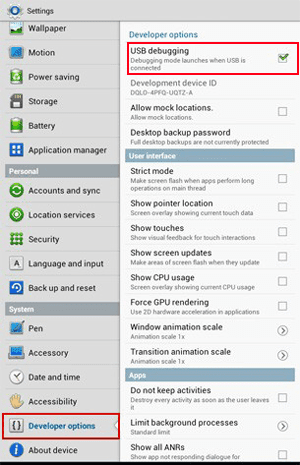
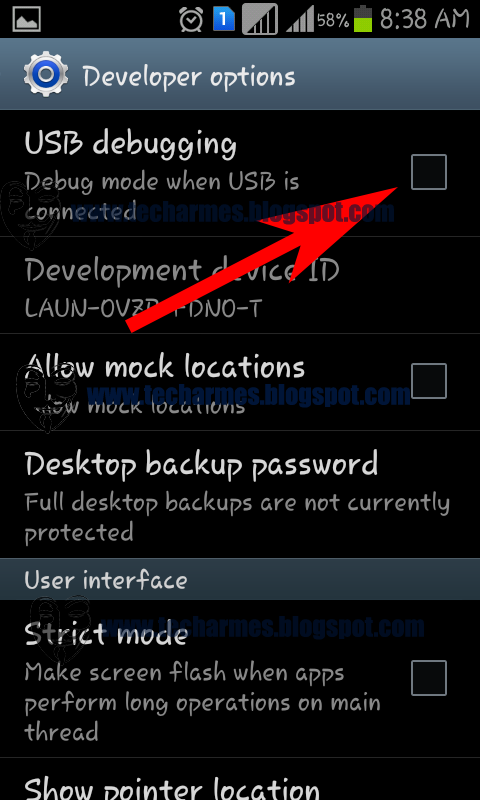
3.Scrolling down, you will be able to find the “Developer options“.
4.Tap that option now and you can see the “USB Debugging” option. Just enable it by taping on it.
Enable USB Debugging Mode In Android 4.2 Or Latest Versions (4.4, 5.0, etc):

1.In this version, Google has hidden the whole “Developer options” section for the users who are not much familiar to use developing tools.
2.So, to enable it go to “Settings” option.
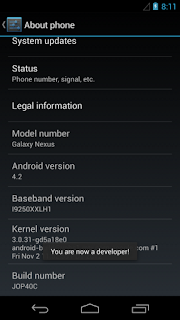
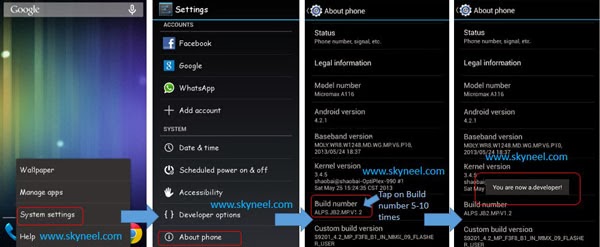
3.From Settings go to “About” option.
4.From there go the “Build number“. You can find this at the end of the scroll.
5.Just tap that Build Number option repeatedly for 7 times. On the third tap, you will be presented with a message saying you have only 4 more taps to be a developer.
6.Continue to tap until you the message “Hooray, you are now a Developer“. At this phase, go back to the “Settings” page.
7.Now, you will be able to see the “Developer options“.
8.Launch the developer options, then check the “USB Debugging” option. Tap “OK“.
Once this option is enabled, even as a non-developer you can access this option over your device and you will get full freedom to control your android phone. There after you can easily root or update your android smartphone by following the appropriate procedure. Enjoy!
Available link for download
Wednesday, December 14, 2016
How To Enable USB Debugging in Android 4 2 Jelly Bean
How To Enable USB Debugging in Android 4 2 Jelly Bean
Yo can simply enable this Developer options by following the below method.
How To Enable USB Debugging in Android 4.2 Jelly Bean ?
1. Go to Settings-> About phone.2. Now tap on the Build number option repeatedly about 7 times.
Now you will get a Toast message you are now a developer.
Thats it ... Now go back to Settings you will see the Developer options placed in the menu and you can enable USB debugging.
Available link for download
Monday, December 5, 2016
How to Enable Developer Options and USB Debugging Mode on All Android Devices
How to Enable Developer Options and USB Debugging Mode on All Android Devices

Features of Developer Options
Among the most useful features that are found under Developer Options are as follows:
- Enable debugging over USB.
- Quickly capture bug reports onto the device.
- Show CPU usage on screen.
- Draw debugging information on screen such as layout bounds, updates on GPU views and hardware layers, and other information.
- Many other options to simulate app stresses or enable debugging options.
Developer Options on Gingerbread (Android 2.3):
.png)

.png)
Settings> Developer Options> USB Debugging
.png)
.png)
Settings> Developer Options> USB Debugging
If you have recently upgraded your device to Android 4.2 Jelly Bean or have bought a new device with 4.2 or higher pre-installed, do not be surprised if you find the ”Developer Options” missing.
How to Enable Developers Options on Android > 4.2
In fact, the developer options lie at the core of Android development and so they cannot be removed as long as Android is an open source environment. The only change Android 4.2 brings in connection to these useful options is that now they are hidden by default and you will have to make it available by doing some finger exercise.
- Open Settings> About on your Android phone or tablet.
.jpg)
- Now scroll to Build number and tap it 7 times.
.png)
- After tapping the Build Number 7 times, you will see a message “You are now a developer!”
.png)
- Return to the main Settings menu and now you’ll be able to see Developer Options.
- Tap on Developer options and mark the box in front of USB Debugging to enable it.
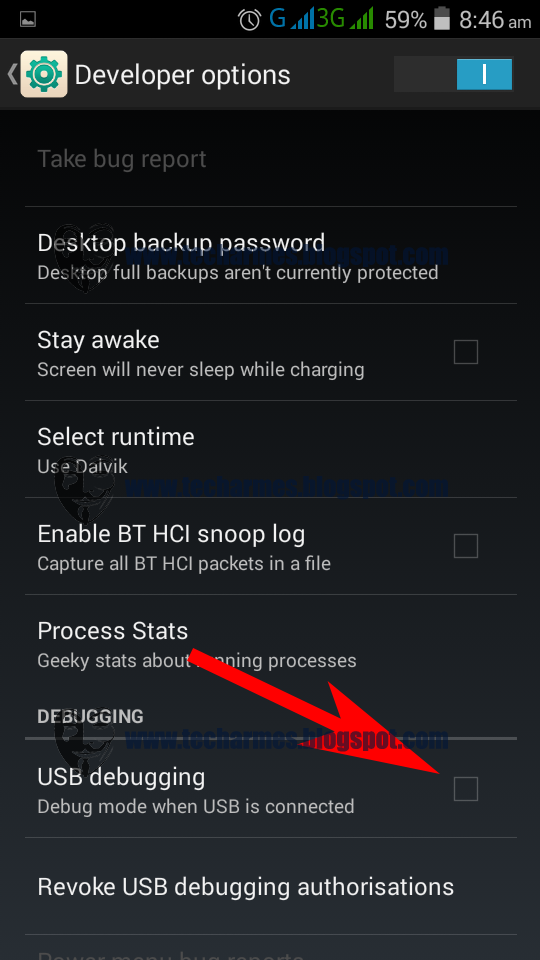.png)
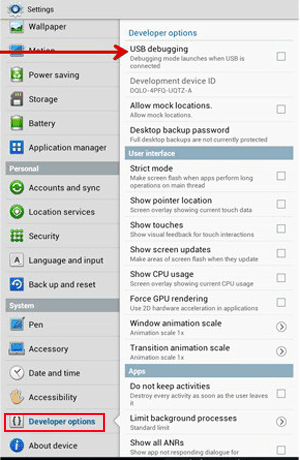
- To disable USB Debugging mode later, you can uncheck the box before the option
- To enable Developer Options, go to Settings> Developer options and tap on the ON/OFF slider on the top of the page.
Hiding Developer Options on Android:
Once activated, the Developer Options on devices with Android 4.2/4.3 or above remain visible. You will not find a single option that lets you revert back to the state when it was hidden. However, there is still a way to hide Developer Options on Android device. To do this, you will have to boot your device into Recovery Mode and perform a “data/factory reset”.
Available link for download
Thursday, November 24, 2016
How to Enable USB Debugging in Asus ZenFone 5 6
How to Enable USB Debugging in Asus ZenFone 5 6

Is there no USB debugging in Asus ZenFone 5/6 phone? Actually, it does exist, but it is hidden. And this article, for your convenience, will summarize the steps to enable USB debugging in ZenFone 5/6(Android 4.3).
Related Articles:
Asus Android USB Drivers
Available link for download
Tuesday, November 15, 2016
How to enable developer options and debugging on Android 4 2 or upper
How to enable developer options and debugging on Android 4 2 or upper
Follow these sets for Enable developer options and debugging mode: -
What is USB Debugging Mode?
USB Debugging Mode, in some versions of Android, is also called Developer Mode. Then it is relatively easy for you to understand that this USB Debugging Mode establishes a direct connection between an Android Device and a computer and readies it for deeper-level actions. You may come across a pop-out notification as it shows below:
What is USB Debugging for?
You’ve probably got the idea that USB Debugging Mode grants you a level of access to your device. What kind of access, you may ask. This level of access that USB Debugging Mode grants is important when you need system-level clearance, such as when coding a new app. This mode, also called Developer Mode, allows newly programmed apps to be copied via USB to the device for testing. Depending on the OS version and installed utilities, the mode must be turned on to let developers read internal logs.
But it does more than that. There are a few non-development-related benefits from this new level of access that can give you much more freedom of control over you device. For example, with Android SDK, you gain direct access to your phone through your computer and that allows you to do things or run terminal commands with ADB. These terminal commands can help you restore a bricked phone. So this mode is a useful tool for any adventurous Android owner.
Of course, the background knowledge is always complicated for those non-experts. This is exactly what Android Update exists for. Android Update incorporated all these complicated features and tools to make it easy for you.
Available link for download