Showing posts with label galaxy. Show all posts
Showing posts with label galaxy. Show all posts
Tuesday, April 11, 2017
How To Manually Update Galaxy S3 GT I9300 to Official Android Jelly Bean 4 1 2 XXEMH4 Using Odin
How To Manually Update Galaxy S3 GT I9300 to Official Android Jelly Bean 4 1 2 XXEMH4 Using Odin

In this I included the steps to manually flash Android 4.1.2 Jelly bean XXEMH4 to Galaxy S3 I9300 International version using Odin.
Firmware Details
PDA: I9300XXEMH4
CSC: I9300ODDEMI2
MODEM: I9300DDEMG2
Note :
1. Backup your important data.
2. Enable USB debugging in your phone.
3. Battery must have 60% or more charge.
4. Disable or Exit Antivirus and Kies if you are installed.
5. Your PC must install Kies or Galaxy S3 driver.
6. This Firmware is only for Galaxy S3 I9300 International Version.
How To Flash Official Android 4.1.2 I9300XXEMH4 in Galaxy S3 I9300 using Odin ?
1. Download Official Android Jelly Bean 4.1.2 I9300XXEMH4 for your country from below links.India | Sri Lanka | Bangladesh | Nepal
2. Extract the downloaded firmware zip.
3. Download Odin v1.85 - Download
4. Now, Extract and Open odin3 v1.85.exe.
5. Power off your phone.
6. Now boot in to download mode. ( Press and hold : Volume down key and Home button ( Center button ) ,now press and hold the power button to boot in to download mode and Press Volume up on Warning)
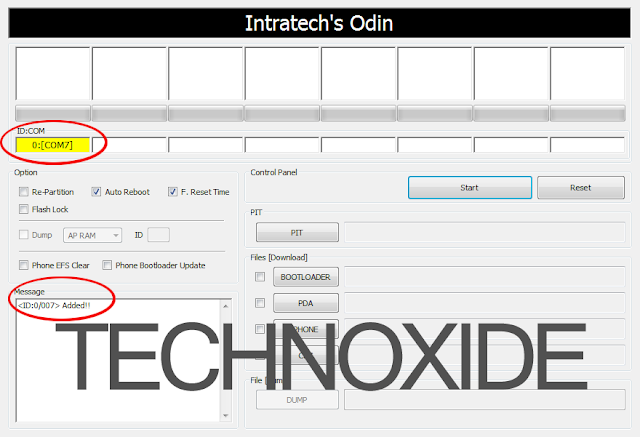
7. In download mode connect your phone to PC.
8. Now look in to Odin... ID:COM box, it will be yellow with a port name and Added! message will be displayed.
( If not it will the problem of driver or USB ... check both )
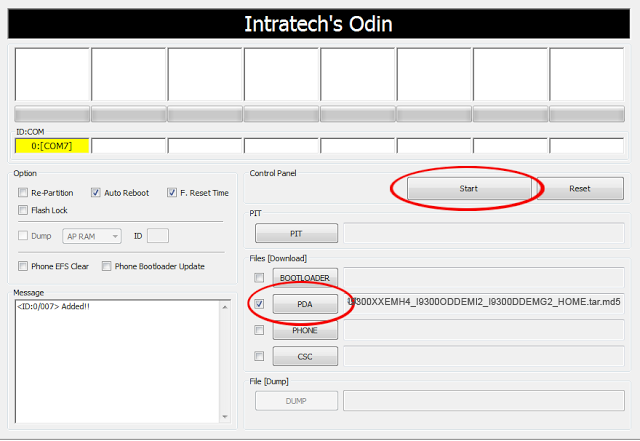
9. In Odin..Click PDA and browse the extracted firmware folder and select I9300XXEMH4_I9300ODDEMI2_I9300DDEMG2_HOME.tar.md5 finally Click Start button.
10. After complete update Odin will show PASS on top left and phone will reboot. now unplug phone from USB.
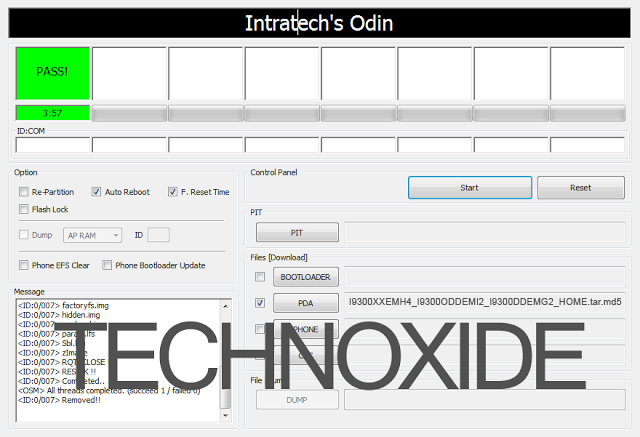
Thats it .... Done .
Note :
If the phone stuck at the boot screen...
1. Remove and reinsert your battery.
2. Now boot into recovery mode. (Volume up + Home + Power )
3. Apply wipe data/factory reset.
4. Apply wipe cache partition.
5. Finally reboot system...
Done !
Go to the below post to root the firmware
How To Root Samsung Galaxy S3 Jelly Bean 4.1.2 XXEMH4 ?
Available link for download
How to Open USB Debugging in Samsung Galaxy S5
How to Open USB Debugging in Samsung Galaxy S5
To open USB debugging in Samsung Galaxy S5(Android 4.4), you can follow the steps below.
Firstly, access Settings.
Secondly, locate and open About device.

Thirdly, keep clicking Build number for 5 to 7 times, and stop when a prompt turns up, which reads, “No need, developer mode has already been enabled.”

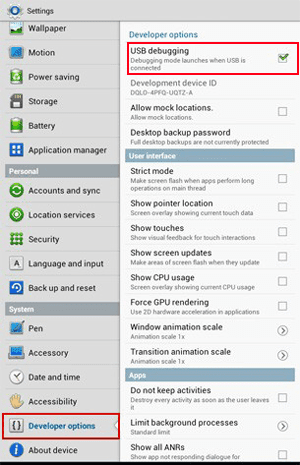
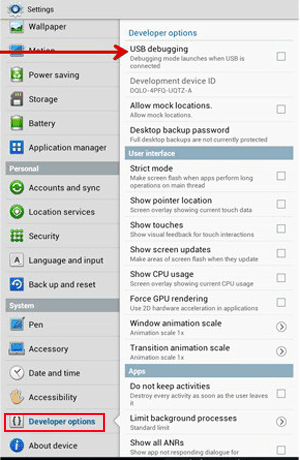
Fourthly, go back to Settings and turn on Developer options.

Fifthly, choose USB debugging in Developer options and tap OK in the pop-up confirm window.

In a word, with the above 5 steps, the USB debugging in Samsung Galaxy S5 can be opened easily.
Related articles:
How to Enable and Disable USB Debugging in Samsung GALAXY Tab2
How to Set Password on Galaxy S4 GT-I9500/GT-I9508
How to Set Password on Samsung Galaxy S3 I9300/I9308
Related articles:
How to Enable and Disable USB Debugging in Samsung GALAXY Tab2
How to Set Password on Galaxy S4 GT-I9500/GT-I9508
How to Set Password on Samsung Galaxy S3 I9300/I9308
How to Get Your Contacts Back on Samsung Galaxy Note 3 Android
Available link for download
Friday, April 7, 2017
How to Enable and Disable USB Debugging in Samsung GALAXY Tab2
How to Enable and Disable USB Debugging in Samsung GALAXY Tab2
In this article, the method to enable and disable USB debugging in Samsung GALAXY Tab2 (with Android 4.0) is illustrated in detail.

Step 1: Open all apps.
Click the Apps icon on the top right corner of the tablet screen.
Step 2: Access Settings in Apps interface.
Find and click Settings to enter it.

Step 3: Enable or disable USB debugging.
1. Locate Developer options, open it and select USB debugging to enable it.
2. To disable USB debugging, open Developer optionsand uncheck USB dubugging.
Related articles:
How to Open USB Debugging in Samsung Galaxy S5
How to Set Password on Galaxy S4 GT-I9500/GT-I9508
How to Get Your Contacts Back on Samsung Galaxy Note 3 Android
Available link for download
Monday, April 3, 2017
How to Flash Stock Firmware on Samsung Galaxy Devices
How to Flash Stock Firmware on Samsung Galaxy Devices

How to Flash Stock Firmware on Samsung Galaxy Devices
Samsung phones are notoriously known for the lag issue on its TouchWiz interface. However, one cannot deny the fact that despite their minor and major drawbacks of their phones, Samsung is still the most popular OEM of smartphones. One of the reasons why Samsung Galaxy devices are popular among users is the ease with which we can find the official firmware for our phones and install them using their Odin tool.
If you got a Samsung phone or tablet and are having software based issues, you can easily restore the stock firmware on it and fix it yourself. Flashing a Samsung device is easier than most Android phones. This is because Samsung provides their own software that can be used to flash all their phone models (Samsung Kies). By using the unofficially released Odin tool, the flashing process becomes easier and smoother as compared to Kies.
The process described below is for flashing any Samsung device back to the original operating system (ROM) and/or for upgrading to any higher or a lesser version of Android version.
Disclaimer/Warning!
This tutorial is only for Samsung Android smartphones and tablets. While we have taken utmost care in describing the procedure in a detailed way, the user must be extra careful with selecting the correct firmware file to install it succesfully. If you have any doubts regarding the procedure, we suggest you to drop us a comment below to clear the same.Flashing the stock firmwares do not void your device’s warranty or trip KNOX Warranty counter. However, if you flash CF-Auto-Root packages or a custom recovery using Odin, doing so will void the warranty. Just follow the tutorial to the word carefully and everything will go fine hopefully. Technastic will not be responsible for any damages caused to your device.
Preparations
Charge Your Device
Before you proceed to install the firmware on your Samsung device, it’s important that your device has sufficient battery juice left on it. In case the battery turns off during firmware flashing, your phone be hard-bricked. To avoid any unpleasant experience, make sure your device has 60-70% battery power at least.

Enable Developer options and USB Debugging
To install a firmware successfully, you must enable USB Debugging on your phone and tablet. You can find this option under Developer Options. If you don’t find it under Settings, here’s is how you can enable it:
- Open Settings and go to About Device.
- Scroll down to Build number and tap it 7 times.
- You will see a toast message that “Developer mode has been enabled” on your device.
- Now go back to Settings panel and scroll down to Developer options.
- Tap it and check the box for USB debugging option to enable it.


Install the Latest Samsung USB Drivers
Install the latest Samsung USB drivers on your PC. If you already have them installed on your computer, you can skip this step.omputer. If you have Kies on your computer, make sure that the program is closed while you use Odin. You can download the Samsung USB Drivers from google search.
Backup the Apps and Important Data
It’s very important that you take a backup of all your apps, images, videos, messages, memos, and other important data present on your device before installing a new firmware. Usually, new firmwares don’t wipe any data, but you should still take precautions. You can find hundreds of useful backup apps at the Google Play Store to help you with the job.
Download Odin Flashing Tool
Now download the recommended Odin tool for flashing firmware on your Samsung device. As you know that there are several Odin versions available but considering the rate of success, you should use Odin3 v3.09 (for JellyBean and KitKat), or Odin3 v3.10.7, (for Lollipop and Marshmallow).
Download the Stock Firmware for Your Samsung Device
While downloading the stock firmware for your device, make sure you download the correct file for your device model. You can check the model by going to Settings> About. You can download the firmware from Samsung-Updates or Sammobile.
Reboot Your Samsung Galaxy Phone/Tab into the Download Mode
To install a stock firmware, or any .tar file, you will have to reboot your Samsung device into the Download or Odin Mode. You can easily access the Download Mode as follows: Turn off your device and then press and hold
Turn off your device. Now press and hold Volume UP+Home+Power buttons at the same time for about 2-3 seconds.

When you see the warning screen with a yellow triangle sign, press the Volume Up key to enter Download/Odin mode:
After pressing the Volume Up key, you device will get into the Odin or Download mode.

Flash Stock Firmware on Samsung Galaxy Using Odin
- If the firmware/CF-Root/custom recovery file you downloaded is a zip file, extract it to get the file with .tar or .tar.md5 extension.
- Extract the Odin zip file too, and launch the program by clicking the Odin3 vx.xx.exe file.
- Now turn off your device and reboot it into the Download Mode.
- Connect your device to the computer using a compatible USB cable.
- When your device is detected by Odin, the ID: COM port on Odin will turnBlue or Yellow depending on the Odin version and you’ll see “Added!!”message in the message box in Odin.
- In case your phone is not detected by Odin, try the following things:
- Reboot your phone and turn it off.
- Disable and enable USB Debugging again.
- Uninstall Samsung USB Driver or Kies and reinstall it.
- Reboot your PC.
- Use a different USB port.
- Try a different USB cable, preferably the one provided with your device.
- Click the AP or PDA button on Odin.
- Single firmware file installation: Navigate to the firmware or recovery file and select the file with .tar/.tar.md5 extension.
- Multi-file firmware installation: In case you have to install a multi-file firmware with AP, BL (bootloader), CP (modem), CSC, and .PIT files, you must add the firmware components to corresponding slots in Odin like shown below. If you don’t have the .PIT file for your device, click here to download or request it. Below is an example of Odin configuration while flashing a multifile firmware.
- Single firmware file installation: Navigate to the firmware or recovery file and select the file with .tar/.tar.md5 extension.
- In the Option section, make sure that only the Auto Reboot and F. Reset Time boxes are checked and everything else are unchecked.
- Having made sure that everything looks fine (as shown in the screenshots above), just click the Start button on Odin to initiate the firmware installation.
- Available link for download


Friday, March 31, 2017
How To Install Extended Power Menu Mod in Samsung Galaxy S3
How To Install Extended Power Menu Mod in Samsung Galaxy S3

In this post I included the steps to install extended power menu mod (Recovery, Download, etc.) in Samsung Galaxy S3. We should thank XDA Recognized Developer AndiP for making this mod. Currently, extended power menu mod is only available for selected ICS and Jelly bean versions.
Note:
- Make sure to download the correct odex or deodex firmware versions file. Check if Odexed or Deodexed ?
- This mod is only for Galaxy S3 with Stock Rom.
Disclaimer:
Installing Mods may brick your phone. I am not responsible for any damage. Do at your risk.
How To Install Extended Power Menu Mod in Samsung Galaxy S3 ?
1. Download the correct version of Extended PowerMenu zip for your firmware build number - Download2. Copy XX...-ExtPowMenu.zip to SD card.
3. Boot into CWM recovery. ( Power Off .... Press and Hold Volume up , Home and Power button )
4. In CWM Recovery select - install zip from sd card
5. Now click choose zip from sd card.
6. Finally select the XX...-ExtPowMenu.zip
After installation .... reboot...done...After reboot long press power button and click reboot. if the installation was success it will show options like Recovery, Download etc..
If the above method not worked or if you want to rollback the power menu to its default state just follow the steps below.
How to Restore the default power menu in Samsung Galaxy S3 ?
1. Download the correct version of Extended PowerMenu Rollback zip for your firmware build number - Download2. Copy XX...-ExtPowMenu-Rollback.zip to SD card.
3. Boot into CWM recovery. ( Power Off .... Press and Hold Volume up , Home and Power button )
4. In CWM Recovery select - install zip from sd card
5. Now click choose zip from sd card.
6. Finally select the XX...-ExtPowMenu-Rollback.zip
After complete install...reboot...
source
Available link for download
Monday, March 27, 2017
How to Set A Password to Samsung Galaxy Gio GT S5660
How to Set A Password to Samsung Galaxy Gio GT S5660

Setting a strong password to your Samsung Galaxy Gio GT-S5660 is greatly helpful in protecting the personal and confidential phone data. Therefore, do not hesitate a moment to follow the steps introduced in this article to set a password to your phone.
Steps to set a password to Samsung Galaxy Gio GT-S5660:
Step 1: Open Settings.
Step 2: Select Location and security.
Step 3: Tap Set screen lock.
Step 4: Choose Password to go to the next procedure.
Step 5: Set a password which contains at least 4 characters and then click Continue.
Step 6: Reenter the password and tap OK.
Related Articles:
How to Set Pattern Lock on Samsung Galaxy Gio GT-S5660
How to Set Password on Samsung Galaxy S3 I9300/I9308
How to Set Password on Galaxy S4 GT-I9500/GT-I9508
Android USB Driver for Samsung
Android USB Driver for Samsung
Available link for download
Sunday, March 26, 2017
How to add more notification toggles to our Samsung Galaxy Core GT I8262
How to add more notification toggles to our Samsung Galaxy Core GT I8262
Notice: You should be running on stock android to do this. This requires root and although its not so risky but it is always better to have a backup. Also please do not blame me if you softbrick your device.. Do at your own risk!! It worked for me and it should work for anyone running stock rooted like I am.
Okay.. so, heres what you need:
(1) Rooted Galaxy Core in Easy Way
(2) Sqlite editor app
Dts all!!
So heres what you need to do:
(1) Open sqlite and give root permission. It should show a list
(2) Scroll down to "Settings Storage" and open it
(3) Open "Settings.db"
(4) Next, tap "System"
(5) Scroll down until you find "notification_panel_active_app_list" NOT the notification_panel_default_active_app_list.Tap it. If its not present (well... it was not present for me atleast)(Make sure to Check Properly),then tap the menu key and then tap new record. Set the name to "notification_panel_active_app_list" and under value type the following.
Note that the above letters should be CaSe sEnsItiVe and no spaces
(6) ReBoot
(7) Congratzz... U have successfully customized the notification panel..
You can press the thanks button if you think ive helped you as ive researched alot on this.. This is my first post here and i hope to see some warm welcomes
If you have any questions regarding this then im always ready to help..
Thank you,
Ansley
Okay.. so, heres what you need:
(1) Rooted Galaxy Core in Easy Way
(2) Sqlite editor app
Dts all!!
So heres what you need to do:
(1) Open sqlite and give root permission. It should show a list
(2) Scroll down to "Settings Storage" and open it
(3) Open "Settings.db"
(4) Next, tap "System"
(5) Scroll down until you find "notification_panel_active_app_list" NOT the notification_panel_default_active_app_list.Tap it. If its not present (well... it was not present for me atleast)(Make sure to Check Properly),then tap the menu key and then tap new record. Set the name to "notification_panel_active_app_list" and under value type the following.
Code:
Wifi;Location;SilentMode;Bluetooth;MobileData;AutoRotate;WiFiHotspot;SmartStay;AirplaneMode;DormantMode;PowerSaving;DrivingMode;Sync
(6) ReBoot
(7) Congratzz... U have successfully customized the notification panel..
You can press the thanks button if you think ive helped you as ive researched alot on this.. This is my first post here and i hope to see some warm welcomes
If you have any questions regarding this then im always ready to help..
Thank you,
Ansley
Available link for download
Thursday, March 23, 2017
Guide Hard Reset Samsung Galaxy A7 2016 To Restore Factory Setting Remove Forgot Pattern PIN Password
Guide Hard Reset Samsung Galaxy A7 2016 To Restore Factory Setting Remove Forgot Pattern PIN Password
[Guide] Hard Reset Samsung Galaxy A7 2016 To Restore Factory Setting & Remove Forgot Pattern/PIN/Password.
Hard Reset Samsung Galaxy A7 2016. Samsung Galaxy A7 2016 has this version (A7100 (Hong Kong), A710M (Latin America), A710FD (Southeast Asia), A710Y (Taiwan), A710F (Europe)), and this Android Smartphone Also known as Samsung Galaxy A7 (2016) Duos with dual-SIM card slots. This device is released on December, 2015. And todays guidebelajar will explain to you how to perform hard reset on Samsung Galaxy A7 2016 smartphone. Please keep in mind, this tutorial will erase all data saved on your internal memory. Samsung Galaxy A7 2016 is the smartphone with 5,5 Inchi Super AMOLED capacitive touchscreen, 16M colors, work on Android OS, v5.1.1 (Lollipop), and supported with Processor Quad-core 1.2 GHz Cortex-A53 & Quad-core 1.5 GHz Cortex-A53, Qualcomm MSM8939 Snapdragon 615 chipset, Adreno 405 GPU, combined with 3 GB of RAM, 13 MP on primary camera and 5 MP on secondary camera to capture best moment and make a selfie on your life.
Most of Android user say that Hard reset process is call with master reset or factory reset. Many people asking why shoud we perform hard reset to our phone. The logical answer that can I say for this asking is :
Most of Android user say that Hard reset process is call with master reset or factory reset. Many people asking why shoud we perform hard reset to our phone. The logical answer that can I say for this asking is :
- Samsung Galaxy A7 2016 has a persistent problem that cannot be solved.
- Because we will sell our Samsung Galaxy A7 2016 Android phones
- We want to remove all personal data and setting that was stored in Samsung Galaxy A7 2016.device.
- There are many bug on Samsung Galaxy A7 2016.
- Our Samsung Galaxy A7 2016 has been lagging and stuck on android logo, this call with bootloop
- We have forgotten on PIN or Patern Lock at Samsung Galaxy A7 2016.
- We will give our Samsung Galaxy A7 2016 away to some one else, and we dont want that one know everything about our secret data, so we have to erase all data before back up it.
- and many other reason.
1st Methode. Hard Reset Samsung Galaxy A7 2016 Using Menu :
- Make sure your batery is fully charged, Recomended you have 80% of battery capacity
- Then Backup your Samsung Galaxy A7 2016. See This Guide
- Go to menu: System Setting >
- Select Backup and Reset >
- Factory Data Reset >
- Reset Phone
- Choose Erase everything to confirm that you already to perform hard reset on Samsung Galaxy A7 2016
- Samsung Galaxy A7 2016 will continue to hard reset process to restore factory default.
2ndMethode. Hard Reset Samsung Galaxy A7 2016 Using Hardware Keys:
- Make sure your battery is fully charged, we recomended that your battery has 80% power
- Always BackUp your important data that store in Samsung Galaxy A7 2016. see this guide
- Turn Off your Samsung Galaxy A7 2016 by hold and press Power Button for a second.
- Release any SIM card and SD card that was installed on your Samsung Galaxy A7 2016 smartphone.
- Then press and hold together a combination button Volume Up + Home Button + Power button at same time for a seconds.

Hard Reset Samsung Galaxy A7 2016 - Then you will see Samsung Galaxy J7 Logo. On this step release Power Button only, while keep holding Volume Up and Home Button.

Samsung Galaxy A7 2016 Logo - When Android Logo appear on your screen. You must release all button.

Android Logo - hard reset samsung galaxy A7 2016 - And now you will enter, Android System Recovery.

Android System Recovery - Scroll down using Power Down button, and you can select "wipe data/factory reset" and confirm it using Power Button.

wipe data - Hard Reset - Then select "Yes ---Delete All User Data". use volume down button to choice menu, and again confirm it using Power Button. Please be ware, on this this step you will be lost everything stored on your phone. So, make sure to always backup all data before performing hard reset.

yes delete all user data - Now, wait the process untill you see data wipe complete appear on screen.

wipe data process - After a few minute hard reset process will finished, and your screen will be back to Android System recovery screen.
- Now, Select Reboot System Now to reboot your device.

Reboot System Now - You can wait a while for Samsung Galaxy A7 2016 to reboot system
- Done, your hard reset process success now.


Video Guide.
Available link for download
Monday, March 20, 2017
How To Root Galaxy S2 Jelly Bean 4 1 2 XXLSJ
How To Root Galaxy S2 Jelly Bean 4 1 2 XXLSJ
We should thank to XDA senior member PhilZ for the zip package with a short time. The package contains root files , CWM6 and SuperSu.
Warning : Rooting will void phones Warrenty ! Rooting / Flashing may brick your phone ! We are not responsible for any damage do at your risk !
Note:
1. Backup Importent Data
2. Battery charge must be 60% or more
Root Galaxy S2 Jelly Bean 4.1.2 XXLSJ using zip package
1. Download 4.1.2 XXLSJ Root zip package from here (v3.75)2. Copy the downloaded zip package XXLSJ-ROOT-CWM6.zip to external SD card.
3. Switch off your phone and wait till vibrate.
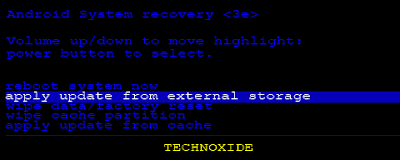
4. Boot in to stock recovery ( Volume up + Home + Power )
5. In recovery select apply update from external storage.
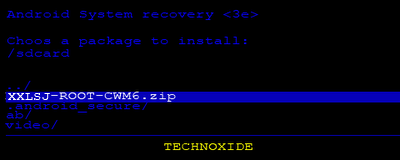
6. Select copied zip file XXLSJ-ROOT-CWM6.zip
7. After installation ....select reboot system now...
Thats it...Now you are successfully rooted Galaxy S2 4.1.2 XXLSJ.
Available link for download
Saturday, March 18, 2017
Guide Hard Reset Samsung Galaxy J1 2016 To Restore Factory Setting Remove Forgot Pattern PIN Password
Guide Hard Reset Samsung Galaxy J1 2016 To Restore Factory Setting Remove Forgot Pattern PIN Password
[Guide] Hard Reset Samsung Galaxy J1 2016 To Restore Factory Setting & Remove Forgot Pattern/PIN/Password.
Hard Reset Samsung Galaxy J1 2016. Samsung Galaxy J1 2016 has this version (J120F (Global); J120H, J120M, J120M, J120T), and this Android Smartphone Also known as Samsung Galaxy J1 (2016) Duos with dual-SIM card slots. This device is released on January, 2016. And todays guidebelajar will explain to you how to perform hard reset on Samsung Galaxy J1 2016 smartphone. Please keep in mind, this tutorial will erase all data saved on your internal memory. Samsung Galaxy J1 2016 is the smartphone with 4,5 Inchi Super AMOLED capacitive touchscreen, 16M colors, work on Android OS, v5.1.1 (Lollipop), and supported with Processor Quad-core 1.3 GHz Cortex-A7, Exynos 3475 Quad chipset, Mali-T720 GPU, combined with 1 GB of RAM, 5 MP on primary camera and 2 MP on secondary camera to capture best moment and make a selfie on your life.
Most of Android user say that Hard reset process is call with master reset or factory reset. Many people asking why shoud we perform hard reset to our phone. The logical answer that can I say for this asking is :
Most of Android user say that Hard reset process is call with master reset or factory reset. Many people asking why shoud we perform hard reset to our phone. The logical answer that can I say for this asking is :
- There are many bug on Samsung Galaxy J1 2016.
- Samsung Galaxy J1 2016 has a persistent problem that cannot be solved.
- Because we will sell our Samsung Galaxy J1 2016 Android phones
- We want to remove all personal data and setting that was stored in Samsung Galaxy J1 2016.device.
- Our Samsung Galaxy J1 2016 has been lagging and stuck on android logo, this call with bootloop
- We have forgotten on PIN or Patern Lock at Samsung Galaxy J1 2016.
- We will give our Samsung Galaxy J1 2016 away to some one else, and we dont want that one know everything about our secret data, so we have to erase all data before back up it.
- and many other reason.
1st Methode. Hard Reset Samsung Galaxy J1 2016 Using Menu :
- Make sure your batery is fully charged, Recomended you have 80% of battery capacity
- Then Backup your Samsung Galaxy J1 2016. See This Guide
- Go to menu: System Setting >
- Select Backup and Reset >
- Factory Data Reset >
- Reset Phone
- Choose Erase everything to confirm that you already to perform hard reset on Samsung Galaxy J1 2016
- Samsung Galaxy J1 2016 will continue to hard reset process to restore factory default.
2ndMethode. Hard Reset Samsung Galaxy J1 2016 Using Hardware Keys:
- Make sure your battery is fully charged, we recomended that your battery has 80% power
- Always BackUp your important data that store in Samsung Galaxy J1 2016. see this guide
- Turn Off your Samsung Galaxy J1 2016 by hold and press Power Button for a second.
- Release any SIM card and SD card that was installed on your Samsung Galaxy J1 2016 smartphone.
- Then press and hold together a combination button Volume Up + Home Button + Power button at same time for a seconds.

Hard Reset Samsung Galaxy J1 2016 - Then you will see Samsung Galaxy J7 Logo. On this step release Power Button only, while keep holding Volume Up and Home Button.

Samsung Galaxy J1 2016 Logo - When Android Logo appear on your screen. You must release all button.

Android Logo - hard reset samsung galaxy J1 2016 - And now you will enter, Android System Recovery.
Android System Recovery - Scroll down using Power Down button, and you can select "wipe data/factory reset" and confirm it using Power Button.
wipe data - Hard Reset - Then select "Yes ---Delete All User Data". use volume down button to choice menu, and again confirm it using Power Button. Please be ware, on this this step you will be lost everything stored on your phone. So, make sure to always backup all data before performing hard reset.
yes delete all user data - Now, wait the process untill you see data wipe complete appear on screen.
wipe data process - After a few minute hard reset process will finished, and your screen will be back to Android System recovery screen.
- Now, Select Reboot System Now to reboot your device.
Reboot System Now - You can wait a while for Samsung Galaxy J1 2016 to reboot system
- Done, your hard reset process success now.


Video Guide.
Available link for download
Subscribe to:
Posts (Atom)