Showing posts with label root. Show all posts
Showing posts with label root. Show all posts
Wednesday, April 12, 2017
How to root karbonn A1
How to root karbonn A1
Requirements :
 ?Ginger break
?Root checker.apk
?Super user
?Root checker.apk
?Super user
Step-By-Step Instructions:-
1) Download the app Gingerbreak.apk. From Here.
2) Turn the USB Debugging mode on. From Settings>Applications>Development>USB Debugging.
3)Then install Gingerbreak.apk to your phone.
4) Open the Gingerbreak app.
5) Then click on Root Device.
6) You will have to wait for a minute
7) Then the phone will reboot.The reboot shows that the root is complete download super user from here
8) Using root checker check the rooting
9) download and install super user from here
8) Using root checker check the rooting
9) download and install super user from here
*********************************************************
Available link for download
Tuesday, April 11, 2017
how to root karbonn a6
how to root karbonn a6
Requirements:
1.Vroot
2.USB driver(for your android click here)
3.Root checker
STEPS TO ROOT ANDROID :-
Step 1: Enable USB Debugging on your Android Smartphone. To enable USB debugging, Open Settings > Developers Option > USB Debugging > Tick (if u dont know how to enable usb debugging click here
Step 2: Download and install vRoot Application on your Windows Computer
.
Step 3: Once vRoot Application is installed on your Computer, and install usb driver and Open vroot.
Step 4: Once vRoot Application is launched, connect your Android device to the computer
Step 5: Once Your Smartphone is connected successfully to the computer, vRoot will automatically detect your Smartphone.
Step 6: Now, Click on the “Root” button to begin the rooting process.
Step 7: Now, vRoot will automatically “Reboot” your Smartphone and install the SuperSU Application
Step 8: Now your Android Device is Rooted. To check whether your phone is rooted correctly, open Applications Menu, there you will be able to see a new app installed, called SuperSU. If this app exist then it means you have successfully rooted your device.
Optional: You can also verify that your device is successfully rooted or not by Root Checker Application.
**************************************************************
Available link for download
Monday, April 10, 2017
How to Root Yu Yureka Plus
How to Root Yu Yureka Plus
1) Enable Developer Option (Go to Settings-> About Phone -> Tap on Build number 7 times)
2) Go to Developer Option and disable Update Recovery
3) Enable Android Debugging
4) Install the 15-Second ADB driver file (GooGle Drive Link)
5) Download adb+fastboot zip (https://www.androidfilehost.com/?fid=95916177934556622)
6) Download Su binaries (https://download.chainfire.eu/696/SuperSU)
7) Copy UPDATE-SuperSU-v2.46.zip to an SD card
8) Download TWRP (https://s.basketbuild.com/uploads/de...7.0_YUREKA.img)
8) Connect Phone to PC and navigate to the folder where you have abd+fastboot
9) Shift+right click -> Open command prompt
Type : adb devices
If your device is connected you will get it in connected devices
Type : adb reboot-bootloader
Your phone will restart into bootloader.
Type : fastboot -i 0x1ebf oem device-info
If your bootloader is unlocked, it will say "True", else it will say "false". If it is False, then do the next step
Type : fastboot -i 0x1ebf oem unlock
WARNING : All your userdata will be GONE! Now you can root your phone in two ways
Type : fastboot -i 0x1ebf boot TWRP_V2.8.7.0_YUREKA.img
This will launch TWRP on your device. Navigate to where you saved the UPDATE-SuperSU-v2.46.zip file. Flash it, wipe Cache, Reboot and you are rooted!
Type : fastboot -i 0x1ebf flash recovery TWRP_V2.8.7.0_YUREKA.img
Your Cyanogen recovery will be replaced with TWRP. Then, unplug your device, hold volume up+down+power to boot into recovery, navigate to where you saved the UPDATE-SuperSU-v2.46.zip file. Flash it, wipe Cache, Reboot and you are rooted!
2) Go to Developer Option and disable Update Recovery
3) Enable Android Debugging
4) Install the 15-Second ADB driver file (GooGle Drive Link)
5) Download adb+fastboot zip (https://www.androidfilehost.com/?fid=95916177934556622)
6) Download Su binaries (https://download.chainfire.eu/696/SuperSU)
7) Copy UPDATE-SuperSU-v2.46.zip to an SD card
8) Download TWRP (https://s.basketbuild.com/uploads/de...7.0_YUREKA.img)
8) Connect Phone to PC and navigate to the folder where you have abd+fastboot
9) Shift+right click -> Open command prompt
Type : adb devices
If your device is connected you will get it in connected devices
Type : adb reboot-bootloader
Your phone will restart into bootloader.
Type : fastboot -i 0x1ebf oem device-info
If your bootloader is unlocked, it will say "True", else it will say "false". If it is False, then do the next step
Type : fastboot -i 0x1ebf oem unlock
WARNING : All your userdata will be GONE! Now you can root your phone in two ways
Method 1 : If you want to retain the Original Recovery - Hot boot
Type : fastboot -i 0x1ebf boot TWRP_V2.8.7.0_YUREKA.img
This will launch TWRP on your device. Navigate to where you saved the UPDATE-SuperSU-v2.46.zip file. Flash it, wipe Cache, Reboot and you are rooted!
Method 2: If you want to flash Custom Recovery - Flash
Type : fastboot -i 0x1ebf flash recovery TWRP_V2.8.7.0_YUREKA.img
Your Cyanogen recovery will be replaced with TWRP. Then, unplug your device, hold volume up+down+power to boot into recovery, navigate to where you saved the UPDATE-SuperSU-v2.46.zip file. Flash it, wipe Cache, Reboot and you are rooted!
No enjoy Your Rooted Phone
Available link for download
Sunday, April 9, 2017
How to root karbonn A4 plus
How to root karbonn A4 plus
Requirements :
KARBONN USB DRIVER
BIN4RY
Step-By-Step Instructions:-
1.Go To Settings>Security & Enable The Install From Unknown Source. (Skip If Already Enabled)
2. Open Rooting Software File and Unzip Software
3. After that Connect Your Karbonn Android Mobile, and before to connecting make sure you have install Driver and Enable USB Debugging.
4. After that Wait few mins
5. Then open Rooting software folder and click on "RunMe.bat" file
6. Then you see Many option, so Type "1" for normal and press enter, then in few sec your mobile rooted and you have see message "Your mobile is rooted successfully".
7. And when you have need to unroot your mobile then open "RunMe.bat" file and type "x" and press enter then your mobile unrooted.
NOTE:
This article related to Rooting of Karboon Android Mobile Phone, and may be its work properly, if you have getting any problem use universal root
Available link for download
Tuesday, April 4, 2017
How to root karbonn A9
How to root karbonn A9
Requirements :
KARBONN USB DRIVER
BIN4RY
Step-By-Step Instructions:-
1.Go To Settings>Security & Enable The Install From Unknown Source. (Skip If Already Enabled)
2. Open Rooting Software File and Unzip Software
3. After that Connect Your Karbonn Android Mobile, and before to connecting make sure you have install Driver and Enable USB Debugging.
4. After that Wait few mins
5. Then open Rooting software folder and click on "RunMe.bat" file
6. Then you see Many option, so Type "1" for normal and press enter, then in few sec your mobile rooted and you have see message "Your mobile is rooted successfully".
7. And when you have need to unroot your mobile then open "RunMe.bat" file and type "x" and press enter then your mobile unrooted.
NOTE:
This article related to Rooting of Karboon Android Mobile Phone, and may be its work properly, if you have getting any problem use universal root
Available link for download
Saturday, April 1, 2017
How To Root Unroot Xiaomi Redmi 2 Without PC
How To Root Unroot Xiaomi Redmi 2 Without PC
 Redmi 2 is my first Xiaomi device and I am really satisfied with the spec and performance of the Redmi 2 for the price tag 6,999/- INR. Here I am posting the safest root method available in Xiaomi official forum for Redmi 2. This root method doesnt need any PC or Custom Recovery, just do it in your phone it self.
I have tested this root on the Redmi 2 Global version with MIUI version 6.4.4.0 (KHJMICB) and it worked without issue. In the Xiaomi forums Redmi 2 rooting thread you can find other variants of Redmi 2 root too.
Update
- Post updated with unrooting method.
Update (23/05/2015)
- Redmi 2 OTA update installation will fail on rooted device. So Unroot your Redmi 2 before OTA update.
Update (29-5-2015)
- Root available for V6.5.2.0.KHJMICD
Update (21-7-2015)
- Root available for V6.6.6.0.KHJMICF
Notes:
- In this post I am using the root for Redmi 2 Indian (Global) version with MIUI 6.4.4.0 (KHJMICB). If you have different phone or different MIUI version use appropriate root file.
- This root process will not delete any data. (Still recommend to backup important data)
- Battery percentage should be 40 or above.
- Rooting Will Void Warranty I am not responsible for any damage.
Redmi 2 Root Without PC
1. Download Specific Root File for Your Redmi 2 Version - Download2. Copy The Root File to Internal Memory.
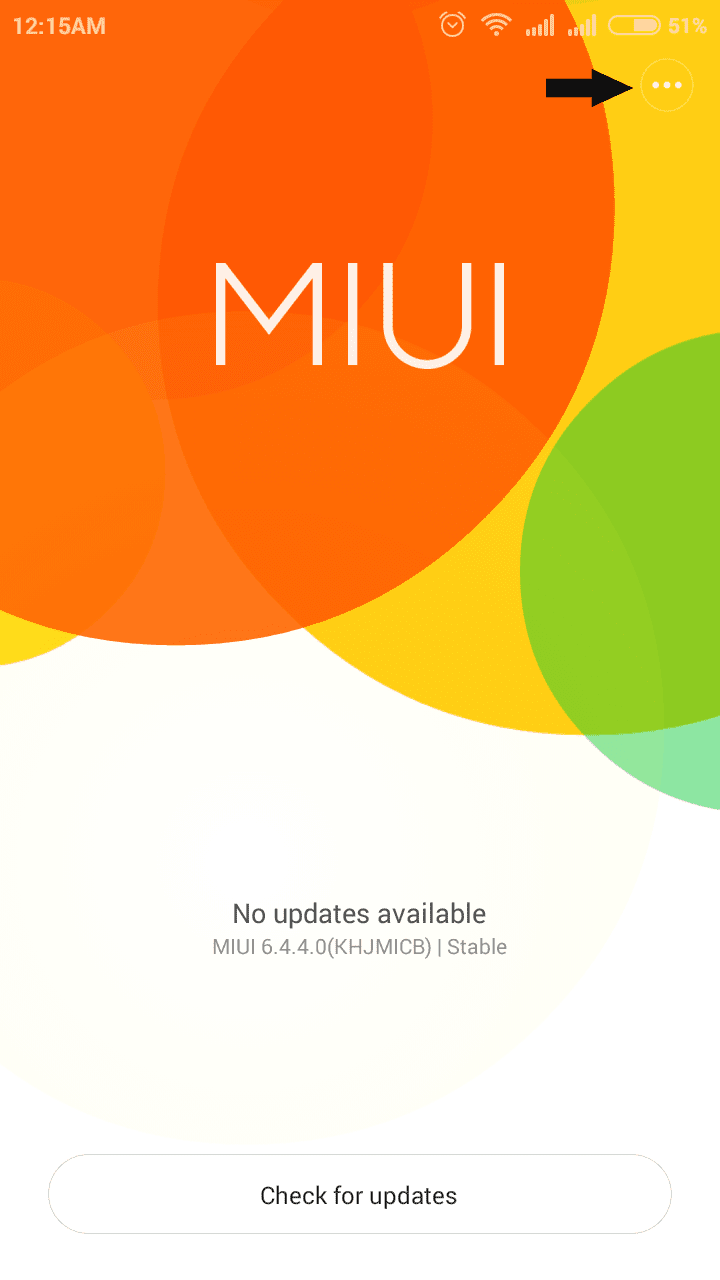
3. Open Updater app (Probably in Tools Folder)
4. In Updated app tap on the 3 dots on the right top and select Choose update package.
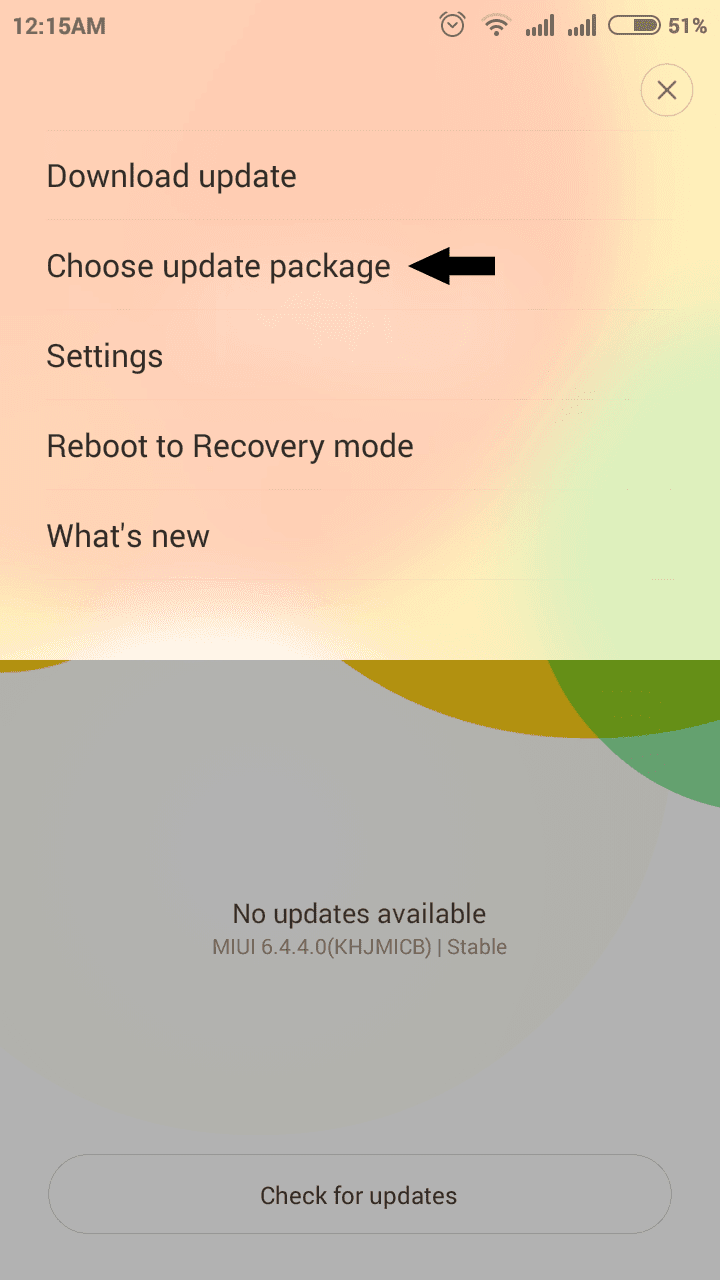
5. Now browse for the copied root file and select it.
(When You select the root package phone will reboot. Wait till it finish the process.)
6. After Reboot, Open Security app and tap on Permissions. You will see Root access menu there.
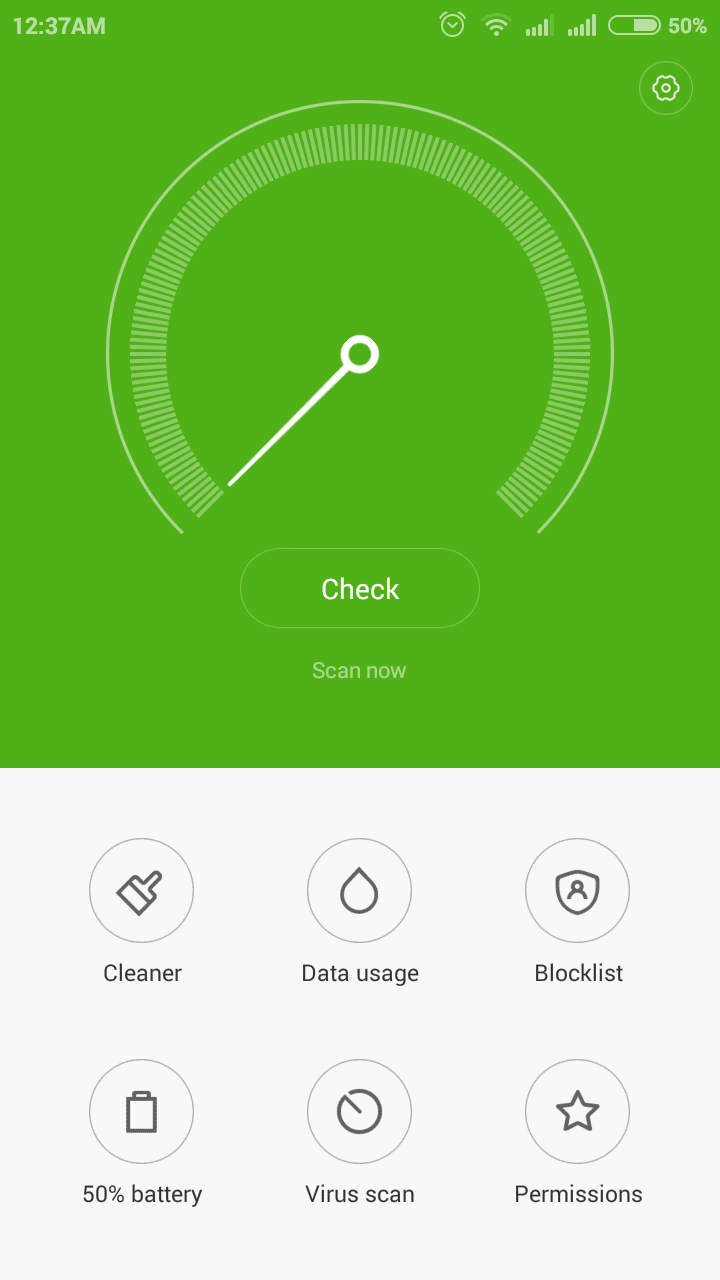
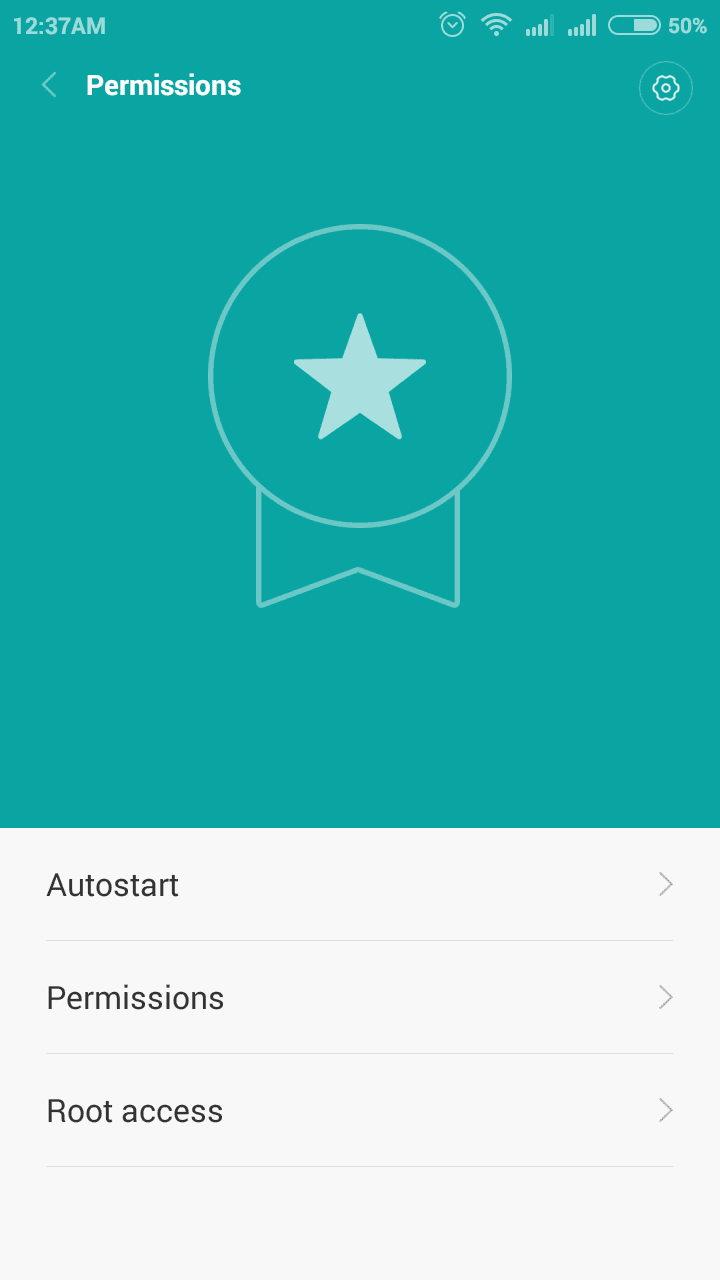
7. For Better root Management download Supersu and open it, then enable root access for Supersu in Security app finally Reboot device ...
Thats it you are successfully rooted your Xiaomi Redmi 2.
Redmi 2 Unroot Without PC
If any case you wish to unroot your Redmi 2 follow the below steps.1. Download Specific UnrootRoot (Disable) File for Your Redmi 2 Version - Download
2. Copy the Unroot file to Internal Memory.
3. follow the rooting procedure from step 3.
Thats it.
Available link for download
Friday, March 31, 2017
How to root Samsung Exhilarate i577
How to root Samsung Exhilarate i577
STEPS TO ROOT Samsung Exhilarate i577 :

Requirements:
1.Cydia Impactor
For windows : click here
For mac : click here
2.Super user
3.Root checker
4.USB driver(for your android click here)
Steps to root using cydia impactor :
Step 1:-
Step 1:-
Enable USB Debugging on your Android Smartphone.
To enable USB debugging, Open Settings > Developers Option > USB Debugging > Tick to Enable. ( if you dont know how to enable developer option click here )
Step 2: Download and extract Cydia Impactor on your computer. After extracting, you will be able to see the following files:
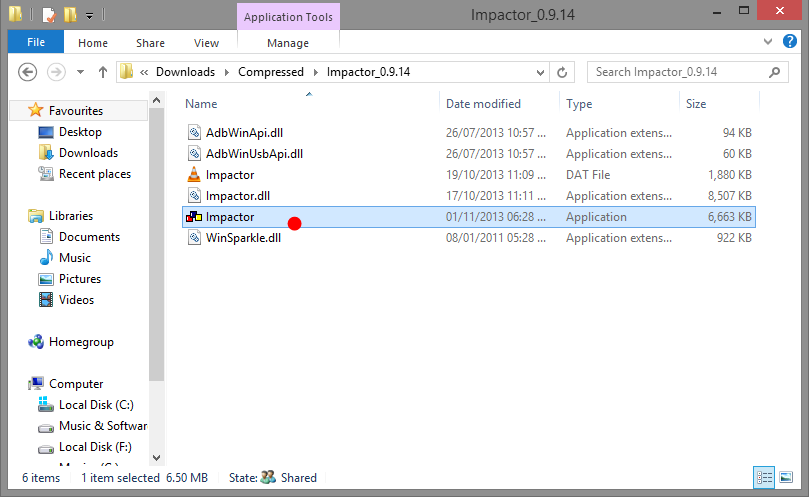
Step 3:install necessary usb driver and Now, Open Impactor.exe (you have extracted this file in step#2)
Step 4: Once Cydia Impactor Application is launched, connect your Android device to the computer (with USB Debugging enabled).
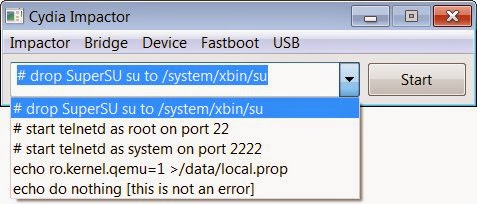
Step 5: Now, to begin the rooting process click on the Start Button
Step 6: Now, Cydia Impactor will install SuperSU binary on your Android Device. Once, this process is completed, close the Cydia Impactor application and Disconnect your Android Device from the computer.
Step 7: Now, Restart your Android Device.
Step 8: Once your Android Device is restarted, and Install SuperSU application (chainfire).
Step 9: Now your Android Device is Rooted successfully. To check whether your phone is rooted correctly, open SuperSU application If you are able to use it without any error then it means your device is rooted successfully.
Optional: You can also verify your device is successfully rooted or not by Root Checker Application.
***************************************************
Available link for download
Wednesday, March 29, 2017
How to root karbonn A12 star
How to root karbonn A12 star
Requirements :
KARBONN USB DRIVER
BIN4RY
Step-By-Step Instructions:-
1.Go To Settings>Security & Enable The Install From Unknown Source. (Skip If Already Enabled)
2. Open Rooting Software File and Unzip Software
3. After that Connect Your Karbonn Android Mobile, and before to connecting make sure you have install Driver and Enable USB Debugging.
4. After that Wait few mins
5. Then open Rooting software folder and click on "RunMe.bat" file
6. Then you see Many option, so Type "1" for normal and press enter, then in few sec your mobile rooted and you have see message "Your mobile is rooted successfully".
7. And when you have need to unroot your mobile then open "RunMe.bat" file and type "x" and press enter then your mobile unrooted.
NOTE:
This article related to Rooting of Karboon Android Mobile Phone, and may be its work properly, if you have getting any problem use universal root
Available link for download
Monday, March 27, 2017
How to Root Android Smartphones with Rooting Tools
How to Root Android Smartphones with Rooting Tools
How to Root Android Smartphones.
Best Rooting tools for Android .


What is Rooting ?
Read more about Rooting smartphones and tablets .
After reading about rooting I am sure your mind would be clear enough about rooting a smartphone. In this post we will talk about the best rooting tool I ever found. For a long time I was confused too about rooting and feel fear when think about rooting smartphone. Then I found very best rooting tool for smartphones that is Called VROOT . You can download English version from here .
How Does VROOT work ?
VROOT is one click rooting tool for smartphones. Support various models of Android smartphones. I have personally test this tool with Samsung Galaxy S2,S3 and some old models. The results are awesome. I rooted all the smartphones without any fear.
How to Root with VROOT ?
Turn on USB debugging mode .
Connect your smartphones via cable.
Open up VROOT software .
Click on Root.
Now just look at screen and sit relax.
It will take 3 minutes to complete the rooting process . (Based on my personal experience).
You are done.
Now enjoy Unlimited options on your smartphones.
Available link for download
How to root karbonn A15 plus
How to root karbonn A15 plus
Requirements :
KARBONN USB DRIVER
BIN4RY
Step-By-Step Instructions:-
1.Go To Settings>Security & Enable The Install From Unknown Source. (Skip If Already Enabled)
2. Open Rooting Software File and Unzip Software
3. After that Connect Your Karbonn Android Mobile, and before to connecting make sure you have install Driver and Enable USB Debugging.
4. After that Wait few mins
5. Then open Rooting software folder and click on "RunMe.bat" file
6. Then you see Many option, so Type "1" for normal and press enter, then in few sec your mobile rooted and you have see message "Your mobile is rooted successfully".
7. And when you have need to unroot your mobile then open "RunMe.bat" file and type "x" and press enter then your mobile unrooted.
NOTE:
This article related to Rooting of Karboon Android Mobile Phone, and may be its work properly, if you have getting any problem use universal root
Available link for download
Tuesday, March 21, 2017
How to root gionee E6t elife
How to root gionee E6t elife
? frama root
? Root checker
Step-By-Step Instructions:-
1.Go To Settings>Security & Enable The Install From Unknown Source. (Skip If Already Enabled)
2.Open Settings>Application>Development>USB Debugging>Enable USB Debugging.(Skip If Already Enabled)
3.Download The frama root App From Above Link.
4.Copy It To Your Phone Sdcard. Install The App.
5.Open The App and install it
6. click super user And install super user
7.And reboot the device
8.your mobile is now rooted
9. using root checker check if the mobile rooting or not
Disclaimer: We should not be held responsible in any manner for any damage happened to your Gionee mobile. Also, rooting may void the warranty.
ABOUT GIONEE:
Gionee (Gionee Communication Equipment Co. Ltd., is a manufacturer of mobile phones based in Shenzhen, China. The company was founded in 2002.It is one of China’s largest mobile phone manufacturers. According to Gartner, its market share in China was 4.7% in 2003, and it has moved into other markets, such as India, Vietnam, the Philippines, and Nigeria.
Gionee Communication has two processing plants,in China including Dongguan Jinming Electronics and Dongguan Jinzhong Electronics, with a total investment of more than RMB 80 million, an area of factory building of more than 20,000 square meters and the number of staff beyond 1000 persons. After 2010, Gionee started focusing on slimmer smartphone designs and by 2014, Gionee held the title of slimmest smartphone with the companys Gionee Elife S5.5 whose body has just 5.5mm thickness.Gionee launched an even thinner smartphone Gionee Elife S5.1 with only 5.15mm thickness
Available link for download
Monday, March 20, 2017
How to root any Mediatek MTK CPU based smartphones
How to root any Mediatek MTK CPU based smartphones

How to root any Mediatek (MTK) CPU based smartphones
You might have read some complex definitions of rooting your Android. So first of all let me tell you what is rooting & its Jaw dropping features. Root Android through PC (One-Click Root Apps). Google provides stock Android which has some limitations like you cannot kill System apps even if you use Any kind of Ram booster of anything, the app starts up the very next moment, you cannot customize your system, you cannot increase your battery life etc etc. There are many such issues faced by Android users & the Only solution for this is ‘Rooting’. Today we’ll learn, How to Root Any Android in Single Click through PC. Once you root your phone you can Access, Change, Customize it any way you want. Rooting Not only increase you Battery life & Performance, but also Provides you option to unofficially Upgrade your Current Android version. There are many benefits of rooting your phone like
- Boost your Phone speed & Battery Life.
- Remove Pre installed crap ware like System Apps.
- Remove Bloatwares, Apps like Facebook, Chrome Keep sucking your Ram & battery by running in background So, Among the smartphone geek crowd, applications like these are referred to as “bloatware:” they do nothing but bloat the software by existing as unnecessary applications.
- Tweak your phone like : Increase Video streaming speed, Increase Wifi Speed, Increase SIM detecting Speed, Increase SD read/write speed.
- Most Important & Best part, Install Custom Kernel & Custom ROMS ( I will explain about it in Installing Custom ROM section Custom ROM section )
- Finally, Truly Own your Device, Make it appear in the way you want.
Note:
- No data loss process : Your Android phone data like contacts, pictures, video etc will not be affected.
- Warranty Void : Your Android Device warranty may get void after following the below tutorial.
- How to Unroot : To unroot your device, Open Kinguser on your device > Settings > Remove Root permission.
1: Root your android device using Kingoroot-
Kingo ROOT is One – Click Root Designed to work on Windows Computer . It helps to root any Android Smartphones in single click which has a success rate of 80-90%. This is the best Android rooting software through PC available in market. This is the only one click root app which has tones of developers working on it to bring improvements and to increase the device limit in every update which are released frequently.
Success Rate : 92-98%
Precaution : If you are using any Antivirus Application on your Computer, then disable it first then follow the tutorial.
Rooting Android using Kingo Root PC App:
Step 1: Enable USB Debugging Mode on your Android smartphone. To enable USB debugging . Go to Settings > Developer Option > USB debugging > Tick to Enable. Developer Option is Hidden for Android 4.2.2 & Above, to show this option Go to Settings > About phone > Built Number ( Tap on it 7 times until it shows you are now a Developer.)
Step 2: Download Kingo Root Windows Application and install it normally in your Windows PC.
Download Kingo Root : Kingo Root App
Step 3: Once you have Installed Kingo Root App in your Windows PC, you will see a windows similar to this.
Step 4: Once your Smartphone is connected successfully to the Computer (Enabling USB Debugging), Kingo Root will Automatically detect your device.
Step 5: Now, Click on ‘Root’ Button to begin the rooting process.
Step 6: Now Kingo Root will Automatically Root your phone and install SuperSU.
Step 7: Now your Android Device is rooted, To confirm Check for a App named ‘SuperSU’ on your phone. Congratulations, you have successfully Rooted your Android Smartphone. I hope this guide helped in rooting your phone. If Kingo Root was unable to detect or ROOT your device you can use other One click Root Apps mentioned below. But if you where able to root your device easily then please consider making a donation for Kingo ROOT here Donate Kingo ROOT.
2: Root your android device using V Root-
Vroot’s goal is providing the excellent and simplest experience for all android users. The newest version of Vroot have supported for more than 8000 kinds of Android devices. It is more effective, easier and faster than you can imagine.
Success Rate: 70-75%
- VRoot Rooting App for PC: Download.
- Install it. Just click Next and Launch it.
- Connect your android device and make sure that USB Debugging mode is enabled from Settings – Developer Options.
- From VRoot on your PC, click Root.
- Wait for the result. If it’s a success, your device will reboot and you can now disconnect your android device from your PC.
- Check if you are successfully rooted by downloading and installing Root Checker app from Play Store.
- Done.
3: Root your android device using I Root-
iRoot App was previously known as vRoot. iRoot provides rooting for almost all Android devices with different Android versions. After the full preparation, you are able to root the Android devices in 3 handy steps: Install and launch iRoot -> Enable USB Debugging -> Begin “Root”. Continuous updates and improvements of root scripts ensure the success of your Android devices rooting rate, which makes iRoot powerful.
How to Root using iRoot:
The rooting procedure is same as other one click rooting Apps. Just enable USB debugging & click on root button. iRoot will find the exploit procedure from its servers & root your device in 4-5mins.
iRoot App for PC: Download
4: Root your android device using Root Genius-
Root genius is the best & easy-to-use rooting software with high success rate with Mediatek devices. Root Genius is a Windows Application.
Step 1: Download and Install Root genius for Windows: Root Genius 3.1.3
Step 2: Run Root genius Android Root as administrator and connect your Android device to your PC via USB cable. Wait for the drivers to completely load.
Step 3: Enable USB Debugging mode from Settings – Developer options from your android device. Just follow the instructions shown on the Root genius based to your Android version. Carefully read the notifications
before continuing.
before continuing.
Step 4: Click ROOT to begin the rooting process. It could take 2 up to 3 minutes for the
rooting process to be completed. (Don’t unplug the USB cable).
rooting process to be completed. (Don’t unplug the USB cable).
Step 5: When done, click Finish and it will reboot your phone.
Step 6: Check if you are successfully rooted by downloading and installing Root Checker app from Play Store or by checking Kinguser App which will get installed automatically after the rooting process.
Step 7: Done.
5: Root your android device using Unlock Root-
Unlock Root roots and unlocks the boot-loader of various android devices. They have their own way of rooting and unlocking. To use this method for you to root your phone, they have their guides provided on each android device. Just visit Unlock Root and follow their own guides for your device.
I Hope this tutorial helped you in rooting your Smartphone. If you found this helpful then please Like & Share this post. You can also leave your questions / queries in comment section. Thanks for visiting.
All the best!!!
Available link for download
How To Root Galaxy S2 Jelly Bean 4 1 2 XXLSJ
How To Root Galaxy S2 Jelly Bean 4 1 2 XXLSJ
We should thank to XDA senior member PhilZ for the zip package with a short time. The package contains root files , CWM6 and SuperSu.
Warning : Rooting will void phones Warrenty ! Rooting / Flashing may brick your phone ! We are not responsible for any damage do at your risk !
Note:
1. Backup Importent Data
2. Battery charge must be 60% or more
Root Galaxy S2 Jelly Bean 4.1.2 XXLSJ using zip package
1. Download 4.1.2 XXLSJ Root zip package from here (v3.75)2. Copy the downloaded zip package XXLSJ-ROOT-CWM6.zip to external SD card.
3. Switch off your phone and wait till vibrate.
4. Boot in to stock recovery ( Volume up + Home + Power )
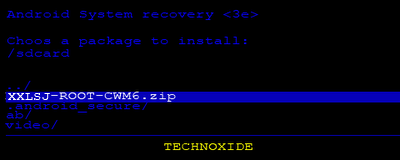
5. In recovery select apply update from external storage.
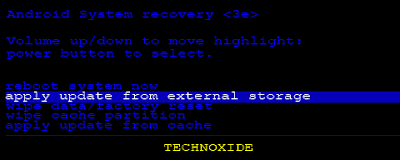
6. Select copied zip file XXLSJ-ROOT-CWM6.zip
7. After installation ....select reboot system now...
Thats it...Now you are successfully rooted Galaxy S2 4.1.2 XXLSJ.
Available link for download
Saturday, March 18, 2017
How to root gionee E3 elife
How to root gionee E3 elife
ROOT.ZIP
Super user
Root checker
Procedure to Root Gionee :
STEP 1: To enable the USB debugging “Settings > Applications > Development > USB debugging” in your Gionee mobile so as to enable the USB Debugging Mode
STEP 2: Download the Rooting Zip file in your computer
STEP 3: Extract the zip file into the computer
STEP 4:Make sure you install usb drive into your computer if not installed click here to install usb drive for your gionee mobile and make sure that your device is detected in your computer.
STEP 5: Connect your device to the computer with the help of l US cable and run the “run.bat” file in your computer.
STEP 6:Follow the on screen instructions to root the device.
STEP 7: After this, you need to wait for the device to get rebooted.
STEP 8: Download the “Root Checker” app and check on whether the device is rooted or not.
STEP 9:Once your device is rooted, you will now need to also install the “SuperSU” . here you go, you have now successfully rooted Gionee mobile.
Disclaimer: We should not be held responsible in any manner for any damage happened to your Gionee mobile. Also, rooting may void the warranty.
ABOUT GIONEE:
ABOUT GIONEE:
Gionee (Gionee Communication Equipment Co. Ltd., is a manufacturer of mobile phones based in Shenzhen, China. The company was founded in 2002.It is one of China’s largest mobile phone manufacturers. According to Gartner, its market share in China was 4.7% in 2003, and it has moved into other markets, such as India, Vietnam, the Philippines, and Nigeria.
Gionee Communication has two processing plants,in China including Dongguan Jinming Electronics and Dongguan Jinzhong Electronics, with a total investment of more than RMB 80 million, an area of factory building of more than 20,000 square meters and the number of staff beyond 1000 persons. After 2010, Gionee started focusing on slimmer smartphone designs and by 2014, Gionee held the title of slimmest smartphone with the companys Gionee Elife S5.5 whose body has just 5.5mm thickness.Gionee launched an even thinner smartphone Gionee Elife S5.1 with only 5.15mm thickness
Available link for download
Subscribe to:
Posts (Atom)