Showing posts with label disable. Show all posts
Showing posts with label disable. Show all posts
Friday, April 7, 2017
How to Enable and Disable USB Debugging in Samsung GALAXY Tab2
How to Enable and Disable USB Debugging in Samsung GALAXY Tab2
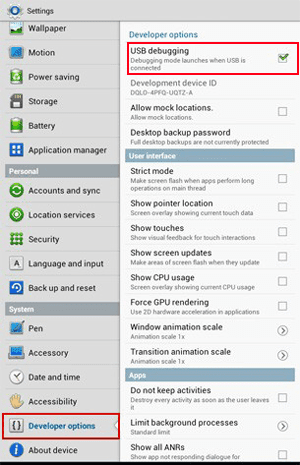
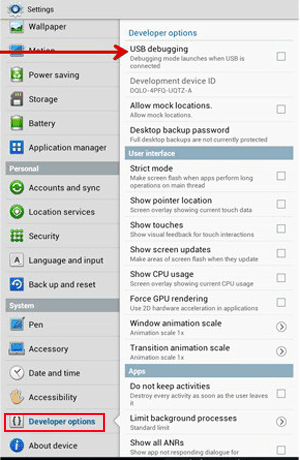
In this article, the method to enable and disable USB debugging in Samsung GALAXY Tab2 (with Android 4.0) is illustrated in detail.

Step 1: Open all apps.
Click the Apps icon on the top right corner of the tablet screen.
Step 2: Access Settings in Apps interface.
Find and click Settings to enter it.

Step 3: Enable or disable USB debugging.
1. Locate Developer options, open it and select USB debugging to enable it.
2. To disable USB debugging, open Developer optionsand uncheck USB dubugging.
Related articles:
How to Open USB Debugging in Samsung Galaxy S5
How to Set Password on Galaxy S4 GT-I9500/GT-I9508
How to Get Your Contacts Back on Samsung Galaxy Note 3 Android
Available link for download
Saturday, March 25, 2017
How To Disable Talkback on Android
How To Disable Talkback on Android

How To Disable Talkback on Android
One of the prominent specification in today’s smartphone is screen display. We all peep at pixels, compare HD screen with retina display and even get disappointed at devices which don’t offer ultra high-resolution true HD screen. But there are some vision-impaired people who have a problem looking at the screen and don’t know whether their device is working in the same way as they have command. For them, Google has come up with a solution in the form of Google Talkback.
Google Talkback is an accessibility service for vision-impaired to use all the Android features. Once you have activated Google Talkback it speaks out everything you do on your Android device. It uses vibration, audio feedback and spoken word to let you know what you are doing, what’s on screen, what you are touching and what you can do with it. This feature is found on all Android devices installed on Android 4.0 to 6.0. You can enable Talkback feature fromSettings-> Accessibility-> Talkback.
However, for those who have no vision problem, Talkback feature is not of much use. Enabling the Talkback feature blocks some of the features of your device like you can’t take a screenshot or open the notification center. A female voice will read out all your actions and it seems unpleasant to hear what you are doing when you can actually see it. So now or later you will try to turn off the Talkback feature and for your surprise, you will find it quite difficult as there will be no “Accessibility” option after you activate the Talkback feature.
Disable Google Talkback on Android Devices
Unlock your device with Talkback Mode Activated
You can unlock your Android device with Talkback mode activated by double tapping + swiping your finger on the lock screen.
Unlock your device in Password Mode with Talkback Mode Activated
If you want to unlock your device but you can’t enter the password due to Talkback mode activated, then follow the steps below:
- Long press the password field and double click it.
- Now the keyboard will appear.
- Long press your password.
- Double click the “Done” button.
Your Android device will now be unlocked.
Disable Talkback on Android
If you want to disable the Google Talkback, you need to make your way to Settings option. Follow the below steps to turn off the Google Talkback:
- Using 2 fingers (slightly separated), open notification panel by swiping down from the top.
- Touch the settings icon once and then double-click to open it.
- Using 2 fingers, scroll down in the settings option.
- Touch the accessibility icon once and then double-click to open it.
- Click on Talkback once and then double tap it.
- Click once on the On/Off button and then double tap it.
- Click once on OK and then double tap it.
That’s it. The Google Talkback will now be deactivated and you can again use your Android device normally. For any queries, drop a comment below. Feel free to share this article on Google+, Facebook and Twitter.
Available link for download
Sunday, March 5, 2017
How to Disable Blogger From Country Specific URL Redirection
How to Disable Blogger From Country Specific URL Redirection
 As we all know recently blogger blog get redirected to country specific URL from the .com URL. The redirecting URL depends by the country we visit from. for example if we are visiting from India URL will be blogspot.in from Japan it will be blogspot.jp.
Because of this Blogger redirection our social stats like Facebook Like and Twitter Tweet counts are different for different countries. So if you want to block blogger from country specific redirection just apply this simple hack.
Method:
1. In your Blogger dashboard Click Template > Edit HTML > Proceed
2. Now find <head> tag.
3. And paste the below script just after the <head> tag
 <script type="text/javascript">
 var blog = document.location.hostname;
 var slug = document.location.pathname;
 var ctld = blog.substr(blog.lastIndexOf("."));
 if (ctld != ".com") {
 var ncr = "http://" + blog.substr(0, blog.indexOf("."));
 ncr += ".blogspot.com/ncr" + slug;
 window.location.replace(ncr);
 }
 </script>
4. Click Save Template Done !
Thats all Now check your blog No More Blogger URL redirection !
Available link for download
Wednesday, February 1, 2017
How To Disable Camera Shutter Sound in Redmi2 Redmi Note and Other MIUI Devices
How To Disable Camera Shutter Sound in Redmi2 Redmi Note and Other MIUI Devices
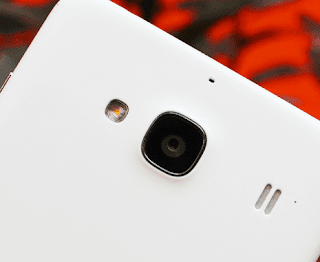 Previously, I wrote post a on disabling camera shutter sound on Samsung and many other Android devices using the app named Enforced Stream Silencer. Unlike Samsung and other Android devices, MIUI devices like Redmi 2S/2A, Redmi Note, MI 4i, etc. doesnt need a third party app to disable the Camera Shutter sound as the default Camera app in MIUI has a built in option to turn off the annoying capture sound.
Here are the steps to turn off the camera sound in MI devices.
1. Open the Camera app.
2. Swipe Left and tap on the Settings icon.
3. In Camera Settings page tap on Camera sounds toggle button to turn off the sound.
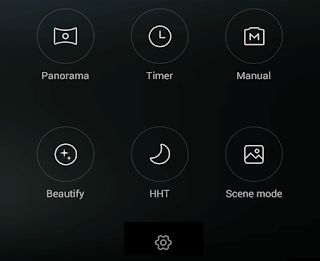
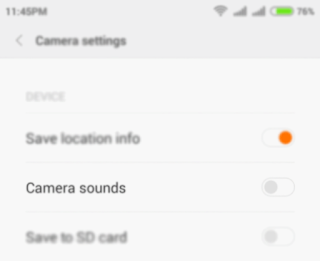
Thats it.
Available link for download
gtk3 nocsd Module To Disable Client Side Decorations Sees New Release
gtk3 nocsd Module To Disable Client Side Decorations Sees New Release
gtk3-nocsd is a module used to disable client-side decorations, either globally (for all applications) or only for certain applications.
The module was updated to version 3 recently and it includes quite a few improvements:
- added bash completion support for gtk3-nocsd wrapper;
- added custom CSS for cosmetic improvements of the header bar look when CSDs are disabled (should be largely theme-agnostic, but tested against Adwaita);
- drop compositor trick in Gtk+3 3.16.1 or higher; the set_titlebar function is reimplemented there anyway, and this should solve some possible issues with newer GTK3 versions;
- selectively disable decorations: dont drop the application menu icon by using set_show_close_button (FALSE), but instead replace the decoration_layout string of header bars to remove the "icon", "minimize", "maximize" and "close" buttons. This should fix issues with missing GNOME menu (with gThumb 3.4.x as an example);
- also override GtkDialogs GtkBuildable->add_child and the instance initializer of GtkShortcutsWindow; previously CSDs werent removed from all windows because of that;
- added a test that verifies that no Glib/Gtk symbols are imported during link time (to make sure preloading works with BINDNOW binaries that dont use Gtk);
- Improvements to the documentation.
gtk3-nocsd was included in the Debian (sid and stretch) repositories about 2 months ago and its also available in the Ubuntu 16.10 Yakkety Yak repositories. These official packages enable gtk3-nocsd automatically in non GNOME desktops (except Unity), without requiring any configuration.
The gtk3-nocsd packages in the main WebUpd8 PPA now include the official Debian packaging however, Ive modified it slightly to allow the module to work without any configuration in Unity, like it does for other non-GNOME desktops.
Heres a screenshot with gtk3-nocsd enabled (and thus, client-side decorations disabled) in Ubuntu 14.04:

Ubuntu 16.04 (with Unity) supports client-side decorations so you dont really need gtk3-nocsd, but if you want to use it for whatever reason (consistency would be one), note that it wont look that good with the default Ambiance theme. You can try something like Numix theme instead:

For installing gtk3-nocsd in Ubuntu and its optional configuration, see our initial (updated) article: How To Disable GTK3 Client-Side Decorations (Header Bars)

Available link for download
Tuesday, January 24, 2017
How To Enable Disable Paranoid Android Halo Notification
How To Enable Disable Paranoid Android Halo Notification

In this post I include the steps to enable and disable HALO notification in Paranoid Android ROM.
How To Enable HALO Notification in Paranoid Android ROM ?
1. Swipe the Notification Panel and touch the HALO icon.How To Disable HALO Notification in Paranoid Android ROM ?
Method 1 ( Reverse HALO Checked ):
1. Double-Tap on the HALO floating widget and drag it to the red circle.
Method 2 ( Reverse HALO Unchecked ):
1. Tap on the HALO floating widget and drag it to the red circle.
source
Available link for download
Friday, December 16, 2016
How to permanently disable Speed Dial Recently used webpage in newtab in Firefox
How to permanently disable Speed Dial Recently used webpage in newtab in Firefox
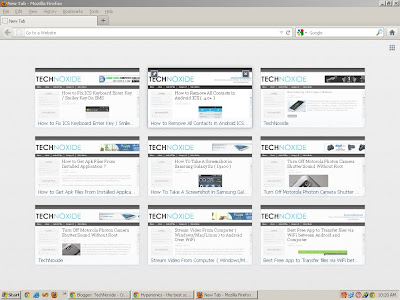 In Firefox latest version a Speed Dial feature is introduced , it displays your most frequently visited sites as thumbnails when you click newtab. Devs give a button (small tile square icon all the way to the right side) to hide/show the thumbnails.
If you want to Disable this feature permanently just follow the simple steps below.
1. In the address bar type about:config and hit enter.
2. click Ill be careful, I promise! button for the warranty warning.
3. Now type browser.newtab.url in the search box or scroll down to find the same.
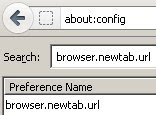
4. Double-click on browser.newtab.url alternatively Right-click and select Modify.
5. Now in the prompt box, change the string value from about:newtab to about:blank. Click OK to save.

Thats it. Now when you bring up a new tab, itll be blank and you cant see any button to show the thumbnail back.
Note: If you want to bring back the Speed dial. On Step 5 just change about:blank to about:newtab.
Available link for download
Friday, November 25, 2016
How To Disable Increasing Ringtone Volume in Galaxy Note 3 S4 S3 and all other Samsung and LG Mobiles
How To Disable Increasing Ringtone Volume in Galaxy Note 3 S4 S3 and all other Samsung and LG Mobiles

This option is very much annoying because we cant hear our favorite ringtone in its real structure. The ring tone starts quietly, then increase to the level the volume was set at. Even Samsung hasnt included the option to disable ascending / increasing ringtone volume we can still disable it using third party apps or switching to any custom ROM.
Flashing a custom ROM to disable increasing volume may not fit for every user. So, in this post I included the download link of an Android app which uses to Disable Increasing Ring. The app is available for free at Google Play.
How To
1. Install Disable Increasing Ring
2. Open the app
Thats it..
Note:
To hide the Disable Increasing Ring app notification uncheck Show notification in App info.
Disable Increasing Ring (Playboard) | Disable Increasing Ring (Play Store)
Available link for download
Subscribe to:
Posts (Atom)