Showing posts with label quick. Show all posts
Showing posts with label quick. Show all posts
Friday, February 17, 2017
How To Change The Mouse Scroll Wheel Speed In Linux Using imwheel Quick Tip
How To Change The Mouse Scroll Wheel Speed In Linux Using imwheel Quick Tip

Ive never actually needed to modify the mouse scroll wheel speed until recently, when I got a new mouse and I wanted to change the scroll wheel settings. Thats when I noticed theres no such option in Unity / GNOME Control Center.
I searched for ways to change this under Linux and the easiest to use seems to be "imwheel", a command line tool that can be used to tweak the mouse wheel behavior and which, among others, can change the scroll speed of the mouse wheel, and I decided to share the information with you.
Heres what you need to do to change the scroll speed of the mouse wheel if your desktop environment doesnt have an option for this:
1. Install imwheel. Since the app is available in the official Ubuntu repositories, you can install using Synaptic, Ubuntu Software Center, etc. or use the following command to install it:
sudo apt-get install imwheel2. Next, create a file called ".imwheelrc" in your home directory - Ill use Gedit in the command below to open this file:
gedit ~/.imwheelrcAnd in this file, paste the following:
".*"
None, Up, Button4, 3
None, Down, Button5, 3
Control_L, Up, Control_L|Button4
Control_L, Down, Control_L|Button5
Shift_L, Up, Shift_L|Button4
Shift_L, Down, Shift_L|Button5
"3" at the end of lines two and three represent the number of lines to scroll ("3" should be default) - modify this number to suit your needs. Once youre done, save the file.
The first (".*") line from the code used above represents is used to specify in which applications to use those settings. ".*" means everywhere, but you can also apply application-specific settings by changing ".*" to the window name (and add multiple application-dependent settings). Run "man imwheel" for more information.
And finally, the last 4 lines in the code above are there to allow Ctrl / Shift with mouse scroll wheel up / down to work (for instance, to allow zooming in on a webpage in the web browser, etc.), which is the default behaviour.
And finally, the last 4 lines in the code above are there to allow Ctrl / Shift with mouse scroll wheel up / down to work (for instance, to allow zooming in on a webpage in the web browser, etc.), which is the default behaviour.
3. Start "imwheel" (type "imwheel" in a terminal). Important note: make sure you dont run multiple imwheel instances (if you want to stop any previous instances, run the following command: "killall imwheel")!
Also, if you have back / forward navigation buttons on your mouse, they will stop working using the configuration weve used above. In such cases, you should launch imwheel like this:
imwheel -b "4 5"4. Since these settings are only applied when imwheel is running, you should add imwheel to startup (if you use Unity, to do this, open Startup Applications, click "Add" and under both "Name" and "Command" fields, add "imwheel"). Also, like I mentioned above, if you have back / forward mouse navigation buttons, use the following command instead of simply running "imwheel" or else those buttons wont work: imwheel -b "4 5"
Its important to mention that imwheel applies the settings available in ~/.imwheelrc when the application starts and it doesnt update when changing the configuration file. So if you modify the configuration file, youll need to close imwheel and start it again to apply / test the changes (you can close/kill it using the following command: "killall imwheel").
Notes:
- this will most probably not fix issues such as very fast scrolling, if you encounter such an issue, you can try unplugging and then plugging the mouse back (from what Ive read, that seems to solve the issue in most cases);
- if you only want to change the scroll wheel speed in Firefox and Chrome, you can do this from within the app or using an extension: Firefox | Chrome, etc.
via AskUbuntu; image via Wikipedia.

Available link for download

Friday, February 3, 2017
How To Install Facebook And Others Emoticons In Pidgin Quick Tip
How To Install Facebook And Others Emoticons In Pidgin Quick Tip
Quick tip: If youre using the new Facebook Chat plugin for Pidgin, you may want to add support for Facebooks official emoticons, so heres how to do it.
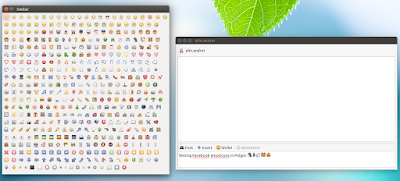
To add Facebook (including secret) emoticons to Pidgin, you can use pidgin-EAP, a project which provides emoticon themes for most available protocols, including Facebook. The pack even contains some sound and buddy list themes.
To install pidgin-EAP emoticon themes in Linux, use the following commands in a terminal:
cd /tmp
wget https://github.com/Hernou/pidgin-EAP/archive/master.tar.gz
tar -xvf master.tar.gz
cp -rf pidgin-EAP-master/{.fonts,.purple} ~
Or, if you want to install it manually, go to the pidgin-EAP GitHub page, click "Download ZIP" on the right, extract the zip and copy its contents to your home directory (note that the zip contains two hidden ".fonts" and ".purple" folders so youll have to use Ctrl + H in your file manager to see them).
For Windows, see the instructions available on GitHub.
Then, open Pidgin, from its menu select Tools > Preferences and on the Themes tab select "EAP" under "Smiley Theme":
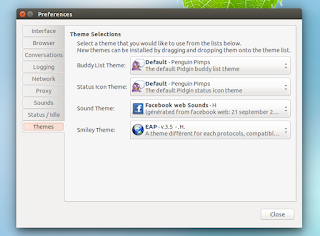
This will use pidgin-EAPs custom smilies for all the protocols it supports. If you only want this for Faceook, select "Facebook" from the drop-down instead.
Available link for download
Sunday, December 11, 2016
How To Hide Files And Folders In Your File Manager Without Renaming Them Quick Tip
How To Hide Files And Folders In Your File Manager Without Renaming Them Quick Tip
Usually if you want to hide a file or folder so it doesnt show up in your file manager, you can rename it by adding a dot (".") at the beginning of the filename.
However, there are situations in which you may want to hide a file or folder without renaming it. For instance, some applications insist on creating a folder in the users home directory or in the Documents folder (and they cant be renamed) and so on. But I dont want these folders cluttered - I want to easily find what Im looking for.
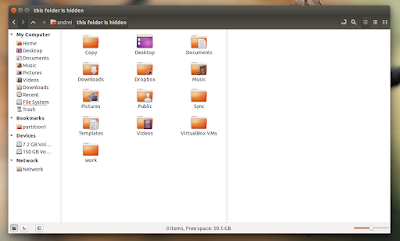
For such situations or whatever other reasons, theres another way of hiding files and folders (prevent them from showing up in the file manager only): you can create a file called ".hidden" (theres a dot in front of "hidden" so this is a hidden file!) and in this file, enter the name of the files and folders you want to hide, each on a separate line. Then, refresh the folder (press F5 or Ctrl + R) and those files or folders should no longer be visible in your file manager.
This should work (at least, it worked in my test) with the following file managers: Nautilus, Nemo, Caja, Thunar (Im not sure when this was introduced but I can tell you that it doesnt work with version 1.2.2 available in Xubuntu 12.04; it does work with versions 1.6.3 and newer) and Pantheon Files (from Freya only), but there might be others to support it.
Note: for Thunar youll need to navigate to a separate folder for the changes to be applied, refreshing isnt enough.
Heres an example: lets assume you have a folder called "FOLDER1" and a file call "FILE1" in your home directory and you want to hide both without renaming them. To do this, create a file called ".hidden" in your home directory and in this file, add the following two lines:
FOLDER1
FILE1
Then save the file and press F5 to refresh the home folder - "FOLDER1" and "FILE1" shouldnt be displayed any more.
Extra tip: HEREs a Nautilus extension which allows hiding files and folders using this method via the context menu.
Available link for download
Subscribe to:
Posts (Atom)