Showing posts with label odin. Show all posts
Showing posts with label odin. Show all posts
Tuesday, April 11, 2017
How To Manually Update Galaxy S3 GT I9300 to Official Android Jelly Bean 4 1 2 XXEMH4 Using Odin
How To Manually Update Galaxy S3 GT I9300 to Official Android Jelly Bean 4 1 2 XXEMH4 Using Odin

In this I included the steps to manually flash Android 4.1.2 Jelly bean XXEMH4 to Galaxy S3 I9300 International version using Odin.
Firmware Details
PDA: I9300XXEMH4
CSC: I9300ODDEMI2
MODEM: I9300DDEMG2
Note :
1. Backup your important data.
2. Enable USB debugging in your phone.
3. Battery must have 60% or more charge.
4. Disable or Exit Antivirus and Kies if you are installed.
5. Your PC must install Kies or Galaxy S3 driver.
6. This Firmware is only for Galaxy S3 I9300 International Version.
How To Flash Official Android 4.1.2 I9300XXEMH4 in Galaxy S3 I9300 using Odin ?
1. Download Official Android Jelly Bean 4.1.2 I9300XXEMH4 for your country from below links.India | Sri Lanka | Bangladesh | Nepal
2. Extract the downloaded firmware zip.
3. Download Odin v1.85 - Download
4. Now, Extract and Open odin3 v1.85.exe.
5. Power off your phone.
6. Now boot in to download mode. ( Press and hold : Volume down key and Home button ( Center button ) ,now press and hold the power button to boot in to download mode and Press Volume up on Warning)
7. In download mode connect your phone to PC.
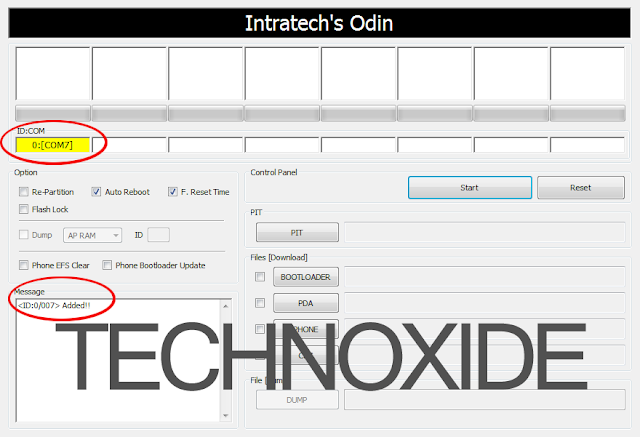
8. Now look in to Odin... ID:COM box, it will be yellow with a port name and Added! message will be displayed.
( If not it will the problem of driver or USB ... check both )
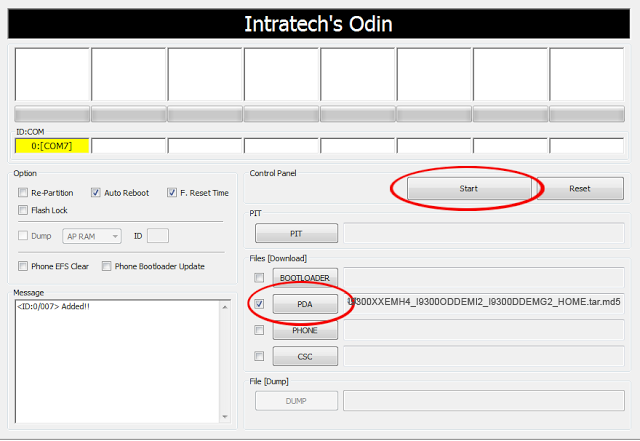
9. In Odin..Click PDA and browse the extracted firmware folder and select I9300XXEMH4_I9300ODDEMI2_I9300DDEMG2_HOME.tar.md5 finally Click Start button.
10. After complete update Odin will show PASS on top left and phone will reboot. now unplug phone from USB.
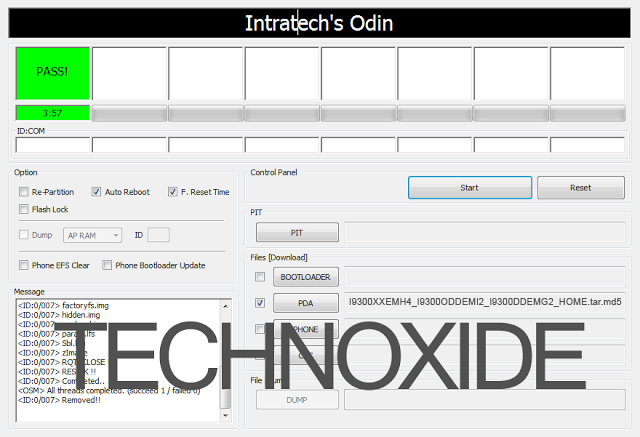
Thats it .... Done .
Note :
If the phone stuck at the boot screen...
1. Remove and reinsert your battery.
2. Now boot into recovery mode. (Volume up + Home + Power )
3. Apply wipe data/factory reset.
4. Apply wipe cache partition.
5. Finally reboot system...
Done !
Go to the below post to root the firmware
How To Root Samsung Galaxy S3 Jelly Bean 4.1.2 XXEMH4 ?
Available link for download

Thursday, February 9, 2017
How to flash Samsung Stock ROM via Odin
How to flash Samsung Stock ROM via Odin
Flash Samsung Stock ROM (Official/Original Firmware) via Odin
Step 1: Download and install device driver software on your computer.
If you have used Kingo android Root already, skip this step. Otherwise, do it manually. Following are ways to do this...
- Visit Samsung official website to find the correspondent driver software.
- Google the driver software of your device. Download and then install it on you computer.
- Download or update Kies, part of which will install or update drivers.
Once drivers are installed or updated, it is highly recommended that you restart your computer.
Step 2: Download and extract the Stock ROM (Official/Original Firmware).
You can get all the Official Samsung Firmware you might need here on this site...Go here to download for any Samsung Model.
After downloading it (normally a compressed file), you need to extact/unzip it to certain location of your PC. The file types that Odin uses are *.bin,*.tar and *.tar.md5.
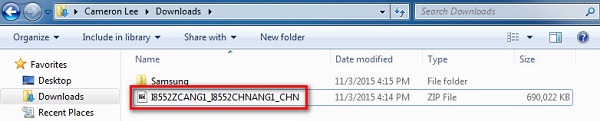
Find the file you have downloaded and then unzip it to Desktop.

You will find a *.md5 file after extracting.
Step 3: Download and extract Odin on you PC.
You can download Odin V3.10.7 directly from SamMobile. AndroidMTK is a fine alternative, it also offers a detailed list of Odin versions and download link. Or you can always Google "Odin download". After downloading it on your PC, extract it to Desktop or another location youd prefer.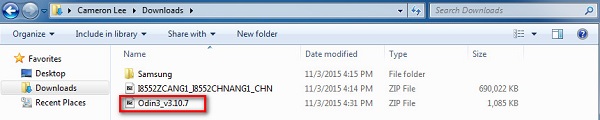
Odin v3.10.7 zip file.
After extracting, right-click to "Open as Administrator". It may prevent certain issue from happening.
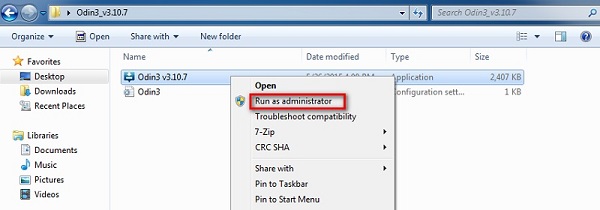
Run Odin as administartor is recommended.
Step 4: Boot your Samsung device into Download mode.
Follow these steps to enter Download Mode/Odin Mode
- Power off your device
- Press and hold Volume Down key, Home Key and Power Key
- When your device vibrates, release Power key while keep holding the Volume Down key and Homekey
- Press Volume Up key to enter Download mode, which has a green robot figure and “Downloading… Do not turn off target!!)
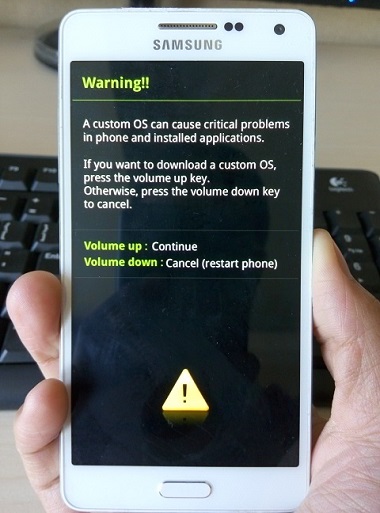
Warning before entering into download mode
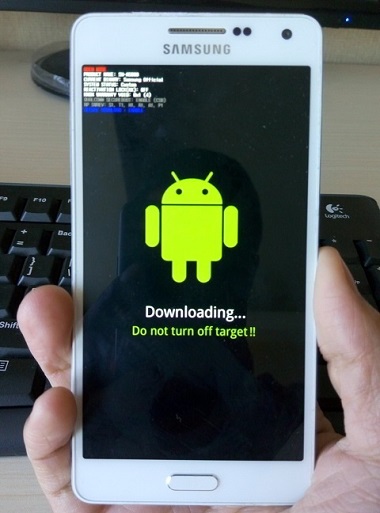
Now you are in download mode.
Step 5: Connect your device to PC.
You device should be automatically recognized by Odin. At the lower-left of Odin interface, it should show a message that says "Added!" and in the meantime you should see a light-blue box at the ID:COM section stating "COM:3" (the number depend on which USB port you have plugged the device cable and is irrelevant).
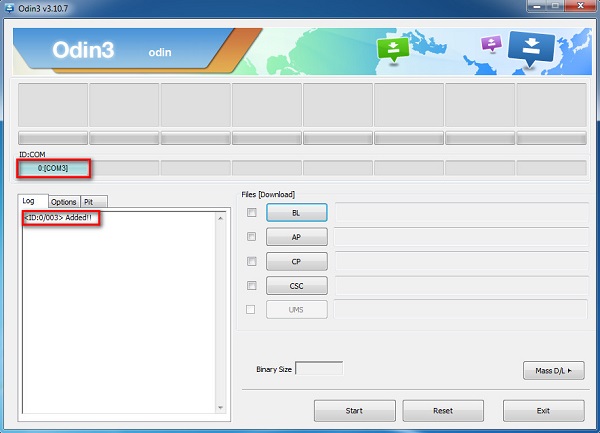
Device is connected to Odin.
Step 6: Click "PDA" or "AP" to add tar.md5 file that you have extracted and then "Start".
Whether it is "PDA" or "AP" depends on the version of Odin that you used. But the md5 file goes to either "PDA" or "AP".
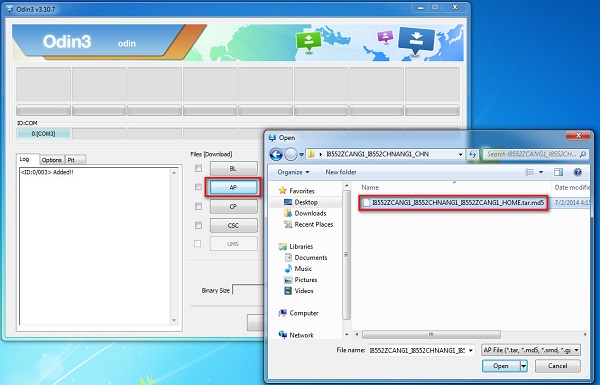
Add *.md5 to Odin.
After adding the file, click "Start" to begin the flashing process.
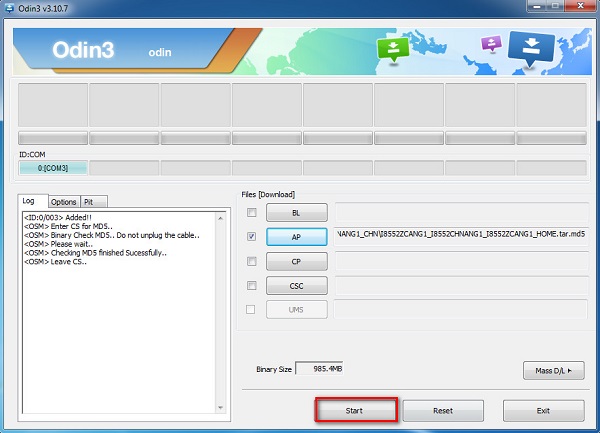
Click "Start" to flash.
WARNING DO NOT REMOVE OR OPERATE ON YOUR DEVICE UNTIL FINISHED OR FAILED IS SHOWED ON ODIN.
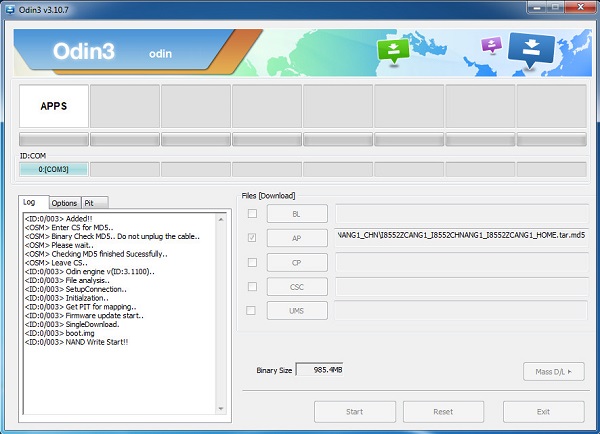
Ongoing flashing process. Do not remove your device.
When the flashing process is done and if everything goes well, you should see a big green box saying "RESET" or "PASSED" (depends on the version of Odin is used). By now, the device should be rebooted and it is safe to remove/unplug your device.

Flash succeeded.
If failed, what should you do?
Try these things first:
- Update your device driver software to the latest.
- Restart your computer.
- Run Odin as Administrator.
- Try different cable (original one or the one with better quality) and USB port (the main port recommended)
- Re-download the firmware file, make sure it is intact and match your device model
Available link for download
Tuesday, January 31, 2017
Gratis download odin terbaru Odin3 v3 10 7
Gratis download odin terbaru Odin3 v3 10 7
Odin adalah salah satu tool gratisan yang tetep eksis dan digemari kalangan service handphone, dengan perintah yang sederhana tapi bisa mengatasi segala problem error pada handphone samsung galaxy berbasis android
Antara lain: bootloop, stuck logo, restart, root dll
dengan bantuan tool tsb handphone bisa terselesaikan
Silahkan download DISINI
untuk caranya bisa lihat dibawah ini
Available link for download
Tuesday, November 29, 2016
Guide Flash Update Firmware Samsung GALAXY S7 EDGE SM G935F Using ODIN v3 11 1
Guide Flash Update Firmware Samsung GALAXY S7 EDGE SM G935F Using ODIN v3 11 1
[Guide] Flash / Update Firmware Samsung GALAXY S7 EDGE SM-G935F Using ODIN v3.11.1.
Flash Stock Firmware On Samsung GALAXY S7 EDGE SM-G935F. This guide show you how to flash a stock ROM on Samsung GALAXY S7 EDGE SM-G935F using Odin V3.11.1 software. Before you decide to use this guide, we recommend using Samsung’s own utilities, Samsung Kies and OTA (Over-the-air). Only use this guide if you are 100% sure about the risks involved in flashing your device. guidebelajar is not responsible for any damage caused by following this guide.
This Samsung android device is released on 2016, March. and available on USA, Global and Southeast Asia. Samsung GALAXY S7 EDGE SM-G935F is the smartphone with 5,1 Inchi Super AMOLED capacitive touchscreen, 16M colors, work on Android OS, v6.0 (Marshmallow), with Quad-core 1.8 GHz CDual-core 2.15 GHz Kryo & dual-core 1.6 GHz Kryo CPU, Qualcomm MSM8996 Snapdragon 820 chipset, Adreno 530 GPU, combined with 4 GB of RAM and 12 MP of Main camera and 5 MP on secondary camera.
This Samsung android device is released on 2016, March. and available on USA, Global and Southeast Asia. Samsung GALAXY S7 EDGE SM-G935F is the smartphone with 5,1 Inchi Super AMOLED capacitive touchscreen, 16M colors, work on Android OS, v6.0 (Marshmallow), with Quad-core 1.8 GHz CDual-core 2.15 GHz Kryo & dual-core 1.6 GHz Kryo CPU, Qualcomm MSM8996 Snapdragon 820 chipset, Adreno 530 GPU, combined with 4 GB of RAM and 12 MP of Main camera and 5 MP on secondary camera.
Flashing process in android Smartphone is like reinstall process on windows computer PC, with flash your Samsung GALAXY S7 EDGE SM-G935F android device you can unbrick, downgrade, manually upgrade (instead of updating via OTA or Samsung Smart Switch), or restore Samsungs stock firmware instead of custom ROM. I make this guide just for you as user all Samsung GALAXY S7 EDGE SM-G935F variant.
You need to read this guide carefully, so you can get the best result flashing on your Samsung GALAXY S7 EDGE SM-G935F. Cause you need to download necessary file, you must ensure that you have good internet connection in your computer device, this guide using a windows computer.
Initial Step To Flash Samsung GALAXY S7 EDGE SM-G935F
Now, we have reached on beginning guide, so you must to do initial step to ensure everything run smoothly.
- Make sure your Samsung GALAXY S7 EDGE SM-G935F battery is not in a low battery state, a minimum of 80%. If the battery runs out in the middle of the Root, it can lead to failure
- Always perform backup your important data before flashing process, Cause this process will delete or erase the data in memory.
- Make sure you have installed a Latest of Driver Samsung that support with your Smartphone, If you dont have, please download here
- Original USB cable driver for your Samsung GALAXY S7 EDGE SM-G935F
- Download Samsung Smart Switch, Here
- Download Odin V3.11.1, Here
- Download Official firmware file for the model number of your device, download it from - SamMobile, or you can visit the other site, Here
Main Guide To Flash Samsung GALAXY S7 EDGE SM-G935F
- You must download all necessary file.(Samsung USB driver or Smart Switch and Odin)
- Then you must install all driver or samsung smart switch to your computer or PC.
- Extraxt Odin V3.11.1. file on the destination folder.
- To download Samsung firmware you must visit this link, you can download specific firmware file for your device model number. you must Log In with your registered account on this website.
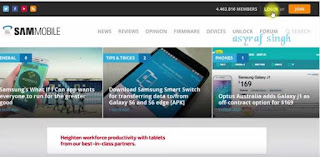
sammobile website Log In - On the row menu at the top of page, you can select firmware.

sammobile website GALAXY S7 EDGE SM-G935F - Then you must enter in search bar with your phone model number.
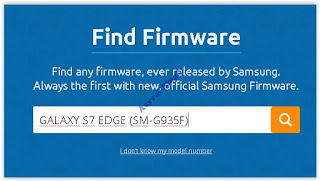
Firmware Samsung GALAXY S7 EDGE SM-G935F - Then select your country/carrier.
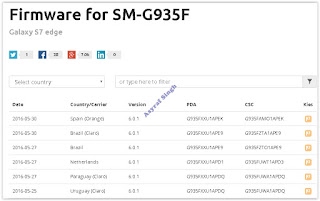
select country or carrier for samsung firmware - Then you click on available country link.
- For Non-Premium member you can Select regular download.

sammobile download non premium member - And Donwload button again. Approximately file size is 1,9 GB
- Wait untill your file finish downloaded, after that you must extract all firmware file on specific folder on your computer.
- This is your file.

Flash Stock Firmware On Samsung GALAXY S7 EDGE SM-G935F - Switch Off your Samsung GALAXY S7 EDGE SM-G935F to start flashing process.
- Then, you must run Odin3 v3.11.1 by right click on Odin.exe and select Run as Administrator.
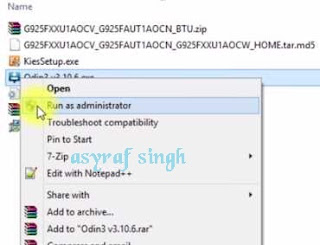
Flash Stock Firmware On Samsung GALAXY S7 EDGE SM-G935F - When program is running, now you can click AP, and navigate to the *.tar or *.tar.md5 firmware file.
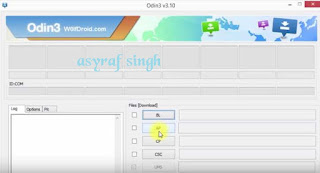
Flash Stock Firmware On Samsung GALAXY S7 EDGE SM-G935F - Now your firmware file has been inserted in Odin3

Flash Stock Firmware On Samsung GALAXY S7 EDGE SM-G935F - Then, Enter download mode your Samsung GALAXY S7 EDGE SM-G935F by pressing and hold Volume Down Button + Home Button + Power Button. Hold and press all button untill your phone vibrate and LCD show menu.
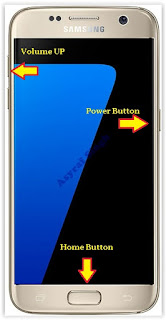
download mode Samsung GALAXY S7 EDGE SM-G935F - And you will see picture like this on your LCD screen.
- On this mode, now you must connect your Samsung GALAXY S7 EDGE SM-G935F to your PC / laptop using a USB cable.
- After your phone connected, you will see a message appear that show your device added and there is info on the ID: COM at top left corner. Keep in mind for this COM vary depending on the PC / Laptop. Just Ignore all, in this picture you will see that your device is detected on (COM 5)
Port Com samsung GALAXY S7 EDGE SM-G935F - Make sure re-partition is NOT ticked
- When everything already you can click Start Button. at the bottom left corner
- Just wait for the process to run about 2-5 minutes, and make sure there is no interference in this process.
- When complete it will display a notification PASS and your smartphone Samsung GALAXY S7 EDGE SM-G935F will automatically restart.
- Wait your device to boot up, it will take a while.
- When your Samsung GALAXY S7 EDGE SM-G935F is ready to use, you can check your firmware update version by dial *#1234# on dial pad.

dial pad samsung GALAXY S7 EDGE SM-G935F - And you will see your new firmware version.

firmware version samsung GALAXY S7 EDGE SM-G935F - Finish.


 |
| Download Mode GALAXY S7 EDGE SM-G935F |


Warning.
Never disconnect the USB cable while flashing process is running.
Install Samsung Mobile Driver or Samsung Smart Switch if you dont see a sign in Odin.
Flash your Samsung GALAXY S7 EDGE SM-G935F device at your own risk.
Flashing firmwares which contains more than one *.tar.md5 file will wipe all data on internal storage. Flashing official/stock firmware wont increase the binary flash nor KNOX WARRANTY VOID counter and wont cancel the Samsung GALAXY S7 EDGE SM-G935F devices warranty.
Available link for download
Thursday, November 24, 2016
Guide Flash Update Firmware Samsung GALAXY A9 SM A9000 Using ODIN v3 11 1
Guide Flash Update Firmware Samsung GALAXY A9 SM A9000 Using ODIN v3 11 1
[Guide] Flash / Update Firmware Samsung GALAXY A9 SM-A9000 Using ODIN v3.11.1.
Flash Stock Firmware On Samsung GALAXY A9 SM-A9000. This guide show you how to flash a stock ROM on Samsung GALAXY A9 SM-A9000 using Odin V3.10.7 software. Before you decide to use this guide, we recommend using Samsung’s own utilities, Samsung Kies and OTA (Over-the-air). Only use this guide if you are 100% sure about the risks involved in flashing your device. guidebelajar is not responsible for any damage caused by following this guide.
This Samsung android device is released on 2015, December. and available worldwide. Samsung GALAXY A9 SM-A9000 is the smartphone with 6,0 Inchi Super AMOLED capacitive touchscreen, 16M colors, work on Android OS, v5.1.1 (Lollipop), planned upgrade to v6.0 (Marshmallow), with Quad-core 1.8 GHz Cortex-A72 & quad-core 1.2 GHz Cortex-A53 CPU, Qualcomm MSM8976 Snapdragon 652 chipset, Adreno 510 GPU, combined with 3 GB of RAM and 13 MP of Main camera and 8 MP on secondary camera.
This Samsung android device is released on 2015, December. and available worldwide. Samsung GALAXY A9 SM-A9000 is the smartphone with 6,0 Inchi Super AMOLED capacitive touchscreen, 16M colors, work on Android OS, v5.1.1 (Lollipop), planned upgrade to v6.0 (Marshmallow), with Quad-core 1.8 GHz Cortex-A72 & quad-core 1.2 GHz Cortex-A53 CPU, Qualcomm MSM8976 Snapdragon 652 chipset, Adreno 510 GPU, combined with 3 GB of RAM and 13 MP of Main camera and 8 MP on secondary camera.
Flashing process in android Smartphone is like reinstall process on windows computer PC, with flash your Samsung GALAXY A9 SM-A9000 android device you can unbrick, downgrade, manually upgrade (instead of updating via OTA or Samsung Smart Switch), or restore Samsungs stock firmware instead of custom ROM. I make this guide just for you as user all Samsung GALAXY A9 SM-A9000 variant.
You need to read this guide carefully, so you can get the best result flashing on your Samsung GALAXY A9 SM-A9000. Cause you need to download necessary file, you must ensure that you have good internet connection in your computer device, this guide using a windows computer.
Initial Step To Flash Samsung GALAXY A9 SM-A9000
Now, we have reached on beginning guide, so you must to do initial step to ensure everything run smoothly.
- Make sure your Samsung GALAXY A9 SM-A9000 battery is not in a low battery state, a minimum of 80%. If the battery runs out in the middle of the Root, it can lead to failure
- Always perform backup your important data before flashing process, Cause this process will delete or erase the data in memory.
- Make sure you have installed a Latest of Driver Samsung that support with your Smartphone, If you dont have, please download here
- Original USB cable driver for your Samsung GALAXY A9 SM-A9000
- Download Samsung Smart Switch, Here
- Download Odin V3.11.1, Here
- Download Official firmware file for the model number of your device, download it from - SamMobile, or you can visit the other site, Here
Main Guide To Flash Samsung GALAXY A9 SM-A9000
- You must download all necessary file.(Samsung USB driver or Smart Switch and Odin)
- Then you must install all driver or samsung smart switch to your computer or PC.
- Extraxt Odin V3.10.7. file on the destination folder.
- To download Samsung firmware you must visit this link, you can download specific firmware file for your device model number. you must Log In with your registered account on this website.
sammobile website Log In - On the row menu at the top of page, you can select firmware.
sammobile website GALAXY A9 SM-A9000 - Then you must enter in search bar with your phone model number.
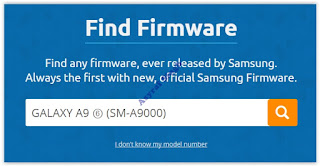
Firmware Samsung GALAXY A9 SM-A9000 - Then select your country/carrier.

select country or carrier for samsung firmware - Then you click on available country link.
- For Non-Premium member you can Select regular download.
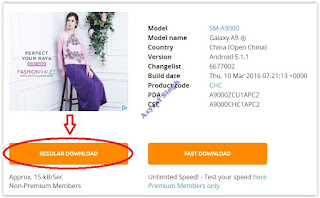
sammobile download non premium member - And Donwload button again. Approximately file size is 1,5 GB
- Wait untill your file finish downloaded, after that you must extract all firmware file on specific folder on your computer.
- This is your file.
Flash Stock Firmware On Samsung GALAXY A9 SM-A9000 - Switch Off your Samsung GALAXY A9 SM-A9000 to start flashing process.
- Then, you must run Odin3 v3.11.1 by right click on Odin.exe and select Run as Administrator.
Flash Stock Firmware On Samsung GALAXY A9 SM-A9000 - When program is running, now you can click AP, and navigate to the *.tar or *.tar.md5 firmware file.
Flash Stock Firmware On Samsung GALAXY A9 SM-A9000 - Now your firmware file has been inserted in Odin3
Flash Stock Firmware On Samsung GALAXY A9 SM-A9000 - Then, Enter download mode your Samsung GALAXY A9 SM-A9000 by pressing and hold Volume Down Button + Home Button + Power Button. Hold and press all button untill your phone vibrate and LCD show menu.

download mode Samsung GALAXY A9 SM-A9000 - And you will see picture like this on your LCD screen.
- On this mode, now you must connect your Samsung GALAXY A9 SM-A9000 to your PC / laptop using a USB cable.
- After your phone connected, you will see a message appear that show your device added and there is info on the ID: COM at top left corner. Keep in mind for this COM vary depending on the PC / Laptop. Just Ignore all, in this picture you will see that your device is detected on (COM 5)
Port Com samsung GALAXY A9 SM-A9000 - Make sure re-partition is NOT ticked
- When everything already you can click Start Button. at the bottom left corner
- Just wait for the process to run about 2-5 minutes, and make sure there is no interference in this process.
- When complete it will display a notification PASS and your smartphone Samsung GALAXY A9 SM-A9000 will automatically restart.
- Wait your device to boot up, it will take a while.
- When your Samsung GALAXY A9 SM-A9000 is ready to use, you can check your firmware update version by dial *#1234# on dial pad.
dial pad samsung GALAXY A9 SM-A9000 - And you will see your new firmware version.
firmware version samsung GALAXY A9 SM-A9000 - Finish.


|
| Download Mode GALAXY A9 SM-A9000 |
Warning.
Never disconnect the USB cable while flashing process is running.
Install Samsung Mobile Driver or Samsung Smart Switch if you dont see a sign in Odin.
Flash your Samsung GALAXY A9 SM-A9000 device at your own risk.
Flashing firmwares which contains more than one *.tar.md5 file will wipe all data on internal storage. Flashing official/stock firmware wont increase the binary flash nor KNOX WARRANTY VOID counter and wont cancel the Samsung GALAXY A9 SM-A9000 devices warranty.
Available link for download
Friday, November 11, 2016
Guide Flash Update Firmware Samsung GALAXY S7 SM G930F Using ODIN v3 11 1
Guide Flash Update Firmware Samsung GALAXY S7 SM G930F Using ODIN v3 11 1
[Guide] Flash / Update Firmware Samsung GALAXY S7 SM-G930F Using ODIN v3.11.1.
Flash Stock Firmware On Samsung GALAXY S7 SM-G930F. This guide show you how to flash a stock ROM on Samsung GALAXY S7 SM-G930F using Odin V3.11.1 software. Before you decide to use this guide, we recommend using Samsung’s own utilities, Samsung Kies and OTA (Over-the-air). Only use this guide if you are 100% sure about the risks involved in flashing your device. guidebelajar is not responsible for any damage caused by following this guide.
This Samsung android device is released on 2016, February. and available on USA, Global and Southeast Asia. Samsung GALAXY S7 SM-G930F is the smartphone with 5,1 Inchi Super AMOLED capacitive touchscreen, 16M colors, work on Android OS, v6.0 (Marshmallow), with Quad-core 1.8 GHz CDual-core 2.15 GHz Kryo & dual-core 1.6 GHz Kryo CPU, Qualcomm MSM8996 Snapdragon 820 chipset, Adreno 530 GPU, combined with 4 GB of RAM and 12 MP of Main camera and 5 MP on secondary camera.
This Samsung android device is released on 2016, February. and available on USA, Global and Southeast Asia. Samsung GALAXY S7 SM-G930F is the smartphone with 5,1 Inchi Super AMOLED capacitive touchscreen, 16M colors, work on Android OS, v6.0 (Marshmallow), with Quad-core 1.8 GHz CDual-core 2.15 GHz Kryo & dual-core 1.6 GHz Kryo CPU, Qualcomm MSM8996 Snapdragon 820 chipset, Adreno 530 GPU, combined with 4 GB of RAM and 12 MP of Main camera and 5 MP on secondary camera.
Flashing process in android Smartphone is like reinstall process on windows computer PC, with flash your Samsung GALAXY S7 SM-G930F android device you can unbrick, downgrade, manually upgrade (instead of updating via OTA or Samsung Smart Switch), or restore Samsungs stock firmware instead of custom ROM. I make this guide just for you as user all Samsung GALAXY S7 SM-G930F variant.
You need to read this guide carefully, so you can get the best result flashing on your Samsung GALAXY S7 SM-G930F. Cause you need to download necessary file, you must ensure that you have good internet connection in your computer device, this guide using a windows computer.
Initial Step To Flash Samsung GALAXY S7 SM-G930F
Now, we have reached on beginning guide, so you must to do initial step to ensure everything run smoothly.
- Make sure your Samsung GALAXY S7 SM-G930F battery is not in a low battery state, a minimum of 80%. If the battery runs out in the middle of the Root, it can lead to failure
- Always perform backup your important data before flashing process, Cause this process will delete or erase the data in memory.
- Make sure you have installed a Latest of Driver Samsung that support with your Smartphone, If you dont have, please download here
- Original USB cable driver for your Samsung GALAXY S7 SM-G930F
- Download Samsung Smart Switch, Here
- Download Odin V3.11.1, Here
- Download Official firmware file for the model number of your device, download it from - SamMobile, or you can visit the other site, Here
Main Guide To Flash Samsung GALAXY S7 SM-G930F
- You must download all necessary file.(Samsung USB driver or Smart Switch and Odin)
- Then you must install all driver or samsung smart switch to your computer or PC.
- Extraxt Odin V3.11.1. file on the destination folder.
- To download Samsung firmware you must visit this link, you can download specific firmware file for your device model number. you must Log In with your registered account on this website.
sammobile website Log In - On the row menu at the top of page, you can select firmware.
sammobile website GALAXY S7 SM-G930F - Then you must enter in search bar with your phone model number.

Firmware Samsung GALAXY S7 SM-G930F - Then select your country/carrier.

select country or carrier for samsung firmware - Then you click on available country link.
- For Non-Premium member you can Select regular download.

sammobile download non premium member - And Donwload button again. Approximately file size is 1,5 GB
- Wait untill your file finish downloaded, after that you must extract all firmware file on specific folder on your computer.
- This is your file.
Flash Stock Firmware On Samsung GALAXY S7 SM-G930F - Switch Off your Samsung GALAXY S7 SM-G930F to start flashing process.
- Then, you must run Odin3 v3.11.1 by right click on Odin.exe and select Run as Administrator.
Flash Stock Firmware On Samsung GALAXY S7 SM-G930F - When program is running, now you can click AP, and navigate to the *.tar or *.tar.md5 firmware file.
Flash Stock Firmware On Samsung GALAXY S7 SM-G930F - Now your firmware file has been inserted in Odin3
Flash Stock Firmware On Samsung GALAXY S7 SM-G930F - Then, Enter download mode your Samsung GALAXY S7 SM-G930F by pressing and hold Volume Down Button + Home Button + Power Button. Hold and press all button untill your phone vibrate and LCD show menu.
download mode Samsung GALAXY S7 SM-G930F - And you will see picture like this on your LCD screen.
- On this mode, now you must connect your Samsung GALAXY S7 SM-G930F to your PC / laptop using a USB cable.
- After your phone connected, you will see a message appear that show your device added and there is info on the ID: COM at top left corner. Keep in mind for this COM vary depending on the PC / Laptop. Just Ignore all, in this picture you will see that your device is detected on (COM 5)
Port Com samsung GALAXY S7 SM-G930F - Make sure re-partition is NOT ticked
- When everything already you can click Start Button. at the bottom left corner
- Just wait for the process to run about 2-5 minutes, and make sure there is no interference in this process.
- When complete it will display a notification PASS and your smartphone Samsung GALAXY S7 SM-G930F will automatically restart.
- Wait your device to boot up, it will take a while.
- When your Samsung GALAXY S7 SM-G930F is ready to use, you can check your firmware update version by dial *#1234# on dial pad.
dial pad samsung GALAXY S7 SM-G930F - And you will see your new firmware version.
firmware version samsung GALAXY S7 SM-G930F - Finish.


|
| Download Mode GALAXY S7 SM-G930F |
Warning.
Never disconnect the USB cable while flashing process is running.
Install Samsung Mobile Driver or Samsung Smart Switch if you dont see a sign in Odin.
Flash your Samsung GALAXY S7 SM-G930F device at your own risk.
Flashing firmwares which contains more than one *.tar.md5 file will wipe all data on internal storage. Flashing official/stock firmware wont increase the binary flash nor KNOX WARRANTY VOID counter and wont cancel the Samsung GALAXY S7 SM-G930F devices warranty.
Available link for download
Subscribe to:
Posts (Atom)