Showing posts with label power. Show all posts
Showing posts with label power. Show all posts
Monday, April 10, 2017
How to Save Power in Any Mobile Phone
How to Save Power in Any Mobile Phone

frustrating when you run out of power especially when you are dealing with a very important or serious matter. Ever wondered why is that so? Try to follow these easy steps, it might help you extend your battery life in any mobile phones and devices.
1. Keep your Screen Brightness as low as possible.
Keeping your screen brightness in low can help you save power. When you are using your devices at night, it is more appropriate to reduce your screen brightness. This can also help in protecting your eyes since too much brightness in the dark can is not appropriate.

Keeping your your device backlight time at a minimum level can help save power. This will let your device doesnt stay active for long when not in use.

Widgets like weather, news feeds, and social networking updates consume more power as they use your phones data connection and auto sync capabilities.


5. Close running unused applications.
When you are using your device, for example a tablet, there are times that you do really open lots of applications ( Games, Browsers or etc ). And so inorder to have easier access with them, you just minimize it on the dock. To save power, close unused applications. They are just minimized and still continue to function, thus consuming more battery.

It is much better to download a battery saver application in play store ( If your device is Android ). This app will provide you a lists of running applications which consumes more power.

If you have questions/clarifications or additional tips, please leave a comment.
Available link for download
Friday, March 31, 2017
How To Install Extended Power Menu Mod in Samsung Galaxy S3
How To Install Extended Power Menu Mod in Samsung Galaxy S3

In this post I included the steps to install extended power menu mod (Recovery, Download, etc.) in Samsung Galaxy S3. We should thank XDA Recognized Developer AndiP for making this mod. Currently, extended power menu mod is only available for selected ICS and Jelly bean versions.
Note:
- Make sure to download the correct odex or deodex firmware versions file. Check if Odexed or Deodexed ?
- This mod is only for Galaxy S3 with Stock Rom.
Disclaimer:
Installing Mods may brick your phone. I am not responsible for any damage. Do at your risk.
How To Install Extended Power Menu Mod in Samsung Galaxy S3 ?
1. Download the correct version of Extended PowerMenu zip for your firmware build number - Download2. Copy XX...-ExtPowMenu.zip to SD card.
3. Boot into CWM recovery. ( Power Off .... Press and Hold Volume up , Home and Power button )
4. In CWM Recovery select - install zip from sd card
5. Now click choose zip from sd card.
6. Finally select the XX...-ExtPowMenu.zip
After installation .... reboot...done...After reboot long press power button and click reboot. if the installation was success it will show options like Recovery, Download etc..
If the above method not worked or if you want to rollback the power menu to its default state just follow the steps below.
How to Restore the default power menu in Samsung Galaxy S3 ?
1. Download the correct version of Extended PowerMenu Rollback zip for your firmware build number - Download2. Copy XX...-ExtPowMenu-Rollback.zip to SD card.
3. Boot into CWM recovery. ( Power Off .... Press and Hold Volume up , Home and Power button )
4. In CWM Recovery select - install zip from sd card
5. Now click choose zip from sd card.
6. Finally select the XX...-ExtPowMenu-Rollback.zip
After complete install...reboot...
source
Available link for download
Sunday, February 5, 2017
How to add reboot recovery and bootloader options in Power menu
How to add reboot recovery and bootloader options in Power menu
So lets Start
Required
1-apktool
2-notepad++
3-some brains
STEP-1
Decompile Framework-res.apk
goto to res/vlaues/arrays.xml
and add these lines at the end
now goto res/values/strings
and add these lines at the end
goto add the ic_lock_reboot.png which i have i provided in the resources attached below this post to drawablw-hdpi folder
so before compiling the framework-res.apk follow erorcuns guide to properly recompile framework-res.apk
once recompile is done ....decompile again to get the HEX IDs
STEP-2
decompile android.policy.jar
goto classoutcomandroidinternalpolicyimpl
and add the 3 smalis files which i provided in the resources attached below
Now option classoutcomandroidinternalpolicyimplGlobalAc tions.smali
and find these lines and add the red marked lines between them
now we need to assign the Hex ids as per ur Public.xml
NOTE: the hex ids might be different from mine and yours so be careful while comparing
new as per the above changes in GlobalActions.xml
assign the ids as below
<public type="drawable" name="ic_lock_reboot" id="0x01080827" />
<public type="string" name="reboot" id="0x0104060b" />
Now option up classoutcomandroidinternalpolicyimplGlobalAc tions$11.smali
find and replace the following
@line 70
<public type="string" name="reboot" id="0x0104060b" />
@line 90
<public type="array" name="reboot_options" id="0x0107003b" />
@line 105
<public type="string" name="ok" id="0x0104000a" />
@line 147
<public type="bool" name="config_sf_slowBlur" id="0x0111000b" />
now open up classoutcomandroidinternalpolicyimplGlobalAc tions$11$2.smali
@line 59
<public type="array" name="reboot_actions" id="0x0107003c" />
save it and recompile android.policy.jar
now push all the files into ut phone...will have the new Advanced reboot options
Required
1-apktool
2-notepad++
3-some brains
STEP-1
Decompile Framework-res.apk
goto to res/vlaues/arrays.xml
and add these lines at the end
Code:
 <string-array name="reboot_options">
 <item>@string/reboot_normal</item>
 <item>@string/reboot_recovery</item>
 <item>@string/reboot_bootloader</item>
 </string-array>
 <string-array name="reboot_actions">
 <item>now</item>
 <item>recovery</item>
 <item>bootloader</item>
 </string-array>
now goto res/values/strings
and add these lines at the end
Code:
 <string name="reboot">Reboot</string>
 <string name="reboot_normal">Reboot</string>
 <string name="reboot_recovery">Recovery</string>
 <string name="reboot_bootloader">Bootloader</string>
goto add the ic_lock_reboot.png which i have i provided in the resources attached below this post to drawablw-hdpi folder
so before compiling the framework-res.apk follow erorcuns guide to properly recompile framework-res.apk
once recompile is done ....decompile again to get the HEX IDs
STEP-2
decompile android.policy.jar
goto classoutcomandroidinternalpolicyimpl
and add the 3 smalis files which i provided in the resources attached below
Now option classoutcomandroidinternalpolicyimplGlobalAc tions.smali
and find these lines and add the red marked lines between them
Code:
 .line 235
 iget-object v0, p0, Lcom/android/internal/policy/impl/GlobalActions;->mItems:Ljava/util/ArrayList;

 new-instance v1, Lcom/android/internal/policy/impl/GlobalActions$2;

 const v2, 0x1080030

 const v3, 0x10400fa

 invoke-direct {v1, p0, v2, v3}, Lcom/android/internal/policy/impl/GlobalActions$2;-><init>(Lcom/android/internal/policy/impl/GlobalActions;II)V

 invoke-virtual {v0, v1}, Ljava/util/ArrayList;->add(Ljava/lang/Object;)Z

 .line 213
 move-object/from16 v0, p0

 iget-object v1, v0, Lcom/android/internal/policy/impl/GlobalActions;->mItems:Ljava/util/ArrayList;

 new-instance v2, Lcom/android/internal/policy/impl/GlobalActions$11;

 const v3, 0x1080827

 const v4, 0x104060b

 move-object/from16 v0, p0

 invoke-direct {v2, v0, v3, v4}, Lcom/android/internal/policy/impl/GlobalActions$11;-><init>(Lcom/android/internal/policy/impl/GlobalActions;II)V

 invoke-virtual {v1, v2}, Ljava/util/ArrayList;->add(Ljava/lang/Object;)Z

 .line 260
 iget-object v0, p0, Lcom/android/internal/policy/impl/GlobalActions;->mItems:Ljava/util/ArrayList;

 iget-object v1, p0, Lcom/android/internal/policy/impl/GlobalActions;->mAirplaneModeOn:Lcom/android/internal/policy/impl/GlobalActions$ToggleAction;

 invoke-virtual {v0, v1}, Ljava/util/ArrayList;->add(Ljava/lang/Object;)Z
now we need to assign the Hex ids as per ur Public.xml
NOTE: the hex ids might be different from mine and yours so be careful while comparing
new as per the above changes in GlobalActions.xml
assign the ids as below
<public type="drawable" name="ic_lock_reboot" id="0x01080827" />
Code:
 new-instance v2, Lcom/android/internal/policy/impl/GlobalActions$11;

 const v3, 0x1080827
<public type="string" name="reboot" id="0x0104060b" />
Code:
new-instance v2, Lcom/android/internal/policy/impl/GlobalActions$11;

 const v3, 0x1080827

 const v4, 0x104060b
Now option up classoutcomandroidinternalpolicyimplGlobalAc tions$11.smali
find and replace the following
@line 70
<public type="string" name="reboot" id="0x0104060b" />
Code:
const v3, 0x104060b@line 90
<public type="array" name="reboot_options" id="0x0107003b" />
Code:
const v3, 0x107003b@line 105
<public type="string" name="ok" id="0x0104000a" />
Code:
const v2, 0x104000a@line 147
<public type="bool" name="config_sf_slowBlur" id="0x0111000b" />
Code:
const v3, 0x111000bnow open up classoutcomandroidinternalpolicyimplGlobalAc tions$11$2.smali
@line 59
<public type="array" name="reboot_actions" id="0x0107003c" />
Code:
const v2, 0x107003csave it and recompile android.policy.jar
now push all the files into ut phone...will have the new Advanced reboot options
Available link for download
Wednesday, January 11, 2017
How to save power on your Corby
How to save power on your Corby
1. Keep your screen brightness as low as possible. You can greatly save more battery from doing so.
2. Keep backlight time at a minimum level so your phone doesnt stay active for long when not in use.
3. Do not use widgets like weather, news feeds, and social networking updates as they use your phones data connection and auto sync capabilities, thus consuming more battery.
4. Turn off Bluetooth and Wifi when not in use.
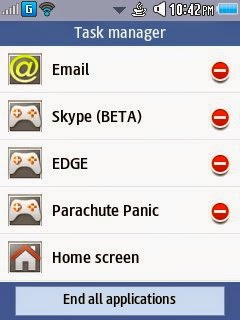
5. Close running unused applications. You may not know it, but you could probably have a few minimized apps running. To close these apps, run task manager. Hold the menu key and you will see the list of the minimized apps. Tap on the stop-like sign to close a certain app or tap on End all applications to close them all at once.
Source : www.corby2mods.blogspot.com
NOTE: Credits to the owner. CorbySociety do not intend to own this.
Available link for download
Sunday, November 20, 2016
GIGABYTE X99 All Digital Power Design
GIGABYTE X99 All Digital Power Design

Here is an introduction from Colin of GIGABYTE X99 series power design.
Available link for download
Friday, October 14, 2016
How to Root Ulefone Power
How to Root Ulefone Power

To install TWRP Recovery you will need latest version of Flash Tools and TWRP Recovery v3.0; also you will need set of universal driver. You can download the Ulefone Power Root archive from here, here or here. (84 MB)
Ulefone Power Root archive content
- TWRP-3.0.0-megthebest-Ulefone-Power.rar
- SP_Flash_Tool_Win_v5.1552.rar
- Driver_Auto_Installer_v5.1453.03.zip
Drivers Installation
1.Unzip Driver_Auto_Installer_v5.1453.03 archive.
2.Disable driver signature enforcement (Tutorial 1 or Tutorial 2)
3.Go to the unzipped archive and open Universal_Adb_Driver as an Administrator.
4.Follow the instructions of the installation program.
TWRP Recovery installation
1.Unzip Flash Tools archive.
2.Unzip TWRP Recovery archive.
3.Open flash_tool file in the Flash Tools folder. We recommend you to do that as an administrator.
4.Open Options in the left upper corner. Go to Download and check USB Checksum. Close it Options window.
5.Press Scatter-Loading
6.In TWRP-3.0.0-megthebest-Ulefone-Power folder (from the unzipped TWRP Recovery archive) find the MT6753_Android_scatter- TWRP 3.0 file, choose it and press Open.
7.Press Download button.
8.Turn off your phone.
9.Connect your phone to the computer with the USB cable.
10.Wait until Flash Tools finish installing TWRP Recovery to your phone.
11.Disconnect the phone.
12.Press and hold for some time vol+ and Power on buttons.
13.In the appeared menu choose Recovery. Use vol+ to navigate, and vol- to choose.


How to get ROOT access
1.Go to TWRP Recovery.
2.Press Reboot.
3.Follow the Installation program instructions.
1.Go to TWRP Recovery.
2.Press Reboot.
3.Follow the Installation program instructions.
Warning
Everything you doing with your phone you do on your own risk. We are not taking responsibility for anything that may happen during the actions described above.
Don’t miss any of our future video tutorials, follow us on Youtube. Like us on Facebook. Add us in your circles on Google+. Watch our photo albums on Flickr. Subscribe now to our newsletter.
Available link for download
Subscribe to:
Posts (Atom)