Tuesday, April 11, 2017
How To Manually Update Galaxy S3 GT I9300 to Official Android Jelly Bean 4 1 2 XXEMH4 Using Odin
How To Manually Update Galaxy S3 GT I9300 to Official Android Jelly Bean 4 1 2 XXEMH4 Using Odin
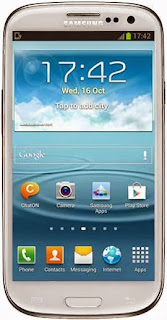
In this I included the steps to manually flash Android 4.1.2 Jelly bean XXEMH4 to Galaxy S3 I9300 International version using Odin.
Firmware Details
PDA: I9300XXEMH4
CSC: I9300ODDEMI2
MODEM: I9300DDEMG2
Note :
1. Backup your important data.
2. Enable USB debugging in your phone.
3. Battery must have 60% or more charge.
4. Disable or Exit Antivirus and Kies if you are installed.
5. Your PC must install Kies or Galaxy S3 driver.
6. This Firmware is only for Galaxy S3 I9300 International Version.
How To Flash Official Android 4.1.2 I9300XXEMH4 in Galaxy S3 I9300 using Odin ?
1. Download Official Android Jelly Bean 4.1.2 I9300XXEMH4 for your country from below links.India | Sri Lanka | Bangladesh | Nepal
2. Extract the downloaded firmware zip.
3. Download Odin v1.85 - Download
4. Now, Extract and Open odin3 v1.85.exe.
5. Power off your phone.
6. Now boot in to download mode. ( Press and hold : Volume down key and Home button ( Center button ) ,now press and hold the power button to boot in to download mode and Press Volume up on Warning)
7. In download mode connect your phone to PC.
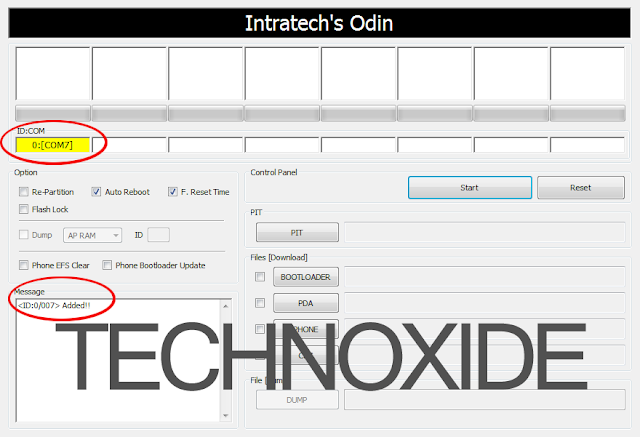
8. Now look in to Odin... ID:COM box, it will be yellow with a port name and Added! message will be displayed.
( If not it will the problem of driver or USB ... check both )
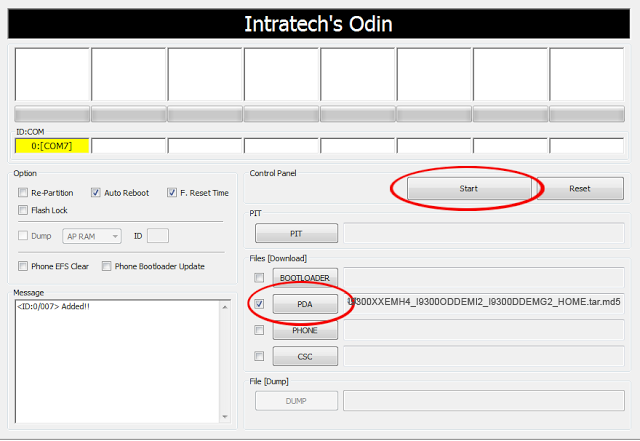
9. In Odin..Click PDA and browse the extracted firmware folder and select I9300XXEMH4_I9300ODDEMI2_I9300DDEMG2_HOME.tar.md5 finally Click Start button.
10. After complete update Odin will show PASS on top left and phone will reboot. now unplug phone from USB.
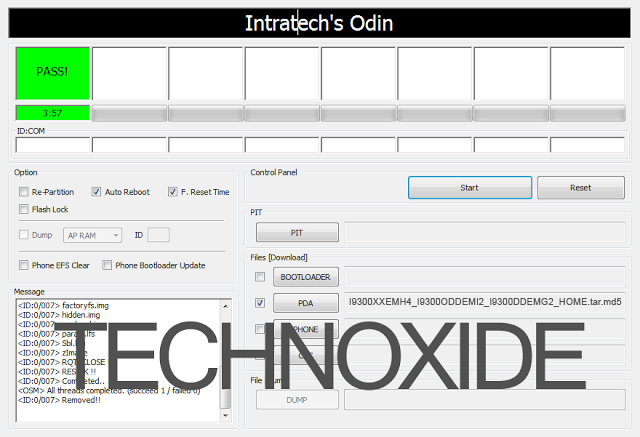
Thats it .... Done .
Note :
If the phone stuck at the boot screen...
1. Remove and reinsert your battery.
2. Now boot into recovery mode. (Volume up + Home + Power )
3. Apply wipe data/factory reset.
4. Apply wipe cache partition.
5. Finally reboot system...
Done !
Go to the below post to root the firmware
How To Root Samsung Galaxy S3 Jelly Bean 4.1.2 XXEMH4 ?
Available link for download

Saturday, March 4, 2017
Google Playstore 4 3 10 Update
Google Playstore 4 3 10 Update

Bagi kalian yang tidak sabar menuggu update OTA dari Playstore, androidpolice telah mengeluarkan update manual untuk versi 4.3.10. Tidak seperti update sebelumnya pada versi 4.2.9, pada versi 4.3.9 lebih menonjolkan tampilan antar muka.
Apa yang baru?
recently update : Kita bisa tahu aplikasi apa saja yang baru di update di menu install. Berguna bagi yang mengaktifkan menu automatically update.


Available link for download
Saturday, February 18, 2017
how do i update my laptop drivers
how do i update my laptop drivers
If youve got a laptop computer thats not spanking new, youll have questioned a way to update its drivers in order that your hardware runs as with efficiency as attainable. whether or not youre reinstalling your OS, making an attempt to repair a retardant together with your laptop computer or {simply} simply making an attempt to create it work higher, there area unit 2 main ways that youll move change its drivers
Start your portable computer and open Windows Update. To do this, click on the "Start" button, then "All Programs," then "Windows Update." If youre running Windows XP, a browser can launch and youll be asked if you would like to run an exact ActiveX plugin, that you ought to do. If youre running Windows visual percept or Windows seven, a specialised Windows Update program can seem.
Proceed through any Windows real validation checks or Windows Update updates that ar needed, then opt for the choice to put in nonobligatory updates. Wait whereas Windows Update scans your portable computer and tries to seek out driver updates for your hardware.
Choose to read out there hardware drivers (if any ar found). If theres a driver out there for the hardware you were yearning for, opt for it by choosing the radio button or check box next to its name then click the install button close to the highest of the window. The update are downloaded and put in onto your portable computer. Once installation has completed, restart the portable computer if prompted.
Learn the laptops manufacturer and model. samples of potential makers ar dicot genus, Alienware, Dell, HP, Sony or any of variety of pc makers. The model range is also written on top of the keyboard on the portable computer, beneath it on a sticker or maybe carved directly into the portable computer chassis. youll conjointly determine the manufacturer and model info by right-clicking on "My Computer" within the software and clicking on the "Properties" button.
Go to the portable computer manufacturers official web site and proceed to their "Drivers" or "Downloads" section. opt for the model that corresponds to your portable computer and examine all of the drivers and downloads that ar out there for the software that you simply have put in.
Download the motive force for the actual piece of hardware thats needed. put it aside to your portable computer then run the motive force installation file. Follow any directions that ar given and proceed through the installation method till it completes. Restart your portable computer if prompted.
Available link for download
Sunday, February 5, 2017
Get Android Lollipop Icons and Animations Using Latest Nova Launcher Lollipop Update
Get Android Lollipop Icons and Animations Using Latest Nova Launcher Lollipop Update
 Yesterday I have posted the stock lollipop wallpaper pack. Now its time to get a bit more. Apart from other features and performance improvements most Android users like to get the UI look and feel in every latest Android release. If you are one of them and you would like to get the lollipop icons and animations in your old Android device, just install the latest version of the Nova launcher from Google play.
The latest version of Nova launcher packed with the Android 5.0 lollipop animation and icon pack. You can apply the lollipop icons in the Look and feel menu.
How To Apply Lollipop Icons in Nova launcher?
1. Install Nova Launcher - Download
2. After installation click home and chose Nova as the default launcher.
3. Click settings soft key and tap on Nova settings.
4. In Nova settings, tap on Look and feel then on Icon theme.
5. Finally in Icon theme list choose Lollipop.
Thats it...
Available link for download
Monday, January 30, 2017
How to easily update firmware via OTA on Leagoo Z1 smartphone
How to easily update firmware via OTA on Leagoo Z1 smartphone

Firmware details
OTA? LEAGOO_Z1_OS_1.1_Lite_A_20160517
Size: 17.80 MB
Firmware: Android Lollipop 5.1 OTA update
Image: update.zip
Old build number: LEAGOO Z1_OS 1.1 Lite A 20160513
New build number: LEAGOO Z1_OS 1.1 Lite A 20160517
Change log
1. Fixed bugs and improved device performance.
Install Guide
Search the new OTA update firmware from Settings menu, download it and install it. The device will reboot and enter into Recovery Mode. The whole process will take a few minutes, please make sure the battery power is enough.

Available link for download
Saturday, January 28, 2017
Hcl Ezeebee Max 4981P4 506 Asus Bios Update
Hcl Ezeebee Max 4981P4 506 Asus Bios Update
Hcl Ezeebee Max 4981P4-506 Asus Bios Update
Driver Details:
File name: hcl-ezeebee-max_4981p4_506-asus-bios-update.rar
File size: 4.782 MB
Driver version: 2.82
Average rating: 9.6 / 10
Downloads: 1163
If you need hcl ezeebee max 4981p4-506 asus bios update, just click below. All drivers are scanned using antivirus software and 100% compatible with Windows OS.
Available link for download
Wednesday, January 25, 2017
GNOME Software Update That Fixes Installing Third Party Deb Files Lands In Ubuntu 16 04 Proposed Repository
GNOME Software Update That Fixes Installing Third Party Deb Files Lands In Ubuntu 16 04 Proposed Repository

- support for apt:// URLs;
- increased the number of displayed reviews from 10 to 30;
- GNOME Software now displays version and size information for non-installed applications;
- enabled the Snappy backend.

Available link for download
Monday, January 16, 2017
GC PRO KEY GcProKey Update V25 Latest Setup Download
GC PRO KEY GcProKey Update V25 Latest Setup Download
..... GCPRO GSM TOOL V1.0.0.0019 released.
- Added New Support
- Samsung N920T Unlocking official support.
- (NOTE 5 T-Mobile)
- Samsung G928T Unlocking official support.
- S6Edge+ T-Mobile
- Samsung G928T Unlocking official support.
- S6Edge+ T-Mobile
- Samsung sprint USA unlocking official support.
- including GCF_ENABLE setting.
- Select samsung usb serial port
A.K.A. DIAG PORT- if need domestic unlocking. This will enable GCF.
- Select samsung usb serial port
- including GCF_ENABLE setting.
- Samsung sprint spc/msl read while sprint unlocking.
- Samsung Write_NV_DATA
- Useful to restore backup nv_data.bin created by GcPro or EVEN other tools !
- Samsung N920T Unlocking official support.
- Added New Support As Beta
- Samsung SS222 base band sim unlock support..
- T339N & G800F/H/HQ/I/M ETC
- adb + root
- USE ADB_UNLOCK
- Samsung SS222 baseband CERT read support
- T339N & G800F/H/HQ/I/M ETC
- adb + root
- USE ADB_UNLOCK
- Samsung SS222 base band sim unlock support..
- Improvements
- mtk nvram added option to continue even after decryption fail...
- Caution !!
- Use At Your Own Risk !!
- Caution !!
- adb unlock exynos show unsupported security..
- adb unlock old device cert read..
- htc sprint unlocking..
- Samsung sprint unlocking..511 and other version
- Samsung regional unlocking support sprint devices.
- DOMESTIC UNLOCKING FOR USA.ONLY FOR SAMSUNG AT MOMENT
- Improved crash on some time
- mtk nvram added option to continue even after decryption fail...
link1= https://www.mediafire.com/folder/kzd5v0z4fecn7/GCPROKEY
link2= https://mega.co.nz/#F!1pxHgTBA!P7owR-MlJxD-r0_N6o0xWQ
link3= https://drive.google.com/folderview?...FE&usp=sharing
Available link for download
Wednesday, December 28, 2016
How To Manually Update Galaxy S3 GT I9300 to Android 4 3 Leaked firmware
How To Manually Update Galaxy S3 GT I9300 to Android 4 3 Leaked firmware
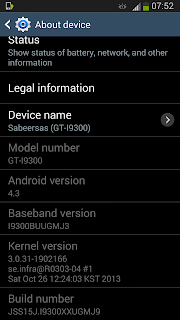
Follow the steps below to manually flash the Galaxy S3 Android 4.3 leaked firmware using Odin 3.09.
Firmware Info:
Model: GT-I9300
Country: Germany (Vodafone)
Version: Android 4.3
Changelist: 1902166
Build date: Sat, 26 Oct 2013 12:24:03 +0000
Product Code: VFG
PDA: I9300XXUGMJ9
CSC: I9300VFGGMJ5
MODEM: I9300BUUGMJ3
Note:
- This firmware is only for Galaxy S3 International version (GT-I9300)
- Backup all important data
- Battery must be 60% or above
- Kill all the kies processes in Task Manager
- Disable Antivirus
Update:
This leaked version have an annoying deepsleep issue...so better dont flash it. Official 4.3 firmware from Samsung started rolling out yesterday. so wait for that official version for your country.
Update 2:
Samsung Galaxy S3 Official Stock Android 4.3 update started rolling out click the below link to the Official firmware post.
Galaxy S3 GT-I9300 Official Stock Android 4.3 Update Using Odin
Available link for download
Tuesday, November 29, 2016
Guide Flash Update Firmware Samsung GALAXY S7 EDGE SM G935F Using ODIN v3 11 1
Guide Flash Update Firmware Samsung GALAXY S7 EDGE SM G935F Using ODIN v3 11 1
[Guide] Flash / Update Firmware Samsung GALAXY S7 EDGE SM-G935F Using ODIN v3.11.1.
This Samsung android device is released on 2016, March. and available on USA, Global and Southeast Asia. Samsung GALAXY S7 EDGE SM-G935F is the smartphone with 5,1 Inchi Super AMOLED capacitive touchscreen, 16M colors, work on Android OS, v6.0 (Marshmallow), with Quad-core 1.8 GHz CDual-core 2.15 GHz Kryo & dual-core 1.6 GHz Kryo CPU, Qualcomm MSM8996 Snapdragon 820 chipset, Adreno 530 GPU, combined with 4 GB of RAM and 12 MP of Main camera and 5 MP on secondary camera.
Initial Step To Flash Samsung GALAXY S7 EDGE SM-G935F
- Make sure your Samsung GALAXY S7 EDGE SM-G935F battery is not in a low battery state, a minimum of 80%. If the battery runs out in the middle of the Root, it can lead to failure
- Always perform backup your important data before flashing process, Cause this process will delete or erase the data in memory.
- Make sure you have installed a Latest of Driver Samsung that support with your Smartphone, If you dont have, please download here
- Original USB cable driver for your Samsung GALAXY S7 EDGE SM-G935F
- Download Samsung Smart Switch, Here
- Download Odin V3.11.1, Here
- Download Official firmware file for the model number of your device, download it from - SamMobile, or you can visit the other site, Here
Main Guide To Flash Samsung GALAXY S7 EDGE SM-G935F
- You must download all necessary file.(Samsung USB driver or Smart Switch and Odin)
- Then you must install all driver or samsung smart switch to your computer or PC.
- Extraxt Odin V3.11.1. file on the destination folder.
- To download Samsung firmware you must visit this link, you can download specific firmware file for your device model number. you must Log In with your registered account on this website.
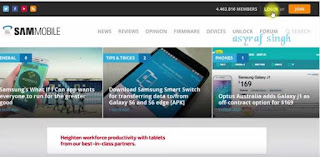
sammobile website Log In - On the row menu at the top of page, you can select firmware.

sammobile website GALAXY S7 EDGE SM-G935F - Then you must enter in search bar with your phone model number.
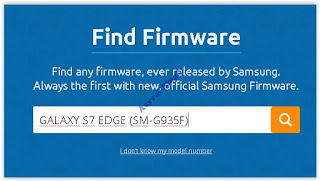
Firmware Samsung GALAXY S7 EDGE SM-G935F - Then select your country/carrier.
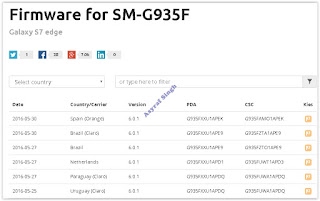
select country or carrier for samsung firmware - Then you click on available country link.
- For Non-Premium member you can Select regular download.

sammobile download non premium member - And Donwload button again. Approximately file size is 1,9 GB
- Wait untill your file finish downloaded, after that you must extract all firmware file on specific folder on your computer.
- This is your file.

Flash Stock Firmware On Samsung GALAXY S7 EDGE SM-G935F - Switch Off your Samsung GALAXY S7 EDGE SM-G935F to start flashing process.
- Then, you must run Odin3 v3.11.1 by right click on Odin.exe and select Run as Administrator.
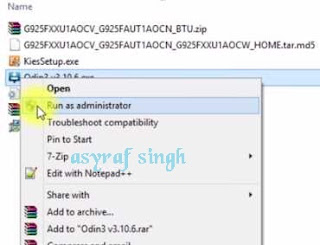
Flash Stock Firmware On Samsung GALAXY S7 EDGE SM-G935F - When program is running, now you can click AP, and navigate to the *.tar or *.tar.md5 firmware file.
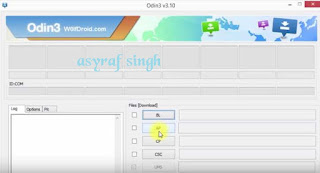
Flash Stock Firmware On Samsung GALAXY S7 EDGE SM-G935F - Now your firmware file has been inserted in Odin3

Flash Stock Firmware On Samsung GALAXY S7 EDGE SM-G935F - Then, Enter download mode your Samsung GALAXY S7 EDGE SM-G935F by pressing and hold Volume Down Button + Home Button + Power Button. Hold and press all button untill your phone vibrate and LCD show menu.
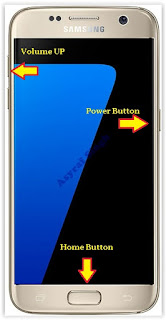
download mode Samsung GALAXY S7 EDGE SM-G935F - And you will see picture like this on your LCD screen.
- On this mode, now you must connect your Samsung GALAXY S7 EDGE SM-G935F to your PC / laptop using a USB cable.
- After your phone connected, you will see a message appear that show your device added and there is info on the ID: COM at top left corner. Keep in mind for this COM vary depending on the PC / Laptop. Just Ignore all, in this picture you will see that your device is detected on (COM 5)
Port Com samsung GALAXY S7 EDGE SM-G935F - Make sure re-partition is NOT ticked
- When everything already you can click Start Button. at the bottom left corner
- Just wait for the process to run about 2-5 minutes, and make sure there is no interference in this process.
- When complete it will display a notification PASS and your smartphone Samsung GALAXY S7 EDGE SM-G935F will automatically restart.
- Wait your device to boot up, it will take a while.
- When your Samsung GALAXY S7 EDGE SM-G935F is ready to use, you can check your firmware update version by dial *#1234# on dial pad.

dial pad samsung GALAXY S7 EDGE SM-G935F - And you will see your new firmware version.

firmware version samsung GALAXY S7 EDGE SM-G935F - Finish.


 |
| Download Mode GALAXY S7 EDGE SM-G935F |


Never disconnect the USB cable while flashing process is running.
Install Samsung Mobile Driver or Samsung Smart Switch if you dont see a sign in Odin.
Flash your Samsung GALAXY S7 EDGE SM-G935F device at your own risk.
Flashing firmwares which contains more than one *.tar.md5 file will wipe all data on internal storage. Flashing official/stock firmware wont increase the binary flash nor KNOX WARRANTY VOID counter and wont cancel the Samsung GALAXY S7 EDGE SM-G935F devices warranty.
Available link for download
Thursday, November 24, 2016
Guide Flash Update Firmware Samsung GALAXY A9 SM A9000 Using ODIN v3 11 1
Guide Flash Update Firmware Samsung GALAXY A9 SM A9000 Using ODIN v3 11 1
[Guide] Flash / Update Firmware Samsung GALAXY A9 SM-A9000 Using ODIN v3.11.1.
This Samsung android device is released on 2015, December. and available worldwide. Samsung GALAXY A9 SM-A9000 is the smartphone with 6,0 Inchi Super AMOLED capacitive touchscreen, 16M colors, work on Android OS, v5.1.1 (Lollipop), planned upgrade to v6.0 (Marshmallow), with Quad-core 1.8 GHz Cortex-A72 & quad-core 1.2 GHz Cortex-A53 CPU, Qualcomm MSM8976 Snapdragon 652 chipset, Adreno 510 GPU, combined with 3 GB of RAM and 13 MP of Main camera and 8 MP on secondary camera.
Initial Step To Flash Samsung GALAXY A9 SM-A9000
- Make sure your Samsung GALAXY A9 SM-A9000 battery is not in a low battery state, a minimum of 80%. If the battery runs out in the middle of the Root, it can lead to failure
- Always perform backup your important data before flashing process, Cause this process will delete or erase the data in memory.
- Make sure you have installed a Latest of Driver Samsung that support with your Smartphone, If you dont have, please download here
- Original USB cable driver for your Samsung GALAXY A9 SM-A9000
- Download Samsung Smart Switch, Here
- Download Odin V3.11.1, Here
- Download Official firmware file for the model number of your device, download it from - SamMobile, or you can visit the other site, Here
Main Guide To Flash Samsung GALAXY A9 SM-A9000
- You must download all necessary file.(Samsung USB driver or Smart Switch and Odin)
- Then you must install all driver or samsung smart switch to your computer or PC.
- Extraxt Odin V3.10.7. file on the destination folder.
- To download Samsung firmware you must visit this link, you can download specific firmware file for your device model number. you must Log In with your registered account on this website.
sammobile website Log In - On the row menu at the top of page, you can select firmware.
sammobile website GALAXY A9 SM-A9000 - Then you must enter in search bar with your phone model number.
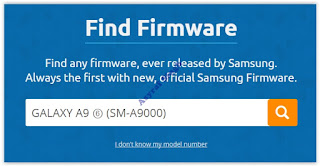
Firmware Samsung GALAXY A9 SM-A9000 - Then select your country/carrier.

select country or carrier for samsung firmware - Then you click on available country link.
- For Non-Premium member you can Select regular download.
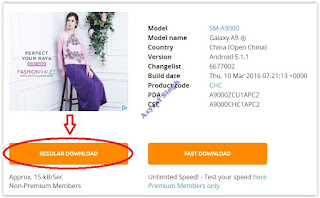
sammobile download non premium member - And Donwload button again. Approximately file size is 1,5 GB
- Wait untill your file finish downloaded, after that you must extract all firmware file on specific folder on your computer.
- This is your file.
Flash Stock Firmware On Samsung GALAXY A9 SM-A9000 - Switch Off your Samsung GALAXY A9 SM-A9000 to start flashing process.
- Then, you must run Odin3 v3.11.1 by right click on Odin.exe and select Run as Administrator.
Flash Stock Firmware On Samsung GALAXY A9 SM-A9000 - When program is running, now you can click AP, and navigate to the *.tar or *.tar.md5 firmware file.
Flash Stock Firmware On Samsung GALAXY A9 SM-A9000 - Now your firmware file has been inserted in Odin3
Flash Stock Firmware On Samsung GALAXY A9 SM-A9000 - Then, Enter download mode your Samsung GALAXY A9 SM-A9000 by pressing and hold Volume Down Button + Home Button + Power Button. Hold and press all button untill your phone vibrate and LCD show menu.

download mode Samsung GALAXY A9 SM-A9000 - And you will see picture like this on your LCD screen.
- On this mode, now you must connect your Samsung GALAXY A9 SM-A9000 to your PC / laptop using a USB cable.
- After your phone connected, you will see a message appear that show your device added and there is info on the ID: COM at top left corner. Keep in mind for this COM vary depending on the PC / Laptop. Just Ignore all, in this picture you will see that your device is detected on (COM 5)
Port Com samsung GALAXY A9 SM-A9000 - Make sure re-partition is NOT ticked
- When everything already you can click Start Button. at the bottom left corner
- Just wait for the process to run about 2-5 minutes, and make sure there is no interference in this process.
- When complete it will display a notification PASS and your smartphone Samsung GALAXY A9 SM-A9000 will automatically restart.
- Wait your device to boot up, it will take a while.
- When your Samsung GALAXY A9 SM-A9000 is ready to use, you can check your firmware update version by dial *#1234# on dial pad.
dial pad samsung GALAXY A9 SM-A9000 - And you will see your new firmware version.
firmware version samsung GALAXY A9 SM-A9000 - Finish.


|
| Download Mode GALAXY A9 SM-A9000 |
Never disconnect the USB cable while flashing process is running.
Install Samsung Mobile Driver or Samsung Smart Switch if you dont see a sign in Odin.
Flash your Samsung GALAXY A9 SM-A9000 device at your own risk.
Flashing firmwares which contains more than one *.tar.md5 file will wipe all data on internal storage. Flashing official/stock firmware wont increase the binary flash nor KNOX WARRANTY VOID counter and wont cancel the Samsung GALAXY A9 SM-A9000 devices warranty.
Available link for download
Saturday, November 12, 2016
How to remove charging time ads in xender new update
How to remove charging time ads in xender new update


Available link for download
Friday, November 11, 2016
Guide Flash Update Firmware Samsung GALAXY S7 SM G930F Using ODIN v3 11 1
Guide Flash Update Firmware Samsung GALAXY S7 SM G930F Using ODIN v3 11 1
[Guide] Flash / Update Firmware Samsung GALAXY S7 SM-G930F Using ODIN v3.11.1.
This Samsung android device is released on 2016, February. and available on USA, Global and Southeast Asia. Samsung GALAXY S7 SM-G930F is the smartphone with 5,1 Inchi Super AMOLED capacitive touchscreen, 16M colors, work on Android OS, v6.0 (Marshmallow), with Quad-core 1.8 GHz CDual-core 2.15 GHz Kryo & dual-core 1.6 GHz Kryo CPU, Qualcomm MSM8996 Snapdragon 820 chipset, Adreno 530 GPU, combined with 4 GB of RAM and 12 MP of Main camera and 5 MP on secondary camera.
Initial Step To Flash Samsung GALAXY S7 SM-G930F
- Make sure your Samsung GALAXY S7 SM-G930F battery is not in a low battery state, a minimum of 80%. If the battery runs out in the middle of the Root, it can lead to failure
- Always perform backup your important data before flashing process, Cause this process will delete or erase the data in memory.
- Make sure you have installed a Latest of Driver Samsung that support with your Smartphone, If you dont have, please download here
- Original USB cable driver for your Samsung GALAXY S7 SM-G930F
- Download Samsung Smart Switch, Here
- Download Odin V3.11.1, Here
- Download Official firmware file for the model number of your device, download it from - SamMobile, or you can visit the other site, Here
Main Guide To Flash Samsung GALAXY S7 SM-G930F
- You must download all necessary file.(Samsung USB driver or Smart Switch and Odin)
- Then you must install all driver or samsung smart switch to your computer or PC.
- Extraxt Odin V3.11.1. file on the destination folder.
- To download Samsung firmware you must visit this link, you can download specific firmware file for your device model number. you must Log In with your registered account on this website.
sammobile website Log In - On the row menu at the top of page, you can select firmware.
sammobile website GALAXY S7 SM-G930F - Then you must enter in search bar with your phone model number.

Firmware Samsung GALAXY S7 SM-G930F - Then select your country/carrier.

select country or carrier for samsung firmware - Then you click on available country link.
- For Non-Premium member you can Select regular download.

sammobile download non premium member - And Donwload button again. Approximately file size is 1,5 GB
- Wait untill your file finish downloaded, after that you must extract all firmware file on specific folder on your computer.
- This is your file.
Flash Stock Firmware On Samsung GALAXY S7 SM-G930F - Switch Off your Samsung GALAXY S7 SM-G930F to start flashing process.
- Then, you must run Odin3 v3.11.1 by right click on Odin.exe and select Run as Administrator.
Flash Stock Firmware On Samsung GALAXY S7 SM-G930F - When program is running, now you can click AP, and navigate to the *.tar or *.tar.md5 firmware file.
Flash Stock Firmware On Samsung GALAXY S7 SM-G930F - Now your firmware file has been inserted in Odin3
Flash Stock Firmware On Samsung GALAXY S7 SM-G930F - Then, Enter download mode your Samsung GALAXY S7 SM-G930F by pressing and hold Volume Down Button + Home Button + Power Button. Hold and press all button untill your phone vibrate and LCD show menu.
download mode Samsung GALAXY S7 SM-G930F - And you will see picture like this on your LCD screen.
- On this mode, now you must connect your Samsung GALAXY S7 SM-G930F to your PC / laptop using a USB cable.
- After your phone connected, you will see a message appear that show your device added and there is info on the ID: COM at top left corner. Keep in mind for this COM vary depending on the PC / Laptop. Just Ignore all, in this picture you will see that your device is detected on (COM 5)
Port Com samsung GALAXY S7 SM-G930F - Make sure re-partition is NOT ticked
- When everything already you can click Start Button. at the bottom left corner
- Just wait for the process to run about 2-5 minutes, and make sure there is no interference in this process.
- When complete it will display a notification PASS and your smartphone Samsung GALAXY S7 SM-G930F will automatically restart.
- Wait your device to boot up, it will take a while.
- When your Samsung GALAXY S7 SM-G930F is ready to use, you can check your firmware update version by dial *#1234# on dial pad.
dial pad samsung GALAXY S7 SM-G930F - And you will see your new firmware version.
firmware version samsung GALAXY S7 SM-G930F - Finish.


|
| Download Mode GALAXY S7 SM-G930F |
Never disconnect the USB cable while flashing process is running.
Install Samsung Mobile Driver or Samsung Smart Switch if you dont see a sign in Odin.
Flash your Samsung GALAXY S7 SM-G930F device at your own risk.
Flashing firmwares which contains more than one *.tar.md5 file will wipe all data on internal storage. Flashing official/stock firmware wont increase the binary flash nor KNOX WARRANTY VOID counter and wont cancel the Samsung GALAXY S7 SM-G930F devices warranty.
Available link for download