Showing posts with label custom. Show all posts
Showing posts with label custom. Show all posts
Tuesday, March 7, 2017
How To Create Custom Redirects for Blogger Post
How To Create Custom Redirects for Blogger Post
 Yesterday i wrote a post on editing blogger post URL, and i was mentioned to write down the posts old URL before changing to a new one .Because, if the post you are decide to change the URL is an old one there is chance that the old URL may be indexed in search engine or in social website like Facebook or Twitter or GooglePlus. Because of that there is a chance to lose the visitor coming from those sites as the URL will give a does not exist error ! Here comes the importance of Custom Redirects.
 Custom Redirects will help us to redirect the user from those old URL to the new URL. This post describe the steps to create a Custom Redirect in Blogger. Just follow the steps below.
Steps:
1. Login to your Blogger account.
2. In your blogs dashboard , GO to Settings > Search Preferences

3. Click on Custom Redirects > Edit

4. Now you will get something like below image

5. Now Add the your posts Old URL to From textfield and add the posts new URL to To textfield.
( Dont add the full URL just add the the red marked part of the URL in the example below )
eg. http://technoxide.blogspot.com/2012/07/redirect-blogger-post.html
6. Click Save and Save Changes.
Update: [ Custom Redirect Mobile Version of Blogger URL ]
You also need to add the mobile version of the old URL to the custom redirect. add ?m=1 after the old post URL to get the mobile version.
eg: http://technoxide.blogspot.com/2012/07/redirect-blogger-post.html?m=1
Thats it ! Now navigate to your posts old URL it will automatically redirects to your posts new URL.
Available link for download

Tuesday, February 7, 2017
How To Change Blogger Post URL Using Custom Permalink
How To Change Blogger Post URL Using Custom Permalink
 Whenever we publish a new post, Blogger automatically generates the post URL according to the title of the blog post. For example, if the post title is How To Change Blogger Post URL Using Permalink? then Blogger will generate http:// technoxide.blogspot.com /2012/07/ how-to-change -blogger-post- url-using.html as the post URL. If you want to change this URL to a small SEO friendly one here comes the solution.
Recently Blogger introduced an option named Permalink in Post settings to edit the post URL to your desired one. In this post I included the simple steps to use custom permalink in Blogger blog. Here are the steps.
Steps:
Note : If you have Permalink Option in your Blogger Post Settings Start from Step 2.
1. Open a post you wish to edit the URL or Create a New Post.
(If you are editing a published post, then click on Revert to draft button to enable Permalink editing.)

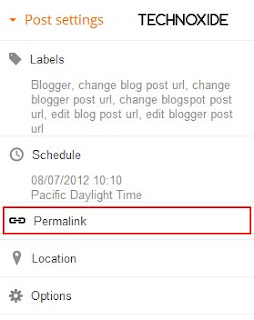
2. Then click Permalink in Post Settings.
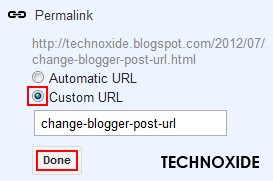
3. Now check the Custom URL radio button and type the new post URL in Custom URL text field. After changing the URL dont forget to click Done!
4.Finally, Click Publish .
Thats it...Now check the post URL it will be changed to the modified one !
Note : If you are changing URL of a old post, please note down the old URL before changing to a new one. Because your old post URL may be submitted to search engine or social websites.So If any one come to your blog using the old URL he will get a 404 not found error. Dont Worry ! you can Redirect your old URL to new URL using Custom Redirects feature of Blogger.
Available link for download
Thursday, January 12, 2017
How to Create Own Custom Rom FOR ANY ANDROID DEVICE
How to Create Own Custom Rom FOR ANY ANDROID DEVICE
Who is this tutorial for?
Quote:
|
Tools Required : (Update them manually and report me dead links please)
Quote:
|
Step one: Installing the JAVA JDK, Cygwin and Setting up the Kitchen.
INSTRUCTIONS
- Download and extract the cygwin_packages.zip
- Run the set up(make sure there is no previous cygwin installation)Quote:
NOTE: INSTALL CYGWIN IN ROOT DISK LIKE C: - Follow the kitchen read me txt!!!
- local package directory *must* be the path to the cygwin_packages folder that you just extracted
- when it shows all the package names, go to the top and select "all default" until it changes to "all install" (you must click on the arrows)Quote:
- Download the kitchen from above. Then, extract the kitchens .zip file to a folder under your home account. Rename the dsixda-android-kitchen-*** folder to just "kitchen". In Cygwin, this folder would depend on what was set for your Cygwin install directory, e.g. C:cygwinhomeJohnkitchen
NOTE!! If your user folder contains spaces (e.g. C:cygwinhomeJohn Smithkitchen), then the kitchen will not function properly. Instead, copy it under C:cygwinhomekitchen. - Now your ready to run the kitchen type:Quote:
those who have their kitchen like this C:cygwinhomeJohnkitchen use these commands given below. those who have their kitchen like this C:cygwinhomekitchen use these commands given below.Quote:cd kitchen(enter)
./menu(enter)Quote:cd ../kitchen(enter)
./menu(enter)Quote:
Step Two: Setting up a working folderIf you did things right you should see this:
THERE ARE TOW METHODS FOR THIS.
1. WHEN YOU HAVE BASE ROM AVAILABLE.
2. WHEN YOU DONT HAVE BASE ROM.
FIRST METHOD -- First our folder structure should look like this:Code:
cygwin folder/home/your user name/kitchen
- Inside the kitchen it should look like this:
- Now we need a rom to work on, for GALAXY ACE PLUS[s7500] users i will recommend this rom by blackburner but you can use any rom.
Just Place the original rom zip in the original_update folder inside the kitchen. - run the cygwin.exe again type:Code:
cd kitchen(enter)
./menu(enter) - now enter option 1, enter again. You should see your rom listed, choose and enter
you will be asked about changing the working folders name, at this point it makes no difference so just continue. - congratulations you have a working folder!!!
SECOND METHOD - this method is by neroyoung
FIRST MAKE A WORKING FOLDER IN CYGWIN FOLDERQuote:IT SHOULD LOOK LIKE THIS
cygwin folder/home/your user name/kitchen/WORKING_(your rom name)
NOTE: FOR THIS MEETHOD WE NEED 3 FILES AND FOLDERS TO BE PLACED IN WORKING FOLDER.
1. META-INF FOLDER - GET THIS FROM DOWNLOAD FILES LIST IN FIRST POST
2. SYSTEM FOLDER - TUTORIAL BELOW
3. BOOT.IMG - TUTORIAL BELOW
2. getting system folder
(NOTE - YOU MUST BE ROOTED FOR THIS MEDHOD)- This is universal method and can be done easily using terminal emulator.
For this simply download Terminal Emulator from Android Market.
we need freshly flashed device here. OTHERWISE YOU WILL HAVE LOT OF JUNK FILES. - Open it and type:This will copy all your /system folder to your SDcard with name System.tarQuote:
su
tar -c system/* >> sdcard/system.tar
This will take some time to finish so be patient. - After its done you should have a tar file in your /sdcard named system.tar
You can extract it using Winrar or 7zip software. But yes this will have huge size , as it has other useless folders so you will have to delete them. After extracting this system.tar file you will get following folders (Similar one)Quote:- /etc
- /fonts
- /framework
- /lib
- /lost-found
- /media
- /sd
- /semc
- /usr
- /xbin
- build.prop
- And some other files and folders like ""autorooted,kernel files" etc
Now simply delete the folders marked in red color and its done.Dont worry if you dont have folders with red colors above,we dont need them. - And the final files that we will have in our system folders will beQuote:
- /app
- /bin
- /etc
- /fonts
- /framework
- /lib
- /media
- /semc
- /usr
- /xbin
- build.prop
If it dont have semc folder no need to worry.
NOTE: YOU CAN ALSO GET THIS SYSTEM FOLDER BY USING ANY ROOT BROWSER. JUST FIND THIS FOLDER AND COPY/EXTRACT TO SDCARD - NOW COPY THIS system FOLDER TO WORKING FOLDER
3. getting boot.img
Here we have 2 options
1. stock boot.img from stock rom - simple kernel which we get in brand new mobile.
2. custom boot.img from custom kernel - kernel which are modified for overclock or other featuresQuote:1. getting stock boot.img from stock rom.
extract your stock rom with winrar or 7zip. you will see boot.img there. copy it to working folder
2. getting custom boot.img from custom kernel.- download any custom kernel which is only for your device. [galaxy ace plus [s7500] users get from here or here]
- extract it with winrar or 7zip and copy boot.img to working folder
- First our folder structure should look like this:
- Step Three :change/modify/update rom
YOU CAN MODIFY YOUR ROM IN TWO STEPS:- MODIFY USING ANDROID KITCHEN - for basic modification.
- MODIFY MANUALLY. - for advanced modification.
1. MODIFYING USING ANDROID KITCHENQuote:watch this amazing tutorial by neroyoung on how to editing rom with kitchen
NOTE: DONT FORGET TO DEODEX YOUR ROM
2. MODIFYING MANUALLY.
FOR ALL ANDROID PHONES (ESPECIALLY FOR GINGERBREAD ROMS) USE THIS GUIDE FOR COOL MODS. like center clock,CRT animation, ics and jelly bean style mods etc... ANOTHER GUIDE BY ME- Adding/removing applications
1. Go to the working folder where you extracted your rom, inside you will find:OR
2. Then go to "system/app" inside this folder you will find all the rom applications(apks) you may also find some in the data folder if your rom has this folder.
3. Copy, replace, and change any app(apk) be carefull if you dont know what the apk is do not delete!!
LIST OF APPS YOU CAN DELETE - HERE OR HERE
If you can not find some apps in this guide then try opening all those app in your phone and see app name and icon or move those apps from system/app to sdcard and see what is not working... - Adding new boot animation
android kitchen doesnt works for this in Samsung phones. So we need a different method.
1) Download and extract the bootanimation and samsungani file from Custom Booting.zip attached in first post.
2) Put them in the /system/bin folder and replace the existing files there
3) Now download any boot animation, and rename the bootanimation to “sanim.zip”.
4) Now, navigate to /system/media and replace the “ODEanim” with “sanim.zip”
You are done with the bootanimation change - customizing the theme
1. replace stock launcher with launchers like nova launcher
2. theming using uot kitchen (fonts, status bar, batery and other icons etcQuote: - Edit the gps script for your country/location
1. In the workingfolder/system/etc/ you will find a file named gps.conf, you can
edit this file with notepad++ or even word.
2. using the right gps script in this file can speed up gps lock, you can
find some from angeldeath, download extract and replace the gps.conf. - Adding ringtones :
- Take your ringtone file...it should be in .ogg format..If not then convert it to .ogg..
- Locate to the folder system>media>audio>ringtones>
- Copy and paste your .ogg files here in ringtones folder..
- You can also change notifications, alarm and UI tones like this..
- Changing the Fonts :
- Take your desired font.ttf file and rename it as DroidSans.ttf..
- Locate to the folder system>fonts>
- Now, replace the file DroidSans.ttf with your desired DoridSans.ttf...
- To change the lock screen clock font...replace the Clocktopia.ttf with your desired one..(rename first)..
- build.prop tweaks!!
check this or this or this post for build.prop
NOTE: EDIT BUILD.PROP WITH NOTEPAD++. SIMPLE NOTEPAD WILL CORRUPT THE FILE. - adding mods and scripts...
download mods and scripts from links below and copy past all files in same folder as your rom... like for init.d scripts add them to system/etc/init.d/here and all permissions in updater script to your updater script...(dont forget to give them credit for it...)
links:-- [TweakZV6] Init.d best tweaks[Flashable] Increase your performance by st@matis
- Collection build.prop; init.d; etc. by optik19918
- init.d Tweaks collection by dsexton702
- [SCRIPTS][TWEAKS][CWM]SlaidyBoost-V2.3 by slaid480
- [CWM][SCRIPTS][TWEAKS] Adrenaline™ Engine by ImbaWind
- V6 SuperCharger by zeppelinrox
- [SCRIPTS]CronMod-A2SD/D2EXT/INT2EXT by croniccorey
- Xloud and Bravia engine by aiman112
- AwesomeBEATS™ v.3 by ...Awesome...
- (MOD)Beats Audio(2.3+up) by RockoDev
- Tuned MegaBassBeat by kurotsugi
- Maximum MultiTasking Mods + V6 SuperCharger BY zeppelinrox
- [AROMA] Beats Mode - Enhanced Beats sound V7.5 by MemAllocatoR
- Interactive Phone Modification [GUIDE]
- ICS Style Settings.apk - Make it yourself by balamu96m
- StatusBar Tweaks by Master&Slave™
- Change lockrings on any rom by daveyannihilation
- change ICS lockscreen animation to Honeycomb style by evilisto
- S Voice for any devices [ICS] by PlaYOuT
- Implement Swipe to Remove Notification by hansip87
- Remove SMS log from Call log by wilfredcool007
- Activate the rotation of the lockscreen by GalaxyUser
- How to use AROMA INSTALLER in any ROM/MOD by pankaj88
- All in one tweaks build.prop,init.d,Wifi,Xloud,Bravia,A-Gps,A/V Sync,Modules by XtremePeople
- Add 6 lockscreens Mod + Lockscreen Gestures by pratyush.creed
- How to add customizable 14 statusbar toggle buttons for samsung ROM by lidroid
- Create a custom notification dropdown by jeffsanace
these are few i love, find more yourself...
- MORE WILL BE ADDED SOON...


Available link for download
How to flash Galaxy S2 i9100 4 2 2 Custom ROM Super Nexus 2 0 Updated
How to flash Galaxy S2 i9100 4 2 2 Custom ROM Super Nexus 2 0 Updated

There are many custom ROMs in XDA but i like Super Nexus ROM. I started using this ROM since its 4.0.4 build and i am really satisfied with it. In my Galaxy S2 ,now i am using Super Nexus 2.0 build 3. Its really smooth. Thanks to Faryaab for making this amazing ROM.
Super Nexus 2.0 gives vanilla android experience like Googles nexus devices. The ROM is entirely built from Googles AOSP Source with lot of improvements and optimizations and removed all the third party apps(ZERO Bloatware).
Update:
I was using XWLS8 4.1.2 now again switched back to Super Nexus 2.0. Now its on Android 4.2.2 the latest one recently started giving to Nexus device only.
System Details:
- Android 4.2.2 Jelly Bean (JOP40D - Android-4.2.2_r1)
- Latest CM Kernel
- All Jelly Bean Features and Apps (Nothing excluded from AOSP)
- No Visual Changes!
- Stock Jelly Bean Look and Feel
ROM Features:
Show / Hide Content
Note:
- Phone must be rooted and Clockworkmod Recovery (CWM) installed.
- Backup your data
- battery must be 70% or above.
- download links provided on this post is only for Galaxy S2 i9100 .. if you have a different device visit forum thread to get download link.
Note from developer
Philz kernel and recovery causes some kind of issues with AOSP ROM installations, please use CF-Root, Siyah, CM or Dorimanx kernel before flashing SuperNexus.
Disclaimer : Rooting / Flashing may brick your phone we are not responsible for any damage. Do at your risk.
How to flash Super Nexus 2.0 on Galaxy S2 i9100
1. Download Super Nexus 2.0 BUILD 3 From XDA threadfrom here2. Download Gapps for Jelly Bean from here
3. Copy both downloaded files to internal SD card.
4. Switch off your phone and wait till vibrate.
5. Boot in to Clockworkmod recovery ( Volume up + Home + Power )
6. Do a Wipe data/factory reset.
7. select install zip from sdcard.
8. select choose zip from internal sdcard.
9. select SuperNexus-2.0-i9100-BUILD3.zip and install..after installation.
10. select gapps-jb-20121212-signed.zip and install...after installation.
11. select reboot system now.
Thats it wait till the phone reboots...!
Available link for download
Thursday, November 10, 2016
GIGABYTE Z170X Gaming G1 Custom Build
GIGABYTE Z170X Gaming G1 Custom Build
Here is a GIGABYTE Z170X Gaming G1 custom build weve been working on for our Intel Roadshow. Share it with your friends if you like it!
SYSTEM SPEC:
- GIGABYTE Z170X Gaming G1
- Intel 6700K @4.5GHz
- GIGABYTE 290X GPU
- Corsair H110i watercooling
- Corsair 16GB Vengeance DDR4 3200MHz
- Corsair AX760 PSU
- Corsair 512GB Force SSD
- Inwin 805 case
- Bitfenix LEDs
- Bitfenix LED Fans
- Bitfenix Cable Sleeving
- Windows 10 Pro


View Full Album
Available link for download
Sunday, October 23, 2016
How To Fix Custom Binary Blocked by FRP on Samsung Galaxy J1 J5 J7
How To Fix Custom Binary Blocked by FRP on Samsung Galaxy J1 J5 J7
How To Fix Custom Binary Blocked by FRP on Samsung Galaxy J1-J5-J7
please subscribe my youtube channel
youtube:.youtube.com/howtounlock
like us on facebook.com
facebook:. www.facebook.com/libuledi
Google Plus:. https://plus.google.com/+Howtounloc
blogger:. http://how-2unlock.blogspot.com/
tags
samsung, frp, custom binary blocked by frp lock, custom binary blocked by frp, lock, j7, j5, galaxy, j2, binary, custom, custom binary blocked by frp lock s6 edge plus, custom binary blocked by frp lock samsung galaxy core prime, custom binary blocked by frp lock note 5, by, note 5, j3, blocked, fix, how to, s6, bypass, factory, reset, frp lock, samsung galaxy s5 neo, kies 3, recovery g925p, how to fix brick error custom binary blocked by frp all samsung mobile, s5, smart switch, j1, , phone, edge
Available link for download
Subscribe to:
Posts (Atom)