Showing posts with label like. Show all posts
Showing posts with label like. Show all posts
Monday, February 13, 2017
how to edit your photo with Adobe photoshop like photoshop profesional Adobe photoshop tutorials
how to edit your photo with Adobe photoshop like photoshop profesional Adobe photoshop tutorials
how to edit your photo with Adobe photoshop like photoshop profesional- Adobe photoshop tutorials

Learn how to create a surreal scene of waterfall mountains in Photoshop. In this tutorial I’ll show how you can merge different stock images to accomplish a surreal and fantastic scene of waterfall mountains. You’ll learn how you can create amazing lights effects, blending mountains stocks into a cohesive scene, enhancing light effects and creating a magnificent natural environment of waterfalls. I’ll also give you some quick tip for blending mountains stocks, so what are you waiting for ? Just click on read more button and then captive yourself into the beauty of waterfall mountains.
What you’ll be creating
We’ll begin with setting up our basic ambient that includes mountains, waterfalls and sky. Then we’ll select each image to adjust them using adjustment layers. We’ll also add some more stocks such as waterfalls, eagle to the scene using blending techniques. After that we’ll blend model to the scene by creating shadows and using adjustment layers. At the end we’ll create light effects and then finally we’ll finish it up using Final Adjustments layers. Note :that I am using Adobe Photoshop CC 2014 for this tutorial but you can follow it using Photoshop CS3 or newer.
Step 1
Start by creating a new document by selecting File > New and then set the setting as shown in the image below or feel free to choose your own setting.

Step 2
Place the cliff image to the main document by selecting File > Place Embedded or Place. Then place it to the right side of document.

Step 3
Now place the mountain 1 image under the cliff layer.

Step 4
Add a layer mask to cliff layer ( to add layer mask, select Layer > Layer Mask > Reveall All). Activate the Brush tool (B) and set it’s opacity about 30%. Then using a soft round black brush hide the highlighted red parts of cliff image to blend it with mountain 1 layer.

Here are the results.

Step 5
You may notice that the platform for waterfall in cliff layer also hided while masking. So we need new platform for waterfall so it’s look like it is falling from the cliff. To achieve this, place the waterfall 1 image under the cliff layer as shown in the image below. The best part of this image is that it has same falling waterfall as we’ve have in cliff image and you can also use it to blend it with cliff waterfall.

Add layer mask to it and then hide all the parts of waterfall 1 layer except it’s top part (peak) using same brush setting in previous step. Here are the results with added part of waterfall 1 image.

Step 6
You may also notice that left part of document is still empty. So let’s add some more stock to the document. Add the mountain 2 image below the mountain 1 layer. I am hiding the visibility for the rest of the layers so you can clearly see how I placed the mountain 2 image.

Here are results with all layers.

Step 7
Add a layer mask to mountain 1 layer and using a soft round black brush hide the highlighted red parts of mountain 1.

Here are the results. Don’t worry about the rough masking, we’ll blend them in next couples of step. I am leaving some parts because we’ll fill up all the parts using waterfall stocks. If you don’t want to leave them then mask it as well and further you can use the mountain 1 layer below parts when you feel that I need some more parts of mountain 1 layer.

Step 8
Add the waterfall 2 image below the mountain 1 layer but above the mountain 2. Resize it using transform tool (CTRL + T), so we get the waterfall. You may also notice I am placing it below the mountain 1 layer so I can cover rough masking parts of mountain 1 layer. Since the both images parts matches with each other therefore we are free to add any parts either of waterfall or mountain 1 layer. That we’ll make the blending easier.

Add layer mask to the mountain 2 layer. Using a soft round black brush hide the highlighted part of waterfall 2 image to blend it properly.

Here are the results

Step 9
I need some more parts of mountain 1 layer over the waterfall 2 layer to cover it up. To do this, duplicate the mountain 1 layer by pressing (CTRL + J) on keyboard. Move it little bit to left as shown in the image below.

Hide all the parts of mountain 1 layer using layer mask but keep some parts above the waterfall 2. Here you can see that how I covered it over the waterfall 2 layer.

Step 10
As you can see in the previous step I’ve kept some parts of waterfall 2 (hard edges) and to blend it we’ll use the same waterfall 2 image. So place the waterfall 2 image again (above waterfall 2 layer) and this time transform it shown in the image below as we only want the bush parts of this image. Also name it ‘Waterfall 2 again’

Here you can see how I placed it after transforming it.

Hide all the parts of ‘waterfall 2 again’ layer using layer mask but keep the selected parts (see the image below) of ‘waterfall 2 again’ layer to blend it with waterfall 2 layer.

Here are the results after masking. As you can see we’ve very decent blending for all the stock images.
Available link for download
Thursday, January 26, 2017
How To Get A Unity Like HUD Searchable Menu In Xubuntu Ubuntu MATE Linux Mint More
How To Get A Unity Like HUD Searchable Menu In Xubuntu Ubuntu MATE Linux Mint More
Youre probably familiar with the Unity HUD, or Head-Up Display, which lets you search through and applications menu. Thanks to Rafael Bocquets i3-hud-menu (and J.A. McNaughtons fork), you can use this menu search feature in pretty much any desktop environment (and in any Linux distribution in which you can install unity-gtk-module).
i3-hud-menu allows searching and navigating through an applications menu using the keyboard, with the use of dmenu (dmenu doesnt have mouse support by default). Heres how it looks like in Xubuntu 16.04:

And in Linux Mint 17.3 Cinnamon:

i3-hud-menu works with GTK2, GTK3 (but not client-side decorated apps) and Qt4 applications.
i3-hud-menu works with GTK2, GTK3 (but not client-side decorated apps) and Qt4 applications.
The tool is buggy with Qt5 applications as well as LibreOffice - see the limitations / issues section below for more information.
Important: issues and limitations
i3-hud-menu has quite a few issues / limitations but I decided to post an article about it anyway since some of you might still find it useful.
Also, Im hoping someone reading this article might be able to fix or at least come up with some workarounds for some of the issues below. If you do, please let us know in the comments!
i3-hud-menu limitations / issues:
- it doesnt work with client-side decorated applications;
- it doesnt work with Firefox or Thunderbird;
- it doesnt work with Qt5 apps (make sure appmenu-qt5 and libdbusmenu-qt5 are not installed or else you wont have a menu for Qt5 apps, such as VLC in Ubuntu 16.04 - if you do install those packages, you can use the menu via i3-hud-menu, but the actual menu wont be visible in the application);
- using it, LibreOffice no longer has a menu if the "libreoffice-gtk" package is installed - this package is used for GTK+ integration (though using i3-hud-menu, you can search the menu, but actually using the menu items doesnt work for some reason);
- to get i3-hud-menu to work with Java swing applications, youll need JAyatana;
- probably more.
It appears that the LibreOffice and the Qt5 applications issue occur because "APPMENU_DISPLAY_BOTH=1" is not respected. Furthermore, using "UBUNTU_MENUPROXY=" (for example, using "UBUNTU_MENUPROXY= libreoffice --writer") or blacklisting it via Dconf Editor (com > canonical > unity-gtk-module > blacklist) doesnt get the LibreOffice menu to show up.
On Arch Linux (possibly in other Linux distributions as well), which requires the unity-gtk-module-standalone-bzr package, you need to run the following command (or change this via Dconf Editor: com > canonical > unity-gtk-module, set gtk2-shell-shows-menubar to "false") and reboot to ensure that menus are displayed in GTK applications:
gsettings set com.canonical.unity-gtk-module gtk2-shell-shows-menubar falseInstall and configure i3-hud-menu
Important note: I included exact instructions for Xubuntu, Ubuntu MATE and Linux Mint Cinnamon edition, but this should work with any Ubuntu or Linux Mint flavor (14.04 and newer only). It may also work in other Linux distributions, as long as you can install unity-gtk-module and appmenu-qt.
1. Install the required dependencies: python3, python-dbus, dmenu, appmenu-qt and unity-gtk-module.
In Ubuntu (14.04 and newer), use the following command (will also install "wget", required under step 2):
sudo apt install python3 python-dbus dmenu appmenu-qt unity-gtk2-module unity-gtk3-module wget2. Download and install i3-hud-menu
To download and install J.A. McNaughtons i3-hud-menu fork from the command line, use the following commands:
cd /tmp
wget https://github.com/jamcnaughton/i3-hud-menu/archive/master.tar.gz
tar -xvf master.tar.gz
sudo mkdir -p /opt/i3-hud-menu
sudo cp -r i3-hud-menu-master/* /opt/i3-hud-menu/
If you want to install it yourself, grab the code from GitHub (but note that the instructions below assume that youve installed i3-hud-menu in /opt/i3-hud-menu/)
3. Load the Unity gtk module
Open ~/.profile with a text editor (".profile" is a hidden file in your home folder so use Ctrl + H to see hidden files in your gile manager), paste the following at the end of the file:
export APPMENU_DISPLAY_BOTH=1
if [ -n "$GTK_MODULES" ]
then
 GTK_MODULES="$GTK_MODULES:unity-gtk-module"
else
 GTK_MODULES="unity-gtk-module"
fi

if [ -z "$UBUNTU_MENUPROXY" ]
then
 UBUNTU_MENUPROXY=1
fi

export GTK_MODULES
export UBUNTU_MENUPROXYIf after completing all the steps below, i3-hud-menu doesnt work, you can try to paste the lines above in ~/.bashrc instead of ~/.profile.
4. Add i3-appmenu-service.py to startup
The next step is to add i3-appmenu-service.py to the system startup. If youve installed i3-hud-menu using the commands above, this file should be located in /opt/i3-hud-menu/
Xubuntu: To add i3-appmenu-service.py to startup, launch Session and Startup from the menu / System Settings, and on the "Application Autostart" tab click "Add", enter "i3 menu service" under "Name", and "/opt/i3-hud-menu/i3-appmenu-service.py" (without the quotes) under "Command":

Ubuntu MATE: launch Control Center and open Startup Applications, click "Add", use "i3 menu service" under "Name", and "/opt/i3-hud-menu/i3-appmenu-service.py" (without the quotes) under "Command", and click "Add":

Linux Mint (Cinnamon): launch Startup Applications from the menu, click Add > Custom Command, use "i3 menu service" under "Name", and "/opt/i3-hud-menu/i3-appmenu-service.py" (without the quotes) under "Command", and click "Add":

5. Assign a keyboard shortcut to i3-hud-menu.py
The keyboard shortcut you assign to i3-hud-menu.py will be used to open i3-hud-menu and search through an applications menu. Heres how to configure it in some Ubuntu flavors and Linux Mint (Cinnamon).
Xubuntu: open "Keyboard" from the menu / System Settings, and on the "Application Shortcuts" tab, click "Add". Use "/opt/i3-hud-menu/i3-hud-menu.py" (without the quotes; if youve installed i3-hud-menu to a different location, make sure you use the correct path) for the command, click "OK:

... and assign it a keyboard shortcut:

You can even use "Alt", like in Ubuntu (with Unity), but I dont recommend it as you wont be able to use other shortcuts that use Alt. You can use something like Alt + 1 or any other keyboard shortcut thats not already in use.
Ubuntu MATE: from Control Center open Keyboard Shortcuts, click "Add", under "Name" enter "i3-hud-menu" (without the quotes), and use "/opt/i3-hud-menu/i3-hud-menu.py" (without the quotes; if youve installed i3-hud-menu to a different location, make sure you use the correct path) for "Command":

... and assign it a keyboard shortcut. Note that unlike Xubuntu, Ubuntu MATE doesnt allow assigning Alt as a shortcut. You can use something like Alt + 1 or whatever other keyboard shortcut you want, but make sure its not already in use.
Linux Mint (Cinnamon): launch Keyboard from the menu, click "Add custom shortcut", enter "i3-hud-menu" (without the quotes) under "Name", "/opt/i3-hud-menu/i3-hud-menu.py" (without the quotes; if youve installed i3-hud-menu to a different location, make sure you use the correct path) under "Command" and click "Add":

... and assign it a keyboard shortcut.
6. And finally, restart the session (logout/login), focus an application and use the keyboard shortcut you set in step 5 to open i3-hud-menu.
via / further reference:
- Reddit (thanks to JaZoray)
- jamcnaughton.com

Available link for download
Friday, December 30, 2016
How To Easily Access WiFi Mobile Data Bluetooth GPS Like Toggles Setting Screen in Samsung Stock ROMS
How To Easily Access WiFi Mobile Data Bluetooth GPS Like Toggles Setting Screen in Samsung Stock ROMS

For example if we want to receive files via Bluetooth we need to change the visibility settings if the device not paired. In this case, we can access the Bluetooth visibility settings by long pressing the Bluetooth toggle button. The feature may familiar to many Samsung users. But still its worth writing here if its helpful for any new user.
This feature is tested on TouchWiz Nature UX version dont know if its available in older TouchWiz version.
Method:
Long Press on the corresponding Toggle to access the settings screen.
Available link for download
Thursday, December 15, 2016
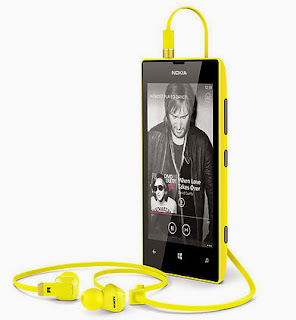
How To Fix Nokia Lumia Headphone Jack Problems Like One side Only Low Volume etc
How To Fix Nokia Lumia Headphone Jack Problems Like One side Only Low Volume etc
Last week my friend bought Nokia Lumia 625. The phone is amazing in looks and build quality. It has a great spec for the price tag expect the 512 MB RAM and the lack of NFC and magnetic sensor. It could be better if it has a 1 GB RAM as some of the games in the windows app store are optimized only for 1 GB RAM only. Even it has 512 MB RAM there is no hang or lag issues that we are facing in the low end Android mobiles.
After using 3 days he faced a problem with the headphone jack. In headphone the sound was only coming in one side. The same headphone tested with galaxy S3 and worked fine. We tried using S3 headset, but no luck. According to Google search results the headphone problem is a common issue in almost all Lumia phones mostly in 520,620,625,720,820,920 etc. Finally, I found a simple and working solution commented by MaulerX at WP Central forum.
Solution
- Restart the Phone
Thats It....Tested and Works Fine in Lumia 625.
source
Available link for download
Monday, October 3, 2016
How To Change NotePad Default Shortcut Keys For Plugins Like Emmet Intent By Fold Etc
How To Change NotePad Default Shortcut Keys For Plugins Like Emmet Intent By Fold Etc
 In Windows Platform, Notepad++ is the most popular code Editor among the developers. Its code highlighting available on a wide range of languages includes Java, PHP,HTML,CSS, XML, etc. The availability of wide range of plugins extends Notepad++ to the level of premium IDEs.
Shortcut keys will be more helpful when the keys are handy for the user. It depends by the user. Most of the popular Notepad++ plugins like Emmet, Indent By Fold, etc. has a default shortcut to execute the command. But many users like to change it to another hot-key which feels more comfortable for them.
Luckily in Notepad++ we have the option to change or assign new shortcut keys for the built-in Notepad++ commands and the third party plugin commands. In this post I included the simple steps to change the default shortcut keys in Notepad++ code editor.
Change Notepad++ Short cut Keys
1. Open Notepad++2. Goto Settings -> Shortcut Mapper..
3. To change plugin shortcut click on Plugin Command tab
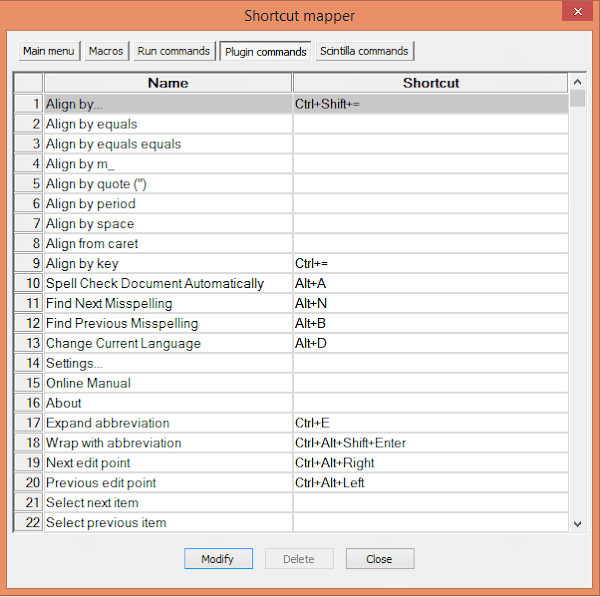
4. In the shortcut mapper window...double click on the desired command you wish to change or select the command and click Modify.
5. Modify to the desired one...
(For example, if You need Ctrl + E for Expand Abbreviation, then the selection will be like in the image below)

6. Finally, Click OK...Restart NotePad++. Thats it.
Available link for download
Subscribe to:
Posts (Atom)