Increase volume of any android device[fully working method]
Some of our phones have very low speaker output. This is because of the default handsets settings, but this problem can be overcome by some tricks using some apps. Even the quality of sound can be increased with a touch of awesome bass and treble. So lets get started.
This post is divided into two parts one is for non rooted users and the other for rooted users.==> NON ROOTED USERS
This can be done by either MTK engineering mode which works on devices having MTK(MediaTek) chipsets or those who dont have MTK they can simply use the Volume+ app which works on all devices.Using MTK Engineer Mode
Step 1- Enter *#*#3646633#*#* in the dialpad.
Step 2- Enter engineer mode (MTK).
Step 3- Snap towards right and go to hardware testing.
Step 4- Select Audio option.
Step 5- Go to LoudSpeaker mode.
Step 6- In this default value is 128 change that value to 140 (or according to your requirements) and press set.
Step 7- Dont exceed this value above 145 or 150 it may damage your speaker.
Step 8- Now close the engineer mode and check the volume of your device.You will feel the change in your audio.
NOTE- THIS METHOD ONLY WORKS ON DEVICES HAVING MTK CHIPSET SO FOR DEVICES HAVING SNAPDRAGON OR OTHER CHIPSETS CHECK OUT SECOND METHOD.

Using App Volume+
Download and install Volume+ app the link is given below.
This works on both rooted and non rooted devices!!
Step 1- Open app and go to speaker settings.(as shown in screenshot)
 Step 2- Enable Audio or Speaker Modifications.
Step 3- Change volume level to 10 (max for some devices) or upto 20 depending upon the desired output.
Done!!
==> Volume+ App download <==
==>NOW FOR ROOTED USERS
Viper4Android
It is a brilliant app for the rooted users. It increases the sound quality with a polished good bass quality enhancement. So if your device have poor or has average audio quality and you area rooted android user then this app is the one and only perfect solution for your problem. It is an all in one audio control system that supports almost all the devices from
Android 2.3 to Android 4.4.


Download link is given below so lets get started.
NOTE- INSTALL BUSYBOX FROM PLAYSTORE AND INSTALL THE BINARIES AND REBOOT YOUR DEVICE.
Step 1- Download ViPER4Android and extract the file. You will get two file namely ViPER4Android_FX_A4.x.apk and ViPER4Android_FX_A2.3.apk. So if you are on Android 2.3 or above
install ViPER4Android_FX_A2.3.apk and if you are using Android 4.0 or above install ViPER4Android_FX_A4.x.apk.
Step 2- Install the application.
Step 3- Open the app and grant superuser permission a pop up will come having three options Super Audio Quality, High Audio Quality and Power Saving. Select Super Audio Quality.
Step 4- Reboot your device for proper drivers installation.
Step 5- Open the app go to phone speaker option enable it. Now choose between different equalizers for best Audio experience.
DONE!!
==> Click here to Download Viper <==
 Comparing to Windows, Ubuntu has more restriction in the file system and other system settings. To change some root level configurations you need to enter root password. By default the Root account password is locked in Ubuntu. In this case you can either change the default root password or use sudo command to login as root user which is stored by default for 15 minutes. After that time, you will need to enter your password again.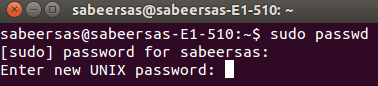
 In Windows Platform, Notepad++ is the most popular code Editor among the developers. Its code highlighting available on a wide range of languages includes Java, PHP,HTML,CSS, XML, etc. The availability of wide range of plugins extends Notepad++ to the level of premium IDEs.