Showing posts with label mint. Show all posts
Showing posts with label mint. Show all posts
Sunday, March 5, 2017
How To Get Flash And H 264 To Work In Vivaldi Browser Ubuntu Linux Mint
How To Get Flash And H 264 To Work In Vivaldi Browser Ubuntu Linux Mint
Vivaldi 1.0 stable was released today and if you gave it a try, you might have noticed, at least on a fresh Ubuntu installation, that Flash and H.264 dont work out of the box.
Heres how to get Adobe Flash and H.264 (used, for instance, by the YouTube HTML5 player) to work with Vivaldi browser, in Ubuntu, Linux Mint and derivatives.
Get Vivaldi browser to support H.264
 |
| Before installing "chromium-codecs-ffmpeg-extra" |
 |
| After installing "chromium-codecs-ffmpeg-extra" |
To enable H.264 support for Vivaldi in Ubuntu, you need to install a package called "chromium-codecs-ffmpeg-extra".
This is already available if Chromium browser is installed on your system. If you dont have Chromium browser, you can install the package that provides H.264 support by using the following command:
sudo apt-get install chromium-codecs-ffmpeg-extraAnd restart Vivaldi.
You can check if your browser supports H.264 by visiting the YouTube HTML5 page.
Get Adobe Flash working in Vivaldi Browser
Important note: since Google Chrome is now only available for 64bit on Linux, it means that its Pepper Flash plugin is also only available on 64bit. So the instructions below only work on 64bit! Flash might work on Vivaldi 32bit if you have an old Google Chrome for 32bit installed, but it wont receive any updates so you shouldnt use it.
Vivaldi supports the Google Chrome built-in Pepper Flash plugin, but it doesnt come bundled with it. If you have Google Chrome installed on your system, Vivaldi should already be using its Pepper Flash plugin, so theres nothing you need to do.
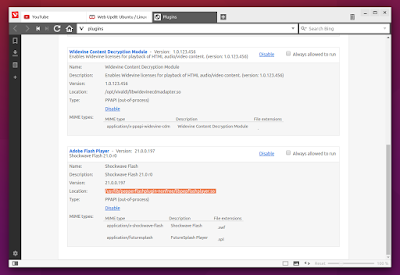
If Google Chrome is not installed on your system, to get Vivaldi browser to use the Google Chrome Pepper Flash plugin, you can install a package called "pepperflashplugin-nonfree".
The package is available in Ubuntu 14.04, 15.04, 14.10 and 16.04 / Linux Mint 17.x and derivatives and you can install it by using the following command:
The package is available in Ubuntu 14.04, 15.04, 14.10 and 16.04 / Linux Mint 17.x and derivatives and you can install it by using the following command:
sudo apt-get install pepperflashplugin-nonfreeThen restart Vivaldi. Thats it!
Update: the bug that caused pepperflashplugin-nonfree not to work in Ubuntu 16.04 was fixed.
Extra tip:
If Google Chrome is installed, Vivaldi will automatically pick up its Widevine Content Decryption plugin (it comes with a symbolic link to the location of the libwidevinecdm.so plugin in the Google Chrome stable installation folder).
If you dont want to install Google Chrome and you need this plugin, you can extract libwidevinecdm.so from the Google Chrome deb and place it in /opt/vivaldi/, replacing the existing symbolic link.
thanks to B.Jay for the tip!

Available link for download

Thursday, January 26, 2017
How To Get A Unity Like HUD Searchable Menu In Xubuntu Ubuntu MATE Linux Mint More
How To Get A Unity Like HUD Searchable Menu In Xubuntu Ubuntu MATE Linux Mint More
Youre probably familiar with the Unity HUD, or Head-Up Display, which lets you search through and applications menu. Thanks to Rafael Bocquets i3-hud-menu (and J.A. McNaughtons fork), you can use this menu search feature in pretty much any desktop environment (and in any Linux distribution in which you can install unity-gtk-module).
i3-hud-menu allows searching and navigating through an applications menu using the keyboard, with the use of dmenu (dmenu doesnt have mouse support by default). Heres how it looks like in Xubuntu 16.04:
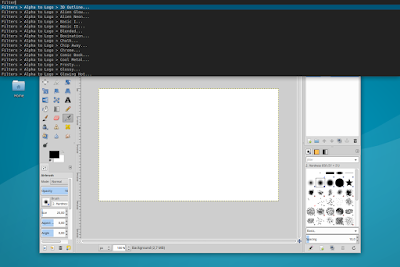
And in Linux Mint 17.3 Cinnamon:

i3-hud-menu works with GTK2, GTK3 (but not client-side decorated apps) and Qt4 applications.
i3-hud-menu works with GTK2, GTK3 (but not client-side decorated apps) and Qt4 applications.
The tool is buggy with Qt5 applications as well as LibreOffice - see the limitations / issues section below for more information.
Important: issues and limitations
i3-hud-menu has quite a few issues / limitations but I decided to post an article about it anyway since some of you might still find it useful.
Also, Im hoping someone reading this article might be able to fix or at least come up with some workarounds for some of the issues below. If you do, please let us know in the comments!
i3-hud-menu limitations / issues:
- it doesnt work with client-side decorated applications;
- it doesnt work with Firefox or Thunderbird;
- it doesnt work with Qt5 apps (make sure appmenu-qt5 and libdbusmenu-qt5 are not installed or else you wont have a menu for Qt5 apps, such as VLC in Ubuntu 16.04 - if you do install those packages, you can use the menu via i3-hud-menu, but the actual menu wont be visible in the application);
- using it, LibreOffice no longer has a menu if the "libreoffice-gtk" package is installed - this package is used for GTK+ integration (though using i3-hud-menu, you can search the menu, but actually using the menu items doesnt work for some reason);
- to get i3-hud-menu to work with Java swing applications, youll need JAyatana;
- probably more.
It appears that the LibreOffice and the Qt5 applications issue occur because "APPMENU_DISPLAY_BOTH=1" is not respected. Furthermore, using "UBUNTU_MENUPROXY=" (for example, using "UBUNTU_MENUPROXY= libreoffice --writer") or blacklisting it via Dconf Editor (com > canonical > unity-gtk-module > blacklist) doesnt get the LibreOffice menu to show up.
On Arch Linux (possibly in other Linux distributions as well), which requires the unity-gtk-module-standalone-bzr package, you need to run the following command (or change this via Dconf Editor: com > canonical > unity-gtk-module, set gtk2-shell-shows-menubar to "false") and reboot to ensure that menus are displayed in GTK applications:
gsettings set com.canonical.unity-gtk-module gtk2-shell-shows-menubar falseInstall and configure i3-hud-menu
Important note: I included exact instructions for Xubuntu, Ubuntu MATE and Linux Mint Cinnamon edition, but this should work with any Ubuntu or Linux Mint flavor (14.04 and newer only). It may also work in other Linux distributions, as long as you can install unity-gtk-module and appmenu-qt.
1. Install the required dependencies: python3, python-dbus, dmenu, appmenu-qt and unity-gtk-module.
In Ubuntu (14.04 and newer), use the following command (will also install "wget", required under step 2):
sudo apt install python3 python-dbus dmenu appmenu-qt unity-gtk2-module unity-gtk3-module wget2. Download and install i3-hud-menu
To download and install J.A. McNaughtons i3-hud-menu fork from the command line, use the following commands:
cd /tmp
wget https://github.com/jamcnaughton/i3-hud-menu/archive/master.tar.gz
tar -xvf master.tar.gz
sudo mkdir -p /opt/i3-hud-menu
sudo cp -r i3-hud-menu-master/* /opt/i3-hud-menu/
If you want to install it yourself, grab the code from GitHub (but note that the instructions below assume that youve installed i3-hud-menu in /opt/i3-hud-menu/)
3. Load the Unity gtk module
Open ~/.profile with a text editor (".profile" is a hidden file in your home folder so use Ctrl + H to see hidden files in your gile manager), paste the following at the end of the file:
export APPMENU_DISPLAY_BOTH=1
if [ -n "$GTK_MODULES" ]
then
 GTK_MODULES="$GTK_MODULES:unity-gtk-module"
else
 GTK_MODULES="unity-gtk-module"
fi

if [ -z "$UBUNTU_MENUPROXY" ]
then
 UBUNTU_MENUPROXY=1
fi

export GTK_MODULES
export UBUNTU_MENUPROXYIf after completing all the steps below, i3-hud-menu doesnt work, you can try to paste the lines above in ~/.bashrc instead of ~/.profile.
4. Add i3-appmenu-service.py to startup
The next step is to add i3-appmenu-service.py to the system startup. If youve installed i3-hud-menu using the commands above, this file should be located in /opt/i3-hud-menu/
Xubuntu: To add i3-appmenu-service.py to startup, launch Session and Startup from the menu / System Settings, and on the "Application Autostart" tab click "Add", enter "i3 menu service" under "Name", and "/opt/i3-hud-menu/i3-appmenu-service.py" (without the quotes) under "Command":

Ubuntu MATE: launch Control Center and open Startup Applications, click "Add", use "i3 menu service" under "Name", and "/opt/i3-hud-menu/i3-appmenu-service.py" (without the quotes) under "Command", and click "Add":

Linux Mint (Cinnamon): launch Startup Applications from the menu, click Add > Custom Command, use "i3 menu service" under "Name", and "/opt/i3-hud-menu/i3-appmenu-service.py" (without the quotes) under "Command", and click "Add":

5. Assign a keyboard shortcut to i3-hud-menu.py
The keyboard shortcut you assign to i3-hud-menu.py will be used to open i3-hud-menu and search through an applications menu. Heres how to configure it in some Ubuntu flavors and Linux Mint (Cinnamon).
Xubuntu: open "Keyboard" from the menu / System Settings, and on the "Application Shortcuts" tab, click "Add". Use "/opt/i3-hud-menu/i3-hud-menu.py" (without the quotes; if youve installed i3-hud-menu to a different location, make sure you use the correct path) for the command, click "OK:

... and assign it a keyboard shortcut:

You can even use "Alt", like in Ubuntu (with Unity), but I dont recommend it as you wont be able to use other shortcuts that use Alt. You can use something like Alt + 1 or any other keyboard shortcut thats not already in use.
Ubuntu MATE: from Control Center open Keyboard Shortcuts, click "Add", under "Name" enter "i3-hud-menu" (without the quotes), and use "/opt/i3-hud-menu/i3-hud-menu.py" (without the quotes; if youve installed i3-hud-menu to a different location, make sure you use the correct path) for "Command":

... and assign it a keyboard shortcut. Note that unlike Xubuntu, Ubuntu MATE doesnt allow assigning Alt as a shortcut. You can use something like Alt + 1 or whatever other keyboard shortcut you want, but make sure its not already in use.
Linux Mint (Cinnamon): launch Keyboard from the menu, click "Add custom shortcut", enter "i3-hud-menu" (without the quotes) under "Name", "/opt/i3-hud-menu/i3-hud-menu.py" (without the quotes; if youve installed i3-hud-menu to a different location, make sure you use the correct path) under "Command" and click "Add":

... and assign it a keyboard shortcut.
6. And finally, restart the session (logout/login), focus an application and use the keyboard shortcut you set in step 5 to open i3-hud-menu.
via / further reference:
- Reddit (thanks to JaZoray)
- jamcnaughton.com
Available link for download
Subscribe to:
Posts (Atom)