Thursday, April 13, 2017
Ganti Icon Cursor Blogger
Ganti Icon Cursor Blogger

Kali ini saya akan memposting tentang bagaimana cara mengganti cursor di bloger. sebenarnya artikel yang membahas tentang masalah ini sangat banyak bertebaran di internet dan cara-cara yang digunakan juga
sangat berfariasi, tapi kali ini saya akan membahas tentang cara yang saya anggap paling simpel dan mudah, ahh... gak usah panjang-panjang lagi basa-basinya tar malah temen-temen bosen bacanya... gini ni caranya....
Seperti biasa kamu login dulu di blog kamu....
Terus... kamu pilih "Tata Letak" Terus... pada "Elemen Laman" kamu klik "Tambah Gadget"
Terus... kamu pilih Gadget "HTML/Java Script" kemudian kamu copy kode dibawah dan paste pada gadget HTML/Java script tadi.
<style type="text/css">body {cursor:url("http://img1.blogblog.com/img/icon18_wrench_allbkg.png"),default}</style>
Terus kamu "Simpan" dan lihat hasilnya....
Kamu juga bisa mengganti jenis coursornya sesuai dengan pilihan mu... dengan cara merubah isi URL dari kode tadi. dan ingat gambar yang akan kamu gunakan sebaiknya berukuran micro agar tidak terlalu berat dan dengan format *.png, *.ico,*.cur, maupun *.ani dan *.gif tapi untuk gambar dengan format *.ani dan *.gif hanya berfungsi pada web browser tertentu saja, salah satunya adalah IE.
terus.... kalau kamu bingung mau nyari gambar cursor dimana kamu bisa disini atau tanya sama mbah google.
Available link for download
GNOME 3 18 Released See What s New
GNOME 3 18 Released See What s New

Changes in GNOME 3.18

Yet another new feature in GNOME 3.18, which you might not notice at first, is automatic screen brightness, for computers that have an integrated light sensor. This feature is enabled by default and it can be disabled from the Power settings.
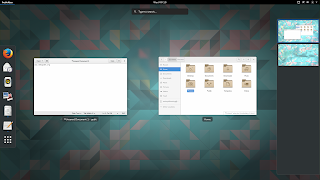
Other changes:
- improved touchscreen support: its now easier to select, cut, copy and paste text using a touchscreen, via new popovers and also, the handles used to adjust text selections have been made bigger;
- Kinetic scrolling (scrolling feels physical) is now handled by GTK+ - this should fix this type of scrolling if it didnt work for you previously. Furthermore, a new auto-scroll feature has been added (to activate it, press the scrollbar with the right mouse or touchpad button);
- the latest GTK+ 3.18 includes new typographic features such as colored underlines, letterspacing and translucent font colors as well as support for custom font maps and font options;
- various Wayland improvements, including HiDPI support (as well as HiDPI cursor support), support for copy, paste and drag and drop between windows, including between two Wayland apps and between Wayland and X11 apps, GTK+ OpenGL support under Wayland and more. Also, its now possible to use multitouch gestures such as pinch to zoom and rotate with a touchpad (previously, they were only available with a touchscreen);
- Bluetooth sharing has been merged into the main Bluetooth settings, so it is easier to find;
- The animation of progress spinners has been made super smooth.
GNOME applications
- the files places sidebar, displayed in the Files app and in open and save dialogs, has been reworked and it now includes a new location, called "Other Locations", which provides a useful overview of local and network locations;
- the copy/move dialog is now in the form of a button on the Files toolbar which shows progress information along with more information when pressed;
- improved folder creation as well as file and folder renaming - these now use dialogs and popovers (according to the release notes, these changes were introduced following user testing results);
- search as you type has been added to the open and save dialogs;
- placeholders are now displayed when folders are empty, or when no search results are found;
- recursive search is now automatically disabled when searching remote locations, in order to prevent performance problems;
- theres a new option in Dconf (org > gnome > nautilus > preferences) which allows disabling recursive search. When disabled, the search will only look for files and folders in the current directory, ignoring subfolders.
- recent files lists have been improved, and now show the full location of each file;
- Google Drive integration (which I already mentioned above).

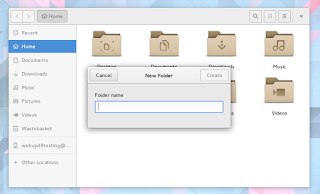
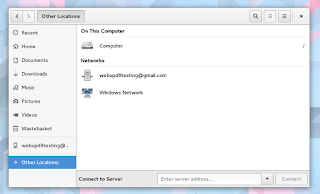


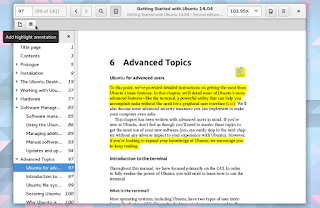
Changes in other GNOME applications:
- Maps is now able to indicate your direction as well as location. It is also possible to enter latitude/longitude coordinates or a geoURI;
- Web, the GNOME browser is faster and also, the screen will no longer automatically lock when you are watching a fullscreen video in Web;
- Builder has a new workspace system which allows different panels to be added and removed, a new appearance for the pop-up command bar, a new shortcuts window (to open it, use Ctrl + Shift + ?) as well as a new plug-in system which allows plug-ins to be written using Python 3, C or Vala;
- the collections dialog has been greatly improved in Documents, with a better layout and easier renaming and deletion;
- the layout of the Logs application has been improved, so that it is more efficient and easier to read. It is also possible to select which boot to view logs from;
- GNOMEs IRC application, Polari, has received paste service integration along with other improvements such as a better first run experience, improved feedback for connection errors and better indicators for new messages;
- Boxes includes a new list view with more details about your boxes along with other improvements.
 |
| GNOME Builder |



Getting GNOME 3.18
You may also want to check out the official GNOME 3.18 release notes.
Originally published at WebUpd8: Daily Ubuntu / Linux news and application reviews.
Available link for download
How to add Facebook Likes widget to your blog or website
How to add Facebook Likes widget to your blog or website

1. Login To Blogger Account.
2. Click Layout > Add A Gadget.
3. Select HTML / Javascript > Paste The Following Code In content Box.
Replace my facebook page URL with your page URL, Change Width And Height According To Your Template.
4. Now save and you are done.
Available link for download
Get Gfive Blade F500 USB Driver For Windows
Get Gfive Blade F500 USB Driver For Windows

Driver Supported Following Models Of Gfive Blade F500 :
Gfive Blade F500 Modem / Com port / Android USB Driver
The package provides the installation files for Gfive Blade F500 ADB USB Driver.
Download File Contain Three Package:
1. All MTK USB Driver 2014 - Manual Installation
2. Universal ADB Android USB Driver - Installer
3. Latest PdaNet Driver V.A4150.exe - Installer
Drivers required to properly communicate with your MTK Phone for rooting etc...
These ADB drivers from PDA Net are the easiest to install and will work with most all MTK phones.
Supported OS:
Gfive F500 Blade USB Driver For Windows 7
Gfive F500 Blade USB Driver For Windows 8
Gfive F500 Blade USB Driver For Windows XP
Gfive F500 Blade USB Driver For Windows Vista
[ Unchecked This Option: Use our download manager and get recommended downloads ]
Mirror Link
Download Driver
Mediafire Link
Download Driver
Available link for download
How to Install Google Play Store on Amazon Fire TV
How to Install Google Play Store on Amazon Fire TV

Step #1
Download Xposed Framework APK
Step #2
Sideload Xposed Framework
Step #3
Open Xposed Installer in Settings >> Applications Menu
Step #4
Select Framework then OK close the appear popup
Step #5
Click on Install/Update
Step #6
Select Grant
Step #7
Press OK to reboot system
Step #1
Download HDXPosed Module
Step #2
Sideload HDXPosed Module
Step #3
After reboot system open Xposed Installer
Step #4
Select Modules
Step #5
Check HDXPosed after Mouse Connect
Step #6
Reboot Fire TV
Step #1
Download Google APK
Step #2
Sideload APK in your Fire TV
Step #3
Open Google Play Store in Settings >> Applications Menu
Step #4
Click on Existing for Add your Google Account
Step #5
Enter your Google Account Details
Step #6
Press Next button for Backup and Restore
Step #7
Accept Google Play Terms of Service
Step #8
Google Play Store install on your Fire TV
Available link for download
Wednesday, April 12, 2017
How To Install GNOME 3 20 In Ubuntu GNOME 16 04 Xenial Xerus
How To Install GNOME 3 20 In Ubuntu GNOME 16 04 Xenial Xerus
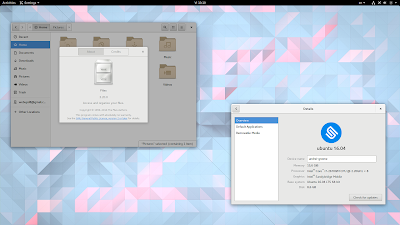
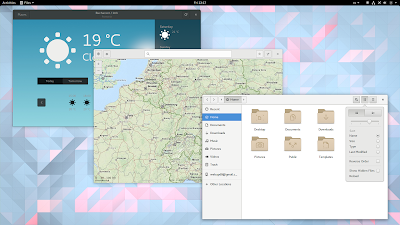
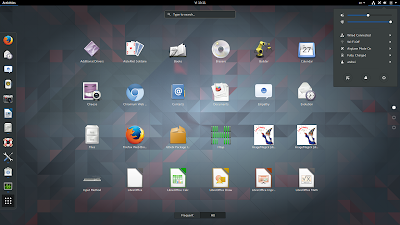
So use the PPA with care and only if you know what youre doing!
Update: pierremichaud points out in a comment below that the GNOME Calendar and Evolution calendar synchronization with Google doesnt work for now.
How to upgrade to GNOME 3.20 in Ubuntu GNOME 16.04 (Xenial Xerus)
sudo add-apt-repository ppa:gnome3-team/gnome3-staging
sudo apt update
sudo apt dist-upgrade$ sudo apt dist-upgrade
Reading package lists... Done
Building dependency tree
Reading state information... Done
Calculating upgrade... Done
The following packages will be REMOVED:
grilo-plugins-0.2-base grilo-plugins-0.2-extra libmutter0g
The following NEW packages will be installed:
gir1.2-geoclue-2.0 gir1.2-grilo-0.3 gir1.2-lokdocview-0.1 grilo-plugins-0.3
grilo-plugins-0.3-base grilo-plugins-0.3-extra libcamel-1.2-57 libgexiv2-2
libgrilo-0.3-0 libgspell-1-1 libjpeg62 libmutter0h libreoffice-gtk3
The following packages will be upgraded:
...................The same goes for "grilo-plugins-0.2-extra" and "libmutter0g". This is just an example though!
How to revert the changes and go back to GNOME 3.18 in Ubuntu GNOME 16.04
sudo apt install ppa-purge
sudo ppa-purge ppa:gnome3-team/gnome3-staging
Originally published at WebUpd8: Daily Ubuntu / Linux news and application reviews.
Available link for download
How to HTC 10 S OFF Download Recovery
How to HTC 10 S OFF Download Recovery
How to HTC 10 S OFF Download Recovery
Unofficial Support site All Mobile Solution
Here is a step-by-step manual how to S-OFF your HTC 10:1. First step is to unlock bootloader:
a) If bootloader unlock is turned off on your phone, you need to turn it on first:
- Boot to Android OS and perform initial setup if necessary
- Go to Menu -> Developer settings and tick "Enable OEM unlock"
Run XTC 2 Tool and open "Bootloader unlock" tab, follow instructions to unlock your bootloader.
2. Reboot to download mode, open "HTC 10" tab and install twrp recovery, you can get it here:
Download twrp-3.0.2-5-pme.img
or
twrp-3.0.2-5-pme.img
3. Boot to Bootloader, and press "Reboot to recovery".
4. In "HTC 10" tab press "Do S-OFF button".
5. Wait for the process to finish. Done.
For More Information
Available link for download
How to Hard Reset Factory Reset Android OPPO FIND 5 MINI R827 Guide
How to Hard Reset Factory Reset Android OPPO FIND 5 MINI R827 Guide
How to Hard Reset / Factory Reset Android OPPO FIND 5 MINI R827 [Guide].
Some People say that Hard reset process is call with master reset or factory reset. Many people asking why should we perform hard reset to our phone. The logical answer that can I say for this asking is :
- There are many bug on OPPO FIND 5 MINI R827.
- OPPO FIND 5 MINI R827 has a persistent problem that cannot be solved.
- We want to remove all personal data and setting that was stored in OPPO FIND 5 MINI R827 device.
- Restore OPPO FIND 5 MINI R827 to Default Factory Setting.
- Because we will sell our OPPO FIND 5 MINI R827 Android phones.
- We have forgotten on PIN or Patern Lock at OPPO FIND 5 MINI R827.
- We will give our OPPO FIND 5 MINI R827 away to some one else, and we dont want that one know everything about our secret data, so we have to erase all data before back up it.
- Our OPPO FIND 5 MINI R827 has been lagging and stuck on android logo, this call with bootloop.
- and many other reason.
1st Methode. Hard Reset OPPO FIND 5 MINI R827 Using Software Menu :
- Make sure your batery is fully charged, Recomended you have 80% of battery capacity
- Then Backup your OPPO FIND 5 MINI R827 . see this guide
- Open the application tray, pointing up located in the middle at the bottom of the display screen
- Go to menu: Setting >
- Select Back Up and Reset>
- Factory Data Reset >
- Reset Phone
- Choose Erase everything to confirm that you already to perform hard reset on OPPO FIND 5 MINI R827
- OPPO FIND 5 MINI R827 will continue to hard reset process to restore factory default.
- You can not use this methode to reset your phone if it lost or stolen.
2ndMethode. Hard Reset OPPO FIND 5 MINI R827 Using Hardware Keys:
- Make sure your battery is fully charged, we recomended that your battery has 80% power
- Always BackUp your important data that store in OPPO FIND 5 MINI R827 . see this guide
- Turn Off your OPPO FIND 5 MINI R827 by hold and press Power Button for a second.
- Release any SIM card and SD card that was installed on your OPPO FIND 5 MINI R827 smartphone.
- Then press and hold a combination key Power button + Volume Down.
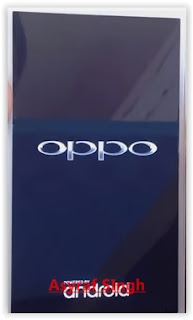
hard reset OPPO FIND 5 MINI R827 - The phone will vibrate and show Oppo Logo on screen, release only power button.
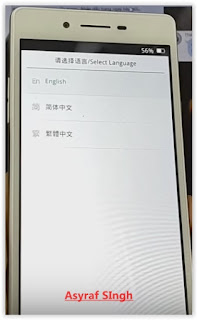
oppo logo - hard reset oppo FIND 5 MINI R827 - Now, release All button when your phone show language choice on screen.
Hard Reset OPPO FIND 5 MINI R827 - You can use volume Down and Volume Up to navigate all menu. and Power Button for confirm your choice. or you can tap menu on screen.
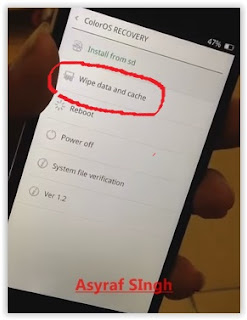
- Now select English to enter ColorOS Recovery.

ColorOS Recovery - Reset Android OPPO FIND 5 MINI R827 - Then select Wipe Data and cache.
Hard Reset OPPO FIND 5 MINI R827 - On the next screen select Wipe All Data and Removable Applications.
Wipe All Data and Removable Applications - On the next screen you will show a confirmation about Wipe All Data and Removable Applications, because All Data and Removable Applications will be wiped, this operation can not be undone. And now select OK.
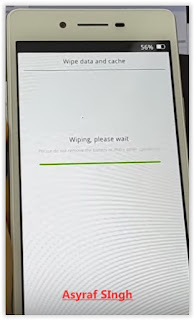
Wipe All Data and Removable Applications - Now, you will see a wipe data and cache process to wipe all data stored on your OPPO FIND 5 MINI R827 phone.
hard reset OPPO FIND 5 MINI R827 - Wait untill everything finish,
- If you see a message that wiped data successfully appear o screen, its mean you have successfully perform hard reset on this OPPO FIND 5 MINI R827 phone.
hard reset OPPO FIND 5 MINI R827 - Now, select reboot, to reboot your device.
Hard Reset OPPO FIND 5 MINI R827. - Select OK to confirm reboot OPPO FIND 5 MINI R827 .
- Finish, Now you have successfully Hard Reset / Factory Reset Android OPPO FIND 5 MINI R827.
Video Guide.
Available link for download
Guide How to Flash Stock ROM on Android OPPO F1 PLUS to Fix a Bootloop Removing Malware Stuck
Guide How to Flash Stock ROM on Android OPPO F1 PLUS to Fix a Bootloop Removing Malware Stuck
[Guide] How to Flash Stock ROM on Android OPPO F1 PLUS to Fix a Bootloop, Removing Malware, Stuck.
Guide Flash Stock ROM OPPO F1 PLUS.
Preparation.
- Make sure you have enough battery capacity on your OPPO F1 PLUS. Its recomended you have at least 80% of battery capacity.
- Always backup your important file (contact, music, video, app) that stored on OPPO F1 PLUS,
- Prepare the Memory Card / SD Card which has a V-Gen Brand. For some reason OPPO F1 PLUS does not recognized besides V-Gen Memory card.
- Then download OPPO F1 PLUS Stock ROM.
- Oppo F1 PLUS
- Once download finish, now copy Stock ROM from computer to the phone memory or SD Card. but note that you copy this ROM at outside not to the public folder for easy finding. (if you download ROM Via PC)
- But, Stock ROM can be download directly from yourAndroid phone. And you must have a good and stable internet connection for it, such as Wi-Fi connection.
- Rom download directly from the Android phone located in the File Manager / phone / download.
http://downloads.oppo.com.s3.amazonaws.com/firmware/X9009/X9009EX_11_OTA_013_all_201604131943.zip
Flashing Stock ROM.
- To start flashing Stock ROM on OPPO F1 PLUS you must enter Recovery Mode. how to do it ?
- Press and Hold Power Button + Volume Down.
- Then you will see menu like this picture. You can select English
- Select Wipe data and cache by pressing the power button. for Up and down choice, use the volume keys Up / Down, on the next Popup screen select Wipe your data cache to make faster process.
- If appears confirmation you can select : "YES"
- Then you will bring to previous menu, and you can select Install form sd.
- Now you will see 2 options. From mobile phone storage & form SD,.
- Previously you have copy firmware file on SD Card, So. now you must select From SD. and now you can see your Firmware file name on this screen.(Stock rom name is similar as shown on the picture below)
- Select this file name using Power Button
- For Up or Down navigation you can use volume Up and Down Button.
- Then you will see a confirmation page, and you can select yes to proceed this flash on OPPO F1 PLUS
- Just wait the process finish updating system, and your OPPO F1 PLUS will ask to you to reboot the device.
- Now you have finished flash Stock ROM on Android OPPO F1 PLUS Smartphone.
 |
| Flash Bootloop OPPO F1 PLUS |
 |
| Flash Bootloop OPPO F1 PLUS |
 |
| Flash Bootloop OPPO F1 PLUS |
 |
| Flash Bootloop OPPO F1 PLUS |
 |
| Flash Bootloop OPPO F1 PLUS |
 |
| Flash Bootloop OPPO F1 PLUS |
 |
| Flash Bootloop OPPO F1 PLUS |
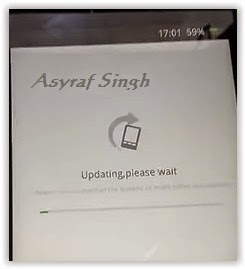 |
| Flash Bootloop OPPO F1 PLUS |
Available link for download
How to make money with affiliate program if you are A blogger
How to make money with affiliate program if you are A blogger

There are many ways to be an affiliate. Most bloggers sign up with an affiliate network because it’s a one-stop place to find many programs to join. You apply to the network and then apply to individual programs in the network. They give you special links to use or banner ads that track clicks and sales. You can link to a website or to a specific product. When someone clicks on your link or ad and makes a purchase you make a percent of the sale, usually around 10%. Some programs give you a percent of any sales from their website from someone who came from your link, up to 30 days or longer.
The advantage of joining a network is you manage many different businesses and get paid from the network, rather than getting individual checks and logging onto different sites. You usually get paid once a month and you can log in and see your sales and what you’re making at any time (remind you of The Blogger Network?).
When you apply to be an affiliate, you are called a “publisher”. The brand or business is called the “merchant”. Some of the signup processes are not very user-friendly but they all involve filling out an application and getting approved by the network. Once approved you can search for merchants to promote. Once accepted, the merchant provides links and creative you can use on your blog.
There are many ways to be an affiliate, here are some examples:
Be an Event Affiliate
Many conferences or events have affiliate programs. It can be as simple as a discount code that if someone uses you code, you’ll make money to a more formal setup. Eventbrite makes it easy to set up affiliates because it’s easy to create a signup code and then track when someone uses that code to sign up. Then the conference organizer will pay you a percentage of the total sales.
Earn Money Promoting Free Products
You can be an affiliate for free things like free ebooks, downloads, coupons (Coupons.com has an affiliate program) free trials, or even by posting recipes (such as with My Recipe Magic – please note the site is temporarily down). There are also affiliates who get paid when someone fills out a lead form, such as applying for a credit card.
Every blogger can create a page of their favorite resources and use affiliate links in the post (be sure to disclose that they are affiliate links though).
Example: the Lemons for Lulu blog has a post that shows the camera, web hosting, WordPress theme, books and other things she uses and loves. See http://www.lemonsforlulu.com/blogger-resources.
Create Helpful Posts and Use Affiliate Links
You could do a post about your favorite plugins and include affiliate links to any paid ones. Many affiliate programs will allow you to promote products directly on social media. We’ve seen fashion bloggers directly link to buy pages on Facebook, for example.
Post about how to start a blog in your niche and link to the web hosting company where they buy a domain, link to the paid theme you recommend, etc. This blog post from Pinch of Yum tells how to start a food blog and includes many affiliate links: http://pinchofyum.com/resources/how-to-start-a-food-blog.
Another way to get started is to go see what your most popular posts are and see if there are ways you could use affiliate links in the post. For example, if you have a recipe that goes viral on Pinterest, you could monetize that post. You can create a box that lists all the ingredients or supplies needed and then link to stores that carry those products. You can link to either Walmart, Target or Amazon in most posts. If you’re higher end you might link to Williams Sonoma, Pottery Barn or other retailer. Don’t just think about food, think about the tools, dishes or other parts of your post. If someone ever asks, where did you get that platter, that’s an opportunity for you.
The good news is, you will get paid on the entire order, so if someone buys anything because of your link, you make money.
To get started, look at the major affiliate networks:
Commission Junction www.Cj.com
This is one of the largest affiliate networks. Here is the sign up page: https://signup.cj.com/member/publisherSignUp.do
Linkshare www.Linkshare.com
Amazon – www.Amazon.com (find the associates link in the footer to apply)
Amazon pays less than a lot of programs but it has a huge selection and user-friendly tools. The name of the game here is to sell quantity because the margins are small. Still, there is a lot of brand trust and many people, especially those with Amazon Prime, prefer to order from Amazon.
Share A Sale www.ShareASale.com
This network has many smaller and mid-sized businesses, including niche products and brands you might not already know.
Clickbank www.Clickbank.com
This program carries information products and ebooks. Since there is very little cost once the product is created, you can get very high commissions. Some offer to 75% commissions on products. Commissions are paid weekly, and direct deposit is available to its affiliates.
AvantLink – www.AvantLink.com
This network has cutting edge tools and more advanced features such as data feeds.
We hope that this helps you understand how affiliate marketing works enough so that you can get started. Please let us know if we missed anything! To inspire you, here’s another post from Pinch of Yum that breaks down how much they make from different revenue streams, including affiliate marketing.
Available link for download
How to root karbonn A1
How to root karbonn A1
 ?Ginger break
?Root checker.apk
?Super user
8) Using root checker check the rooting
9) download and install super user from here
Available link for download
Gigabyte Gv Nx72g512e Driver
Gigabyte Gv Nx72g512e Driver
Here you can download gigabyte gv nx72g512e driver for Windows. Its 100% safe, uploaded from safe source and passed AVG virus scan!
Driver Info:
File name: gigabyte-gv-nx72g512e_drv.zip
Driver version: 2.4.8
File size: 8 191 KB
OS: Win XP, Win Vista, Windows 7, Windows 8
Upload source: other website
Available link for download
How To Get Chrome To Support Installing GNOME Shell Extensions From The GNOME Extensions Repository
How To Get Chrome To Support Installing GNOME Shell Extensions From The GNOME Extensions Repository
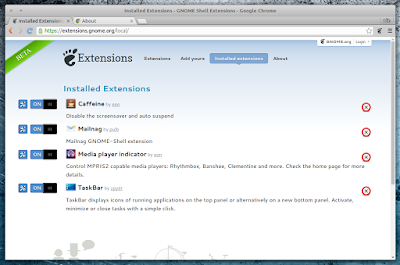 |
| extensions.gnome.org integration for Google Chrome |
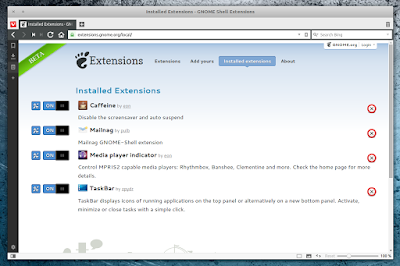 |
| extensions.gnome.org Chrome integration also works with Vivaldi |
sudo add-apt-repository ppa:ne0sight/chrome-gnome-shell
sudo apt-get update
sudo apt-get install chrome-gnome-shellOriginally published at WebUpd8: Daily Ubuntu / Linux news and application reviews.
Available link for download

