Showing posts with label drive. Show all posts
Showing posts with label drive. Show all posts
Saturday, April 1, 2017
How to remove write protection from a USB flash drive
How to remove write protection from a USB flash drive
Today i will show how to remove write protection from a USB flash drive (pendrive).When a pendrive is write protected, no files cannot be copied to it. It cannot be formatted also.When ever you will try to format the pendrive it will show you an error message -"Disk is Write Protected" exactly like the picture show below
 In order to format the penndrive and remove the write protection you need to do the following steps below:
First check whether the USB drive has a write protection switch on the bottom or the sides of the drive If it has a write protection switch then push the switch to the unlock position.Then insert the pendrive to your pcs USB port & go to "My computer".select that USB drive and right click on it and then Click on the Format.A dialog box will appear exactly like the picture below


Step 5

click on the start button and your USB drive will be formatted.
If above method doesnt work then you have to remove the write protection manually.In order to do this ..do the following steps below.
Step 1
Open the Start menu & go to "run".Type "regedit "& press enter or click on OK.This will open the windows registry editor.
Step 2
Navigate to the following path - " HKEY_LOCAL_MACHINESYSTEMCurrentControlSetControlStorageDevicePolicies "
Step 3
After that Double-click on the "WriteProtect" value in the right-hand pane of the Regedit.exe. Change the Value data from 1 to 0 and then click OK to save the change.
Step 4
Close Regedit exe and remove your USB drive .Then restart your PC.
Close Regedit exe and remove your USB drive .Then restart your PC.
Step 5
After restarting you pc connect your USB drive again and u will find it is not longer right protected.Then format the USB drive manually in the normal way by right clicking on it and choosing Format.
Note-
Sometimes you may find that StorageDevicePolicies doesnt exist .In such cases you need to create it manually. In order to do this. simply right click on the black spaces of the control folder & choose New -> key and enter the following name "StorageDevicePolicies"
Now Double click on the new key and right click then choose New -> DWORD.Name it WriteProtect then set the value to 0.Then click ok,exit regedit & reboot your pc..Hope this will work... :)
I will be posting a video tutorial on this..keep visiting regularly
REGARDS
SHANKHA JANA
Available link for download
Sunday, March 12, 2017
Grive2 Grive Fork With Google Drive REST API And Partial Sync Support PPA
Grive2 Grive Fork With Google Drive REST API And Partial Sync Support PPA
Grive was an unofficial, open source command line Linux client for Google Drive. I say "was" because the tool no longer works due to Google changing its API recently and Grive not being maintained any more (there are no commits on its GitHub page since May, 2013).

To get Grive up and running again, Vitaliy Filippov forked it and named his fork "Grive2". The fork supports the new Google Drive REST API and it also includes a new feature: partial (directory) sync, along with bug fixes.
Compared to the original "Grive", Grive2 comes with the following changes:
- supports the new Drive REST API
- added partial sync
- major code refractoring: a lot of dead code removed, JSON-C is not used any more, API-specific code is split from non-API-specific
- some stability fixes
- slightly reduce number of syscalls when reading local files
- bug fixes
Also, just like the old app, Grive2 does NOT support:
- continuously waiting for changes in file system or in Google Drive to occur and upload. A sync is only performed when you run Grive, and it calculates checksums for all files every time;
- symbolic links;
- Google documents.
Install Grive2 in Ubuntu or Linux Mint via PPA
Since there are quite a tools that rely on Grive, the Grive2 binary and package continue to be called "grive", so installing Grive2 from the main WebUpd8 PPA will overwrite any old Grive versions it may find on the system (just as if it was a newer Grive1 version).
To install Grive2 in Ubuntu, Linux Mint and derivatives by using the main WebUpd8 PPA, use the following commands:
sudo add-apt-repository ppa:nilarimogard/webupd8
sudo apt-get update
sudo apt-get install griveArch Linux users can install Grive2 via AUR (its actually the old "grive" package, updated with the new Grive2 fork).
For other Linux distributions, see the Grive2 GitHub page.
Using Grive2

1. Grive2 will download / upload new or changed files from the directory you run it. So firstly, lets create a new folder - well call it "grive" -, in your home directory:
mkdir -p ~/grive2. Next, navigate using the terminal into the newly created "grive" folder:
cd ~/grive3. The first time you run Grive2, you must use the "-a" argument to grant it permission to access your Google Drive:
grive -aAfter running the command above, an URL should be displayed in the terminal - copy this URL and paste it in a web browser. In the newly loaded page, youll be asked to give Grive permission to access your Google Drive and after clicking "Allow access", an authentication code will be displayed - copy this code and paste it in the terminal where you ran Grive2.
Thats it. Now each time you want to sync Google Drive with your local "grive" folder, navigate to the "grive" folder (step 2) and run "grive" (this time without "-a" since youve already authenticated Grive with Google Drive).
Grive2 comes with some advanced features as well. For instance, compared to the original Grive, the new Grive2 fork supports partial sync. To only synchronize one subfolder (a folder from your ~/grive directory) with Google Drive, use:
grive -s SUBFOLDERTo see all the available options, type:
grive --help
Available link for download
Friday, February 17, 2017
How To Host Website in Google Drive for Free
How To Host Website in Google Drive for Free
In this post i am included the steps to host a website in Google Drive. For this example i am used One - A Free one page html template by WEGRAPHICS.NET.
How to Host Web page in Google Drive ?
1. In your computer arrange all your HTML, CSS, JS and resource files in a folder.2. Login to your Google Drive account.
3. Click on the upload icon and select Folder, then browse the websites folder you created in computer and click OK...now it will start uploading.
4. After successful upload , click share on the right side of the uploader prompt or select share by right clicking the uploaded folder.

OR

5. It will alert a new Dialog with Sharing setting. In that setting Dialog click change under the Who has access title and select Public on the web ..click Save.
6. Then copy the Link to share url.
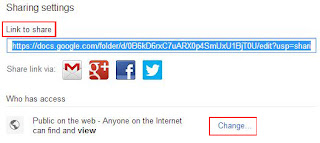
7. Now the final part change sharing URL to the hosting URL.
https://docs.google.com/folder/d/0B6kD6rxC7uARX0p4SmUxU1BjT0U/edit?usp=sharing
8. Remove the red color part from the sharing URL and replace the green color part of the URL with https://googledrive.com/host/
Hosting URL will be something like this.
https://googledrive.com/host/0B6kD6rxC7uARX0p4SmUxU1BjT0U
Note : You can also get the hosting URL by previewing your html file.
Thats it done ... use the Hosting URL to share your website...For a Good looking URL .. use .tk or similar free service to forward to your hosting URL.
Source
Available link for download
Friday, December 16, 2016
How To Change Hard Drive USB Drive Icon in Windows
How To Change Hard Drive USB Drive Icon in Windows
This post describe a simple method to change the icon of your USB drive or hard drive to your favorite one.
Method:
1. Download your favorite icon file from the web or convert your favorite image to icon.
2. Open Notepad and write down the following code below in Notepad .
 [autorun]
 icon=iconname.ico
* In the above code iconname should be the name of your icon.
3. Now Click File > Save Or Ctrl+S to save the file.
4. Type File name: autorun.inf and change Save as type: All Files (*.*).

5. Click Save .
6. Now copy the saved autorun.inf file and your .ico file to the root directory of your USB drive or hard drive. For hard drive you have to restart the system to take effect the change and for USB drive just unplug and plug it back to see the change.
Thats it done !!!
Available link for download
Sunday, October 2, 2016
How to Access Your PC Hard Drive from Android Devices
How to Access Your PC Hard Drive from Android Devices

How to Access Your PC Hard Drive from Android Devices
In many instances, I’ve found that to transfer a file from my computer to my Android device is a lot of pain. Something then struck to my mind, and that was why I didn’t directly share the files from my computer’s hard drive onto my Android device? I knew it was as easy as creating a shared network and then accessing it on my Android device. The process, however, is a little tiresome. I had to proceed with caution since enabling sharing can be a threat to your own files and folders. In this quick little guide, we’ll be taking a look on how you can easily share folders and files from your computer’s hard disk to your Android device.
For this, you need to enable folder sharing from the various options available in Windows. Moreover, you need a file explorer for Android which can surf through your remotely connected files and folders. We’ll be using the most reliable option, which is ES File Explorer. Once you have these two thoughts in your mind, feel free to proceed with the steps given below.
Access Your PC Hard Drive From Android Devices
- You need to select the folder you want to allow sharing of. Once selected, right-click on it, and click on ‘Properties‘. From there, select the ‘Sharing‘ tab.
- From the drop-down list, select ‘Everyone‘, since you need easy sharing of your files. If you want to be more cautious, then you can restrict access to just read or read/write.
- Once you’re done with it, you will get a confirmation with a LAN address and folder path. Keep that it mind, and proceed.
- On your Android device with ES File Explorer installed, swipe to the right, and click on the ‘+‘ button, then select the option which reads ‘LAN‘.
- In this step, it’ll ask you to enter a server name, which is the file path you have copied down earlier.
- Once you’re done, you will now be able to see the various files and folders you’ve had on your computer directly from your Android device.


If you have any problems whatsoever regarding this tutorial, feel free to refer us in the comments below. If you think we’ve helped you, why not stay tuned for more content as such?
Available link for download
Subscribe to:
Posts (Atom)