Saturday, December 31, 2016
GC ProKey V 1 0 0 0034 Setup Download
GC ProKey V 1 0 0 0034 Setup Download
GcProKey Total update count 41 release date 14-07-16

Unofficial support site by Welcome zone Haldwani
GCPRO GSMTOOL V1.0.0.0034 released.
Worlds 1st !! Magnificent Update, Added LG Support for LG Unlocking
Sprint Unlock Support via ADB with 5.x android OS
with no Root
Worlds 1st !! Magnificent Update Added LG LS751 FRP Removed
support in download mode
(old boot loader only.)
Worlds 1st !! Magnificent UpdateAdded FRP_Remove(adb)
In all Tab HTC, Samsung before only in android.
IMPROVEMENTS:
Samsung exynos Tmobile unlocking..
work with special root kernel which dont have supersu.
Motorola Unlock & MotoX some case return fail even success.
Mtk imei repair without nvram.
Read info adb for mtk base htc.
Strongly recommend to use latest version...
Do you feel it ?
Do you feel it ?
Feel The Difference With GCPro.
YES STILL.
NO PACK UNLIKE OTHERS..
NO EVERY YEAR FEE UNLIKE OTHERS..
NO ACTIVATION UNLIKE OTHERS..
NO COPY PASTED SOLUTIONS UNLIKE OTHERS.
NO NEW BOX FOR SELLING OLD SOLUTIONS UNLIKE OTHERS...
Downloading Links:
link1= https://mega.nz/#F!1pxHgTBA!P7owR-MlJxD-r0_ N6o0xWQ
link2= https://drive.google.com/folderview?... FE&usp=sharing
link3= http://www.4shared.com/folder/3Ob62NhG/ GCPROTEAM.html
link4= https://www.dropbox.com/sh/w9gdsem09... Upj32aEVa?dl=0
link5= https://www.mediafire.com/folder/kzd5v0z4fecn7/ GCPROKEY
__________________
Best Regards
Available link for download
HCL ME 1024 Series Windows 7 32Bit 64Bit Driver
HCL ME 1024 Series Windows 7 32Bit 64Bit Driver
Win7

| Model | Device Type | OS | Download |
| Series 1024 | BIOS | Windows 7 64 Bit | click to Download |
| Series 1024 | USB 3.0 | Windows 7 64 Bit | click to Download |
| Series 1024 | Camera | Windows 7 64 Bit | click to Download |
| Series 1024 | Wireless LAN & Bluetooth | Windows 7 64 Bit | click to Download |
| Series 1024 | Touch Pad | Windows 7 64 Bit | click to Download |
| Series 1024 | Card Reader | Windows 7 64 Bit | click to Download |
| Series 1024 | LAN | Windows 7 64 Bit | click to Download |
| Series 1024 | Hotkey | Windows 7 64 Bit | click to Download |
| Series 1024 | Audio | Windows 7 64 Bit | click to Download |
| Series 1024 | VGA | Windows 7 64 Bit | click to Download |
| Series 1024 | IME | Windows 7 64 Bit | click to Download |
| Series 1024 | AHCI | Windows 7 64 Bit | click to Download |
| Series 1024 | Camera | Windows 7 32 Bit | click to Download |
| Series 1024 | Chipset | Windows 7 64 Bit | click to Download |
| Series 1024 | USB 3.0 | Windows 7 32 Bit | click to Download |
| Series 1024 | Card Reader | Windows 7 32 Bit | click to Download |
| Series 1024 | Wireless LAN & Bluetooth | Windows 7 32 Bit | click to Download |
| Series 1024 | Touch Pad | Windows 7 32 Bit | click to Download |
| Series 1024 | LAN | Windows 7 32 Bit | click to Download |
| Series 1024 | Hotkey | Windows 7 32 Bit | click to Download |
| Series 1024 | Audio | Windows 7 32 Bit | click to Download |
| Series 1024 | VGA | Windows 7 32 Bit | click to Download |
| Series 1024 | IME | Windows 7 32 Bit | click to Download |
| Series 1024 | AHCI | Windows 7 32 Bit | click to Download |
| Series 1024 | Chipset | Windows 7 32 Bit | click to Download |
Available link for download
How To Flash Karbonn a51 Speadtrum Pac Flash File Stock Rom
How To Flash Karbonn a51 Speadtrum Pac Flash File Stock Rom
How To Flash Karbonn A51 Speadtrum (Pac) Flash File Stock Rom
Unofficial Support Site For This Phone By Welcome Zone haldwani
The Instructions Given Below To Flash Stock Rom Or Any Custom Rom Flash File Firmware using Smart Spreadtrum Android Flash Tool Smart Phone .
Requirements:
1= Your Android Smartphone should have at-least 40-50 percent of battery to perform the Flashing Process.2= Upgrade Download Tool And Usb Drivers .
3= USB Cable.
Flash: To overwrite your phones existing software with another.
Rom: Firmware for your phone.
.pac file: File in which research download uses
Before this it is important to have the VCOM drivers for you phone installed on your computer. (Links Below)

To start go ahead and press the first gear button. This will open up a browse menu

Use the menu to browse for where your .pac file for your phone is saved. These files are usually given
from the phones manufacture. The browse menu can only open .pac files.

Once the file is loaded you can tell, you will be able to see the name on the bar (as shown).
Next press the second gear to open up the settings menu.

1. How much to port (self explanatory)
2. Bautrate. Leave this at 115200 unless your phone manufacture said otherwise. This works for the SC6820.
3. This will be automatically selected once you load the .pac file.
4. Where all the files are stored. You can actually extract these once you load a .pac file hehe :P .
5. Name of Each file. If its ticked it will be flashed. You can untick things you dont want to be flashed.
6. This is just if your going to build a .pac file from parts, dont worry about it thats a whole other thing.
Once your dont editing the settings you can go ahead and press Ok.

After your done press the arrow like button. This will start the process and have it ready for your phone.
Take the battery out of your phone now for at least 15 seconds. Place it back and plug in the usb while
simultaneously holding the volume down button. You should see in research download that it has started
flashing! ( You can let go of the volume key now :P) When it is finished just press the stop button and
disconnect your phone!
Congratulation Your Flash Successfully Flash Enjoy :-
Karbonn A51 | Usb Driver | Download |
Karbonn A51 | Flash Tool | Download |
Karbonn A51 | Flash File | Download |
Facebook | Like This | Download |
Available link for download
How to boot repair or Flash Redmi Note 2 Prime Dual Sim 4G Model 2014912 with Flash tool Tested
How to boot repair or Flash Redmi Note 2 Prime Dual Sim 4G Model 2014912 with Flash tool Tested
Required for flash:
- Redmi Note 2 Prime (Dual Sim 4G) Model : 2014912 device with well battery charged, and do not try with low battery
- Redmi Note 2 Prime (Dual Sim 4G) Model : 2014912 Stock ROM Firmware (tested) | Download Mirror-1, Mirror-2
- Redmi Note 2 Prime (Dual Sim 4G) Model : 2014912 USB (Flashing) OR Dead Boot Repair driver | Download here
- Redmi Note 2 Prime (Dual Sim 4G) Model : 2014912 Flash Tool | Download here
- Good Quality Micro usb cable
- Computer or Laptop
Procedure:
- First download tested Firmware, Flash tool or driver from above link (if link not working just leave your comment on below comment box i will soon fix it)
- Extract to all are zip files to desktop or as you like path (must be installed winrar software to Extract)
- Open Driver folder and choose Qualcomm_USB_Driver_Setup.exe file and wait until finish installation
- Open QPST.WIN.2.7_Installer-00430.1 folder and chose setup.exe file and open and install it
- Now open QFIL from the "C:Program FilesQualcommQPST in" path
- Tick on Flat Build option
- Go to Programmer Path and click on Browse.. button and choose prog_emmc_firehose_8916.mbn file
- Click on Load XML.. button and choose rawprogram_unsparse.xml file and second choose patch0.xml file from the Firmware folder
- Insert USB cable and wait until driver install
- After drier installed just Click on Download button and wait until finish procedure
- Congratulation you are done

Available link for download
GcPro Key LG Sprint LS770 Unlock Much more Setup Download
GcPro Key LG Sprint LS770 Unlock Much more Setup Download
GcPro Key Total update count 39 release date 26-05-16

Unofficial Support Site by Welcome Zone Haldwani
GCPRO GSM TOOL V1.0.0.0032 released.Whats New?
Added Qcom New GCMod_Method for imei repair
Diag
adb & root need
Added LG Sprint Support for LS770
and other models with same security.
Improvements:
Motorola Unlock
MTK imei with single sim phone.
MTK imei had issue with less then 2 imei repair from last release.
Build read was result empty some time.
Recovery mode pattern remove show false result even if it was successful.
Samsung sprint & domestic unlock & searching only on old samsung note3 etc.
must read new helpfile & new steps
Strongly recommend to use this version for all your task...
Do you feel it ?
Do you feel it ?
Feel The Difference With GCPro.
Download Links:
link1= https://mega.co.nz/#F!1pxHgTBA!P7owR-MlJxD-r0 _N6o0xWQ
link2= https://drive.google.com/folderview?... FE&usp=sharing
link3= GCPROTEAM by gc P. - 4shared
link4= https://www.dropbox.com/sh/w9gdsem09... Upj32aEVa?dl=0
link5= https://www.mediafire.com/folder/kzd5v0z4fecn7/ GCPROKEY
__________________
Best Regards
Faisal_Computer
General Manager
GPGIndustries
Available link for download
How To Clear Voicemail Notification Icon in Android
How To Clear Voicemail Notification Icon in Android
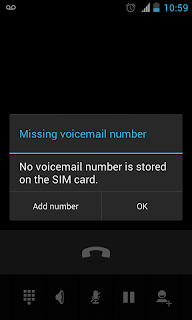
In some android devices Voicemail notification icon remains and we cant clear it by clicking on the notification or by the clear button. It may be because of the network provider issue or the Android ( I dont know the actual reason ).
If you are facing the issue with voice mail notification and want to get rid off it,then here are the steps to clear Voicemail notification icon from the Android notification bar.
Method 1
1. Long Click on the New voicemail notification in the notification bar.
2. Now it will drop a App info menu...Click on it.
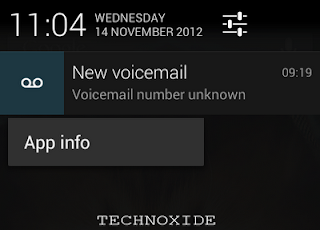
3. It will navigate to Phone app info page.
4. Click Force stop.

Method 2
1. Go to Settings -> Apps -> ALL -> Phone.
2. Click Force stop.
Thats it ...Done...Now it will clear the voicemail notification icon from clear bar.
I am tested it with Android 4.0.4 and 4.1.2 and worked successfully. Please check in your phone and do reply to help others.
Available link for download
How to force install apps to SD card without ROOT!!!
How to force install apps to SD card without ROOT!!!
Source:Androinica How to Install Apps to the SD Card by Default on Android 2.2 Froyo (not for Ace)
You can find the latest version of this tutorial here. Though I will try to keep updating this thread too.
Getting Ready:
1. First you have to enable USB debugging on your Android device from Settings > Applications > Development > USB debugging.
2. You need to download and install the latest Android SDK on your computer fromhttp://developer.android.com/sdk/.
3. Install the latest java SDk if you dont already have one.
Tutorial:
1. Extract the package to the folder of your choice [Lets say- C:/android-sdk-windows/], run SDK Manager.exe
2. Close the command / windows command prompt window that opens.
3. In the new window, click on Available Packages to the left. Untick all options you are prompted to download except the USB driver option & Android sdk tools revisionx(13 as of now) & Android sdk platform-tools revision x(7 as of now) if they are there.
(Note-If you get an error message at this point, enable “Force https://…” in the Settings. From the list of available packages, select “Usb Driver package”, click on the Install Selected button in the bottom right corner and follow the prompts. )
4. Do not open Samsung Kies. Connect your phone to your computer with a USB-cable. Your OS will prompt you to install new drivers. Choose to install them from the android-sdk-windows/extras/google/usb_driverfolder. Do not mount your device; you only need to plug-in the cable.
(If you dont see this prompt, It means USB drivers are already installed or else install them manually: SAMSUNG USB drivers from samfirmware.com)
5. Run command prompt in administrator.
Type in the following after the ">" at each step (without quotations,and including spaces and capital letters)
"cd C:android-sdk-windowsplatform-tools"
"adb devices"
"adb shell"
A $ sign should pop up
"pm setInstallLocation 2"
Another $ should pop up
And your done. Close everything, disconnect phone, turn off phone and then turn it back on again
Note:Now the phone will be set to install all apps you install onto the SD card. However, current apps on phone will mostly still be stored on the internal memory. This process doesnt move these apps for you, it adds the ability. So you must now manually move those already installed on the phone. Install some apps like app2sd etc.
It’s preferable to install certain apps to the main memory, since it will take a while before the SD card becomes available when you start your phone. Applications installed on the memory card will also be unavailable to the system each time you mount your phone as a disk drive.
In general, apps that integrate with the Android OS and that often run in the background is better to install on the internal storage, while games and most other applications will have no problem chilling outside on your SD.
Widgets should essentially be installed on phone memory.
Update:
From what I have come to understand (correct me if I am wrong), Each app will store some .odex files on phone memory to speed up the boot process.
So dont complain that phone memory is getting lesser after each install. Though if you couldve installed 40 apps before now maybe 150+ and still have 30-40 mb left. (depends on what kind of apps you install).
Darktremors a2sd scripts deodex the apps and COMPLETELY move the apps and cache to sd card but you will need to root and run the scripts.
How to install Darktremors a2sd on Froyo!!
Though an easier way will be to install a custom rom.
____________________________________________
Available link for download
Gigabyte G1 Sniper 3 Driver Win7 8 8 1 32Bit 64Bit
Gigabyte G1 Sniper 3 Driver Win7 8 8 1 32Bit 64Bit
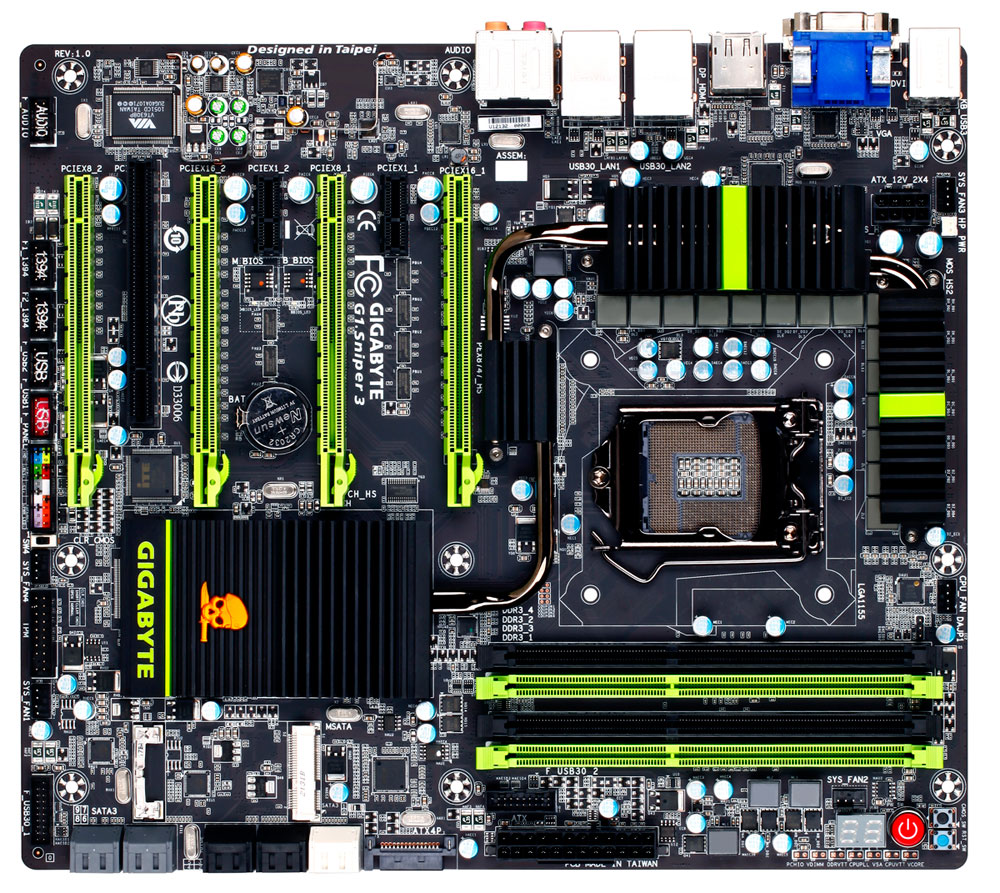
| Audio | Version | Size | Date | Download Here |
|---|---|---|---|---|
| Creative Audio driver OS:Windows 7 32bit,Windows 7 64bit,Windows 8 32bit,Windows 8 64bit,Windows 8.1 32bit,Windows 8.1 64bit | 6.0.101.1007 | 36.99 MB | 2012/10/05 | Asia China America EuropeEurope(Russia) : FTP / Http |
| Chipset | Version | Size | Date | Download Here |
|---|---|---|---|---|
| Intel INF installation OS:Windows 7 32bit,Windows 7 64bit,Windows 8 32bit,Windows 8 64bit,Windows 8.1 32bit,Windows 8.1 64bit | 9.4.0.1027 | 1.24 MB | 2013/11/26 | Asia China America EuropeEurope(Russia) : FTP / Http |
| Intel Management Engine Interface OS:Windows 7 32bit,Windows 7 64bit,Windows 8 32bit,Windows 8 64bit,Windows 8.1 32bit,Windows 8.1 64bit | 9.5.15.1730 | 57.28 MB | 2013/11/26 | Asia China America EuropeEurope(Russia) : FTP / Http |
| LAN | Version | Size | Date | Download Here |
|---|---|---|---|---|
| Intel LAN Driver OS:Windows 8.1 32bit,Windows 8.1 64bit | 18.5 | 44.56 MB | 2013/10/21 | Asia China America EuropeEurope(Russia) : FTP / Http |
| Intel LAN Driver OS:Windows 7 32bit,Windows 7 64bit,Windows 8 32bit,Windows 8 64bit | 17.4 | 79.33 MB | 2012/12/14 | Asia China America EuropeEurope(Russia) : FTP / Http |
| BigFoot LAN driver OS:Windows 7 32bit,Windows 7 64bit,Windows 8 32bit,Windows 8 64bit | 6.1.0.403 | 270.61 MB | 2012/10/05 | Asia China America EuropeEurope(Russia) : FTP / Http |
| SATA RAID/AHCI | Version | Size | Date | Download Here |
|---|---|---|---|---|
| Intel® Rapid Storage Technology OS:Windows 7 32bit,Windows 7 64bit,Windows 8 32bit,Windows 8 64bit,Windows 8.1 32bit,Windows 8.1 64bit | 12.8.0.1016 | 14.04 MB | 2013/11/26 | Asia China America EuropeEurope(Russia) : FTP / Http |
| Intel SATA Preinstall driver (For AHCI / RAID Mode) Note: Press F6 during Windows setup to read from floppy. OS:Windows 7 64bit,Windows 8 64bit,Windows 8.1 64bit | 12.8.0.1016 | 0.43 MB | 2013/11/26 | Asia China America EuropeEurope(Russia) : FTP / Http |
| Intel SATA Preinstall driver (For AHCI / RAID Mode) Note: Press F6 during Windows setup to read from floppy. OS:Windows 7 32bit,Windows 8 32bit,Windows 8.1 32bit | 12.8.0.1016 | 0.40 MB | 2013/11/26 | Asia China America EuropeEurope(Russia) : FTP / Http |
| Hot fix (Note) After installed IRST driver, please install Hot fix. OS:Windows 8 32bit,Windows 8 64bit | 1.0.0.1 | 2.68 MB | 2012/11/26 | Asia China America EuropeEurope(Russia) : FTP / Http |
| Marvell Preinstall Driver Note: Press F6 during Windows setup to read from floppy. OS:Windows 7 32bit,Windows 7 64bit,Windows 8 32bit,Windows 8 64bit | 1.2.0.1020 | 0.42 MB | 2012/10/04 | Asia China America EuropeEurope(Russia) : FTP / Http |
| Marvell SATA Controller Driver OS:Windows 7 32bit,Windows 7 64bit,Windows 8 32bit,Windows 8 64bit | 1.2.0.1020 | 1.28 MB | 2012/10/04 | Asia China America EuropeEurope(Russia) : FTP / Http |
| Marvell Storage Utility OS:Windows 7 32bit,Windows 7 64bit,Windows 8 32bit,Windows 8 64bit | 4.1.0.2013 | 42.35 MB | 2012/10/04 | Asia China America EuropeEurope(Russia) : FTP / Http |
| USB 3.0 | Version | Size | Date | Download Here |
|---|---|---|---|---|
| Intel USB 3.0 Driver OS:Windows 7 32bit,Windows 7 64bit | 1.0.5.235 | 9.11 MB | 2012/07/12 | Asia China America EuropeEurope(Russia) : FTP / Http |
| VGA | Version | Size | Date | Download Here |
|---|---|---|---|---|
| Intel VGA Driver (for Ivy Bridge CPU) OS:Windows 7 64bit,Windows 8 64bit,Windows 8.1 64bit | 15.33.8.3345 | 72.50 MB | 2013/11/26 | Asia China America EuropeEurope(Russia) : FTP / Http |
| Intel VGA Driver (for Ivy Bridge CPU) OS:Windows 7 32bit,Windows 8 32bit,Windows 8.1 32bit | 15.33.8.3345 | 40.95 MB | 2013/11/26 | Asia China America EuropeEurope(Russia) : FTP / Http |
| Intel VGA Driver (for Sandy Bridge CPU) OS:Windows 7 32bit,Windows 8 32bit,Windows 8.1 32bit | 15.28.20.3347 | 72.37 MB | 2013/11/25 | Asia China America EuropeEurope(Russia) : FTP / Http |
| Intel VGA Driver (for Sandy Bridge CPU) OS:Windows 7 64bit,Windows 8 64bit,Windows 8.1 64bit | 15.28.20.3347 | 88.68 MB | 2013/11/25 | Asia China America EuropeEurope(Russia) : FTP / Http |
| WLAN+BT | Version | Size | Date | Download Here |
|---|---|---|---|---|
| WLAN Driver OS:Windows 8.1 32bit,Windows 8.1 64bit | 10.0.0.263 | 40.75 MB | 2013/11/20 | Asia China America EuropeEurope(Russia) : FTP / Http |
| BT Driver OS:Windows 8.1 32bit,Windows 8.1 64bit | 8.0.1.305 | 192.45 MB | 2013/11/20 | Asia China America EuropeEurope(Russia) : FTP / Http |
| Wi-Fi Share OS:Windows 7 32bit,Windows 7 64bit,Windows 8 32bit,Windows 8 64bit | 1.0.5.2 | 3.26 MB | 2013/01/09 | Asia China America EuropeEurope(Russia) : FTP / Http |
| WLAN+BT Driver OS:Windows 7 32bit,Windows 7 64bit | WIFI:10.0.0.67 BT:7.4.0.145 | 141.33 MB | 2012/10/02 | Asia China America EuropeEurope(Russia) : FTP / Http |
| BT Driver OS:Windows 8 32bit,Windows 8 64bit | 8.0.0.204 | 182.94 MB | 2012/09/18 | Asia China America EuropeEurope(Russia) : FTP / Http |
| WLAN Driver OS:Windows 8 32bit,Windows 8 64bit | 10.0.0.75 | 34.46 MB | 2012/09/18 | Asia China America EuropeEurope(Russia) : FTP / Http |
Available link for download
Friday, December 30, 2016
How To Easily Access WiFi Mobile Data Bluetooth GPS Like Toggles Setting Screen in Samsung Stock ROMS
How To Easily Access WiFi Mobile Data Bluetooth GPS Like Toggles Setting Screen in Samsung Stock ROMS

For example if we want to receive files via Bluetooth we need to change the visibility settings if the device not paired. In this case, we can access the Bluetooth visibility settings by long pressing the Bluetooth toggle button. The feature may familiar to many Samsung users. But still its worth writing here if its helpful for any new user.
This feature is tested on TouchWiz Nature UX version dont know if its available in older TouchWiz version.
Method:
Long Press on the corresponding Toggle to access the settings screen.
Available link for download
HCL ME Laptop 1065 Drivers and Details
HCL ME Laptop 1065 Drivers and Details
There are 2 sets of drivers released by TAC (technical Assistant Centre) and HCL Support Division. I will list out both link. So basically these are the common name for HCL ME Laptop 1065 Series:
HCL ME Laptop 1065 Series
HCL ME Laptop L 1065 (Calder)
HCL ME ICON L 1065 B
HCL ME Laptop ICON L 1065 B
Compatibility:
Windows 7 32-bit, Windows 7 64-bit, Windows 8 32-bit, Windows 8 64-bit
Windows 8 drivers can be use for windows 8.1.
Drivers
- On HCL Support server this drivers listed under HCL ME Laptop L 1065
- Please Install according to the order.
Intel Chipset Installation Utility (Intel HM76 , 7 Series)
Windows 7 (32/64-bit): Download
Windows 8 (32/64-bit): Download
MEI
Intel Management Interface Driver
(not listed on Technical support site, but older HCL server provide this driver)
Select base on your operating system : Download
IRST
Intel Rapid Storage Technology Driver
Windows 7/8 (32/64-bit): Download
Graphic
Intel HD (4000) Graphic Driver With Intel Core i5 3rd Generation.
Windows 7 (32/64-bit): Download
Windows 8 (32/64-bit): Download
Hotkey
Drivers for Quicklaunch and Keyboard
Windows 7 (32/64-bit): Download
Windows 8 (32/64-bit): Download
Audio
HD Audio Drivers (Normally HCL use Realtek)
Windows 7 (32/64-bit): Download
Windows 8 (32/64-bit): Download
LAN -Ethernet
Realtek FE/GBe (RTL6139/8168/8169)Ethernet Controller
Windows 7 (32/64-bit): Download
Windows 8 (32/64-bit): Download
Camera
Integrated 2 Megapixel Camera Driver
Windows 7 (32/64-bit): Download
Windows 8 (32/64-bit): Download
Touchpad
Touchpad Drivers - Mouse Drivers (normally ALPS or Synaptic)
Windows 7 (32/64-bit): Download
Windows 8 (32/64-bit): Download
Combo Card - Wireless and Bluetooth
Realtek RTL8723ae Wireless Drivers and Realtek Bluetooth Drivers.
Windows 7 (32/64-bit): Download
Windows 8 (32/64-bit): Download
USB 3.0
Intel(R) USB 3.0 eXtensible Host Controller
Windows 7 (32/64-bit): Download
Windows 8 (32/64-bit): Automatic
( Before upgrade to windows 8, make sure to test compatibility first, if it mention USB 3.0 is not compatible, uninstall current driver on device manager, then perform the upgrade. Windows will automatically installed the compatible drivers during windows 8 installation process).
Available link for download
How To Load the Desktop Version Of Websites On Your Google Android Honeycomb Tablet
How To Load the Desktop Version Of Websites On Your Google Android Honeycomb Tablet
 Tablets are great devices for reading and browsing websites. Using the touchpad is intuitive and convenient, and tablet screens don’t present the size limitations of mobile phones. However, with tablet web browsing, you will notice that many websites automatically load their mobile version. This is because the browser you are using identifies itself as a mobile based application to the websites you are visiting.
Change The Honeycomb Browser User Agent Setting
- Open the native browser on your Android Honeycomb tablet.
- Type about:debug in the address / URL bar and press Enter.
- Don’t expect anything to happen; it will probably look like nothing happened.
- Next, open the browser’s settings via the icon in the top right corner.

- Select Settings from the drop-down menu.
- Switch to the Debug tab via the left-hand menu.
- On the right side now select UAString.
- Select Desktop.

- Click the Back button in the bottom left corner of the browser to exit settings.
- Repeat step 2 to exit debugging mode.
Use A Different Browser

Available link for download
HCL ME 2025 Series Windows 7 32Bit 64Bit Driver
HCL ME 2025 Series Windows 7 32Bit 64Bit Driver

Win7
| Model | Device Type | OS | Download |
| Series 2025 | Camera | Windows 7 64 Bit | click to Download |
| Series 2025 | OSD | Windows 7 64 Bit | click to Download |
| Series 2025 | USB 3.0 | Windows 7 64 Bit | click to Download |
| Series 2025 | Touch Pad | Windows 7 64 Bit | click to Download |
| Series 2025 | Combo Card | Windows 7 64 Bit | click to Download |
| Series 2025 | LAN | Windows 7 64 Bit | click to Download |
| Series 2025 | Card Reader | Windows 7 64 Bit | click to Download |
| Series 2025 | Audio | Windows 7 64 Bit | click to Download |
| Series 2025 | VGA | Windows 7 64 Bit | click to Download |
| Series 2025 | IME | Windows 7 64 Bit | click to Download |
| Series 2025 | AHCI | Windows 7 64 Bit | click to Download |
| Series 2025 | Chipset | Windows 7 64 Bit | click to Download |
| Series 2025 | BIOS | BIOS | click to Download |
| Series 2025 | Camera | Windows 7 32 Bit | click to Download |
| Series 2025 | Hotkey | Windows 7 32 Bit | click to Download |
| Series 2025 | Combo Card | Windows 7 32 Bit | click to Download |
| Series 2025 | Card Reader | Windows 7 32 Bit | click to Download |
| Series 2025 | Touch Pad | Windows 7 32 Bit | click to Download |
| Series 2025 | USB 3.0 | Windows 7 32 Bit | click to Download |
| Series 2025 | Audio | Windows 7 32 Bit | click to Download |
| Series 2025 | LAN | Windows 7 32 Bit | click to Download |
| Series 2025 | VGA | Windows 7 32 Bit | click to Download |
| Series 2025 | IME | Windows 7 32 Bit | click to Download |
| Series 2025 | AHCI | Windows 7 32 Bit | click to Download |
| Series 2025 | Chipset | Windows 7 32 Bit | click to Download |
| Series 2025 | Wireless_Bluetooth | Windows 7 32 Bit | click to Download |
| Series 2025 | Wireless_Bluetooth | Windows 7 32 Bit | click to Download |
| Series 2025 | LAN | Windows 7 64 Bit | click to Download |
| Series 2025 | Audio | Windows 7 64 Bit | click to Download |
| Series 2025 | USB 3.0 | Windows 7 64 Bit | click to Download |
| Series 2025 | Touch Pad | Windows 7 64 Bit | click to Download |
| Series 2025 | Card Reader | Windows 7 64 Bit | click to Download |
| Series 2025 | Wireless_Bluetooth | Windows 7 64 Bit | click to Download |
| Series 2025 | Wireless_Bluetooth | Windows 7 64 Bit | click to Download |
| Series 2025 | Hotkey | Windows 7 64 Bit | click to Download |
Available link for download
Gigabyte GA B75 D3V Driver XP Vista Win7 8 8 1 32Bit 64Bit
Gigabyte GA B75 D3V Driver XP Vista Win7 8 8 1 32Bit 64Bit
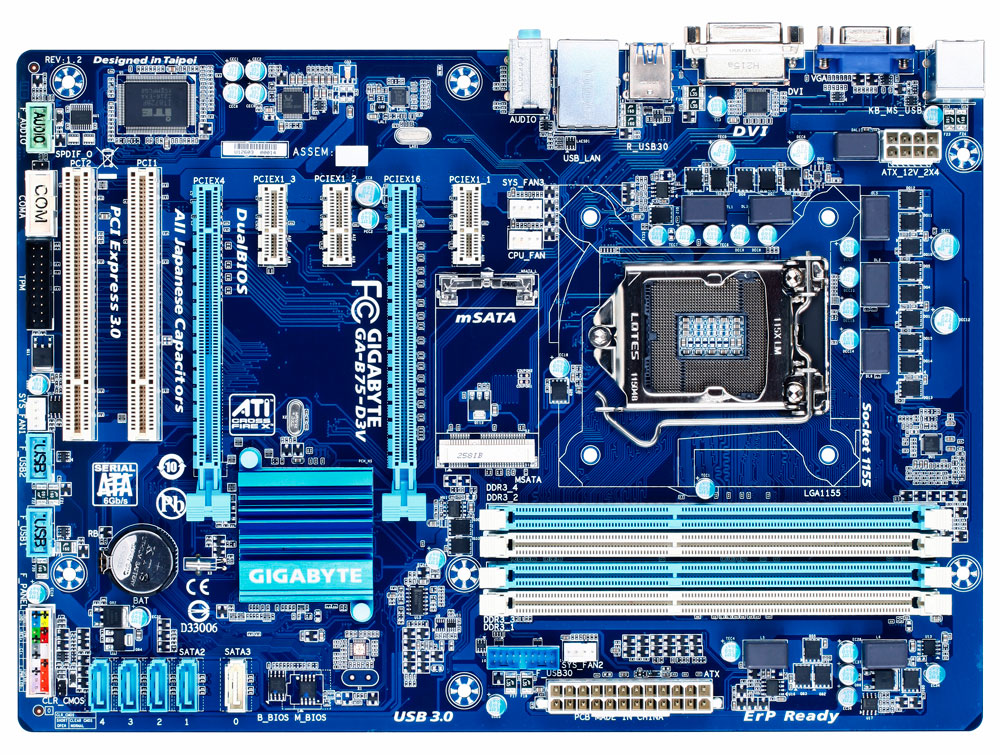
| Audio | Version | Size | Date | Download Here |
|---|---|---|---|---|
| Realtek Function driver for Realtek Azalia audio chip (Including Microsoft UAA Driver in English edition) OS:Windows 8.1 32bit,Windows 8.1 64bit | R3.75 | 315.12 MB | 2013/10/21 | Asia China America EuropeEurope(Russia) : FTP / Http |
| Realtek Function driver for Realtek Azalia audio chip (Including Microsoft UAA Driver in English edition) OS:Windows XP 32bit,Windows XP 64bit,Windows 7 32bit,Windows 7 64bit,Windows 8 32bit,Windows 8 64bit | R2.70 | 109.88 MB | 2012/07/25 | Asia China America EuropeEurope(Russia) : FTP / Http |
| Microsoft UAA (Universal Audio Architecture) Bus driver (Full Multi-language version ) OS:Windows XP 32bit,Windows 2000,Windows Server 2003 32bit | 5.10.0.5010 | 29.87 MB | 2006/10/03 | Asia China America EuropeEurope(Russia) : FTP / Http |
| Chipset | Version | Size | Date | Download Here |
|---|---|---|---|---|
| Intel Management Engine Interface OS:Windows XP 32bit,Windows XP 64bit,Windows 7 32bit,Windows 7 64bit,Windows 8 32bit,Windows 8 64bit,Windows 8.1 32bit,Windows 8.1 64bit | 9.5.15.1730 | 68.43 MB | 2013/11/26 | Asia China America EuropeEurope(Russia) : FTP / Http |
| Intel INF installation OS:Windows XP 32bit,Windows XP 64bit,Windows 7 32bit,Windows 7 64bit,Windows 8 32bit,Windows 8 64bit,Windows 8.1 32bit,Windows 8.1 64bit | 9.4.0.1027 | 1.24 MB | 2013/11/26 | Asia China America EuropeEurope(Russia) : FTP / Http |
| LAN | Version | Size | Date | Download Here |
|---|---|---|---|---|
| Atheros LAN driver OS:Windows XP 32bit,Windows XP 64bit,Windows Vista 32bit,Windows Vista 64bit,Windows 7 32bit,Windows 7 64bit,Windows 8 32bit,Windows 8 64bit,Windows 8.1 32bit,Windows 8.1 64bit | 2.1.0.21 | 2.90 MB | 2013/11/26 | Asia China America EuropeEurope(Russia) : FTP / Http |
| SATA RAID/AHCI | Version | Size | Date | Download Here |
|---|---|---|---|---|
| Intel® Rapid Storage Technology OS:Windows 7 32bit,Windows 7 64bit,Windows 8 32bit,Windows 8 64bit,Windows 8.1 32bit,Windows 8.1 64bit | 12.8.0.1016 | 14.04 MB | 2013/11/26 | Asia China America EuropeEurope(Russia) : FTP / Http |
| Intel SATA Preinstall driver (For AHCI / RAID Mode) Note: Press F6 during Windows setup to read from floppy. OS:Windows 7 64bit,Windows 8 64bit,Windows 8.1 64bit | 12.8.0.1016 | 0.43 MB | 2013/11/26 | Asia China America EuropeEurope(Russia) : FTP / Http |
| Intel SATA Preinstall driver (For AHCI / RAID Mode) Note: Press F6 during Windows setup to read from floppy. OS:Windows 7 32bit,Windows 8 32bit,Windows 8.1 32bit | 12.8.0.1016 | 0.40 MB | 2013/11/26 | Asia China America EuropeEurope(Russia) : FTP / Http |
| Hot fix (Note) After installed IRST driver, please install Hot fix. OS:Windows 8 32bit,Windows 8 64bit | 1.0.0.1 | 2.68 MB | 2012/11/26 | Asia China America EuropeEurope(Russia) : FTP / Http |
| Intel SATA Preinstall driver (For AHCI / RAID Mode) Note: Press F6 during Windows setup to read from floppy. OS:Windows XP 64bit | 11.1.0.1006 | 0.39 MB | 2012/05/30 | Asia China America EuropeEurope(Russia) : FTP / Http |
| Intel SATA Preinstall driver (For AHCI / RAID Mode) Note: Press F6 during Windows setup to read from floppy. OS:Windows XP 32bit | 11.1.0.1006 | 0.37 MB | 2012/05/30 | Asia China America EuropeEurope(Russia) : FTP / Http |
| Intel® Rapid Storage Technology OS:Windows XP 32bit,Windows XP 64bit | 11.1.0.1006 | 10.62 MB | 2012/05/30 | Asia China America EuropeEurope(Russia) : FTP / Http |
| USB 3.0 | Version | Size | Date | Download Here |
|---|---|---|---|---|
| Intel USB 3.0 Driver OS:Windows 7 32bit,Windows 7 64bit | 1.0.5.235 | 9.11 MB | 2012/07/12 | Asia China America EuropeEurope(Russia) : FTP / Http |
| VGA | Version | Size | Date | Download Here |
|---|---|---|---|---|
| Intel VGA Driver (for Ivy Bridge CPU) OS:Windows 7 64bit,Windows 8 64bit,Windows 8.1 64bit | 15.33.8.3345 | 72.50 MB | 2013/11/26 | Asia China America EuropeEurope(Russia) : FTP / Http |
| Intel VGA Driver (for Ivy Bridge CPU) OS:Windows 7 32bit,Windows 8 32bit,Windows 8.1 32bit | 15.33.8.3345 | 40.95 MB | 2013/11/26 | Asia China America EuropeEurope(Russia) : FTP / Http |
| Intel VGA Driver (for Sandy Bridge CPU) OS:Windows 7 32bit,Windows 8 32bit,Windows 8.1 32bit | 15.28.20.3347 | 72.37 MB | 2013/11/25 | Asia China America EuropeEurope(Russia) : FTP / Http |
| Intel VGA Driver (for Sandy Bridge CPU) OS:Windows 7 64bit,Windows 8 64bit,Windows 8.1 64bit | 15.28.20.3347 | 88.68 MB | 2013/11/25 | Asia China America EuropeEurope(Russia) : FTP / Http |
| Intel VGA Driver OS:Windows XP 64bit | 6.14.10.5406 | 17.08 MB | 2012/05/30 | Asia China America EuropeEurope(Russia) : FTP / Http |
| Intel VGA Driver OS:Windows XP 32bit | 6.14.10.5406 | 13.29 MB | 2012/05/30 | Asia China America EuropeEurope(Russia) : FTP / Http |
Available link for download