Wednesday, April 12, 2017
Guide How to Flash Stock ROM on Android OPPO F1 PLUS to Fix a Bootloop Removing Malware Stuck
Guide How to Flash Stock ROM on Android OPPO F1 PLUS to Fix a Bootloop Removing Malware Stuck
[Guide] How to Flash Stock ROM on Android OPPO F1 PLUS to Fix a Bootloop, Removing Malware, Stuck.
Guide Flash Stock ROM OPPO F1 PLUS.
Preparation.
- Make sure you have enough battery capacity on your OPPO F1 PLUS. Its recomended you have at least 80% of battery capacity.
- Always backup your important file (contact, music, video, app) that stored on OPPO F1 PLUS,
- Prepare the Memory Card / SD Card which has a V-Gen Brand. For some reason OPPO F1 PLUS does not recognized besides V-Gen Memory card.
- Then download OPPO F1 PLUS Stock ROM.
- Oppo F1 PLUS
- Once download finish, now copy Stock ROM from computer to the phone memory or SD Card. but note that you copy this ROM at outside not to the public folder for easy finding. (if you download ROM Via PC)
- But, Stock ROM can be download directly from yourAndroid phone. And you must have a good and stable internet connection for it, such as Wi-Fi connection.
- Rom download directly from the Android phone located in the File Manager / phone / download.
http://downloads.oppo.com.s3.amazonaws.com/firmware/X9009/X9009EX_11_OTA_013_all_201604131943.zip
Flashing Stock ROM.
- To start flashing Stock ROM on OPPO F1 PLUS you must enter Recovery Mode. how to do it ?
- Press and Hold Power Button + Volume Down.
- Then you will see menu like this picture. You can select English
- Select Wipe data and cache by pressing the power button. for Up and down choice, use the volume keys Up / Down, on the next Popup screen select Wipe your data cache to make faster process.
- If appears confirmation you can select : "YES"
- Then you will bring to previous menu, and you can select Install form sd.
- Now you will see 2 options. From mobile phone storage & form SD,.
- Previously you have copy firmware file on SD Card, So. now you must select From SD. and now you can see your Firmware file name on this screen.(Stock rom name is similar as shown on the picture below)
- Select this file name using Power Button
- For Up or Down navigation you can use volume Up and Down Button.
- Then you will see a confirmation page, and you can select yes to proceed this flash on OPPO F1 PLUS
- Just wait the process finish updating system, and your OPPO F1 PLUS will ask to you to reboot the device.
- Now you have finished flash Stock ROM on Android OPPO F1 PLUS Smartphone.
 |
| Flash Bootloop OPPO F1 PLUS |
 |
| Flash Bootloop OPPO F1 PLUS |
 |
| Flash Bootloop OPPO F1 PLUS |
 |
| Flash Bootloop OPPO F1 PLUS |
 |
| Flash Bootloop OPPO F1 PLUS |
 |
| Flash Bootloop OPPO F1 PLUS |
 |
| Flash Bootloop OPPO F1 PLUS |
 |
| Flash Bootloop OPPO F1 PLUS |
Available link for download
Monday, April 10, 2017
How to Root Yu Yureka Plus
How to Root Yu Yureka Plus
2) Go to Developer Option and disable Update Recovery
3) Enable Android Debugging
4) Install the 15-Second ADB driver file (GooGle Drive Link)
5) Download adb+fastboot zip (https://www.androidfilehost.com/?fid=95916177934556622)
6) Download Su binaries (https://download.chainfire.eu/696/SuperSU)
7) Copy UPDATE-SuperSU-v2.46.zip to an SD card
8) Download TWRP (https://s.basketbuild.com/uploads/de...7.0_YUREKA.img)
8) Connect Phone to PC and navigate to the folder where you have abd+fastboot
9) Shift+right click -> Open command prompt
Type : adb devices
If your device is connected you will get it in connected devices
Type : adb reboot-bootloader
Your phone will restart into bootloader.
Type : fastboot -i 0x1ebf oem device-info
If your bootloader is unlocked, it will say "True", else it will say "false". If it is False, then do the next step
Type : fastboot -i 0x1ebf oem unlock
WARNING : All your userdata will be GONE! Now you can root your phone in two ways
Type : fastboot -i 0x1ebf boot TWRP_V2.8.7.0_YUREKA.img
This will launch TWRP on your device. Navigate to where you saved the UPDATE-SuperSU-v2.46.zip file. Flash it, wipe Cache, Reboot and you are rooted!
Type : fastboot -i 0x1ebf flash recovery TWRP_V2.8.7.0_YUREKA.img
Your Cyanogen recovery will be replaced with TWRP. Then, unplug your device, hold volume up+down+power to boot into recovery, navigate to where you saved the UPDATE-SuperSU-v2.46.zip file. Flash it, wipe Cache, Reboot and you are rooted!
Available link for download
Sunday, April 9, 2017
How to root karbonn A4 plus
How to root karbonn A4 plus
1.Go To Settings>Security & Enable The Install From Unknown Source. (Skip If Already Enabled)
Available link for download
Friday, March 31, 2017
Gionee Marathon M5 Plus Mobile Flash File And Usb Driver Download
Gionee Marathon M5 Plus Mobile Flash File And Usb Driver Download
Gionee Marathon M5 Plus Flash File Mobile Usb Driver For Window 7-8-Xp-Vista 32-Bit 64-Bit

Related Info For Gionee Mobile Driver For USB
Supported Models For Following Gionee Marathon M5 Plus
Usb driver - Com port - Flash - MTP USB driver - Driver , Flash Supported - Mass Storage -
Lion Storage Driver - Root - Restore
Download Details
Download Driver Before You Disable Your Anti Virus and download driver after download youneed open driver and install this driver auto download driver and driver use for all windows
7 , 8 , xp and vista for 32-bit , 64-bit also supported and easily root and flash option , Flash File firmware Factory Unlocked
restore mobile fast and delete your Mobile Password Lock Break Any Keywords Passwords And
secret Code Install driver and enjoy and easily see which country brand found easily option
this driver .
Gionee Mobile Usb Driver Features :
Gionee mobile Gionee driver supported for root the mobile Gionee brands easily 1 click to root and reset for 1 click save for mobile data and battery all in one Gionee mobile driver so download now button click and download easily use but this driver only for computer install not for apk .
- Miniclip 8 Ball pool apk/ios Hack Auto Win
- bowling king hack apk and ios hack auto strikes
- Facebook credits hack apk and ios hack
- skype credits free iphone and android
- Mod Free Clash Of Clans
- Unlimited Gems Clash Of Calns
Supported Driver For Windows :
Window 7 For 32-Bit , 64-Bit Install SupportedWindow 8 For 32-Bit , 64-Bit Install Supported
Window 9 For 32-Bit , 64-Bit Install Supported
Window XP For 32-Bit , 64-Bit Install Supported
Window Vista For 32-Bit , 64-Bit Install Supported
Note:This Driver By http://flash-driver.blogspot.com/ Official Mobile Drivers For Gionee Mobile Brands Risk Free Download.
Available link for download
Monday, March 27, 2017
How to root karbonn A15 plus
How to root karbonn A15 plus
1.Go To Settings>Security & Enable The Install From Unknown Source. (Skip If Already Enabled)
Available link for download
Wednesday, March 8, 2017
How to root Karbonn A5 plus
How to root Karbonn A5 plus
1.Go To Settings>Security & Enable The Install From Unknown Source. (Skip If Already Enabled)
Available link for download
Tuesday, February 14, 2017
How to root karbonn A11 plus
How to root karbonn A11 plus
1.Go To Settings>Security & Enable The Install From Unknown Source. (Skip If Already Enabled)
Available link for download
Saturday, February 11, 2017
GIGABYTE X99 New Function QFlash Plus
GIGABYTE X99 New Function QFlash Plus
On an healthy running system, you can easily update your BIOS using the @BIOS option found in the App Center. But in the unfortunate event that both your main BIOS and Backup BIOS becomes unavailable, or that you have a new CPU that requires a different BIOS, you will not be able to boot up your system to access the App Center. That is where QFlash Plus comes handy. Here are the steps to follow to flash your BIOS using QFlash Plus.
- Make sure your USB thumb drive is formatted in FAT32 and upload the BIOS you want to flash to it. You can find the latest BIOS version for your motherboard on GIGABYTE’s website : http://www.gigabyte.com/support-downloads/download-center.aspx?ck=2
- Rename that BIOS file to GIGABYTE.BIN
- Turn OFF your system and plug in your USB thumb drive in the white USB port located at the BACK I/O panel.
- Turn your system ON and wait for the BIOS to be flashed. This step may take a few minutes, do not reboot your system or remove the USB thumb drive during that process. An LED located next to the white USB port will blink showing that the new BIOS is being uploaded to your system. Once this LED is turned off, the process is complete.
- Turn off your system, remove the USB thumb drive and restart your system.
Voila!
In the following video, Colin gives you a demonstration on how to use QFlash Plus on GIGABYTE X99 motherboards.
Available link for download
Wednesday, February 1, 2017
Gfive G Haptic Plus A77 USB Driver
Gfive G Haptic Plus A77 USB Driver

Driver Supported Following Models Of Gfive G-Haptic Plus A77 :
Gfive G-Haptic Plus A77 Modem / Com port / Android USB Driver
The package provides the installation files for Gfive G-Haptic Plus A77 ADB USB Driver.
Download File Contain Three Package:
1. All MTK USB Driver 2014 - Manual Installation
2. Universal ADB Android USB Driver - Installer
3. Latest PdaNet Driver V.A4150.exe - Installer
Drivers required to properly communicate with your MTK Phone for rooting etc...
These ADB drivers from PDA Net are the easiest to install and will work with most all MTK phones.
Supported OS:
Gfive A77 G-Haptic Plus USB Driver For Windows 7
Gfive A77 G-Haptic Plus USB Driver For Windows 8
Gfive A77 G-Haptic Plus USB Driver For Windows XP
Gfive A77 G-Haptic Plus USB Driver For Windows Vista
[ Unchecked This Option: Use our download manager and get recommended downloads ]
Mirror Link
Download Driver
Mediafire Link
Download Driver
Available link for download
Wednesday, January 25, 2017
How to root karbonn A12 plus
How to root karbonn A12 plus
STEPS TO ROOT ANDROID :-
Step 7: Now, vRoot will automatically “Reboot” your Smartphone and install the SuperSU Application
Optional: You can also verify that your device is successfully rooted or not by Root Checker Application.
Available link for download
Monday, January 9, 2017
How to root karbonn a2 plus
How to root karbonn a2 plus
? Root checker
Step-By-Step Instructions:-
1.Go To Settings>Security & Enable The Install From Unknown Source. (Skip If Already Enabled)
2.Open Settings>Application>Development>USB Debugging>Enable USB Debugging.(Skip If Already Enabled)
3.Download The frama root App From Above Link.
4.Copy It To Your Phone Sdcard. Install The App.
5.Open The App and install it
6. click super user And install super user
7.And reboot the device
8.your mobile is now rooted
9. using root checker check if the mobile rooting or not
Available link for download
Sunday, January 8, 2017
How to root karbonn A1 plus champ
How to root karbonn A1 plus champ
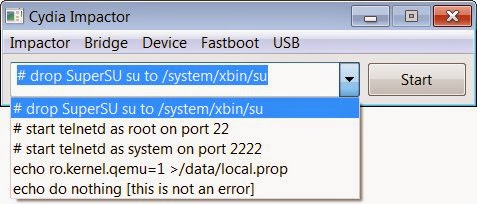
Hi guys this is raj techieguy in this tutorial i will show you how to root your Karbonn A1 plus champ with Cydia Impactor . Cydia Impactor is a GUI tool for working with Android devices. It has features already, but is still very much a work-in-progress. Right now, its key feature is an end-to-end exploit of the Android "Master Key" vulnerability, allowing a user to obtain root access on many Android devices (including Glass and TV). Almost all the android devices are support by this rooting method and download USB Driver for your mobile it will help you to connect your mobile with pc it able to update ROM or flash a custom rom very easy through pc.let us see how to root your karbonn A1 plus champ
REQUIREMENT
- Cydia Impactor
- Super user
- Root checker
- USB driver
( if you dont know how to enable developer option click here )
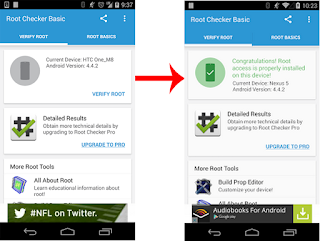
STEP 10 : Another way to check your mobile rooted or not using rootchecker to check (Below fig shows the rootchecker screenshot) Download root checker from the above link
Available link for download
Saturday, December 17, 2016
How to remove frp g928t s6 edge plus 6 0 1
How to remove frp g928t s6 edge plus 6 0 1
Hey , here is a full tutorial working trick of removing FRP Lock in s6 edge plus ( g928t ) (100%) Done

Unofficial Support Site By All Mobile Solutions
I tried some tools and box like Z3X and chimera tools but they cant be able to remove Samsung account from my Samsung g928t running on 6.0.1 versionSo the only method is first you downgrade it from 6.o.1 to 5.1.1 by using odin Because it is not possible to remove FRP in V6.o.1 then By using z3x or chimera tools you can remove FRP lock
So download the s6 edge plus ( g928t ) v5.1.1 file from the below link and flash by odin .
Download file from HERE
Note: Use this at your own risk
Follow us on Facebook
Available link for download
Friday, November 25, 2016
How to enter recovery mode in Samsung Galaxy S Plus
How to enter recovery mode in Samsung Galaxy S Plus
Methode:
1. Switch off your SGS Plus (wait until you get the vibration )
2. Now, press and hold the volume up key and the power button. Leave both buttons when you see the SAMSUNG logo.
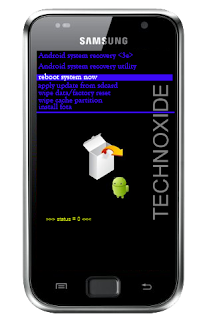
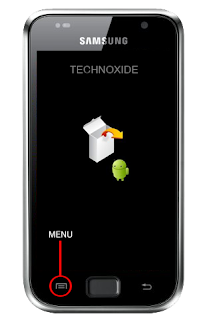
3. After "Galaxy S Plus" splash screen you will get a white box and android logo image like below,then press menu soft key and wait some second.
Thats it ! You will be in recovery mode !
Available link for download
Wednesday, November 23, 2016
How to root karbonn A1 plus duple
How to root karbonn A1 plus duple
? Root checker
? super user
Step-By-Step Instructions:-
1.Go To Settings>Security & Enable The Install From Unknown Source. (Skip If Already Enabled)
2.Open Settings>Application>Development>USB Debugging>Enable USB Debugging.(Skip If Already Enabled)
3.Download The Z4root App From Above Link.
4.Copy It To Your Phone Sdcard. Install The App.
5.Open The App&You Will Be Seeing A Button "Permanent Root".Press That.
Your Phone Will Autoboot Once, & You Are Done With Rooting Your Karbonn A1 Plus duple
6. And install super user from here
7. using root check if the mobile rooting or not
*********************************************************
Available link for download
Friday, November 18, 2016
Guide How to Install TWRP Recovery and Root Android Lenovo Vibe K5 K5 Plus
Guide How to Install TWRP Recovery and Root Android Lenovo Vibe K5 K5 Plus
[Guide] How to Install TWRP Recovery and Root Android Lenovo Vibe K5 | K5 Plus.
Lenovo Vibe K5 is the smartphone released on February, 2016. with 5,0 Inchi IPS capacitive touchscreen, 16M colors, work on Android OS, v5.1 (Lollipop), and supported with Quad-core 1.5 GHz Cortex-A53 & quad-core 1.2 GHz Cortex-A53 CPU, Qualcomm MSM8929 Snapdragon 415 chipset, Adreno 405 GPU, combined with 2 GB of RAM, 13 MP on primary camera and 5 MP on secondary camera.
Install TWRP on Lenovo Vibe K5.
- Make sure Minimal ADB and fastboot installed on your compuer. you can see this guide.
- Make sure your battery is not empty or at least has 70% of battery capacity.
- Now, switch on your Lenovo Vibe K5.
- Then enable the Developer Options.
- Go to Setting -> About Phone -> Phone Information -> tap 7 times at Build Number,
- Then, Enable USB Debugging
- Go to Settings -> Developer -> USB Debugging
- Now, Enable OEM unlock.
- Go to Settings -> Developer -> Unlock OEM
- Make sure driver for Lenovo Vibe K5 installed correctly on your computer, you can find the driver that come on the CD cell partition
- Now, connect your Lenovo Vibe K5 to the computer using original USB cable.
- Then, Download the TWRP recovery, and copy it to the folder where adb is installed on your computer.
- Download link
- Cretaed by Shreps
- TWRP version : 3.0.2.0
- File name : twrp-k5-3.0.2-r1_shreps.img
- Open a command prompt from within your fastboot folder.
- To start this command prompt just hold shift + right click, select open command prompt here.

Run ADB on computer - Now type,
- adb devices
- This command used to confirm the connection between Lenovo Vibe K5 and the computer.
- Once the connection confirmed. Now type.
- adb reboot bootloader
- If you want to temporarily boot this recovery type ,
- fastboot boot TWRP-k5-3.0.2-r1_shreps.img
- If you want to permanently flash it, type ;
- fastboot flash recovery TWRP-k5-3.0.2-r1_shreps.img
- Finish.
Root on Lenovo Vibe K5.
- This step will show you how to root Lenovo Vibe K5
- To start it, you must Download the ZIP file SuperSU v2.46
- Then save it in the micro SD card.
- Now turn off your Lenovo Vibe K5.
- Then enter to recovery mode.
- Press and hold Power Button and Volume Up button
- Then follow instruction appear on screen.
- Select recovery to install SuperSu from SD Card.
Available link for download
Sunday, November 13, 2016
How to root karbonn A9 plus
How to root karbonn A9 plus
1.Go To Settings>Security & Enable The Install From Unknown Source. (Skip If Already Enabled)
Available link for download
Thursday, November 10, 2016
Gionee Elife S Plus Mobile Flash File And Usb Driver Download
Gionee Elife S Plus Mobile Flash File And Usb Driver Download
Gionee Elife S Plus Flash File Mobile Usb Driver For Window 7-8-Xp-Vista 32-Bit 64-Bit

Related Info For Gionee Mobile Driver For USB
Supported Models For Following Gionee Elife S Plus
Usb driver - Com port - Flash - MTP USB driver - Driver , Flash Supported - Mass Storage -
Lion Storage Driver - Root - Restore
Download Details
Download Driver Before You Disable Your Anti Virus and download driver after download youneed open driver and install this driver auto download driver and driver use for all windows
7 , 8 , xp and vista for 32-bit , 64-bit also supported and easily root and flash option , Flash File firmware Factory Unlocked
restore mobile fast and delete your Mobile Password Lock Break Any Keywords Passwords And
secret Code Install driver and enjoy and easily see which country brand found easily option
this driver .
Gionee Mobile Usb Driver Features :
Gionee mobile Gionee driver supported for root the mobile Gionee brands easily 1 click to root and reset for 1 click save for mobile data and battery all in one Gionee mobile driver so download now button click and download easily use but this driver only for computer install not for apk .
- Miniclip 8 Ball pool apk/ios Hack Auto Win
- bowling king hack apk and ios hack auto strikes
- Facebook credits hack apk and ios hack
- skype credits free iphone and android
- Mod Free Clash Of Clans
- Unlimited Gems Clash Of Calns
Supported Driver For Windows :
Window 7 For 32-Bit , 64-Bit Install SupportedWindow 8 For 32-Bit , 64-Bit Install Supported
Window 9 For 32-Bit , 64-Bit Install Supported
Window XP For 32-Bit , 64-Bit Install Supported
Window Vista For 32-Bit , 64-Bit Install Supported
Note:This Driver By http://flash-driver.blogspot.com/ Official Mobile Drivers For Gionee Mobile Brands Risk Free Download.
Available link for download