Wednesday, April 12, 2017
Guide How to Flash Stock ROM on Android OPPO F1 PLUS to Fix a Bootloop Removing Malware Stuck
Guide How to Flash Stock ROM on Android OPPO F1 PLUS to Fix a Bootloop Removing Malware Stuck
[Guide] How to Flash Stock ROM on Android OPPO F1 PLUS to Fix a Bootloop, Removing Malware, Stuck.
Guide Flash Stock ROM OPPO F1 PLUS.
Preparation.
- Make sure you have enough battery capacity on your OPPO F1 PLUS. Its recomended you have at least 80% of battery capacity.
- Always backup your important file (contact, music, video, app) that stored on OPPO F1 PLUS,
- Prepare the Memory Card / SD Card which has a V-Gen Brand. For some reason OPPO F1 PLUS does not recognized besides V-Gen Memory card.
- Then download OPPO F1 PLUS Stock ROM.
- Oppo F1 PLUS
- Once download finish, now copy Stock ROM from computer to the phone memory or SD Card. but note that you copy this ROM at outside not to the public folder for easy finding. (if you download ROM Via PC)
- But, Stock ROM can be download directly from yourAndroid phone. And you must have a good and stable internet connection for it, such as Wi-Fi connection.
- Rom download directly from the Android phone located in the File Manager / phone / download.
http://downloads.oppo.com.s3.amazonaws.com/firmware/X9009/X9009EX_11_OTA_013_all_201604131943.zip
Flashing Stock ROM.
- To start flashing Stock ROM on OPPO F1 PLUS you must enter Recovery Mode. how to do it ?
- Press and Hold Power Button + Volume Down.
- Then you will see menu like this picture. You can select English
- Select Wipe data and cache by pressing the power button. for Up and down choice, use the volume keys Up / Down, on the next Popup screen select Wipe your data cache to make faster process.
- If appears confirmation you can select : "YES"
- Then you will bring to previous menu, and you can select Install form sd.
- Now you will see 2 options. From mobile phone storage & form SD,.
- Previously you have copy firmware file on SD Card, So. now you must select From SD. and now you can see your Firmware file name on this screen.(Stock rom name is similar as shown on the picture below)
- Select this file name using Power Button
- For Up or Down navigation you can use volume Up and Down Button.
- Then you will see a confirmation page, and you can select yes to proceed this flash on OPPO F1 PLUS
- Just wait the process finish updating system, and your OPPO F1 PLUS will ask to you to reboot the device.
- Now you have finished flash Stock ROM on Android OPPO F1 PLUS Smartphone.
 |
| Flash Bootloop OPPO F1 PLUS |
 |
| Flash Bootloop OPPO F1 PLUS |
 |
| Flash Bootloop OPPO F1 PLUS |
 |
| Flash Bootloop OPPO F1 PLUS |
 |
| Flash Bootloop OPPO F1 PLUS |
 |
| Flash Bootloop OPPO F1 PLUS |
 |
| Flash Bootloop OPPO F1 PLUS |
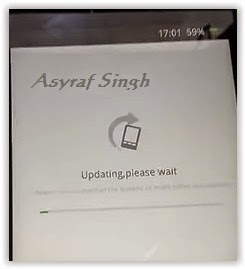 |
| Flash Bootloop OPPO F1 PLUS |
Available link for download
How to make money with affiliate program if you are A blogger
How to make money with affiliate program if you are A blogger

There are many ways to be an affiliate. Most bloggers sign up with an affiliate network because it’s a one-stop place to find many programs to join. You apply to the network and then apply to individual programs in the network. They give you special links to use or banner ads that track clicks and sales. You can link to a website or to a specific product. When someone clicks on your link or ad and makes a purchase you make a percent of the sale, usually around 10%. Some programs give you a percent of any sales from their website from someone who came from your link, up to 30 days or longer.
The advantage of joining a network is you manage many different businesses and get paid from the network, rather than getting individual checks and logging onto different sites. You usually get paid once a month and you can log in and see your sales and what you’re making at any time (remind you of The Blogger Network?).
When you apply to be an affiliate, you are called a “publisher”. The brand or business is called the “merchant”. Some of the signup processes are not very user-friendly but they all involve filling out an application and getting approved by the network. Once approved you can search for merchants to promote. Once accepted, the merchant provides links and creative you can use on your blog.
There are many ways to be an affiliate, here are some examples:
Be an Event Affiliate
Many conferences or events have affiliate programs. It can be as simple as a discount code that if someone uses you code, you’ll make money to a more formal setup. Eventbrite makes it easy to set up affiliates because it’s easy to create a signup code and then track when someone uses that code to sign up. Then the conference organizer will pay you a percentage of the total sales.
Earn Money Promoting Free Products
You can be an affiliate for free things like free ebooks, downloads, coupons (Coupons.com has an affiliate program) free trials, or even by posting recipes (such as with My Recipe Magic – please note the site is temporarily down). There are also affiliates who get paid when someone fills out a lead form, such as applying for a credit card.
Every blogger can create a page of their favorite resources and use affiliate links in the post (be sure to disclose that they are affiliate links though).
Example: the Lemons for Lulu blog has a post that shows the camera, web hosting, WordPress theme, books and other things she uses and loves. See http://www.lemonsforlulu.com/blogger-resources.
Create Helpful Posts and Use Affiliate Links
You could do a post about your favorite plugins and include affiliate links to any paid ones. Many affiliate programs will allow you to promote products directly on social media. We’ve seen fashion bloggers directly link to buy pages on Facebook, for example.
Post about how to start a blog in your niche and link to the web hosting company where they buy a domain, link to the paid theme you recommend, etc. This blog post from Pinch of Yum tells how to start a food blog and includes many affiliate links: http://pinchofyum.com/resources/how-to-start-a-food-blog.
Another way to get started is to go see what your most popular posts are and see if there are ways you could use affiliate links in the post. For example, if you have a recipe that goes viral on Pinterest, you could monetize that post. You can create a box that lists all the ingredients or supplies needed and then link to stores that carry those products. You can link to either Walmart, Target or Amazon in most posts. If you’re higher end you might link to Williams Sonoma, Pottery Barn or other retailer. Don’t just think about food, think about the tools, dishes or other parts of your post. If someone ever asks, where did you get that platter, that’s an opportunity for you.
The good news is, you will get paid on the entire order, so if someone buys anything because of your link, you make money.
To get started, look at the major affiliate networks:
Commission Junction www.Cj.com
This is one of the largest affiliate networks. Here is the sign up page: https://signup.cj.com/member/publisherSignUp.do
Linkshare www.Linkshare.com
Amazon – www.Amazon.com (find the associates link in the footer to apply)
Amazon pays less than a lot of programs but it has a huge selection and user-friendly tools. The name of the game here is to sell quantity because the margins are small. Still, there is a lot of brand trust and many people, especially those with Amazon Prime, prefer to order from Amazon.
Share A Sale www.ShareASale.com
This network has many smaller and mid-sized businesses, including niche products and brands you might not already know.
Clickbank www.Clickbank.com
This program carries information products and ebooks. Since there is very little cost once the product is created, you can get very high commissions. Some offer to 75% commissions on products. Commissions are paid weekly, and direct deposit is available to its affiliates.
AvantLink – www.AvantLink.com
This network has cutting edge tools and more advanced features such as data feeds.
We hope that this helps you understand how affiliate marketing works enough so that you can get started. Please let us know if we missed anything! To inspire you, here’s another post from Pinch of Yum that breaks down how much they make from different revenue streams, including affiliate marketing.
Available link for download
Monday, April 10, 2017
How to create a RESUME
How to create a RESUME
1. Start by making a list of all the jobs you had and the dates. Dont leave anything out. Include jobs, awards, educational degrees, skills, personal projects: anything that would be impressive and/or interesting to anyone (even if not impressive or interesting to everyone). Even after your resume is finished, maintain this list. That way, you dont have to revisit those portions year after year. Organize your list by category.
2. Tailor your list to the position youre applying for (this will require a bit of research). Trim out each item that is not directly relevant to the job and add on two or three sentences explaining the relevance of each item. Whenever possible, list your experience in terms of accomplishments and achievements rather than tasks and responsibilities. Show your success. You may end up with many different versions of your resume, each one emphasizing a different set of skills.
3. Consider stating your objective. Again, keep this short and to the point, a single sentence. Personalize it to the position. Make sure your objective doesnt contradict the position you are applying for. Many employers will ignore an objective; so if it doesnt add something to the resume, dont include it.
4. Its time to format. Mind the look and feel of your resume. It should have clean lines and be easy to read. Make it two pages max, and only one page if youre just out of school - if you have more to share, save it for the interview. The font should be 10-13, no smaller, no bigger, but you should be able to read it well when you print it out. Black and white is best unless youre emphasizing your artistic or publishing skills (and even then be careful and tasteful). Keep the format neat and organized.
5. Include an address, phone number and email address. But, do not include an email that shows you shouldnt be taken seriously, such as beerandboys@email.com. Dont use your current employers name, number or email, either. If necessary, get an extra email address with a professional name that you can use for job searches.
6. Proofread, proofread and proofread again. Have a friend or professional that you trust proofread. Have an enemy proofread. Have a stranger proofread. Then proof again! Take criticism well and remember that just because someone suggests something doesnt mean you have to make the change. Dont boast about written communication skills with a typo.
7. Toot your own horn, but be careful. There is a fine line between arrogance and confidence. Try not to cross that line.
8. Follow directions. This is a huge indicator of responsibility to a hiring manager. If the ad says "no calls please," then dont call! If the job description asks you to provide your salary history, then you will probably want to include that information in your resume. However, this is not an absolute: it may limit your negotiating power to get the best possible salary.
Tips
* The point of a resume is not to get the job, its to get the interview. Focus on your best accomplishments. Focus on things youve accomplished so that whoever reads the resume will think, "I want to find out more about how this person did that."
* Be consistent! Format each entry in your resume in the same way.
* Include an Executive Summary. Many (most?) resumes only get a brief look-through (there may well be 40 applicants for one job). Sometimes, just five or ten seconds is spent scanning through on each one. Therefore,consider including an Executive Summary as the very first thing the employer sees. This will be a concise (3-5 line) note on your education, experience, and abilities. Label this prominently (in a contrasting colour).
* Dont over-qualify yourself for a position. Give enough information for interest and save the "wow" factor for the interview. Write the resume for the position you are applying for without altering the truth.
* Dont go overboard with your attachments! Dont attach 6 letters of recommendation, your diploma, your birth certificate, and your CPR and fitness certifications. Indicate your current certifications and be prepared to give references upon request.
* If you list your references in your resume (which many employers request anyway), be sure you have their permission to list them.
* If youre just out of school put your educational details in before your employment details, with the most recent first on both of them. If youve been out of school for more than a year, or you have significant job credentials then list past employment and accomplishments first.
* Consider leading with your strong suit, whether it be education, skills, work or volunteer experience. The idea is to showcase your strengths and minimize your weaknesses.
* Detail your duties within each position but dont go overboard. Accomplishments are more impressive than duties. "Cut expenses by 25% over six months while maintaining historic revenue levels," is more impressive than, "Was responsible for a $500,000 budget." The latter says, "I did this," the former says, "I did this and I can do it for you."
* Highlight your expertise in any particular skills that will impress the interviewer, such as software programs, foreign languages, customer service, or anything else that might be relevant to the job.
* Listing personal hobbies is optional (and can make you look well-rounded), but make sure they are sending the right impression. You may be proud of your skateboarding prowess, but the employer will probably be more impressed with your Toastmasters International speaking experience.
* Quantify your accomplishments, if possible, by applying specific numbers to your successes. For instance, if you streamlined the flow of work for your department, define how much time it saved the company over a period of, say, 4 months. Time is money.
* Think hard about what youve done and what youve accomplished. Many people are somewhat shy and modest about what they have done on the job. Dont be! For instance, instead of saying "answered phones," say "answered multi-line phone and routed calls for an office of 43 people." The example here shows the prospective employer the volume of work youve handled and the complexity of the equipment.
* Consider double submissions: Send one application to Human Resources, another to the most applicable ranking officer (research and find out who that is). HR clerks have been known to disqualify resumes on a technicality, while it may catch the (less bureaucratically inclined) officers eye.
* If possible, keep the resume for a day or two before reading it again. You may think of something else you want to add before submitting it to prospective employers.
* Write a cover letter that is short, sweet and to the point (and specifically written for the job youre applying for). If at all possible, do not write more than a page-long cover letter (make sure, though, that you include everything the employer asks for). Try and remember that the person reading it is probably looking at hundreds of resumes. Address logical questions in your cover letter. If youre applying for a position in California but your resume has a New York address, explain why. If you dont, the reader will probably trash the resume (unless the company is ready and willing to pay for a relocation package).
* Keep your layout simple. For example, dont use too many type fonts, two or three at most. Sans-serif fonts are best for headers, serif fonts are best for listing the details. White space is free and makes for easier reading. Be very careful in using colour (except very occasionally and for emphasis). Make it easy for the employer to find the information he wants.
* Backup your resume, on a USB, hard-copy, or even in the draft folder of your email.
* Do not pad your resume. This may be illegal, and, if discovered, may well cost you the job, if not immediately, then months or even years later.
* Do not include irrelevant personal information. This includes age, religion, political affiliation, race, and similar (unless these are job-related).
* Be culturally aware. In some cultures it is customary to list your age, marital status, and family status, it is not common everywhere (such as in the US). If you think age is important, you can allude to it with the year you graduated college or high school. Otherwise, these dates arent necessary. Beware that, depending on the industry, you may face age discrimination if you graduated many years ago. For example, in creative industries, having graduated more than a few years ago may disqualify you from getting an interview for a junior position.
* Including a photograph? In some countries, or for certain jobs, this is expected. Elsewhere, it may be illegal for the employer to ask for one. It certainly personalizes your resume and adds visual appeal (assuming you dont make Quasimodo look handsome!)
* Fill-in-the-blank style resume builders are readily available, particularly on Microsoft word processors.
* Draft, re-draft, and revise again!
* Remember, the resume lands you the interview and the interview gets you the job!
Available link for download
Monday, April 3, 2017
How To Get A Global Menu In Xubuntu 16 04 Or Lubuntu 16 04 Using TopMenu
How To Get A Global Menu In Xubuntu 16 04 Or Lubuntu 16 04 Using TopMenu
How to install and get TopMenu to work in Xubuntu 16.04
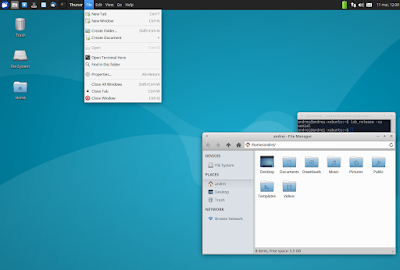
1. Install all the required packages
sudo apt install xfce4-topmenu-plugin libtopmenu-client-gtk2-0 libtopmenu-server-gtk2-0 libtopmenu-client-gtk3-0 libtopmenu-server-gtk3-0 topmenu-gtk2 topmenu-gtk32. Load TopMenu via /etc/profile.d/
pkexec mousepad /etc/profile.d/topmenu-gtk.sh#!/bin/sh
export GTK_MODULES=$GTK_MODULES:topmenu-gtk-moduleTo add TopMenu to the Xfce panel, right click the panel, select Panel > Panel Preferences and on the "Items" tab, click "+" and add TopMenu, then use the up and down arrows to move the applet to the desired location:
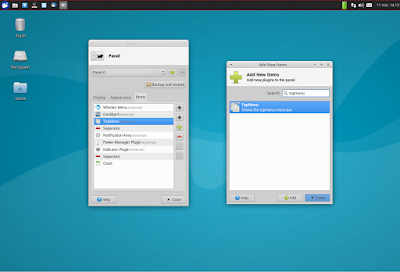
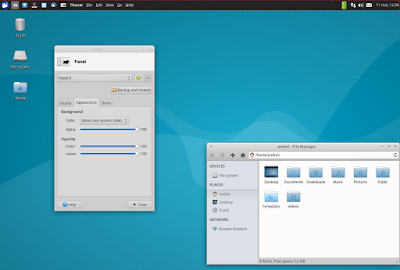
How to install and get TopMenu to work in Lubuntu 16.04
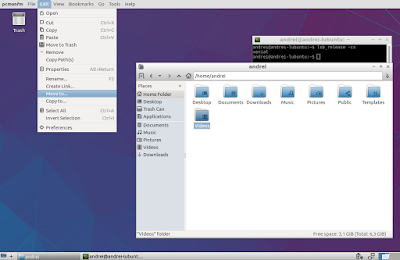
1. Install all the required packages
sudo apt install lxpanel-plugin-topmenu libtopmenu-client-gtk2-0 libtopmenu-server-gtk2-0 libtopmenu-client-gtk3-0 libtopmenu-server-gtk3-0 topmenu-gtk2 topmenu-gtk32. Load TopMenu via /etc/profile.d/
gksu leafpad /etc/profile.d/topmenu-gtk.sh#!/bin/sh
export GTK_MODULES=$GTK_MODULES:topmenu-gtk-module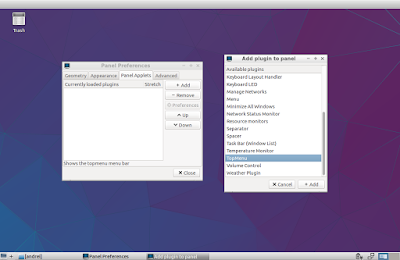
Originally published at WebUpd8: Daily Ubuntu / Linux news and application reviews.
Available link for download
Guide How to Flash Stock ROM on Android OPPO R2001 YOYO to Fix a Bootloop Removing Malware Stuck
Guide How to Flash Stock ROM on Android OPPO R2001 YOYO to Fix a Bootloop Removing Malware Stuck
[Guide] How to Flash Stock ROM on Android OPPO R2001 YOYO to Fix a Bootloop, Removing Malware, Stuck.
Guide Flash Stock ROM OPPO R2001 YOYO.
Preparation.
- Make sure you have enough battery capacity on your OPPO R2001 YOYO. Its recomended you have at least 80% of battery capacity.
- Always backup your important file (contact, music, video, app) that stored on OPPO R2001 YOYO,
- Prepare the Memory Card / SD Card which has a V-Gen Brand. For some reason OPPO R2001 YOYO does not recognized besides V-Gen Memory card.
- Then download OPPO R2001 YOYO Stock ROM.
- Oppo R2001 YOYO
- Once download finish, now copy Stock ROM from computer to the phone memory or SD Card. but note that you copy this ROM at outside not to the public folder for easy finding. (if you download ROM Via PC)
- But, Stock ROM can be download directly from yourAndroid phone. And you must have a good and stable internet connection for it, such as Wi-Fi connection.
- Rom download directly from the Android phone located in the File Manager / phone / download.
http://assorted.downloads.oppo.com/firmware/R2001/R2001_11.A.14_OTA_INT_014_all_151016.zip
Flashing Stock ROM.
- To start flashing Stock ROM on OPPO R2001 YOYO you must enter Recovery Mode. how to do it ?
- Press and Hold Power Button + Volume Down.
- Then you will see menu like this picture. You can select English
- Select Wipe data and cache by pressing the power button. for Up and down choice, use the volume keys Up / Down, on the next Popup screen select Wipe your data cache to make faster process.
- If appears confirmation you can select : "YES"
- Then you will bring to previous menu, and you can select Install form sd.
- Now you will see 2 options. From mobile phone storage & form SD,.
- Previously you have copy firmware file on SD Card, So. now you must select From SD. and now you can see your Firmware file name on this screen.(Stock rom name is similar as shown on the picture below)
- Select this file name using Power Button
- For Up or Down navigation you can use volume Up and Down Button.
- Then you will see a confirmation page, and you can select yes to proceed this flash on OPPO R2001 YOYO
- Just wait the process finish updating system, and your OPPO R2001 YOYO will ask to you to reboot the device.
- Now you have finished flash Stock ROM on Android OPPO R2001 YOYO Smartphone.
 |
| Flash Bootloop OPPO R2001 YOYO |
 |
| Flash Bootloop OPPO R2001 YOYO |
 |
| Flash Bootloop OPPO R2001 YOYO |
 |
| Flash Bootloop OPPO R2001 YOYO |
 |
| Flash Bootloop OPPO R2001 YOYO |
 |
| Flash Bootloop OPPO R2001 YOYO |
 |
| Flash Bootloop OPPO R2001 YOYO |
 |
| Flash Bootloop OPPO R2001 YOYO |
Available link for download
Sunday, April 2, 2017
How to burn a CD DVD Using Windows Default CD DVD Burning Program In Windows 10
How to burn a CD DVD Using Windows Default CD DVD Burning Program In Windows 10
Available link for download
Saturday, April 1, 2017
Heres a Guide to GIGABYTEs 3D OSD
Heres a Guide to GIGABYTEs 3D OSD
Any PC enthusiast knows that information is critically important. Not knowing how your PC is performing is like being blind: without knowing the games FPS, CPU speed, temperature, RAM speed, etc you dont know if your components are performing at their best.
Thankfully GIGABYTE has a solution: 3D OSD.
3D OSD allows the user to see key information about their system. This information is overlaid on their screen, above whatever program is running in the background. For instance, the user can see if their CPU and GPU temperature spikes when running a demanding game -- a sign that the coolers inside the system arent working properly.
If youd like a hands-on look at how 3D OSD works, check out the video below:
Available link for download
How to remove write protection from a USB flash drive
How to remove write protection from a USB flash drive


Close Regedit exe and remove your USB drive .Then restart your PC.
Step 5

Available link for download
Monday, March 27, 2017
How to Set A Password to Samsung Galaxy Gio GT S5660
How to Set A Password to Samsung Galaxy Gio GT S5660

Setting a strong password to your Samsung Galaxy Gio GT-S5660 is greatly helpful in protecting the personal and confidential phone data. Therefore, do not hesitate a moment to follow the steps introduced in this article to set a password to your phone.
Related Articles:
How to Set Pattern Lock on Samsung Galaxy Gio GT-S5660
Android USB Driver for Samsung
Available link for download
Saturday, March 25, 2017
Guide How to Flash Stock ROM on Android OPPO NEO 3 to Fix a Bootloop Removing Malware Stuck
Guide How to Flash Stock ROM on Android OPPO NEO 3 to Fix a Bootloop Removing Malware Stuck
[Guide] How to Flash Stock ROM on Android OPPO NEO 3 to Fix a Bootloop, Removing Malware, Stuck.
Guide Flash Stock ROM OPPO NEO 3.
Preparation.
- Make sure you have enough battery capacity on your OPPO NEO 3. Its recomended you have at least 80% of battery capacity.
- Always backup your important file (contact, music, video, app) that stored on OPPO NEO 3,
- Prepare the Memory Card / SD Card which has a V-Gen Brand. For some reason OPPO NEO 3 does not recognized besides V-Gen Memory card.
- Then download OPPO NEO 3 Stock ROM.
- Oppo NEO 3
- Once download finish, now copy Stock ROM from computer to the phone memory or SD Card. but note that you copy this ROM at outside not to the public folder for easy finding. (if you download ROM Via PC)
- But, Stock ROM can be download directly from yourAndroid phone. And you must have a good and stable internet connection for it, such as Wi-Fi connection.
- Rom download directly from the Android phone located in the File Manager / phone / download.
http://assorted.downloads.oppo.com/firmware/R831K/R831K_11.A.16_OTA_INT_016_all_151103.zip
Flashing Stock ROM.
- To start flashing Stock ROM on OPPO NEO 3 you must enter Recovery Mode. how to do it ?
- Press and Hold Power Button + Volume Down.
- Then you will see menu like this picture. You can select English
- Select Wipe data and cache by pressing the power button. for Up and down choice, use the volume keys Up / Down, on the next Popup screen select Wipe your data cache to make faster process.
- If appears confirmation you can select : "YES"
- Then you will bring to previous menu, and you can select Install form sd.
- Now you will see 2 options. From mobile phone storage & form SD,.
- Previously you have copy firmware file on SD Card, So. now you must select From SD. and now you can see your Firmware file name on this screen.(Stock rom name is similar as shown on the picture below)
- Select this file name using Power Button
- For Up or Down navigation you can use volume Up and Down Button.
- Then you will see a confirmation page, and you can select yes to proceed this flash on OPPO NEO 3
- Just wait the process finish updating system, and your OPPO NEO 3 will ask to you to reboot the device.
- Now you have finished flash Stock ROM on Android OPPO NEO 3 Smartphone.
 |
| Flash Bootloop OPPO NEO 3 |
 |
| Flash Bootloop OPPO NEO 3 |
 |
| Flash Bootloop OPPO NEO 3 |
 |
| Flash Bootloop OPPO NEO 3 |
 |
| Flash Bootloop OPPO NEO 3 |
 |
| Flash Bootloop OPPO NEO 3 |
 |
| Flash Bootloop OPPO NEO 3 |
 |
| Flash Bootloop OPPO NEO 3 |
Available link for download