Showing posts with label protection. Show all posts
Showing posts with label protection. Show all posts
Monday, April 10, 2017
How to remove bypass please enter the Privacy Protection
How to remove bypass please enter the Privacy Protection
With this Miracle Box method, you wont need to flash the phones firmware to fix this "please enter the privacy protection password to unlock" error. Some Supported :- Spice , karbonn , lava , micromax , intex , vivo , and More
Requirement
* Download Miracle Box (MIRACLE BOX SETUP DOWNLOAD HERE)
* PC windows
* USB cord
* Manually Install Mediatek VCOM drivers (see MTK USB DRIVER DOWNLOAD )
IF YOU NEED FIRMWARE ALL MOBILES TO CLICK HERE
Note:-
If this method fails to work for whatever reason then you can always use the SP Flash tool format method (SP FLASH TOOL DOWNLOAD HERE)
Procedure
1. Extract the content of the Miracle Box to your desktop. Open the folder and run "Miracle_Loader_2.27A"

2. Wait till the Miracle Box program is launched

3. Click on the MTK tab

4. Click on the Unlock / Fix tab

5. Tick Clear Anti-theft

6. Click the dropdown box and select your chipset type MT****

7. Click the Start Button

8. Connect the phone to the PC (must be switched off still with battery inside)
9. Press the power button once (this is to ensure that your device is detected immediately). DO NOT hold down the power button else the phone will boot up normally
10. Wait for the message ">>Done. (Need to wait a few minutes the phone is switched)"
11. Disconnect and power on the phone !!!!! Download This App For future App !!!!!
Requirement
* Download Miracle Box (MIRACLE BOX SETUP DOWNLOAD HERE)
* PC windows
* USB cord
* Manually Install Mediatek VCOM drivers (see MTK USB DRIVER DOWNLOAD )
IF YOU NEED FIRMWARE ALL MOBILES TO CLICK HERE
Note:-
If this method fails to work for whatever reason then you can always use the SP Flash tool format method (SP FLASH TOOL DOWNLOAD HERE)
Procedure
1. Extract the content of the Miracle Box to your desktop. Open the folder and run "Miracle_Loader_2.27A"
2. Wait till the Miracle Box program is launched
3. Click on the MTK tab
4. Click on the Unlock / Fix tab
5. Tick Clear Anti-theft
6. Click the dropdown box and select your chipset type MT****
7. Click the Start Button
8. Connect the phone to the PC (must be switched off still with battery inside)
9. Press the power button once (this is to ensure that your device is detected immediately). DO NOT hold down the power button else the phone will boot up normally
10. Wait for the message ">>Done. (Need to wait a few minutes the phone is switched)"
11. Disconnect and power on the phone !!!!! Download This App For future App !!!!!
Available link for download
Saturday, April 1, 2017
How to remove write protection from a USB flash drive
How to remove write protection from a USB flash drive
Today i will show how to remove write protection from a USB flash drive (pendrive).When a pendrive is write protected, no files cannot be copied to it. It cannot be formatted also.When ever you will try to format the pendrive it will show you an error message -"Disk is Write Protected" exactly like the picture show below
 In order to format the penndrive and remove the write protection you need to do the following steps below:
First check whether the USB drive has a write protection switch on the bottom or the sides of the drive If it has a write protection switch then push the switch to the unlock position.Then insert the pendrive to your pcs USB port & go to "My computer".select that USB drive and right click on it and then Click on the Format.A dialog box will appear exactly like the picture below


Step 5

click on the start button and your USB drive will be formatted.
If above method doesnt work then you have to remove the write protection manually.In order to do this ..do the following steps below.
Step 1
Open the Start menu & go to "run".Type "regedit "& press enter or click on OK.This will open the windows registry editor.
Step 2
Navigate to the following path - " HKEY_LOCAL_MACHINESYSTEMCurrentControlSetControlStorageDevicePolicies "
Step 3
After that Double-click on the "WriteProtect" value in the right-hand pane of the Regedit.exe. Change the Value data from 1 to 0 and then click OK to save the change.
Step 4
Close Regedit exe and remove your USB drive .Then restart your PC.
Close Regedit exe and remove your USB drive .Then restart your PC.
Step 5
After restarting you pc connect your USB drive again and u will find it is not longer right protected.Then format the USB drive manually in the normal way by right clicking on it and choosing Format.
Note-
Sometimes you may find that StorageDevicePolicies doesnt exist .In such cases you need to create it manually. In order to do this. simply right click on the black spaces of the control folder & choose New -> key and enter the following name "StorageDevicePolicies"
Now Double click on the new key and right click then choose New -> DWORD.Name it WriteProtect then set the value to 0.Then click ok,exit regedit & reboot your pc..Hope this will work... :)
I will be posting a video tutorial on this..keep visiting regularly
REGARDS
SHANKHA JANA
Available link for download
Wednesday, January 4, 2017
How to remove privacy password protection on mtk device
How to remove privacy password protection on mtk device
How to remove privacy password protection on mtk device using miracle box
This easy guard will guide you on how to remove privacy password protection on mtk device using miracle box crack
Download miracle box latest version from here
Launch Miracle Box
Under MTK tab click Unlock/Fix
Tick Clear Anti-theft
Click Start button
When the backup flash pop up appears, Select NO
Connect the device to PC
Miracle Box will detect the device and start the process
When you see Done!, the process is complete
Disconnect and reboot phone
Note
First boot after this process is a bit longer than normal
See Picture Guide below
see picture guide below

Available link for download
Tuesday, December 27, 2016
How to Bypass Factory Reset Protection on Nexus Devices FRP lock bypass
How to Bypass Factory Reset Protection on Nexus Devices FRP lock bypass
How to Bypass Factory Reset Protection on Nexus Devices- FRP lock bypass
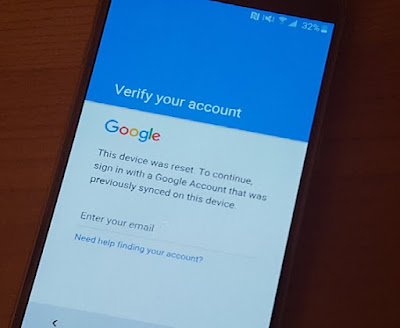
Security is a major concern on every Android device. To make your device more secure Google introduced a new security measure in Android 5.0 A.K.A. Android Lollipop called Factory Reset Protection (FRP). If you are already familiar with the term factory reset, you may have figured out what FRP is. Factory Reset protection keeps your data safe in case your device gets stolen. It does so by requiring authentication after a factory reset to make the device usable.
Once the factory reset is done and the process to setup the device begins, the device will ask to enter the Google account and password that was previously linked with the device. This is Factory Reset Protection. Now, the device is not useful to the thief. Thank you, Google!
What if, instead of losing your device, you forget your password and Google account details? You are stuck; you can’t even make it usable via factory resetting your device (thanks to FRP). You already know that in order to activate FRP you must attach a Google account to your device, set a security option, and factory reset your device via stock recovery menu. If you happen to have a Nexus device (probably a recent one like Nexus 6P, 5X, Nexus 6, and 5) than the Factory Reset Protection can be bypassed in just a few minutes. Here’s how to do it.
Requirement for Performing This Procedure:
The device on which we performing this trick must have a SIM card in it.
Bypass Factory Reset Protection on Nexus Devices
Let’s begin!
Turn off your phone, enter into recovery menu, and factory reset your device.
Now you’ll see the setup wizard. Tap on any Wi-Fi connection to get the “enter password” field. But instead of entering the password hold down “,” button and go into settings.
Tap on language and then tap on the three vertical dots on the top right of the screen and then tap on “Help & feedback”.
Now you’ll get a search bar. Type anything there and hold the text and then select “Share” from the popup menu.
Choose the option to share it via Google messenger. Once the app opens, tap on “New message”.
Dial any number in the “To” input field and then tap on “Send to”.
You’ll see a contact’s like icon on the top right of the next screen. Tap on it and then tap on the “tick mark” icon. This will bring up phone icon that will let you make a call.
Once the call is placed hit the pause button and then hit add dialler button. This will bring up the dialler.
In the input field, type *#*#4636#*#*. Doing so will open up the test mode.
Tap on “Usage statistics” and then tap on the back option. Now you’ll be in device’s settings menu.
From the settings, you can factory reset your phone.
Now, the requirement for FRP to appear is that a Google account must be attached and your phone must have security option enabled. Since neither of these requirements is fulfilled while factory resetting the device for the second time, FRP will be bypassed.
Available link for download
Saturday, October 22, 2016
How to Bypass Factory Reset Protection on Samsung Devices
How to Bypass Factory Reset Protection on Samsung Devices
How to Bypass Factory Reset Protection on Samsung Devices
Security is a major concern on every Android device. To make your device more secure Google introduced a new security measure in Android 5.0 A.K.A. Android Lollipop called Factory Reset Protection (FRP). If you are already familiar with the term factory reset, you may have figured out what FRP is. Factory Reset protection keeps your data safe in case your device gets stolen. It does so by requiring authentication after a factory reset to make the device usable.
Imagine this scenario: You lost your device or your device got stolen. Now, the first thing that a thief will do is to factory reset your device so that he can use it by himself or sell it to someone else. But since you have already attached your Google account with your device and have set a security option (PIN, Password, etc.), the thief will not be able to factory reset it from the settings. He will have to do it via stock recovery option (which is pretty simple, BTW). Once the factory reset is done and the process to setup the device begins, the device will ask to enter the Google account and password that was previously linked with the device. This is Factory Reset Protection. Now, the device is not useful to the thief. Thank you, Google!
What if, instead of losing your device, you forget your password and Google account details? You are stuck; you can’t even make it usable via factory resetting your device (thanks to FRP). You already know that in order to activate FRP you must attach a Google account to your device, set a security option, and factory reset your device via stock recovery menu. If you happen to have a Samsung device (probably a recent one like Galaxy S6/S6 Edge, S7/S7 Edge, Note 5, etc.) than the Factory Reset Protection can be bypassed in just a few minutes. Here’s how to do it.
Requirements For Performing This Procedure:
- An OTG drive
- Download bypass Google verify.apk
Bypass Factory Reset Protection on Samsung Devices
- Turn off your phone and enter recovery menu by using the following combination: Home + Volume Up + Power
- Once the screen turns on, release the power button and keep holding the home and volume up button.
- Using the recovery menu perform a factory reset.
- Once the device is formatted and it is turned on, you’ll see a setup wizard. Follow the steps shown by the wizard till it asks you to enter the previous Google account details (which you don’t remember).
- Now here comes the fun stuff. Transfer that APK mentioned above in the OTG drive and connect it to the phone.
- Due to the built-in software, the device will launch file explorer even during the setup process.
- Locate the APK file and install it. You’ll get the option to activate unknown sources. Activate it and install the APK file. What this APK file does is help you get into the phone’s settings menu.
- Once you are in the settings menu, perform the factory reset again but this time from the Settings menu.
Now, the requirement for FRP to appear is that a Google account must be attached and your phone must have security option enabled. Since neither of these requirements is fulfilled while factory resetting the device for the second time, FRP will be bypassed.
Available link for download
Subscribe to:
Posts (Atom)