Tuesday, February 21, 2017
Have you got your X99 board yet ready for some gaming action this weekend
Have you got your X99 board yet ready for some gaming action this weekend
I built a new gaming rig to have some fun this weekend and thought I’d share my excitement and see who else is up for some gaming on the weekend.
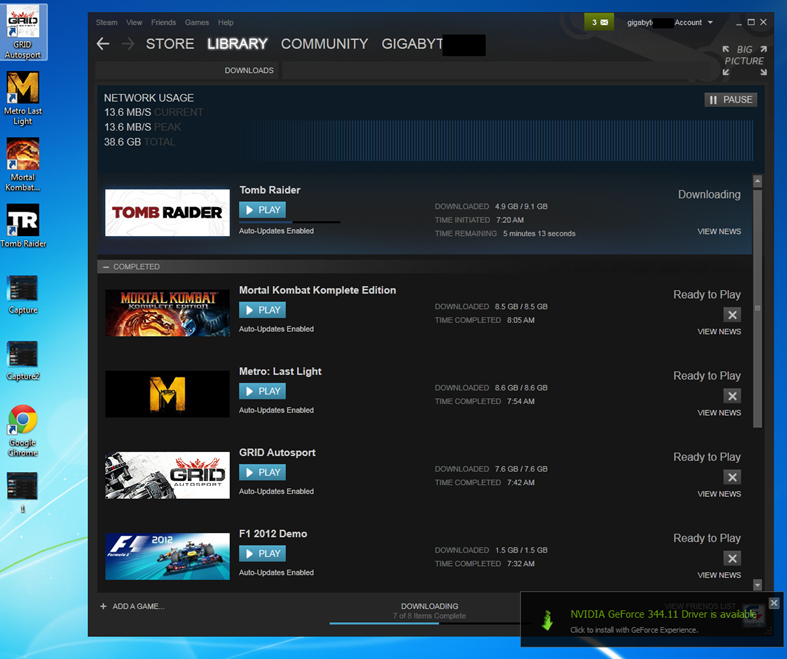
Have a look at this awesome download speed with Telstra 100Mbps cable internet and GIGABYTE X99 SOC Force Intel Gigabit LAN downloading at a constant 13.6MB/s!!!
Time to fire up some GRID Autosport

Btw, loving this Ambient LED feature. Looks awesome in a dark room.
Dino
Available link for download

Friday, January 13, 2017
Gotta Have SLI On A Budget Check Out This Review of The GIGABYTE Z170XP SLI
Gotta Have SLI On A Budget Check Out This Review of The GIGABYTE Z170XP SLI
Not everyone has the same budget when they are building a PC. While some enthusiasts might have be willing to spend a lot to ensure that they have the best that money can buy, others are on more modest budgets that require some restraint when purchasing parts.


Steven says he liked the SLI support on the board, solid memory support at 3600 MHz, upgraded audio, and Intel NIC on the board.
Here are his final thoughts on the board:
The Z170XP-SLI has a lot of the latest features I come to expect from a Z170 motherboard above the $150 price range; USB 3.1, upgraded audio, Intel NIC, solid performance, and decent overclocking capabilities. That being said, this motherboard only costs $136 on Amazon making it a very good deal for those on a budget.The Z170XP-SLI can perform like more expensive motherboards and even overclock like them in the right conditions, but producing those conditions might be difficult, and that is why people pay more for better overclocking.
You can find out more on the GIGABYTE Z170XP-SLI here.
Available link for download
Thursday, January 12, 2017
How to Create This Eerie Floating Island Photo Manipulation in Photoshop
How to Create This Eerie Floating Island Photo Manipulation in Photoshop

What you’ll be creating

Step 1

Step 2

Step 3

Step 4

Step 5

Step 6

Step 7

Step 8

Step 9

Step 10

Step 11

Step 12

Step 13

Step 14
Step 15

Step 16

Step 17

Step 18

Step 19

Step 20
 Available link for download
Sunday, November 13, 2016
Hack This Billing !! Masuk Tanpa Login
Hack This Billing !! Masuk Tanpa Login
Kali ini gue berhasil bereksperimen dan nyobain tools-tools kecil tapi bermanfaat bangget!!!
Ok! Langsung saja.
Tools yang dibutuhkan :
1. Zhider 2.0 atau AceHider Free
2. Startup Manager
Toolsnya bisa dicari melalui paman google atau download dibawah ini
Tools hacking.zip
204 Kb Password : @R!3L
Log in seperti biasa diwarnet kesayangan kamu (bioskop kali!!!):happy:
Setelah online, saatnya beraksi:ninja: !
Buka zhider.exe, untuk membaca keterangan tentang software tersebut dan penggunaannya silakan baca readme.txt.
Setelah Zhider.exe diexecute, maka akan tampak pada tab Processes di Task Manager
Bila menggunakan Kapersky Antivirus maka akan terdeteksi sebagai Invader
Untukamannya bisa menggunakan AceHider Free, tapi perlu diinstall. Apalagistatus kamu cuma Guest bukan Administrator, jadi mustahil untukmenginstall sebuah software kedalam kompi.
Tapi jangan khawatir, kali ini gue udah siapkan semua.
Kamu bisa mengesktrak Folder AceHider Free dari Tools Hacking.Zip, atau AceHider Free.exe dari folder tersebut.
Tapi bila menggunakan AceHider Free maka akan tampak pada taskbar, sehingga kemungkinan ketahuan akan lebih besar.
Sekarang tinggal memilih tools mana yang ingin kamu pakai Zhider atau AceHider Free?
Kita masuk dalam penggunaan tools tersebut
1. Menggunakan Zhider
Bilakita menggunakan Zhider, kendala yang akan kita dapati adalahterdeteksi oleh antivirus, tapi biasanya warnet dikota gue memakaiMcAfee dan NOD32, walaupun diupdate tetap saja nggak bisa dideteksi.Kecuali menggunakan Kapersky, itupun hanya terdeteksi bila Task Managerdibuka. Oleh karena itu Zhider cukup aman untuk dipakai.
Setelahmengeksekusi Zhider.exe, kita dapat mencobanya dengan menyembunyikanjendela apapun yang sedang aktif. Untuk menyembunyikan jendela yangsedang aktif tekan Ctrl+Alt+Z, sedangkan untuk menampilkan kembalijendela tersebut tekan Ctrl+Alt+X.
AceHiderdapat dijalankan walaupun kompi direstart, tapi Zhider tidak. Olehkarena itu gunakanlah Startup Manager yang ada di tools hacking.zip,dengan file bernama strun.exe. Fungsinya untuk menjalankan sebuahaplikasi waktu kompi di Reboot.
Kita akan mengaktifkan Zhider.exepada waktu kompi di reboot, sehingga pada waktu kita mampir kewarnet,kita bisa main GRATISSS!!! Khan tinggal di Ctrl+Alt+Z, jendela log iniakan disembunyikan. Browsing deh sesuka hati:p
Jalankan strun.exe, buka File, new startup item (Ctrl+N)
TambahkanZhider.exe, dengan membuka Zhider pada tempat anda menyimpan filetersebut. Berilah nama untuk Zhider dengan nama yang tidak mencurigakanseperti Adobe Updater. Ok ! Selesai deh!p:
Sekarang, log out dan klik pada jendela log in tepatnya didaerah kosong dimana saja, kemudian tekan Ctrl+Alt+Z.
Bang!!!:yikes: Suprise:D
Ini beberapa hotkey ZHider yang bisa digunakan, untuk hotkey lainnya silakan baca file readme yang disertakan bersama zhider
CTRL+ALT+Z Menyembunyikan jendela aktif
CTRL+ALT+X Menampilkan kembali semua jendela yang disembunyikan
CTRL+ALT+L Menampilkan dialog zhider
CTRL+ALT+M Menampilkan kembali semua jendela yang disembunyikan, dan juga menutup zhider.
2. Menggunakan AceHider Free
Bilakita menggunakan AceHider, maka akan terasa lebih mudah. AktifkanAcehider, untuk menyembunyikan jendela yang sedang aktif double klikpada icon tray pada taskbar, maka jendela yang aktif akandisembunyikan, untuk menampilkan kembali, klik kanan pada icon tray.Kemudian pilih Show Window.
Anda dapat mengatur program ini sesuka hati dengan mengatur Preferences.
Klik kanan lalu pilih Preferences, gantilah system hot keys dengan pilihan anda
Setelah itu log out, dan tekan tombol sesuai pilihan anda yang telah anda atur untuk menyembunyikan jendela log in
Ingat !!! Jangan lupa berdoa sebelum tidur, sorry Resiko tanggung sendiri
Available link for download
Monday, October 24, 2016
GIGABYTE EOC Overclocking Live this Friday August 8 on twitch
GIGABYTE EOC Overclocking Live this Friday August 8 on twitch
If you are free this Friday, August 8, you should definitely tune in to Overclocking-TV’s twitch channel as Massman and Xyala will host a live stream of the GIGABYTE EOC competition taking place in Germany. The stream will start at 10AM (GMT+1), make sure you time this right with your local time zone.
This event has been put together by Der8auer in partnership with GIGABYTE. A total of 6 German overclocking teams will compete during 5 hours, benching through CPU-Z, XTU, SuperPi 32M and Memory clock. To do so, the participants will be using the following hardware:

- CPU: Intel Core i7-4790K
- Motherboard: GIGABYTE Z97X-SOC Force LN2
- VGA: GIGABYTE HD7790
- Memory: Kingston (probably MFR)
- SSD: Kingston
- PSU: Seasonic (probably 1200 W)
Ho yeah, some live overclocking on the Z97X-SOC FORCE LN2! With this motherboard the participants should be able to get exciting and fierce benching results!
Some useful links:
To watch the event on live this Friday on twitch: http://www.twitch.tv/overclockingtv
Facebook event page: https://www.facebook.com/events/334610616703599/
For more details about the event: http://www.overclocking-tv.com/content/events/21752/livestream-gigabyte-eoc-2014-in-germany/
The HWBOT competition page for all rules: http://hwbot.org/competition/gbt_eoc_2014/
Available link for download