Showing posts with label add. Show all posts

Thursday, April 13, 2017

How to add Facebook Likes widget to your blog or website

How to add Facebook Likes widget to your blog or website


floating+static+facebook+like+box+widget+for+blogger+blogspot.png (310×253)


How to add Facebook Likes widget to your blog or website


Facebook fan Page are a great way to promote your blog or website and facebook like box is widely used social plugin from Facebook developers. This facebook like box will help your visitor to become regular reader just by clicking like button. So that this box will increase number of your facebook fans. To get this widget follow below procedure,

Let me explain how to add simple facebook like box.

1. Login To Blogger Account.
2. Click Layout > Add A Gadget.
3. Select HTML / Javascript > Paste The Following Code In content Box.
<iframe src="//www.facebook.com/plugins/likebox.php?href=http://www.facebook.com/bloggerszoom&width=292&height=258&colorscheme=light&show_faces=true&border_color&stream=false&header=false&" style="border:none; overflow:hidden; width:292px; height:258px;" >

Replace my facebook page URL  with your page URL, Change Width And Height According To Your Template.

4. Now save and you are done.


Available link for download

Read more »

Monday, April 3, 2017

How to add banner in About Phone Noob friendly

How to add banner in About Phone Noob friendly


What you need ? : 

  • Latest APKTOOL package .
  • A brain .
  • PC  .
  • Knowledge in decompiling and recompiling .


Lets start the GUIDE !  

Resources 

  • APKTOOL here .
  • Image Resolution : 700*215 .

Guide-

1)

  • Decompile Settings
  • Go to res/Layout folder
  • Download this file
  • paste it in Layout folder

2) 
  • Copy the image to res/drawable folder
  • Rename it to logo and it must be "PNG" !
  • Quote:
    EX: logo.png
3)
  • Go to res/xml
  • open device_info_settings.xml
  • Add this
    Quote:
    <PreferenceScreen android_layout="@layout/logo" android_key="od_logo" />
    after this line
    Quote:
    >


SAMPLE


Available link for download

Read more »

Thursday, March 30, 2017

How To Add Subtitles On TV

How To Add Subtitles On TV


ADD SUBTITLES TO A MOVIE ON TV[FULLY WORKING METHOD]

[ NOTE:- THE SECOND METHOD IS TESTED ON LG AND SAMSUNG SMART TV]

First of all, hello and welcome again to yours one and only goodweknow
Usually the operating system that we get on the Smart TVs are not like our mobile devices, the UI (User Interface) is made so simple on the TV such that we can browse and work on it with the simple default remote we get or via an android App(if possible). I also replaced my old TV like yours with a new one yes obviously with the smart one, but later on I found that while playing movie on it the subtitles was not showing up on the screen. After so many methods I finally found 2 methods that can be used to display the subtitles with the movie. 
The best two ways to display the subtitles on the tv screen are listed below:-

USING MIRACAST/BY SCREEN MIRRORING


1. Go to the tv settings there you can find screen mirroring option or miracast™ (on lg smart tv) or tap on the SOURCE button for the Samsung users to access screen mirroring.

2. Unlock your android lockscreen then after that go to settings>>display>>wireless display(or cast screen option on kitkat) enable it and search for the TV model and connect to the TV.

3. When all done open up the mx player installed on your phone and then add subtitles from there and skadoosh!!! its done you can watch your movie with the subtitles on your tv!!


HOW TO DISPLAY SUBTITLES USING PENDRIVE/USB?
If your TV is not smart enough or its not a smart one then this method will help you to display the subtitles easily via USBBefore placing the movie on the USB device you have to follow these simple steps :-

1. Put the subtitle (.srt) file and the movie (.mp4 / .avi) file together in the same folder on your PC.

2. Then rename the subtitle (.srt) file same as the movie name example:- if the movie name is TAKEN.720p.BLUERAY.YIFY then rename the subtitle file same as the movie file TAKEN.720p.BLUERAY.YIFY.srt

3. Then put the folder on the USB flashdrive and try playing it on your TV, it will work smoothly.

4. Note:- If you dont have srt(subtitle file) of the movie then you can search it at subscene.com and download the compressed .zip folder from there.


Here is the tutorial for adding subtitles to a movie file on TV


If you still have any trouble or the method is not working for you, then feel free to drop your comments!!!


Available link for download

Read more »

Sunday, March 26, 2017

How to add more notification toggles to our Samsung Galaxy Core GT I8262

How to add more notification toggles to our Samsung Galaxy Core GT I8262


Notice: You should be running on stock android to do this. This requires root and although its not so risky but it is always better to have a backup. Also please do not blame me if you softbrick your device.. Do at your own risk!! It worked for me and it should work for anyone running stock rooted like I am.

Okay.. so, heres what you need:
(1) Rooted Galaxy Core in Easy Way
(2) Sqlite editor app

Dts all!!

So heres what you need to do:
(1) Open sqlite and give root permission. It should show a list
(2) Scroll down to "Settings Storage" and open it
(3) Open "Settings.db"
(4) Next, tap "System"
(5) Scroll down until you find "notification_panel_active_app_list" NOT the notification_panel_default_active_app_list.Tap it. If its not present (well... it was not present for me atleast)(Make sure to Check Properly),then tap the menu key and then tap new record. Set the name to "notification_panel_active_app_list" and under value type the following.
Code:
Wifi;Location;SilentMode;Bluetooth;MobileData;AutoRotate;WiFiHotspot;SmartStay;AirplaneMode;DormantMode;PowerSaving;DrivingMode;Sync
Note that the above letters should be CaSe sEnsItiVe and no spaces
(6) ReBoot
(7) Congratzz... U have successfully customized the notification panel.. 

You can press the thanks button if you think ive helped you as ive researched alot on this.. This is my first post here and i hope to see some warm welcomes 
If you have any questions regarding this then im always ready to help.. 

Thank you,
Ansley
ATTACHED THUMBNAILS
Click image for larger version Name: 2014_01_26_21.19.28.png Views: 500 Size: 51.2 KB ID: 2540470   Click image for larger version Name: 2014_01_26_21.20.04.png Views: 459 Size: 54.6 KB ID: 2540471   Click image for larger version Name: 2014_01_26_21.20.34.png Views: 434 Size: 44.9 KB ID: 2540472  


Available link for download

Read more »

Friday, March 17, 2017

How to add edit and delete your place in google map

How to add edit and delete your place in google map


hc-31.jpg (1920×1080)


How to add edit and delete your place in google map 


After adding an option to edit locations, Google Maps allows people to add places. The option seems to work only for the US and you can enter few details about the local business or the place: address, name, phone, website and category. Google promises that "once you save your place, the whole world can find your addition by searching for it within a few minutes."

To find this feature, go to Google Maps, search for an address (e.g.: Madison Ave, NY) and youll see a new option in the left sidebar: "Cant find what youre looking for? Add a place to the map."


You can also edit the details from existing listings and even remove places from the map. Among the possible reasons why you could delete a place you can find: the listing is a duplicate, the place doesnt exist, it is permanently closed or its not of general interest. While business listings are changed almost instantly after you edit them, they can be removed only if someone from Google accepts your removal request. Each local listing can have a status like "Added", "Edited", "Removal requested" and the changes history is available to everyone.


Until now, only business owners could add places, using Googles Local Business Center. "We gather business information from numerous websites, Yellow Pages directories, and other sources to populate Google Maps search results. If youd like to be included, you can easily enter your information into our online Local Business Center for free. (...) Once youve submitted your business information, youll need to verify the listing before it goes live. You can verify using a touch-tone phone, SMS, or a PIN that will be sent via regular mail to your business address. Once the listing is verified, your information will normally appear in our results within six weeks,"explains Google.

Its great to trust your users, but the places added using the new feature should be verified to make sure they are real. Turning Google Maps has a lot of practical advantages and could be used to keep the geographical information up-to-date.


Available link for download

Read more »

Thursday, March 2, 2017

How To Add A Channel Trailer to Your Youtube Channel

How To Add A Channel Trailer to Your Youtube Channel


A featured video (Channel Trailer ) is very much important to grow Your audience in Youtube.A channel trailer is a great way to let new viewers know about the basic theme of your YouTube channel .It is highly recommended by Youtube Creator Hub.So,ive created a video tutorial for you to show how to add a Channel Trailer to your Youtube Channel.Watch the video given below.Step by Step written instructions are also given here.


Step By Step Instructions:

1. Log into your YouTube channel 

2.Go to My Channel  

3. Go to the top right corner above the Subscribe button, a pencil like button will appear.click "Pencil" icon and a drop down menu will appear you will need to click on "Edit Channel Navigation"

4. Once you have clicked on "Channel Navigation" your YouTube channel "Channel Navigation" settings will appear 

5. You will need to select the top option "Browse" and click enable on the right hand side. 

6. At the bottom of your "Channel Navigation" setting click save and the box will close and your YouTube channel will refresh with the new YouTube channel layout. 

6.select "For New Subscribers" tab and then click "+ channel trailer" button.

7. select the video that you want to make your Channel Trailer.

Once you have completed the above steps you will have successfully added a YouTube channel trailer to your YouTube channel.


Thank you for watching if you have any questions leave a comment below.
Click here to subscribe to my Channel.
--------------------
Regards
Shankha Jana


Available link for download

Read more »

Tuesday, February 14, 2017

How to Change Add themes in CodeBocks C C IDE

How to Change Add themes in CodeBocks C C IDE


In this video tutorial i will show you how to change the background theme in CodeBlocks IDE


Note-Theme Code link-https://docs.google.com/file/d/0B-nG6oJdQsyRVl83MGRDNkJLN1U/edit?pli=1

Enjoy this awesome trick...& for more tricks keep visiting this blog...:)


REGARDS
Shankha Jana


Available link for download

Read more »

Wednesday, February 8, 2017

GSM Aladdin Key V2 Released Ver 1 22 Huawei Add Spd 7730 31 Added

GSM Aladdin Key V2 Released Ver 1 22 Huawei Add Spd 7730 31 Added


ALADDIN KEY V2 support " MTK NAND CHIP " & " SPD 6820/8810
Lava Iris 356 Piinlock Direct Removed No Need Adb , No data Loss
Intex Aqua Y2 Pattern Code Read No Need ADB No Need Root No Data Loss
 Huawei Qualcomm mobile unlock
 Huawei mtk mobile unlock
 Huawei sp unlock
Huawei reset security
SPD sc7730/31 Write Flash
SPD sc7730/31 red write NV
SPD sc7730/31 repair  IMEI
READ MORE


Available link for download

Read more »

Sunday, February 5, 2017

How to add reboot recovery and bootloader options in Power menu

How to add reboot recovery and bootloader options in Power menu


So lets Start

Required
1-apktool
2-notepad++
3-some brains


STEP-1

Decompile Framework-res.apk

goto to res/vlaues/arrays.xml

and add these lines at the end

Code:
 <string-array name="reboot_options">
<item>@string/reboot_normal</item>
<item>@string/reboot_recovery</item>
<item>@string/reboot_bootloader</item>
</string-array>
<string-array name="reboot_actions">
<item>now</item>
<item>recovery</item>
<item>bootloader</item>
</string-array>

now goto res/values/strings
and add these lines at the end


Code:
 <string name="reboot">Reboot</string>
<string name="reboot_normal">Reboot</string>
<string name="reboot_recovery">Recovery</string>
<string name="reboot_bootloader">Bootloader</string>

goto add the ic_lock_reboot.png which i have i provided in the resources attached below this post to drawablw-hdpi folder

so before compiling the framework-res.apk follow erorcuns guide to properly recompile framework-res.apk

once recompile is done ....decompile again to get the HEX IDs

STEP-2

decompile android.policy.jar

goto classoutcomandroidinternalpolicyimpl

and add the 3 smalis files which i provided in the resources attached below

Now option classoutcomandroidinternalpolicyimplGlobalAc tions.smali

and find these lines and add the red marked lines between them

Code:
 .line 235
iget-object v0, p0, Lcom/android/internal/policy/impl/GlobalActions;->mItems:Ljava/util/ArrayList;

new-instance v1, Lcom/android/internal/policy/impl/GlobalActions$2;

const v2, 0x1080030

const v3, 0x10400fa

invoke-direct {v1, p0, v2, v3}, Lcom/android/internal/policy/impl/GlobalActions$2;-><init>(Lcom/android/internal/policy/impl/GlobalActions;II)V

invoke-virtual {v0, v1}, Ljava/util/ArrayList;->add(Ljava/lang/Object;)Z

.line 213
move-object/from16 v0, p0

iget-object v1, v0, Lcom/android/internal/policy/impl/GlobalActions;->mItems:Ljava/util/ArrayList;

new-instance v2, Lcom/android/internal/policy/impl/GlobalActions$11;

const v3, 0x1080827

const v4, 0x104060b

move-object/from16 v0, p0

invoke-direct {v2, v0, v3, v4}, Lcom/android/internal/policy/impl/GlobalActions$11;-><init>(Lcom/android/internal/policy/impl/GlobalActions;II)V

invoke-virtual {v1, v2}, Ljava/util/ArrayList;->add(Ljava/lang/Object;)Z


.line 260
iget-object v0, p0, Lcom/android/internal/policy/impl/GlobalActions;->mItems:Ljava/util/ArrayList;

iget-object v1, p0, Lcom/android/internal/policy/impl/GlobalActions;->mAirplaneModeOn:Lcom/android/internal/policy/impl/GlobalActions$ToggleAction;

invoke-virtual {v0, v1}, Ljava/util/ArrayList;->add(Ljava/lang/Object;)Z

now we need to assign the Hex ids as per ur Public.xml

NOTE: the hex ids might be different from mine and yours so be careful while comparing

new as per the above changes in GlobalActions.xml

assign the ids as below

<public type="drawable" name="ic_lock_reboot" id="0x01080827" />

Code:
 new-instance v2, Lcom/android/internal/policy/impl/GlobalActions$11;

const v3, 0x1080827

<public type="string" name="reboot" id="0x0104060b" />

Code:
new-instance v2, Lcom/android/internal/policy/impl/GlobalActions$11;

const v3, 0x1080827

const v4, 0x104060b


Now option up classoutcomandroidinternalpolicyimplGlobalAc tions$11.smali

find and replace the following

@line 70
<public type="string" name="reboot" id="0x0104060b" />


Code:
const v3, 0x104060b

@line 90
<public type="array" name="reboot_options" id="0x0107003b" />


Code:
const v3, 0x107003b

@line 105
<public type="string" name="ok" id="0x0104000a" />


Code:
 const v2, 0x104000a

@line 147
<public type="bool" name="config_sf_slowBlur" id="0x0111000b" />


Code:
const v3, 0x111000b

now open up classoutcomandroidinternalpolicyimplGlobalAc tions$11$2.smali

@line 59
<public type="array" name="reboot_actions" id="0x0107003c" />


Code:
const v2, 0x107003c

save it and recompile android.policy.jar


now push all the files into ut phone...will have the new Advanced reboot options

ATTACHED FILES
File Type: rarreboot_option_resources.rar - [Click for QR Code] (4.5 KB, 140 views)


Available link for download

Read more »

Tuesday, January 17, 2017

How To Minimize Excess Skin For Weight Loss Add Cheap Resveratrol To A Good Diet

How To Minimize Excess Skin For Weight Loss Add Cheap Resveratrol To A Good Diet


How To Minimize Excess Skin For Weight Loss : Add Cheap Resveratrol To A Good Diet

How To Minimize Excess Skin For Weight Loss - Add Cheap Resveratrol to a Good DietImproving your overall well being isnt always simplehats why men and women usually acquire resveratrol products via online suppliers-because it can be quite difficult to alter routines and live a wholly different lifestylehich is at the same time why several health supplements claim that they can help you in numerous areasverall health is among the most severe problems facing us todayo help overcome health items, several men and women attempt to cut costs by locating cheap resveratrol productshey buy resveratrol from both local and online stores to help them combat stress, slow up the telltale signs of aging, and slim downlthough this substance can be found in grapes, red wine, nuts, and berries, there extremely is no substitute for using resveratrol supplementsaving a resveratrol supplement gives extensive rewardsou dont call for to starve yourself to get healthy and fitombined with balanced diet program and routine wor ... [Read More > How To Minimize Excess Skin For Weight Loss]

Presently 4 Idiots for Fat Reduction is one of the most hunted item in U . s .. This system quality can be very good. Many Reviews has demonstrate this these items provides top quality, consequently almost all of the consumers are pleased. You can study that coming from consumer evaluations who have provided optimistic responses. Should you be curious on this the majority of wanted available item, you must purchase soon avoiding dissatisfaction, result in this system tends to sold out too quickly.


How To Minimize Excess Skin For Weight Loss

How To Minimize Excess Skin For Weight Loss : Add Cheap Resveratrol To A Good Diet

How To Minimize Excess Skin For Weight Loss 4 Idiots for Fat Reduction > What this implies is that you cannot get slimmer until finally you Adjust your consuming routines to one thing NEW and Different, anything which youve by no means attempted before. For instance, if you decide on not to begin utilizing this diet program and you hold eating your exact same meals.......then you will be caught with the Identical Entire body forever. Your entire body will not modify all by itself, simply because you wont wake up a single morning and be thinner right up until you Consider THAT First Phase and consider something new.

Almost all of the client testimonials notify that this How To Minimize Excess Skin For Weight Loss are usually good quality merchandise. It is also fantastic product or service In addition to inexpensive as well. You possibly can read most reviews by shoppers for more information using their knowledge. This evaluations will provide you with an excellent sign in the value and dependability on the solutions. Appreciate it regarding going to. Along with sincerely desire that this internet site could be beneficial to people.


You Likely Read below :
Fat Loss 4 Idiots / Weight Loss and Diet Center
Primal Burn
Primal Burn
The Six Pack Method
The Six Pack Method
Belinda Benns Get Lean Program :: Belinda Benn - Your

Look Video on How To Minimize Excess Skin For Weight Loss


Popular Search : how to minimize excess skin for weight loss


Available link for download

Read more »

Wednesday, January 11, 2017

How To Add Application Shortcut To Desktop Context Right Click Menu in Windows

How To Add Application Shortcut To Desktop Context Right Click Menu in Windows


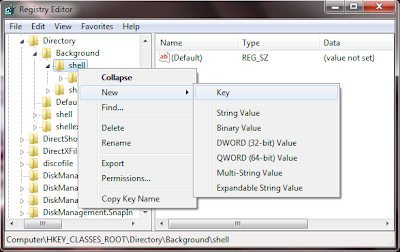
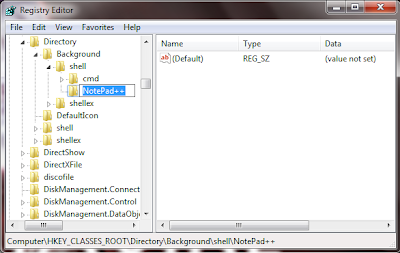
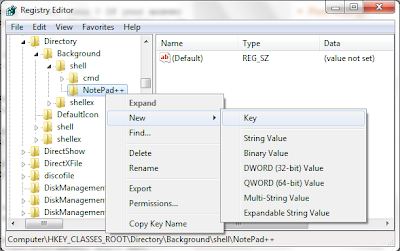
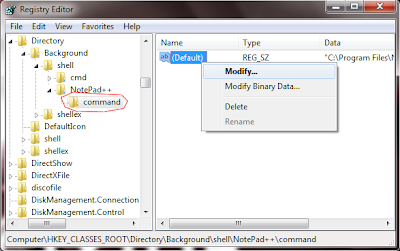
Do you want to add your favorite application to desktop context menu ? If your answer is yes, then this post is for you. There are many third party software available to do the same, but I am not writing about them.

You can add any application to your desktop context menu by simply editing your registry. Just follow the simple steps to get it worked !

Steps
1. Press Windrows + R to open the Run box
2. Enter regedit in the open textfield and click OK
- It will open Registry Editor window
3. In Registry Editor expand HKEY_CLASSES_ROOTDirectoryBackgroundshell
4. Right click on the shell node click New > Key


5. Now name the newly created Key to your apps name or anything you wish, because this name will show on the context menu of desktop. I am named it Notepad++.


6. Now right click on the newly created key ( in my case NotePad++ ) and click New > Key


7. Name it to command


8. Now Right click on (Default) of command key and select Modify


9. Now Copy the full path of your favorite application to the Value data textfield.... Click OK

Note : To copy the full path of application. Go to application folder find the apps .exe file. Shift + Right Click on the exe and click Copy as path.


Thats it done ! Now Go and check by right clicking desktop you will see the added menu item in Context menu !


Available link for download

Read more »

Saturday, November 19, 2016

How to remove Settings Add On on XXLSZ

How to remove Settings Add On on XXLSZ


Are you annoying with additional menu on your settings? Normally added by the developer. This is for XXLSZ only!

What should I do?

1. Go to systemapp folder and delete related applications, such as:
- fastdormancytoggle.apk
- Cpuspy.apk
- org.adaway-1.apk

Note
1. Use Root Explorer and mount r/w to the system/app folder
2. Look inside your add-on. What apps installed into the system. Remove it.

Then download this original SecSettings.apk and push it to preloadsymlinksystemapp folder.
Fix permissions to rw-r--r-- (644) then reboot the phone..

Reboot. Good Luck!

Note:
1. Backup your current SecSettings.apk before replace.


Available link for download

Read more »

Thursday, November 3, 2016

How to add lyrics and album cover to a song

How to add lyrics and album cover to a song


We are going to learn about the steps to embed all the necessary details for mp3 audio files. We have our personal hobbies to mix up musics, tracks & sound-clips for making good and amazing mashups with it or even singing songs and recording it. But most of the times, others never takes the moment to appreciate at our work or not even believes this fact, that its totally our work. But STOP THIS!! The following post will cover all the necessary things like info, meta tags and all the other details to prove the fact that you are the only sole owner of your work. Now you can even embed your favorite wallpapers, album covers, blog details, your own copyright and even embed your own lyrics to the music file.


Now what we really need to do this job?
The only software what we are going to use for this operation is "JJ mp3 Renamer". Its a small sized little software which does a powerful job what we need. Dont worry Ive uploaded the software for you guys below the post you can download it from there.


The answer for HOW TO?

STEP 1:- Open up the "JJ mp3 renamer" then add the music file that you wanna edit.


STEP 2:- Click the music file & down below you can find the v2 edit tag option just in the left corner of the renamer as shown in above image.


STEP 3:- Fill all the information to the music file according to your requirements and click on the next.
In the end attach the album cover or the lyrics file to the song and click on the write option.
now you are finally done with it.


See how simple was that? Now get the complete credits for your work. This amazing software also helped me for make bunch of successful mixes long ago too. I personally had done a lot of music mixes and loved to edit with this simplest, tiny sized software.

Hope this might helped you out.

>>>YOUR JJ MP3 RENAMER LINK<<<

Still have a problem? Here is a complete step by step tutorial for embedding all the details to your music file. 


Available link for download

Read more »