Monday, April 3, 2017
Gigabyte Overclocking Crew Set New XTU World Record
Gigabyte Overclocking Crew Set New XTU World Record
Computex 2015 is here and our overclocking crew is busy settings world records already. Coldest, Dinos22, HiCookie, SniperOz and Sofos1990 kicked things off with the XTU World Record set on GIGABYTE X99 SOC CHAMPION and Intel 5960X.
Hwbot score link: http://hwbot.org/submission/2880776_dinos22_xtu_core_i7_5960x_3089_marks


Available link for download
Wednesday, January 25, 2017
GIGABYTE Target OC Show us your Overclocking Skills
GIGABYTE Target OC Show us your Overclocking Skills

Only a couple of weeks after the end of the GIGABYTE Z97 Pentium AE Challenge, GIGABYTE has the honor to launch a new overclocking competition with the GIGABYTE TARGET OC. This time around, instead of asking the OC community to break records and reach for the ultimate limits, we selected a few benchmarks with some specific scores that participants will have to try to match perfectly. Some precise system tweaking will be in order!
Overclocking is not only about pushing the limits of your hardware, it is also about mastering the skills needed to tweak all aspects of your system to achieve the performance that you want. In this challenge we will also give you an opportunity to showcase your overclocking and downclocking skills. With TARGET OC, GIGABYTE decided to have some fun with selection of the target scores and chose some epic world records back in the day as well as some super bad scores to see how well you can tune your system to the level of performance of old time greats and super bad overclocks of today. By trying to hit every scores set, we are hoping the participants will have fun trying to search the perfect setting for the perfect score.
Contest Stages
STAGE 1: XTU
- Target score: 159 marks
- We challenge you to match the worst Pentium G3258 XTU score on HWBOT (link)
- Submission will be open for 2 hours open on Sunday, October 19th at 2pm (UTC+08:00)
STAGE 2: HWBOT PRIME
- Target score: 2967.55 pps
- We challenge you to match the worst Pentium G3258 HWBOT Prime score on HWBOT (link)
- Submission will be open for 2 hours open on Sunday, October 26th at 2pm (UTC+08:00)
STAGE 3: 3DMARK05
- Target score: 30257 marks
- We challenge you to match an epic world record from 2007 set by a legendary US overclocker OPPAINTER (link)
- Submission will be open for 2 hours open on Sunday, November 2nd at 2pm (UTC+08:00)
STAGE 4: SUPER PI 32M
- Target score: 20min27sec570ms
- We challenge you to match an epic world record from 2006 set by a legendary US overclocker bachus_anonym (link)
- Submission will be open for 2 hours open on Sunday, November 9th at 2pm (UTC+08:00)
STAGE 5: CATZILLA 720P
- Target score: 1938 marks
- We challenge you to match a 2000th ranked score on HWBOT in Catzilla 720p (link)
- Submission will be open for 2 hours open on Sunday, November 16th at 2pm (UTC+08:00)
A lot is on the line too! The winner of each stage will be rewarded a nice $400 USD. But that’s not all, in an effort to have everyone from different level of overclocking join, we’ve included 5 awesome lucky draw prizes, including two X99-SOC FORCE, a Z97N-Gaming 5, a Z97N-Gaming WIFI and a Z97X-SOC FORCE LN2!! All you have to do is submit your score in at least 4 out of the 5 stages and you will be automatically entered to win.
| | | |


Available link for download
Saturday, December 10, 2016
Hardware Asylum podcast on evolution of overclocking motherboards
Hardware Asylum podcast on evolution of overclocking motherboards
Yay, Hardware Asylum podcast is out. In case you guys have not heard of these guys before, make sure you visit their website. I would describe them as a down to earth tech website/podcast geared towards a novice and pro level overclocker or enthusiast alike. The podcast is easy to follow and dissects fairly complex topics and talks about interesting hardware, developments and competitions in this particular episode.
GIGABYTE has been the leading market innovator in the dedicated overclocking motherboards and it’s good to see someone put it into perspective (i.e. overclocking boards existed well before our first series but there was no dedicated product serious which focuses features specifically towards enthusiasts and overclocking until GIGABYTE started it all some 5-6 years ago).
Check out the podcast at the following link http://www.hardwareasylum.com/podcast/nli_podcast_47
Show Notes
Gigabyte Motherboard Evolution
Reviewing motherboards isn’t always the easiest and every reviewer tends to look at different aspects. Some are super critical of fan controls while others may only look at feature differences between an entire group. The reviews at Hardware Asylum often focus on features and what makes the board special. Some are designed for overclocking while others may cater to the gamer. One thing Dennis has noticed over the years is that motherboard designs change based on what users are doing in the marketplace.
A perfect example of this evolution is the Gigabyte OC products dedicated to overclocking. Of course overclocking isn’t the only thing you can use these motherboards for but, the marketing has been designed such that overclocking is first.
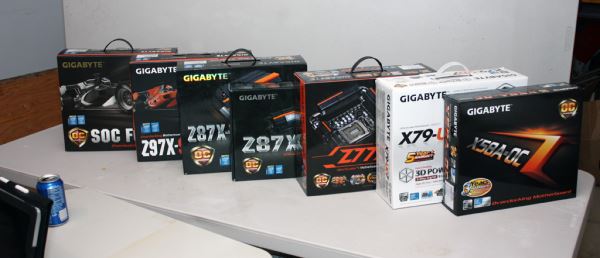
The rouges gallery contains every “mainstream” OC motherboard that Gigabyte has produced staring with the X58A-OC and ending with the X99 SOC Force. In the podcast Dennis mentions a few unicorns with even more to offer.
Related Links:
Gigabyte X99 SOC Force Overclocking Motherboard Review
Gigabyte Z97X SOC Force Overclocking Motherboard Review
Gigabyte Z87X OC Overclocking Motherboard Review
Gigabyte Z77X UP7 Overclocking Motherboard Review
Gigabyte X79 UD7 OC Motherboard Preview
Gigabyte X58A-OC Overclocking Motherboard ReviewA Change to Live Overclocking Competitions
There was an article published on Hardware Asylum that talked about how overclocking competitions needed to change if they were to grow into a full ocSport. Some of the points in the article included removing “bin” from the equation and changing the structure to be more of a game that challenged the overclocker to get the best score possible within a limited set of constraints, submit a score and then do it again.In this segment Dennis and Darren discuss the new competition format and how it can actually make competitions better for everyone from the manufacturers making the hardware to the overclockers dedicating their time to the hobby/sport and the media struggling to find interest in this niche.
Related Links:
Overclocking Competitions: About the Player not the HardwareEpisode 47 featured music:
Little People - Start Shootin (http://www.littlepeoplemusic.com/)
Dr. Nol - The Jumo Love Faction (http://freemusicarchive.org/music/Dr_Nol/The_Juno_Love_Faction/01_Dr_Nol_-_Juno_Love_Faction)
Hardware Asylum have little experience and information on our upcoming X99 SOC Champion board just yet but let’s just say that it will be continuing the legacy X58A-OC started. Incidentally, TeamAU broke another world record with this board today, the 3DMARK11. Here is the score and what this board has been used to achieve so far. There is going to be a heck of a lot more to come, stay tuned!


Available link for download
Wednesday, December 7, 2016
GIGABYTE X99 SOC Champion voted the best overclocking board by European Hardware Awards
GIGABYTE X99 SOC Champion voted the best overclocking board by European Hardware Awards

EHA was formed by KitGuru, Hardware.Info (The Netherlands), Hardwareluxx (Germany), Cowcotland (France), Hardware Upgrade (Italy), Hispazone (Spain), PurePC.pl (Poland) and Lab 501 (Romania).
Combined, the European Hardware Association reaches a vast and unique audience. Here are some of the stats:-
Over 20 million hardware enthusiast visitors a month
Millions of interactions on Facebook
A combined database of more than 100,000 articles
Millions of individual, scientific hardware tests, going back man years
Source: http://www.kitguru.net/channel/computex/andrzej/european-hardware-awards-winners-announced/
Available link for download
Monday, November 14, 2016
GIGABYTE X99 SOC Champion overclocking guide for uncore and memory overclocking
GIGABYTE X99 SOC Champion overclocking guide for uncore and memory overclocking
Our technical marketing guru, Sofos, has put together an advanced overclocking guide based around uncore and memory overclocking using the GIGABYTE X99 SOC Champion motherboard and chipset so make sure you check this out if you are on X99 platform and need a few pointers.
1. Adjust the OC switch the position 2, otherwise you won’t have the voltages you need for Uncore and memories. 
2. Voltages for Uncore
In the CPU Advanced Voltages, when you have the OC switch in the 2 position, you will see some extra voltages. VL1 to VL6.
You only have to change VL4, VL5 and VL6 as below. 
The voltage you have to change to get higher uncore is mostly the VL6. Almost all the CPUs can do 1.45V, most of the CPUs can do 1.5V but some CPUs can do even higher Voltage. There are few CPUs that boot with lower than 1.45V though. If the CPU can do high VL6 then probably it can do and high Uncore but not all the times. It depends on the CPU. In the OS through GTL all you have to do is to raise the VRING to 1.45V-1.5V in able to get high Uncore.
Temperature also helps with VL6 and uncore. If you are using subzero cooling try to find ideal temperature for max VL6 value and then see how high the uncore will clock. VRING is another voltage option that helps some CPUs. Try 1.35v and if going subzero, test up to 1.55 to see if there is any scaling.
3. RTLs
You can change the RTLs but not manually only changing the IOLs manually. IOLs to 1 will bring the RTLs all the way down to what the board is capable of until now. You need to change the IOLs at every channel. Set the option at manual mode and change the primary and secondary timings only for channel A and then change the IOLs to each channel manually.

4. Use both 8pin and 4pin cables for CPU Power otherwise with heavy load the system maybe will be shutting down.
5. You don’t need extremely high VSA and VDIMM. VSA between +0.25-0.35V should be enough to drive the mems high. +0.25-+0.3V should max your mems on most cases. VDIMM 1.55-1.65V is ok. I was able to do even C11 with 1.6V.

6. Few times you will see codes like 72, 74, 50, 51, 60, 8A. Try to press the reset button few times. There’re times that doing it it passes the training. Especially when you change the RTLs and you get 8A try it for sure. It doesn’t happen on latest bios so often.https://www.dropbox.com/s/g46ggra2mtkvv4z/F4f.rar?dl=0
7. X99 MemTweak, GTLhttps://www.dropbox.com/s/546fstudskrtpb8/GTL%202.1%20B15.0129.1.rar?dl=0
https://www.dropbox.com/s/op86rsq2ikubgcl/MemoryTweak-X99%20B14.1218.1.rar?dl=0
Highest bootable VL6 cannot be overridden through software. Same value that your CPU won’t boot from bios if you set it through software it will shut down.
8. Please be careful! The VLs can affect your CPU cold bug so make sure that when you change you don’t hit the cold bug earlier than before. If you have this problem try higher or lower VL3 (usually higher helps). If VL3 doesn’t fix your problem then try the same for VL6.
Also, different bclk affects the cold bug too, so try this as well. Almost all the CPUs are ok with 127.5 bclk and PCI3.
9. Make sure that you’re using proper insulation around the memories area and also put some paper towel around the PCH cooler. The way that worked best for us was a layer of plastidip, then a layer of Vaseline and paper towel.
10. Always save a profile before you save and exit cause most of the times the only way to go back is the CMOS button.
11. For memory voltage we used up to 1.9V on single sided dimms on LN2 without a problem. But it doesn’t mean that all the dimms can handle it so be careful in case you don’t want to degrade or kill your memories. Dino was benching with 1.8V without any issue.
Enjoy!
Available link for download
Monday, October 24, 2016
GIGABYTE EOC Overclocking Live this Friday August 8 on twitch
GIGABYTE EOC Overclocking Live this Friday August 8 on twitch
If you are free this Friday, August 8, you should definitely tune in to Overclocking-TV’s twitch channel as Massman and Xyala will host a live stream of the GIGABYTE EOC competition taking place in Germany. The stream will start at 10AM (GMT+1), make sure you time this right with your local time zone.
This event has been put together by Der8auer in partnership with GIGABYTE. A total of 6 German overclocking teams will compete during 5 hours, benching through CPU-Z, XTU, SuperPi 32M and Memory clock. To do so, the participants will be using the following hardware: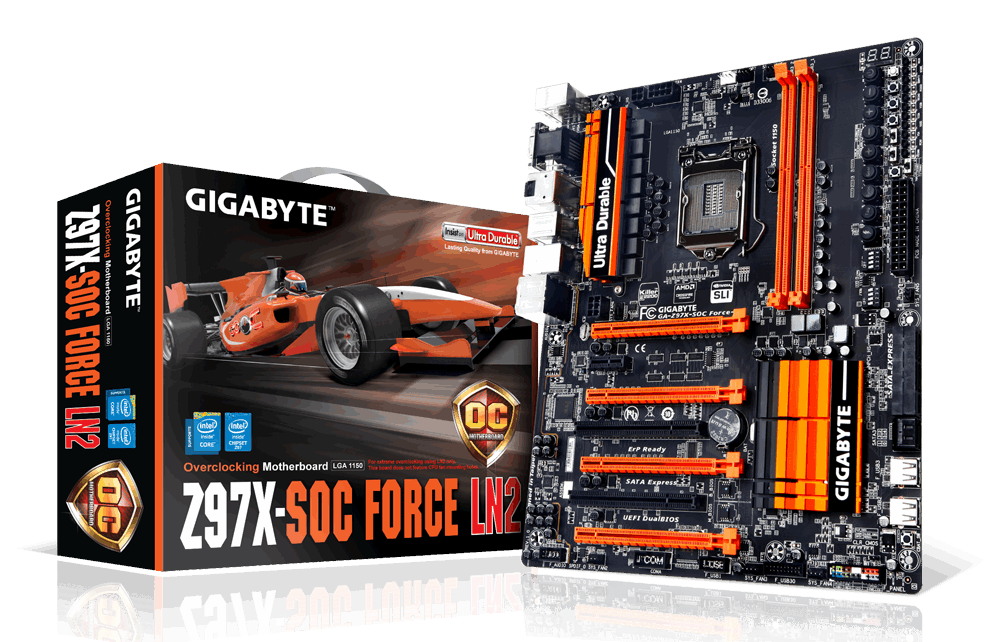
- CPU: Intel Core i7-4790K
- Motherboard: GIGABYTE Z97X-SOC Force LN2
- VGA: GIGABYTE HD7790
- Memory: Kingston (probably MFR)
- SSD: Kingston
- PSU: Seasonic (probably 1200 W)
Ho yeah, some live overclocking on the Z97X-SOC FORCE LN2! With this motherboard the participants should be able to get exciting and fierce benching results!
Some useful links:
To watch the event on live this Friday on twitch: http://www.twitch.tv/overclockingtv
Facebook event page: https://www.facebook.com/events/334610616703599/
For more details about the event: http://www.overclocking-tv.com/content/events/21752/livestream-gigabyte-eoc-2014-in-germany/
The HWBOT competition page for all rules: http://hwbot.org/competition/gbt_eoc_2014/
Available link for download
Tuesday, October 4, 2016
GIGABYTE X99 SOC Champion 6950X Broadwell E Overclocking Guide
GIGABYTE X99 SOC Champion 6950X Broadwell E Overclocking Guide
GIGABYTE X99 SOC Champion OC Guide (Broadwell E Update)
by dinos22 & sofos1990


LN2 cooling we find that its best to start with 1.5v at -60C and go colder. Most CPUs will like 1.55vcore with -80 to -110C. Some chips will scale higher with 1.6v-1.7v but majority we tested stop scaling up to 1.6vcore. Majority of CPUs did 5GHz, great CPUs did 5.2GHz and special chips will go beyond 5.3GHz with Cinebench R15. This may change with new retail batches.
VRIN is another voltage you need to use (up to 2V on air and generally 2.2v LN2). 2.6v can kill CPUs so be careful.
PLL TRIM is the last one to look out for. Use +15. Improves OC performance and stability.

LLC (load line calibration), set to Extreme (refer to screenshot below for full settings).


. B-die memory screenshots


http://www.gigabyte.us/products/product-page.aspx?pid=5280#bios
In the CPU Advanced Voltages when you have switched to the OC mode you will see some extra voltages. VL1 to VL6.
You only have to change VL4, VL5 and VL6 as below.

You can change the RTLs but not manually only changing the IOLs manually.
IOLs to 1 will bring the RTLs all the way down to what the board is capable of until now.
You need to change the IOLs at every channel. Set the option at manual mode and change the primary and secondary timings only for channel A and then change the IOLs to each channel manually.


https://www.dropbox.com/s/g46ggra2mtkvv4z/F4f.rar?dl=0
https://www.dropbox.com/s/546fstudskrtpb8/GTL%202.1%20B15.0129.1.rar?dl=0
https://www.dropbox.com/s/op86rsq2ikubgcl/MemoryTweak-X99%20B14.1218.1.rar?dl=0
Highest bootable VL6 cannot be overridden through software. Same value that your CPU won’t boot from bios if you set it through software it will shut down.
Also, different bclk affects the cold bug too, so try this as well. Almost all the CPUs are ok with 127.5 bclk and PCI3.
Available link for download