Showing posts with label via. Show all posts
Showing posts with label via. Show all posts
Wednesday, April 5, 2017
How To Install Budgie Desktop In Ubuntu 16 04 Or 15 10 Via PPA
How To Install Budgie Desktop In Ubuntu 16 04 Or 15 10 Via PPA
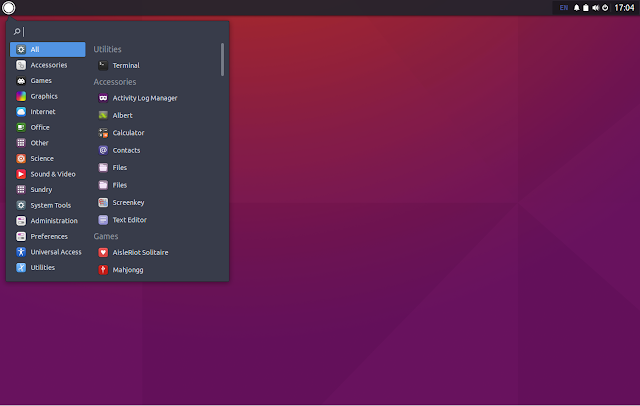
Budgie is a modern GTK-based desktop that was written from scratch, with simplicity and elegance in mind.

Used by default in Solus (not to be confused with SolusOS), a relatively new Linux distribution, Budgie Desktop integrates tightly with the GNOME stack and it features a libmutter-based window manager and a customizable panel which includes Raven, an applet, notification and customization center.
Since recent Budgie Desktop versions werent available in any Ubuntu PPA, fossfreedom decided to maintain such a PPA, which offers the latest Budgie Desktop version (10.2.4 at the time Im writing this article), for Ubuntu 15.10 and 16.04. The PPA doesnt support Ubuntu 14.04 because Budgie Desktop requires a newer GTK version.
Ive briefly tested Budgie Desktop in Ubuntu and it works great for the most part - the only issue I have with it so far is that the tray applet doesnt display the nm-applet or Dropbox icons (and probably others). Update: this bug was fixed and the nm-applet icon now shows up in the tray!
I should also mention that Budgie Desktop doesnt support AppIndicators, though this feature might be added in the future.
In other Budgie Desktop news:
- Solus 1.1 was released yesterday featuring the latest Budgie Desktop and various improvements. See THIS article for more information;
- Budgie Remix is a new Ubuntu (16.04) based Budgie Desktop Linux distributions which, from what I understand, might be the foundation for a new Ubuntu flavor. Right now, this is work in progress and should only be used for testing. More info HERE.
Budgie Desktop video
For a quick look at Budgie Desktop (version 10.2.4) in Ubuntu, check out the video below:
(direct video link)
Install Budgie Desktop in Ubuntu 15.10 or 16.04 via PPA
-----------------------------------------------
Important update for Ubuntu 16.04 users.
The PPA below now updates Nautilus to version 3.18 (while Ubuntu 16.04 has version 3.14.x), without any Unity patches and because of this, Nautilus doesnt come with any Unity integration, so it uses header bars, it doesnt uses a traditional menu and so on.
If youre using Unity and you know what youre doing, you can lock Nautilus so it never upgrades to the version from this PPA. The other option is to not use the PPA below!
If youve already added the PPA and upgraded Nautilus, you can use PPA Purge to purge the PPA (see below).
-----------------------------------------------To add the budgie-remix PPA and install the latest Budgie Desktop (version 10.2.4 at the time Im writing this article) in Ubuntu 15.10 or 16.04, use the following commands:
sudo add-apt-repository ppa:budgie-remix/ppa
sudo apt-get update
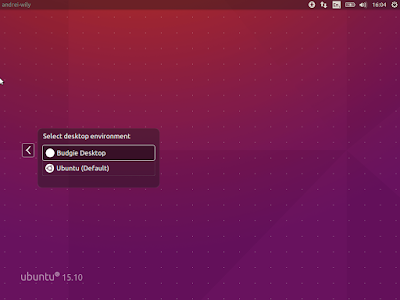
sudo apt-get install budgie-desktopOnce installed, log out and select "Budgie Desktop" from the login screen session list:
For best results, fossfreedom has included the Moka icon theme and Arc GTK theme in the PPA, and they should be installed automatically when installing budgie-desktop. After logging in, you can switch the GTK/icon themes by clicking on the Status Indicator applet (battery/sound/power), click the top-right settings icon and select "Arc-Dark" for the "Widget theme" and "Moka" for the "Icon theme".
Tip: if youve used THIS to fix large black borders around header bar apps with some themes in Ubuntu 15.10, remove it or else you wont have any shadow for header bar applications under Budgie Desktop.
Update: theres a bug that prevents the GNOME appmenu from being displayed in Budgie Desktop 10.2.4. Until this is fixed, you can use the command below to get it working:
Update: theres a bug that prevents the GNOME appmenu from being displayed in Budgie Desktop 10.2.4. Until this is fixed, you can use the command below to get it working:
gsettings set org.gnome.settings-daemon.plugins.xsettings overrides "{Gtk/ShellShowsAppMenu: ,Gtk/DecorationLayout: <menu:minimize,maximize,close>}"Purging the PPA
Since the PPA in this article provides a Nautilus version newer than the one available in the official Ubuntu 16.04 repositories, and without any Unity patches, you might need to purge the PPA at some point.
To purge the budgie-remix PPA (disable it and downgrade any packages installed from that PPA), you can use the following commands:
sudo apt-get install ppa-purge
sudo ppa-purge ppa:budgie-remix/ppa
via xpressubuntu
Available link for download
Wednesday, February 15, 2017
How To Install Cinnamon 3 0 In Ubuntu 16 04 Or 15 10 Via PPA
How To Install Cinnamon 3 0 In Ubuntu 16 04 Or 15 10 Via PPA
Cinnamon 3.0 was released yesterday and it includes improved GTK+ 3.20 support, new accessibility and sound settings and more.

Cinnamon is a GTK3 desktop environment, initially started as a fork of GNOME Shell, which is used by default in Linux Mint Cinnamon edition. Among its features are:
- panel with a menu, launchers, window list, system tray;
- support for panel applets and desktop widgets (Desklets);
- supports desktop animations and transition effects;
- highly configurable: users can customize the panel (besides applets, the panel supports autohide and the panel layout can be changed: you can use one panel or two panels like the old GNOME 2 layout), easily change themes, customize desktop animations, hot corners, etc.;
- much more.
Changes in Cinnamon 3.0 include:
- window management improvements on tiling, mapping and unmapping windows, compositor’s window groups and tracking of full screen windows
- improved out of the box touchpad support (edge-scrolling and two-finger-scrolling can now be configured independently and are both enabled by default)
- new accessibility and sound settings (both rewritten as native cinnamon-settings modules)
- battery powered devices can be renamed
- different favorite applications can now be set for plain-text, documents and source code files
- panel launchers now include application actions
- animation effects are now enabled by default on dialogs and menus
- favorites and system options can now be disabled in the menu applet
- the photo-frame desklet now also scans subdirectories
- improved support for GTK 3.20, Spotify 0.27, Viber
Here are the new Cinnamon accessibility and sound settings:


And the Preferred Applications dialog which now allows settings different applications for opening documents, plain text, and source code files:

Cinnamon 3.0 will be included with Linux Mint 18 Cinnamon edition. Its not yet clear if it will be available for Linux Mint 17.3, but I assume thats pretty difficult to achieve, considering that Linux Mint 17.3 is based on Ubuntu 14.04 which uses a pretty old GTK+ version (3.10).
Update: Clem mentioned in a comment that "versions 3.0, 3.2, 3.4 and 3.6 are targeting Mint 18.x.", so Linux Mint 17.x users wont be getting Cinnamon 3.x.
Update: Clem mentioned in a comment that "versions 3.0, 3.2, 3.4 and 3.6 are targeting Mint 18.x.", so Linux Mint 17.x users wont be getting Cinnamon 3.x.
Note that in the screenshots above, Im using the new Linux Mint Mint Y GTK and icon themes as well as the Linux Mint Cinnamon theme. Youll find download links for these below, under "Cinnamon 3.0 tweaks for Ubuntu".
Install Cinnamon 3.0 in Ubuntu 16.04 or 15.10 via PPA
Important: if you want to install Cinnamon in Ubuntu and youre using the WebUpd8 Nemo PPA, purge that PPA before proceeding. Also, dont add this PPA if you use Linux Mint.
The PPAs that uses to provide Cinnamon stable werent updated with the latest Cinnamon 3.0. I did find 2 PPAs with Cinnamon 3.0:
- Sunderland93s Cinnamon PPA (Ubuntu 16.04 only - its still in the process of being updated at the time Im writing this article)
- embrosyns Cinnamon PPA (for Ubuntu 16.04 and 15.10)
Theres also the Cinnamon Nightly Builds PPA, but its not recommended for regular users because it contains untested / unstable code from Git!
For the instructions below Im using embrosyns Cinnamon stable PPA.
To add the PPA and install Cinnamon 3.0 in Ubuntu 16.04 or 15.10, use the following commands:
sudo add-apt-repository ppa:embrosyn/cinnamon
sudo apt update
sudo apt install cinnamon blueberry
Once installed, log out and select Cinnamon from the login screen:

Tweaks
1. Themes
In Ubuntu 16.04, Ambiance and Radiance themes have some issues in Cinnamon, like missing shadows for CSD apps.
In Ubuntu 16.04, Ambiance and Radiance themes have some issues in Cinnamon, like missing shadows for CSD apps.
However, there are quite a few themes out there that should work properly in Cinnamon, like Numix GTK Theme (available in the official repositories). To install Numix GTK Theme, use the following command:
sudo apt install numix-gtk-themeYou can also download the official Linux Mint themes, including the new Mint Y Theme from Linux Mint 18, by using the links below:
- mint-themes (youll also need libreoffice-style-mint because mint-themes depends on it, as well as mint-x-icons and mint-themes-gtk3, both linked below)
- mint-themes-gtk3 (download the 3.18 version - its for GTK 3.18, available in Ubuntu 16.04)
- mint-y-theme
- mint-x-icons
- mint-y-icons
- cinnamon-themes
Note: to be able to install "libreoffice-style-mint", youll need to remove the "libreoffice-style-human" package, which is installed by default in Ubuntu 15.10.
To install them, download the deb files using the links above and place them in a folder - lets call it "deb" -, in your home directory (~/deb). Then use dpkg to install all the packages at once, using the following command:
To install them, download the deb files using the links above and place them in a folder - lets call it "deb" -, in your home directory (~/deb). Then use dpkg to install all the packages at once, using the following command:
sudo dpkg -i ~/deb/*.debIn my test in Ubuntu 15.10, selecting "Quit" from the Cinnamon menu (which allows you to shutdown the computer) doesnt work properly - the dialog doesnt display any buttons other than "Cancel".
gsettings set org.cinnamon.desktop.session settings-daemon-uses-logind true
gsettings set org.cinnamon.desktop.session session-manager-uses-logind true
gsettings set org.cinnamon.desktop.session screensaver-uses-logind falseI should also mention that I didnt encounter this issue in Ubuntu 16.04.
Thanks to Kevin @ AskUbuntu for the fix!
How to revert the changes
There are two ways you can revert the changes made by using the PPA above to install Cinnamon: either completely remove Cinnamon 3.0 or you can downgrade the packages installed from the PPA and use the Cinnamon version available in the official Ubuntu repositories.
A) Completely remove Cinnamon 3.0
Firstly remove the PPA:
sudo rm /etc/apt/sources.list.d/embrosyn-cinnamon*.listThen, to completely remove Cinnamon, you can use the following command:
sudo apt purge cinnamon* libcinnamon* nemo* libnemo-extension1 cjs libcjs0e blueberry gir1.2-cinnamondesktop-3.0 gir1.2-meta-muffin-0.0 libmuffin0 muffin-commonYou may then use "autoremove" to remove all the depedencies that were installed and are no longer required:
sudo apt autoremoveB) Purge the PPA
By purging the PPA, you can downgrade Cinnamon to the version available in the official Ubuntu repositories. You can do this with PPA Purge:
sudo apt install ppa-purge
sudo ppa-purge ppa:embrosyn/cinnamonAvailable link for download
Thursday, February 9, 2017
How to flash Samsung Stock ROM via Odin
How to flash Samsung Stock ROM via Odin
Flash Samsung Stock ROM (Official/Original Firmware) via Odin
Step 1: Download and install device driver software on your computer.
If you have used Kingo android Root already, skip this step. Otherwise, do it manually. Following are ways to do this...
- Visit Samsung official website to find the correspondent driver software.
- Google the driver software of your device. Download and then install it on you computer.
- Download or update Kies, part of which will install or update drivers.
Once drivers are installed or updated, it is highly recommended that you restart your computer.
Step 2: Download and extract the Stock ROM (Official/Original Firmware).
You can get all the Official Samsung Firmware you might need here on this site...Go here to download for any Samsung Model.
After downloading it (normally a compressed file), you need to extact/unzip it to certain location of your PC. The file types that Odin uses are *.bin,*.tar and *.tar.md5.

Find the file you have downloaded and then unzip it to Desktop.

You will find a *.md5 file after extracting.
Step 3: Download and extract Odin on you PC.
You can download Odin V3.10.7 directly from SamMobile. AndroidMTK is a fine alternative, it also offers a detailed list of Odin versions and download link. Or you can always Google "Odin download". After downloading it on your PC, extract it to Desktop or another location youd prefer.
Odin v3.10.7 zip file.
After extracting, right-click to "Open as Administrator". It may prevent certain issue from happening.

Run Odin as administartor is recommended.
Step 4: Boot your Samsung device into Download mode.
Follow these steps to enter Download Mode/Odin Mode
- Power off your device
- Press and hold Volume Down key, Home Key and Power Key
- When your device vibrates, release Power key while keep holding the Volume Down key and Homekey
- Press Volume Up key to enter Download mode, which has a green robot figure and “Downloading… Do not turn off target!!)

Warning before entering into download mode

Now you are in download mode.
Step 5: Connect your device to PC.
You device should be automatically recognized by Odin. At the lower-left of Odin interface, it should show a message that says "Added!" and in the meantime you should see a light-blue box at the ID:COM section stating "COM:3" (the number depend on which USB port you have plugged the device cable and is irrelevant).

Device is connected to Odin.
Step 6: Click "PDA" or "AP" to add tar.md5 file that you have extracted and then "Start".
Whether it is "PDA" or "AP" depends on the version of Odin that you used. But the md5 file goes to either "PDA" or "AP".

Add *.md5 to Odin.
After adding the file, click "Start" to begin the flashing process.

Click "Start" to flash.
WARNING DO NOT REMOVE OR OPERATE ON YOUR DEVICE UNTIL FINISHED OR FAILED IS SHOWED ON ODIN.

Ongoing flashing process. Do not remove your device.
When the flashing process is done and if everything goes well, you should see a big green box saying "RESET" or "PASSED" (depends on the version of Odin is used). By now, the device should be rebooted and it is safe to remove/unplug your device.

Flash succeeded.
If failed, what should you do?
Try these things first:
- Update your device driver software to the latest.
- Restart your computer.
- Run Odin as Administrator.
- Try different cable (original one or the one with better quality) and USB port (the main port recommended)
- Re-download the firmware file, make sure it is intact and match your device model
Available link for download
Monday, January 30, 2017
How to easily update firmware via OTA on Leagoo Z1 smartphone
How to easily update firmware via OTA on Leagoo Z1 smartphone

A few days ago the Leagoo Z1 smartphone users received a new OTA update, which is very good news, it means that the developers team working hard to offer to the users the best experience. Here you can read about the Leagoo Z1 smartphone First Impressions & Quick Review andd here about the unboxing of this device.
Firmware details
OTA? LEAGOO_Z1_OS_1.1_Lite_A_20160517
Size: 17.80 MB
Firmware: Android Lollipop 5.1 OTA update
Image: update.zip
Old build number: LEAGOO Z1_OS 1.1 Lite A 20160513
New build number: LEAGOO Z1_OS 1.1 Lite A 20160517
Change log
1. Fixed bugs and improved device performance.
Firmware details
OTA? LEAGOO_Z1_OS_1.1_Lite_A_20160517
Size: 17.80 MB
Firmware: Android Lollipop 5.1 OTA update
Image: update.zip
Model: Leagoo Z1 smartphone
Platform: Mediatek MT6580Old build number: LEAGOO Z1_OS 1.1 Lite A 20160513
New build number: LEAGOO Z1_OS 1.1 Lite A 20160517
Change log
1. Fixed bugs and improved device performance.
Install Guide
Search the new OTA update firmware from Settings menu, download it and install it. The device will reboot and enter into Recovery Mode. The whole process will take a few minutes, please make sure the battery power is enough.

Caution: Please do not update firmware unless you know what you are doing, you really want it or it is absolutely necessary. Firmware updates may occasionally have bad results, like bricking your device, temporarily or permanently. The firmware update process is done entirely at your own risk. Before attempting to update the firmware, back up your data.
Don’t miss any of our future video tutorials, follow us on Youtube. Like us on Facebook. Add us in your circles on Google+. Watch our photo albums on Flickr. Subscribe now to our newsletter. Biggest firmware download center.
Available link for download
Tuesday, January 3, 2017
How To Connect Access Android To PC Internet Via USB
How To Connect Access Android To PC Internet Via USB

For a long time, I have been writing about drivers for your different devices and provided you links to download them. Android phones have a huge fan base and most of the people today use them since they are the boss these days. That is due to many features that other devices cant provide. There are millions of amazing apps, games and other features that other devices cant compete with an android device.
One of the many benefits that you can get from android is using it as your internet adapter when your internet connection is not working or finished. In this post, I am going to tell you an easy method, with the help of which you can easily use your data plan on your PC. You shouldnt let it go to waste and use it on your PC by connecting the android device as a router. This process is also known as Tethering. Now lets move on to the step by step guide of how to connect android device to use the internet on PC?
Step by Step Guide how to connect android device to use the internet on PC.
Note: Connect your android device using a USB data cable to do the following process.
1. On your Android phone, go to the Settings.
2. In the settings, go to the Wireless & Networks after you are in the settings.
3. Next step is to tap on more to find some new options in the place.
4. After doing that, search for Tethering and portable hotspot.
5. Now, enable this option. Also, make sure that you have enabled the Mobile Data from the widget bar.
There is nothing more you have to do. Now your PC is ready to use the internet from your mobile data since your android will now work as internet router. Did you like our guide? Leave us your feedback and keep visiting our blog for more amazing tips, tricks, and drivers!
Available link for download
Saturday, November 12, 2016
How To Install The Latest Nvidia Drivers In Ubuntu Via PPA
How To Install The Latest Nvidia Drivers In Ubuntu Via PPA
Upgrading to the latest version of the proprietary Nvidia drivers in Ubuntu was pretty complicated a while back. You would either have to use the official Linux installer, which was not always reliable, at least for me, or use a bleeding edge PPA, like the Xorg Edgers PPA, which would upgrade multiple packages, most of which were unstable.
Thats no longer the case thanks to the Proprietary GPU Drivers PPA, which offers stable proprietary Nvidia graphics driver updates, without updating other libraries to unstable versions (some libraries may still be updated using this PPA, if they are needed by the drivers, but theres nothing unstable in the PPA).
Despite its name, the PPA only provides proprietary Nvidia graphics drivers updates, with no support for AMD or Intel.
Even though the PPA is probably the most stable way of upgrading to the latest proprietary Nvidia drivers version in Ubuntu, its still considered in testing. That means issues may still occur (though I didnt encounter any and Ive been using it for some time), so you should only use this PPA if you have experience with recovering your system from a failed graphics driver upgrade.
Even though the PPA is probably the most stable way of upgrading to the latest proprietary Nvidia drivers version in Ubuntu, its still considered in testing. That means issues may still occur (though I didnt encounter any and Ive been using it for some time), so you should only use this PPA if you have experience with recovering your system from a failed graphics driver upgrade.
I should also mention that the PPA provides packages for all supported Ubuntu versions (16.10, 16.04, 15.10, 14.04 and 12.04). At the time Im writing this article, the PPA provides the latest long lived branch version (367.27) of the Nvidia graphics drivers for Ubuntu 16.10 and 16.04 and the latest short lived branch version (364.19) for Ubuntu 15.10, 14.04 and 12.04.
You can check the latest Nvidia Linux graphics drivers version by visiting THIS page.
Install the latest Nvidia graphics drivers in Ubuntu via PPA
1. Add the PPA.
Before proceeding, please read the PPA description!
To add the Proprietary GPU Drivers PPA in Ubuntu and update the software sources, use the following commands:
sudo add-apt-repository ppa:graphics-drivers/ppa
sudo apt update
2. Install (and activate) the latest Nvidia graphics drivers
From System Settings or directly from the menu / Dash, open Software & Updates, click on the "Additional Drivers" tab, select the driver you want to use, and click "Apply changes":
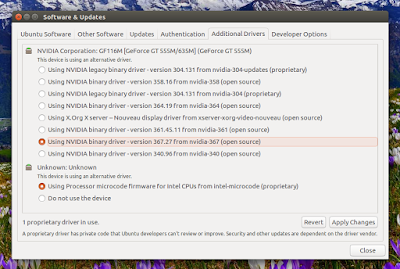
After the driver is downloaded and installed, restart your system. Thats it!
You can also install the latest drivers using Synaptic or from the command line. To see the available versions, you can use:
apt-cache search nvidiaapt search nvidiaAnd look for the packages called "nvidia-VERSION", for instance "nvidia-367" for the latest 367.27 graphics drivers, and install it ("sudo apt install nvidia-VERSION").
Available link for download
Subscribe to:
Posts (Atom)