Showing posts with label support. Show all posts
Showing posts with label support. Show all posts
Wednesday, April 12, 2017
How To Get Chrome To Support Installing GNOME Shell Extensions From The GNOME Extensions Repository
How To Get Chrome To Support Installing GNOME Shell Extensions From The GNOME Extensions Repository
[Quick tip for GNOME Shell users] By default, users are able to install GNOME Shell extensions from extensions.gnome.org only by using Firefox or Epiphany (Web) browsers.
Until GNOME Software will be able to install and update GNOME Shell extensions, Google Chrome / Chromium users are a bit left out, at least as far as the default experience goes.
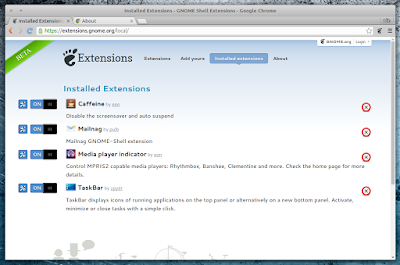
However, there is an easy way of installing GNOME Shell extensions using Chrome: with the help of a Chrome extension and a native connector that provides integration with GNOME Shell and its extensions repository, extensions.gnome.org.
 |
| extensions.gnome.org integration for Google Chrome |
For Ubuntu, this Chrome integration for GNOME Shell is available in a PPA, as a package called "chrome-gnome-shell", which includes the native GS-Chrome connector. The browser extension should be installed automatically upon installing this package and running Google Chrome / Chromium.
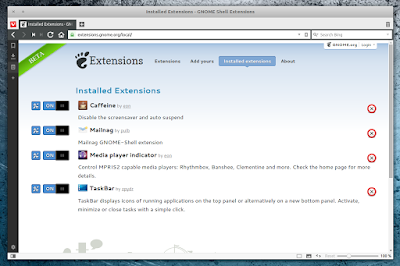
In my test, using the "chrome-gnome-shell" package brought support for installing extensions from extensions.gnome.org (and accessing their preferences), not only to Google Chrome and Chromium, but also to Vivaldi browser. Unfortunately, I it doesnt seem to work with Opera.
 |
| extensions.gnome.org Chrome integration also works with Vivaldi |
The "GNOME Shell integration for Chrome" Ubuntu PPA is only available for Ubuntu 14.04. Add the PPA and install it using the following commands:
sudo add-apt-repository ppa:ne0sight/chrome-gnome-shell
sudo apt-get update
sudo apt-get install chrome-gnome-shell
For Ubuntu (GNOME) versions newer than 14.04, you can download the deb from HERE and install it manually. I tested it under Ubuntu GNOME 16.04 (with GNOME Shell 3.18) and I didnt encounter any issues. The package might also work in Debian, but I didnt test it.
Once installed, restart Chromium / Google Chrome and you should be able to install extensions from https://extensions.gnome.org (just like with Firefox and Epiphany, you need to use GNOME Shell to be able to install extensions).
For other Linux distributions, check out the GNOME Shell integration for Chrome wiki installation page.
Originally published at WebUpd8: Daily Ubuntu / Linux news and application reviews.
Available link for download
Labels:
chrome,
extensions,
from,
get,
gnome,
how,
installing,
repository,
shell,
support,
the,
to
Sunday, March 12, 2017
Grive2 Grive Fork With Google Drive REST API And Partial Sync Support PPA
Grive2 Grive Fork With Google Drive REST API And Partial Sync Support PPA
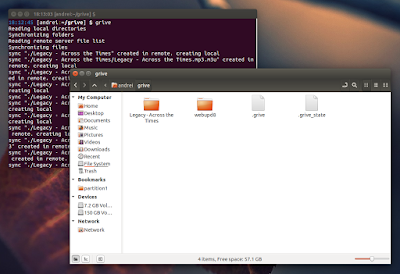
Grive was an unofficial, open source command line Linux client for Google Drive. I say "was" because the tool no longer works due to Google changing its API recently and Grive not being maintained any more (there are no commits on its GitHub page since May, 2013).

To get Grive up and running again, Vitaliy Filippov forked it and named his fork "Grive2". The fork supports the new Google Drive REST API and it also includes a new feature: partial (directory) sync, along with bug fixes.
Compared to the original "Grive", Grive2 comes with the following changes:
- supports the new Drive REST API
- added partial sync
- major code refractoring: a lot of dead code removed, JSON-C is not used any more, API-specific code is split from non-API-specific
- some stability fixes
- slightly reduce number of syscalls when reading local files
- bug fixes
Also, just like the old app, Grive2 does NOT support:
- continuously waiting for changes in file system or in Google Drive to occur and upload. A sync is only performed when you run Grive, and it calculates checksums for all files every time;
- symbolic links;
- Google documents.
Install Grive2 in Ubuntu or Linux Mint via PPA
Since there are quite a tools that rely on Grive, the Grive2 binary and package continue to be called "grive", so installing Grive2 from the main WebUpd8 PPA will overwrite any old Grive versions it may find on the system (just as if it was a newer Grive1 version).
To install Grive2 in Ubuntu, Linux Mint and derivatives by using the main WebUpd8 PPA, use the following commands:
sudo add-apt-repository ppa:nilarimogard/webupd8
sudo apt-get update
sudo apt-get install griveArch Linux users can install Grive2 via AUR (its actually the old "grive" package, updated with the new Grive2 fork).
For other Linux distributions, see the Grive2 GitHub page.
Using Grive2

1. Grive2 will download / upload new or changed files from the directory you run it. So firstly, lets create a new folder - well call it "grive" -, in your home directory:
mkdir -p ~/grive2. Next, navigate using the terminal into the newly created "grive" folder:
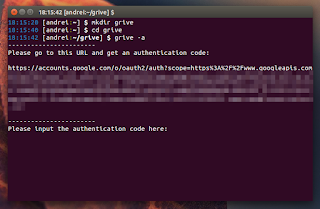
cd ~/grive3. The first time you run Grive2, you must use the "-a" argument to grant it permission to access your Google Drive:
grive -aAfter running the command above, an URL should be displayed in the terminal - copy this URL and paste it in a web browser. In the newly loaded page, youll be asked to give Grive permission to access your Google Drive and after clicking "Allow access", an authentication code will be displayed - copy this code and paste it in the terminal where you ran Grive2.
Thats it. Now each time you want to sync Google Drive with your local "grive" folder, navigate to the "grive" folder (step 2) and run "grive" (this time without "-a" since youve already authenticated Grive with Google Drive).
Grive2 comes with some advanced features as well. For instance, compared to the original Grive, the new Grive2 fork supports partial sync. To only synchronize one subfolder (a folder from your ~/grive directory) with Google Drive, use:
grive -s SUBFOLDERTo see all the available options, type:
grive --helpOriginally published at WebUpd8: Daily Ubuntu / Linux news and application reviews.
Available link for download
Saturday, March 11, 2017
GTK3 Tiling Terminal Emulator Terminix 1 1 0 Beta Released With UI Changes Background Image Support
GTK3 Tiling Terminal Emulator Terminix 1 1 0 Beta Released With UI Changes Background Image Support
Almost two months after its first stable version, Terminix 1.1.0 beta was released today, bringing UI changes, support for background images and more.

In case youre not familiar with Terminix, this is a GTK3 tiling terminal emulator. The application allows splitting terminals, both horizontally and vertically (which can be re-arranged using dragndrop), and it features options to save and restore the layouts.
The most important change in the latest Terminix 1.1.0 is probably the redesign of some parts of the application, making it less cluttered and more intuitive.
For instance, until now you had to look into a terminals title or context menu to create a new horizontal or vertical terminal split. Thats no longer the case and in Terminix 1.1.0 beta, there are two headerbar buttons that allow you to add a new terminal to the right or down.
Other UI changes include the addition of a find button in the headerbar, decluttered terminal menu, the session button no longer uses the new tab icon, which was confusing, and more.
You can read more about the design changes in Terminix 1.1.0 beta, HERE.
 |
| Terminix 1.1.0 with the default Ubuntu 16.04 wallpaper used as background image |
Other changes in the latest Terminix 1.1.0 beta:
- support for background images;
- limited support for automatic profile switching;
- option to globally disable shortcuts;
- option to automatically copy text to clipboard when selecting;
- support for a Visual Bell;
- numerous bug fixes.
For a bit more information, including how to disable the client-side decorations and use a traditional titlebar, see our initial Terminix article.
Download Terminix
Download Terminix (source code and 64-bit binary - requires GTK 3.14+ and GTK VTE Widget 0.42, available with Ubuntu 15.04+)
To install the latest Terminix 1.1.0 beta 1.2.0 64bit binary in Ubuntu (15.04, 15.10, 16.04 or 16.10) or Linux Mint 18, you can use the following commands:
sudo apt-get install wget unzip libglib2.0-bin
cd /tmp
wget https://github.com/gnunn1/terminix/releases/download/1.2.0/terminix.zip
sudo unzip terminix.zip -d /
sudo glib-compile-schemas /usr/share/glib-2.0/schemas/
If the application doesnt show up in the menu or its menu entry doesnt have an icon, you can try to restart the session (logout/login), or run the following command to update the HiColor icon theme cache:
sudo gtk-update-icon-cache --ignore-theme-index -f -q /usr/share/icons/hicolor/Or build it from source. For other Linux distributions, see THIS page.
Originally published at WebUpd8: Daily Ubuntu / Linux news and application reviews.
Available link for download
Thursday, November 10, 2016
GIGABYTE Leads The Industry in Thunderbolt 3 Support
GIGABYTE Leads The Industry in Thunderbolt 3 Support
This year there have been some exciting advances this year in the world of connectivity, particularly the introduction of Thunderbolt™ 3 from Intel®. Thunderbolt™ 3, which uses the reversible USB Type-C connector, brings users a world of revolutionary new features including more bandwidth and support for 4K displays.

Thunderbolt™ 3 is designed for devices where high-bandwidth is of the utmost importance. Thunderbolt™ 3 is able to push up to 40 Gb/s through the wire, which is twice more than the previous generation. For display connectivity Thunderbolt™ 3 offers DisplayPort 1.2, which is able to drive a 4K resolution display at 60 FPS, power delivery for connected devices at up to 36W, as well as the ability to daisy-chain up to 6 devices per port.

Thunderbolt™ 3 makes USB Type-C the one port to rule them all. The days of requiring a plethora of different cables to power all of your devices are over. Now your external storage devices, monitor, and tablets/smartphones can all be connected to a hub which connects to your PC via a single USB Type-C connector.
 |
| No more of this with USB Type-C |
As Thunderbolt™ 3 used the reversible USB Type-C connector, you can also plug in USB devices into the same port. For the billions of older devices that use the Standard-A connectors, adapters are available to ensure that your device will be compatible.
GIGABYTE offers Thunderbolt™ 3 on GIGABYTE GA-Z170X-Gaming G1, GA-Z170X Gaming GT, GA-Z170X Gaming 7, and Z170X-UD5 TH motherboards.
Available link for download
Subscribe to:
Posts (Atom)